
- SAP Community
- Products and Technology
- CRM and Customer Experience
- CRM and CX Blogs by Members
- How To Integrate SAP Marketing With SAP JAM (Part-...
CRM and CX Blogs by Members
Find insights on SAP customer relationship management and customer experience products in blog posts from community members. Post your own perspective today!
Turn on suggestions
Auto-suggest helps you quickly narrow down your search results by suggesting possible matches as you type.
Showing results for
hakan_kose
Contributor
Options
- Subscribe to RSS Feed
- Mark as New
- Mark as Read
- Bookmark
- Subscribe
- Printer Friendly Page
- Report Inappropriate Content
02-17-2019
6:13 PM
Introduction
Nothing breaks like a disconnected departments within an organization. Close relationships among departments bring better customer experience because all departments involved in customer touchpoints would have an idea - and actually have a chance to influence the idea as well - about what has been done, what's happening right now and what is yet to come in terms of customer interactions in that case.
To achieve such a seamless cooperation, you need to have a good collaboration tool tightly integrated with your customer experience solutions.
SAP Jam, that is, a social collaboration solution of SAP delivers a great platform and integration points to increase the engagement and .exchange of information between different units in your organization.

Overview
In this blog post, I will try to provide a step-by-step guide to help you integrate SAP Marketing with SAP Jam and I'll focus on Campaign object in SAP Marketing.
The instructions below are mostly based on configuration documentation of SAP Jam Integration (CEJ_CEI12_BB_ConfigGuide_EN_XX) of Rapid Deployment Solution for SAP Marketing (version 1702). The integration setup mostly includes technical steps rather than functional ones so screenshots in this blog post will make it easier for you if you are not familiar with given transactions. I will also provide a standard report that enables you test SAP Jam API calls for the integration at the end.,
Product versions
SAP Marketing On-Premise | Release: 1809 | Upgrade schedule: Release strategy |
| SAP Jam | Release: February 2019 | Release information: What's new |
References
This blog refers to SAP Jam integration document named "CEJ_CEI12_BB_ConfigGuide_EN_XX" of RDS (Rapid Deployment Solution) for SAP Marketing. I was hoping to share a link to RDS solution for you to download the mentioned documentation however this RDS solution doesn't seem to be available on Best Practices Explorer anymore. If anyone can find the link and share it in the comments, I'm going to update this section.
Configurations
1. Define Settings for Integration of SAP Jam
In this activity you're going to define server settings for the communication with SAP Jam with relevant object types in SAP Marketing. Since we're going to focus on campaign object, we're going to maintain only campaign object entry in this activity.
Go to following customizing path in SAP Marketing backend:
SAP Marketing -> General Settings -> Integration -> Define Settings for Integration of SAP Jam
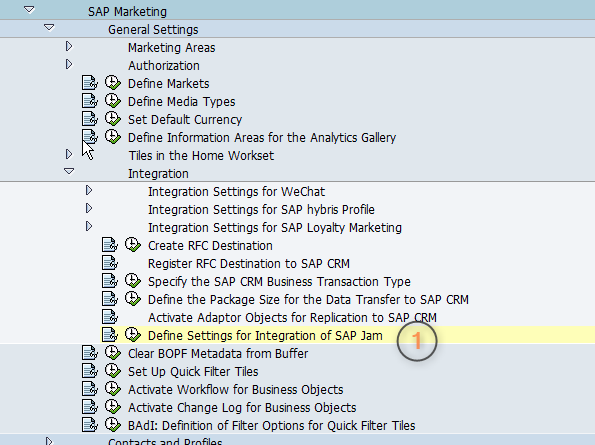
Maintain following entry and save your entries.
| Generic Object Type | CUAN_INITIATIVE |
| Application ID | DEFAULT |
| Service Provider Type | Jam |

Assign a customizing request when pop-up dialog prompts you to do so
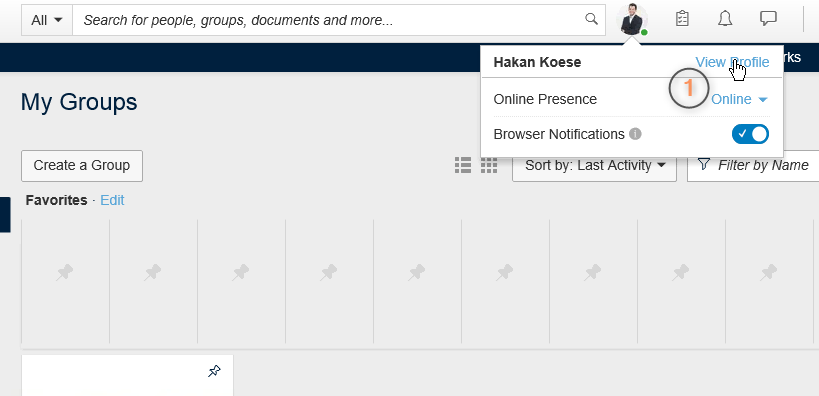
2. Checking E-mail Addresses for Users
The SAP Jam user and the SAP Marketing user must have the same e-mail address, as this is the connection between SAP Jam and SAP Marketing.
Kindly note that if you have any other SAP Jam tenant (i.e. test, production), you need to check e-mail addresses for the users in that SAP Jam tenant as well as for the users in related SAP Marketing backend system you want to integrate SAP Jam with. User maintenance is a client specific administrative activity.
First go to SAP Jam and view your profile

And second, log in to SAP Marketing backend and check your SAP Marketing user using transaction SU01


E-mail address checks are case insensitive. So don't mind upper or lower cases as long as you have the same e-mail address.
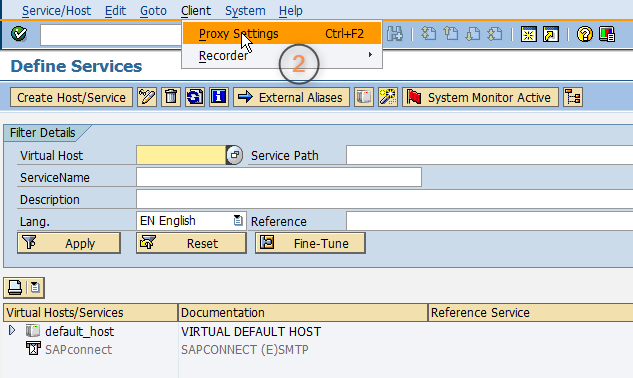
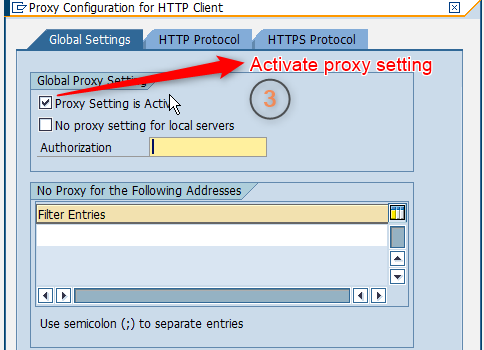
3. Maintaining HTTPS Proxy
Communication from a company network with the outside world takes place with an HTTP proxy. Therefore you need a proxy server to maintain at this step. Contact your BASIS administrator to set up a proxy server for your systems and obtain the following information:
Host Name, Port, User Name and Password
Kindly note that if you have any other SAP Marketing backend systems you want to integrate SAP Jam with, you need to perform this step for each SAP Marketing backend system.
After obtaining the information above, go to transaction SICF and perform following activies in the screenshots below:


4. Service Provider Certificate
At this step, you're going to download the certificate of SAP Jam you want to integrate with and upload this certificate to SAP Marketing using STRUST transaction in SAP Marketing backend later on.
Kindly note that if you have any other SAP Jam tenant (i.e. test, production), you need to download its certificate as well and upload its certificate to one of your related SAP Marketing system that you want to integrate SAP Jam with.
4.1. Downloading SAP Jam's Certificate
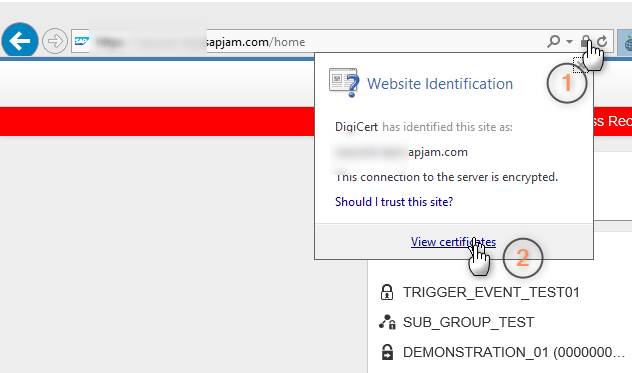
Go to SAP Jam you want to integrate with and view its certificate using lock icon in your browser like shown in the following screenshot:
Switch to "Details" tab and click on "Copy to File" to start Certificate Export Wizard.

Choose "Next" for the first screen that is informative only
For export file format, choose "Base-64 encoded X.509 (.CER)" and click on "Next"

At this point, pick which folder you want to save this certificate to and provide a file name such as "SAP_Jam_Certificate" so that you can easily remember later. Providing names that you can easily remember will help you to find the certificates faster later on. After providing the name, click on "Next" again.

Finally review your choices and if you're fine with them, click on "Finish" to complete the Certificate Export Wizard and finish the export process.
SAP Jam certificate should be placed in the folder you defined with the name you provided in earlier steps.

4.2. Uploading SAP Jam's Certificate to SAP Marketing
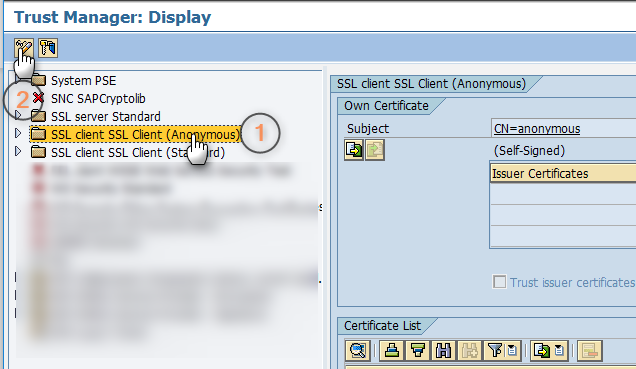
Log in to SAP Marketing backend and go to transaction code STRUST
Double click on SSL Client SSL Client (Anonymous) folder and then switch to change mode by clicking on "Glass/Pencil" icon on the top left.
On the right side of the screen, go to "Certificate" section at the bottom. Click on "Import Certificate" icon to choose the certificate that you've just exported from SAP Jam.

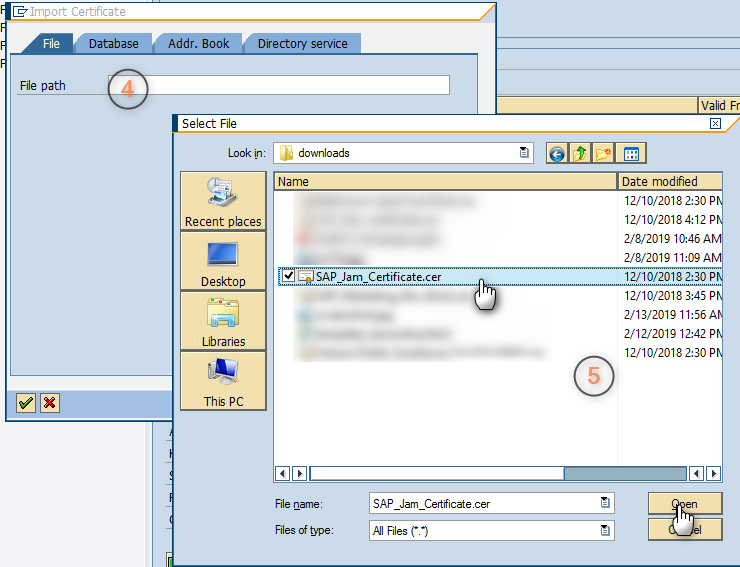
After you choose your certificate and click on green check icon in the bottom left corner, certification details should be filled out under "Certificate" section.
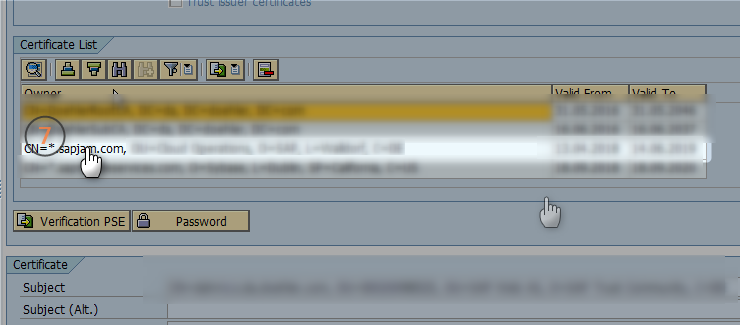
Click on "Add to Certificate List" button while you are in change mode and the certificate now should be listed under "Certificate List" section.

Finally you can save your changes

5. Preparing SAML2
To authenticate a user with SAP Jam, the system uses assertion tickets based on Security Assertion Markup Language, version 2.0 (SAML2).
Kindly note that if you have any other SAP Marketing backend system you want to integrate SAP Jam with, you need to perform this step for each SAP Marketing backend system.
Go to transaction code SAML2. You should be navigated to a logon screen on your browser. Fill out credentials detail and click on "Logon".

5.1. Possible Cases
Now at this step, you may face one of the following cases.
5.1.1. SAML 2.0 Configuration Already Setup
If you see a setup as it's shown in the screenshot below, you are not required to perform anything. You can skip this step.

5.1.2. 403: Forbidden Error Occured Instead of Logon Screen
If you face this error on the opened browser page instead of logon screen when you execute transaction SAML2, that means SAML2 service is not active in your system. You need to activate this service first using transaction SICF and then try executing SAML2 transaction again.
To active SAML2 service, go to transaction SICF first. Make sure that hierarchy type is selected as "SERVICE". Execute the program.

Expand the nodes one by one following this path: /default_host/sap/bc/webdynpro/sap/

Identify the service "saml2". Right click on on the service and choose "Activate Service". Click on "Yes" in the pop-up dialog.

Try executing transaction SAML2 now, you should be able to see logon screen. Perform step 5.1.3. SAML 2.0 Configuration Not Setup below.
5.1.3. SAML 2.0 Configuration Not Setup
This is the most likely case. If you don't have any configuration setup after you log in successfully, in the SAML 2.0 Configuration page, click the "Enable SAML 2.0 Support" button and from the drop down list, click the "Create SAML 2.0 Local Provider" button.
On the "SAML 2.0 Local Provider Configuration" screen, enter the following values:
| Provider Name | Enter the name of your provider: <YouSystemID>_<YourSystemClient> (for example, TRT_500) The Provider Name is needed later in step Registering Identity Provider, |
| Operation Mode | Enter value Service Provider |
Click the "Next" button. A defaut value, 120 seconds, should be proposed for the field "Clock Skew Tolerance". Leave it as it is and click "Next" button again with the proposed value.Finally click "Finish" button to finish the configuration.
5.2. Logging Off The Configuration Setup Page
After you're done with setup of SAML 2.0 Configuration, log off the configuration page by clicking on "Logoff" link on the top right corner.

Continue to second part of this blog series to proceed to next steps.
- SAP Managed Tags:
- SAP Jam,
- SAP Jam Collaboration,
- SAP Marketing
You must be a registered user to add a comment. If you've already registered, sign in. Otherwise, register and sign in.
Labels in this area
-
ABAP
1 -
API Rules
1 -
CRM
1 -
Custom Key Metrics
1 -
Customer Data
1 -
Determination
1 -
Determinations
1 -
Introduction
1 -
KYMA
1 -
Kyma Functions
1 -
open SAP
1 -
Sales and Service Cloud Version 2
1 -
Sales Cloud v2
1 -
SAP
1 -
SAP Community
1 -
SAP CPQ
1 -
SAP CRM Web UI
1 -
SAP Customer Data Cloud
1 -
SAP Customer Experience
1 -
SAP Integration Suite
1 -
SAP Sales Cloud v2
1 -
SAP Service Cloud v2
1 -
SAP Service Cloud Version 2
1 -
Service Cloud v2
1 -
Validation
1 -
Validations
1
Related Content
- SAP Commerce Cloud Q1 ‘24 Release Highlights in CRM and CX Blogs by SAP
- SAP Commerce Cloud Q4 ‘23 Release Highlights in CRM and CX Blogs by SAP
- Search tuning in SAP Commerce Cloud in CRM and CX Blogs by SAP
- Advanced Development Best Practices for SAP Commerce Cloud in CRM and CX Blogs by SAP
- Customer Data Platform: The Core Element for Customer Information in CRM and CX Blogs by SAP