
- SAP Community
- Products and Technology
- Technology
- Technology Blogs by SAP
- integration content advisor: Create a mapping usin...
Technology Blogs by SAP
Learn how to extend and personalize SAP applications. Follow the SAP technology blog for insights into SAP BTP, ABAP, SAP Analytics Cloud, SAP HANA, and more.
Turn on suggestions
Auto-suggest helps you quickly narrow down your search results by suggesting possible matches as you type.
Showing results for
Advisor
Options
- Subscribe to RSS Feed
- Mark as New
- Mark as Read
- Bookmark
- Subscribe
- Printer Friendly Page
- Report Inappropriate Content
02-14-2019
4:39 PM
Introduction
The blog "integration content advisor: Create a customized interface using MIG editor" explains how to create a message implementation guideline (MIG) by the ICA. A MIG describes the structure of a customized interface, the meaning of each defined element, and how each element of payload data is treated or processed according the conventions of the interface. You can now create Mapping guidelines (MAGs) that are based on source and target MIGs; we’ll talk more about these below.
This blog discusses how to create and edit MAGs, as well as how to use the mapping proposal service to create mappings at the semantic level much faster and more efficiently.
Scope
The scenario for this blog is building an integration flow for submitting purchase orders from the SAP S/4 HANA Cloud system of the company Lief GmbH to their trading partner ConTrade, Inc. To create a MAG, you’ll need a source MIG and a target MIG. I’ll show you how to use the MIG from the blog "ICA: Create mapping and its specification using the MAG Editor (Link)" as a target MIG in the Mapping guideline, which will be used in the scenario as shown in the following figure.

Figure 1: Implementation scenario for creating a mapping guideline
SAP S/4 HANA Cloud uses SOA messages in its SOAP API to send purchase order messages[i] to trading partners or other destination applications. However, the structure of the original SOA messages require customization to support , so I’ve built a MIG for those customizations. The name of this MIG is "Source - Lief GmbH - SOA Purchase Order Out." See also the attached PDF.
<<Source_-_Lief_GmbH_-_SOA_Purchase_Order_Out.pdf>>
 Remark: The SAP SOA Message be released in May 2019.
The MAG itself is now used to create a complete mapping at the semantic level that covers the aspects, constraints, and parameters from the source and target MIGs. Based on all information in the MAG, can generate most of the runtime integration content for complete and consistent processing of the purchase order messages, such as preprocessing, mapping, validation, postprocessing, and syntax conversion. How you create these runtime artifacts and implement them into a CPI's integration flow will be described in a future blog.
Create a new Mapping guideline (MAG)
To create a new MAG, click the "Add" (1) button in the "Mapping guidelines (MAGs)"section from (see Figure 2).

Figure 2: Landing page with "Mapping guidelines (MAGs)"
In the next window, you’ll select the source (see (1) in Figure 3) and target Message implementation guidelines.

Figure 3: Empty overview list of own MAGs
Search for the source MIG by entering text such as "Lief" into the search field (see (1) in Figure 4). Select the appropriate MIGs (2), and click on button "Next" (3).

Figure 4: Select source MIG
Select the target MIG in the same manner. The entered text such as "ConTrade" filters the list of possible MIGs, which can be used as target MIG (see (1) in Figure 5). Select now the appropriate target MIG (2) and click on button "Create" for creating the new MAG. You can also review the selected source and target MIG before you click on "Create" button (4).

Figure 5: Select target MIG and click "Create"
You see a new MAG in edit mode. The page includes a pre-assembled name (see (1) in Figure 6), the selected source and target MIGs (2), and the business context, which is derived from the selected business context of the source and target MIGs (3). You can change the name as well as the business context and you can also provide a summary text and a more detailed definition (4).

Figure 6: Create a new MAG
We recommend that you do provide detail, especially for the definition, because an advantage of a MAG is a detailed specification of the mapping itself and some introductory text, usage, and behavior instructions as well as further explanatory guidelines.
Create the mapping details
The MIG structures and mapping itself are shown in "Mapping" (see (1) in Figure 7).
After you’ve created a new MAG, you’ll see the customized source (2) and target structure (3) of the selected source and target MIGs.
At first, you’ll see a mapping structure without any mapping entities between the corresponding elements of the source and target structure. A mapping entity defines the mapping rule from one or more source elements to the matched target element. However, automatically set constants for the target structure (4); a panel below the structures shows a list of all set constants in the mapping list (5). A constant is automatically set for a fixed value of an element, a single selected code value, or for a qualifier value.

Figure 7: Empty MAG mapping structure
As shown in Figure 8, you can manually draw a mapping entity by dragging an element from the source side and dropping it on the desired target element (1).

Figure 8: Edit MAG mapping structure
The MAG editor includes all details for comparing the elements, such as human readable names and definitions. But mapping manually is tiring and error-prone. The ICA supports you via the artificial intelligence (AI)-based proposal service.
Use the MAGs proposal service
All proposals are from a centrally provided and trained knowledge graph. The graph is trained by users; once they activate a MAG, their updates are anonymously pushed into the graph. A number of diverse machine-learning (ML)-based algorithms then calculate the best fit proposal according your business context and based on the selected source and target structure. The main intention is that all proposals are semantically correct, independent of the complexity of the source and target structures.
To get proposals for your required mapping entities, click "Get Proposal" (see (1) in Figure 9). After a short while, you'll get a list of proposed mapping entities in the mapping list (2). The column "Confidence" (3) displays the probability of confidence per mapping entity. Manually select one or more proposed mapping entities by clicking their check boxes (4), or you can click "Select Best Proposal" (5) which places all mapping entities with the highest confidence levels that are unambiguous into your mapping structure.

Figure 9: Get mapping entity proposals
The result of “Select Best Proposal” is shown in form of mapping lines from the source elements to the corresponding target elements (see Figure 10).

Figure 10: Create mapping with best-fitting proposals
Manual maintenance of mapping entities
You can now manually change or delete mapping entities as well as create additional ones.
Mapping entity properties
The "Properties" tab (see (1) Figure 11) shows detailed information for the involved source and target elements. Here, you can add detailed documentation for the mapping entity (2) as well as see all the details such as the definition, name, cardinalities and further facets (3).

Figure 11: Mapping entity properties
Mapping entity function
Use the "Function" tab (see (1) in Figure 12) to define the functions for the final transformation of the values. These functions are based on the XSLT V2.0 / XPath 2.0. Each mapping entity has a default function (2), which is created by concatenating the . The properties of the target elements such as length and cardinality will be considered by this function. This means that the concatenated output string will be split into two smaller pieces, if the max length of the target element is smaller and has an max occurrence greater than 1.

Figure 12: Function tab with the default function
You can override the default function by supplying your own required function (see Figure 13). All XSLT 2.0 and XPath 2.0 functions are supported.

Figure 13: Substituted or created XSLT function
 Remark: Creating and using functions will be described in a separate blog.
Code value mappings
Code value mappings represent the transformation of a code value that is set at the source element into a code value that is required at the target element. The strings for each might differ, but the semantics represented in form of human readable name and definition of both should be the same.
The "Code Value Mapping" tab (see (1) in Figure 14) appears only if both the source and target elements in a mapping have code values. As mentioned, the ICA may provide a proposal of mapped code values on the target side (2); however, you can change the proposals, or create additional code value mappings as required.
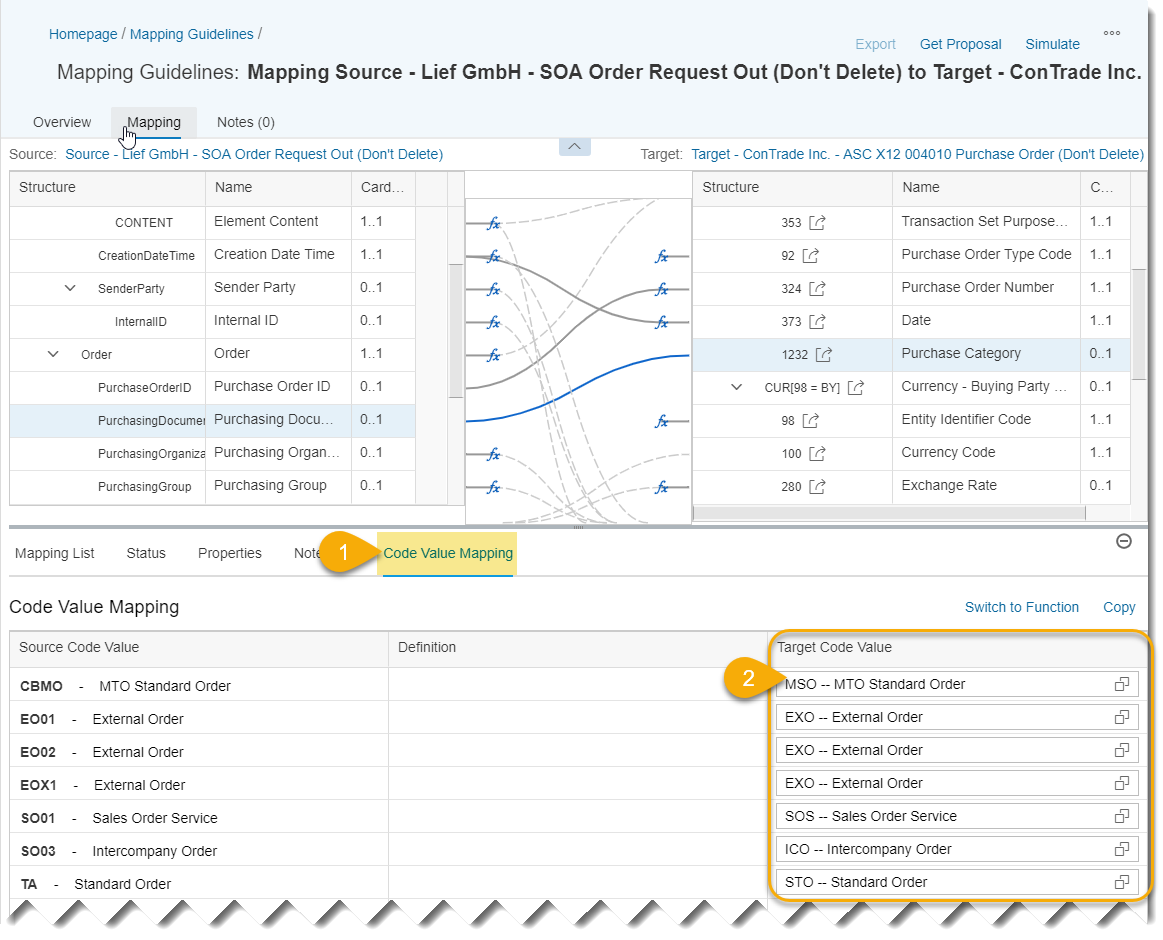
Figure 14: Code value mapping with proposed code values on the target side
 Remark: Additional details about code value mapping will be explained in future blog.
Notes
You can also enter notes for mapping entities using the "Notes" tab (see (1) in Figure 15). These notes can provide further constraints (2), usage instructions, examples, or comments that are related to the mapping entity. Use these notes to provide additional precision about the semantics of each mapping entity.
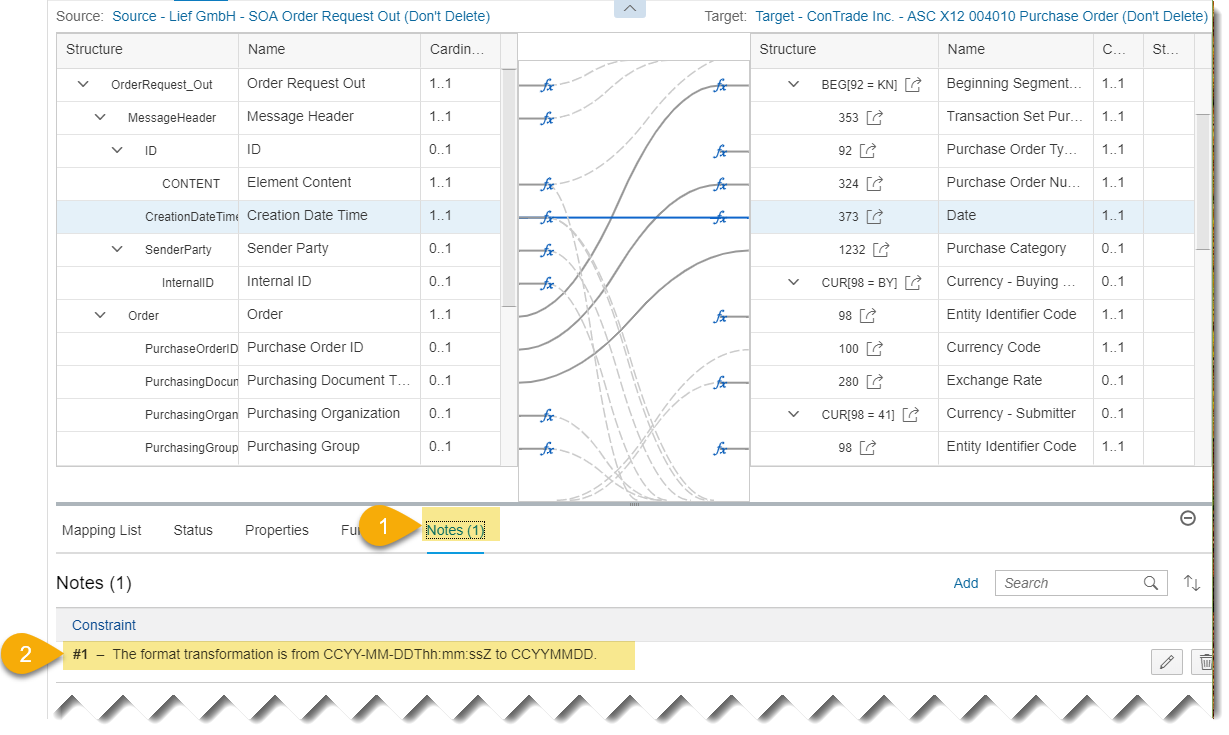
Figure 15: Further notes related to a mapping entity
 Remark: Notes and definitions might include confidential or data privacy related data, therefore, they aren’t stored in the central knowledge graph.
Simulate and review results
Once the mapping in the MAG is finalized, or you’re ready to test it, you can perform an embedded simulation in the MAG itself. The ICA either takes the examples and entered values from the source MIG or automatically calculates some example values.
Click "Simulate" (see (1) in Figure 16) to see additional columns named "Data" (2) in the mapping view. These columns show, on the source side, the input values from the source MIG and, on the target side, the transformed output values.

Figure 16: Simulate the mapping
Click a mapping entity (3) to highlight all involved items. This gives you a better representation of the simulated processing per mapping entity.
Repetitions of values at source and/or target side are displayed with a back and force navigation (4). This lets you navigate directly to the different occurrences of the example payload.
Generate PDF file
You can use Export à Documentation (see (1) in Figure 17) to generate a PDF of the entire MAG after you’ve saved it. The PDF file (2) includes the information from the overview tab and the mapping tab, including all of its details, functions, and explanations (3).
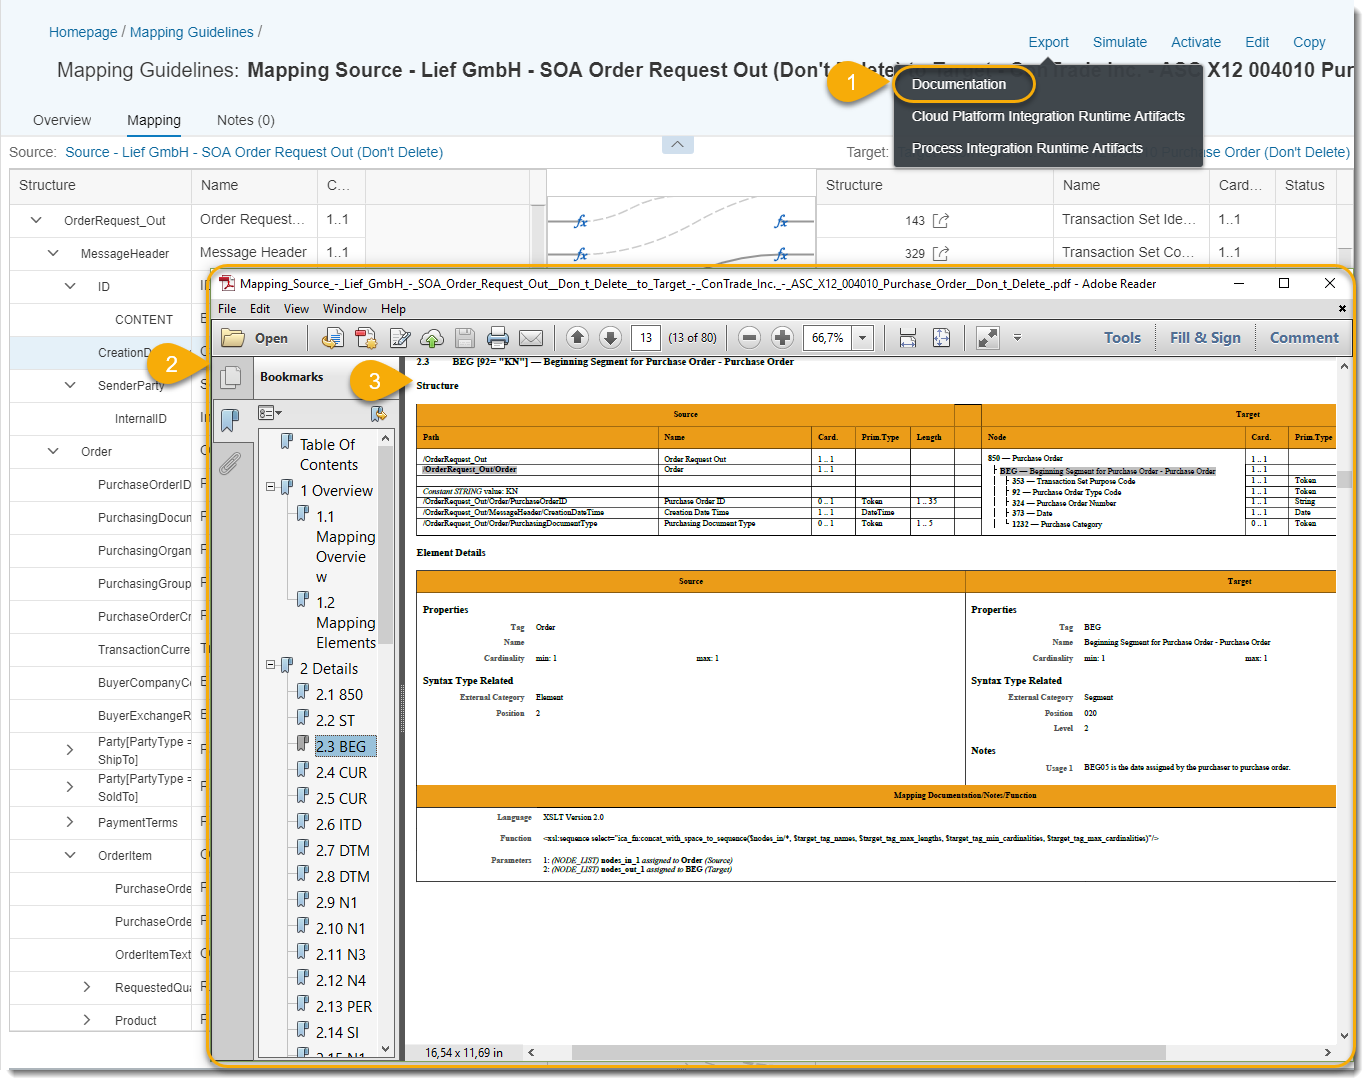
Figure 17: Generated PDF file
Generate runtime artifacts
Last but not least, you can also generate runtime artifacts for a MAG once you’ve saved it. Click Export --> Cloud Platform Integration Runtime Artifacts (see (1) in Figure 18) to create a zip file that includes all generated artifacts that are related to the MAG (2), including:
- XSDs for syntax conversion from EDI-specific syntax to XML or vice versa
- XSD for precise validation of the payloads according the definitions in the source and target MIG
- XSLT for pre- or postprocessing. These scripts are required, because of the consideration of the qualifier references.
- XSLT for the mapping from the source to the target structure
- Some example payloads in XML format
You can manually upload all of the the runtime artifacts (except the example payloads) into the corresponding flow-steps of an existing integration flow in SAP Cloud Platform Integration.
 Remarks:
How you get these runtime artifacts into an integration flow will be explained in a separate blog.
We're working on an automatic push service so that the generated runtime artifacts are pushed directly into the corresponding integration flows.

Figure 18: Generated runtime artifacts
You can also generate specific runtime artifacts, if you want to use these artefacts on your SAP Process Integration/Process Orchestration on-premise system (3). For more information, see Support SAP Process Integration/Process Orchestration with Integration Content Advisor.
Summary
This blog explains how to create a mapping guideline (MAG) by using the ML-based proposal service, which significantly accelerates the creation process. But it’s not only the proposal service that makes the MAG creation and maintenance via ICA interesting; the holistic approach with its complete documentation features, embedded simulation, and the generation of PDF file as well as runtime artifacts for different runtimes, leverages a much higher efficiency, because all required content for an integration project can be created by a single tool and can also be used by business domain experts who understand the information at the semantic (business) level.
Please stay tuned, because we’ll be providing additional blogs that discuss best practices for specific features and the use of runtime artifacts in SAP Cloud Platform Integration.
Glossary
- A2A – application to application
- ASC X12 – Accredited Standards Committee X12, a frequently used B2B standard in the USA
- B2B – business to business
- ICA – Integration Content Advisor
- MAG – mapping guideline. This is the specification of a mapping between a source MIG and target MIG
- mapping entity - This is a single mapping between the directly involved elements at source and target side.
- MIG – message implementation guideline. This is the specification of a customized message interface, including all details.
Further Reading
- Announcement: New integration content advisor for SAP Cloud Platform Integration
- integration content advisor: Discover B2B/A2A standard libraries
- integration content advisor: Create a customized interface using MIG editor
- Support SAP Process Integration/Process Orchestration with Integration Content Advisor
- SAP Help Portal – integration content advisor for SAP Cloud Platform Integration
- B2B Capabilities in Cloud Platform Integration
- B2B Capabilities in SAP Cloud Platform Integration – Part 1
- SAP S/4HANA Cloud EDI Integration Strategy
Footnotes
[i] see also https://api.sap.com/shell/discover/contentpackage/SAPS4HANACloud/api/CO_EDI_ORDER_REQUEST_OUT
- SAP Managed Tags:
- SAP Integration Suite,
- Cloud Integration,
- SAP Process Integration,
- SAP Process Orchestration
Labels:
10 Comments
You must be a registered user to add a comment. If you've already registered, sign in. Otherwise, register and sign in.
Labels in this area
-
ABAP CDS Views - CDC (Change Data Capture)
2 -
AI
1 -
Analyze Workload Data
1 -
BTP
1 -
Business and IT Integration
2 -
Business application stu
1 -
Business Technology Platform
1 -
Business Trends
1,658 -
Business Trends
91 -
CAP
1 -
cf
1 -
Cloud Foundry
1 -
Confluent
1 -
Customer COE Basics and Fundamentals
1 -
Customer COE Latest and Greatest
3 -
Customer Data Browser app
1 -
Data Analysis Tool
1 -
data migration
1 -
data transfer
1 -
Datasphere
2 -
Event Information
1,400 -
Event Information
66 -
Expert
1 -
Expert Insights
177 -
Expert Insights
293 -
General
1 -
Google cloud
1 -
Google Next'24
1 -
Kafka
1 -
Life at SAP
780 -
Life at SAP
12 -
Migrate your Data App
1 -
MTA
1 -
Network Performance Analysis
1 -
NodeJS
1 -
PDF
1 -
POC
1 -
Product Updates
4,577 -
Product Updates
340 -
Replication Flow
1 -
RisewithSAP
1 -
SAP BTP
1 -
SAP BTP Cloud Foundry
1 -
SAP Cloud ALM
1 -
SAP Cloud Application Programming Model
1 -
SAP Datasphere
2 -
SAP S4HANA Cloud
1 -
SAP S4HANA Migration Cockpit
1 -
Technology Updates
6,873 -
Technology Updates
417 -
Workload Fluctuations
1
Related Content
- Hack2Build on Business AI – Highlighted Use Cases in Technology Blogs by SAP
- Convert multiple xml's into single Xlsx(MS Excel) using groovy script in Technology Blogs by Members
- 10+ ways to reshape your SAP landscape with SAP Business Technology Platform - Blog 7 in Technology Blogs by SAP
- Top Picks: Innovations Highlights from SAP Business Technology Platform (Q1/2024) in Technology Blogs by SAP
- It has never been easier to print from SAP with Microsoft Universal Print in Technology Blogs by Members
Top kudoed authors
| User | Count |
|---|---|
| 32 | |
| 24 | |
| 8 | |
| 7 | |
| 7 | |
| 6 | |
| 6 | |
| 6 | |
| 5 | |
| 4 |