
- SAP Community
- Products and Technology
- Technology
- Technology Blogs by SAP
- How to Model Workflow Definition for Collaboration...
Technology Blogs by SAP
Learn how to extend and personalize SAP applications. Follow the SAP technology blog for insights into SAP BTP, ABAP, SAP Analytics Cloud, SAP HANA, and more.
Turn on suggestions
Auto-suggest helps you quickly narrow down your search results by suggesting possible matches as you type.
Showing results for
Product and Topic Expert
Options
- Subscribe to RSS Feed
- Mark as New
- Mark as Read
- Bookmark
- Subscribe
- Printer Friendly Page
- Report Inappropriate Content
02-05-2019
5:48 AM
"SAP intelligent product design offers an ultimate cloud-based solution that empowers you to design your digital products faster. The solution consists of the collaboration and engineering capabilities."
- SAP Intelligent Product Design
Content:
- Introduction
- Getting Ready to Model Workflows for IPD
- Modeling the workflow definition for collaboration in IPD
- Defining Authorization tasks for workflows
- Option 1 : Using JSON code in the guide procedure
- Option 2 : Using Workflow Editor in SAP Web IDE Full-Stack
- Defining custom tasks for workflows
- Defining Authorization tasks for workflows
Introduction
Using the Collaboration offering of SAP intelligent product design (IPD); you can collaborate with internal and external participants, using documents, design models (2D and 3D) and product data (like BOM).The process can be driven leveraging the SAP Cloud Platform Workflow integration within collaboration.
As a Solution Administrator; you have to model and deploy the workflow definition according to the configurations, as defined in the Administration Guide for the product. This blog provides you an insight on how to model workflow definitions for collaborations in IPD.
Getting Ready to Model Workflows for IPD
Detailed Product Documentation - Live Product Cockpit and Collaboration
For the purpose of this blog, process flow for Document Review is taken as an example to model a sample workflow. Assume that in the document review process, the following tasks are to be accomplished:
- Review and Update - a user task is required to complete the document review process
- Approve - a user task is required to complete the document approval process

Access and Authorization to Workflow Editor
- You should be on-boarded to the tenant/account (Onboarding)
- You are added to the recommended User Group COLLABORATION_ADMIN OR you should have the following roles, (User Actions and Required Roles of Collaboration)
- DiDeveloper role from Subaccount sapwebide and Application di
- WorkflowDeveloper role from Subaccount bpm and Application bpmworkflowruntime
- Go to SAP Web IDE Full-Stack service (url pattern : webidecp-<tenantId>.dispatcher.hana.ondemand.com)
- Go to Preference > Workspace Preferences > Extensions (Add-ons)
- Enable the Workflow Editor extension and Save (ref: link)
Creating a Workflow Project
- Go to your Workspace
- File > New > Project from Template > Workflow Project
- Input a project name (DocumentReview) and workflow name (DocumentReview) and Finish (ref: link)
Modeling the Workflow Definition for Collaboration in IPD
To model workflows for IPD, you have to define authorizations for workflow definitions via prerequisite script and service tasks as defined in the Administration Guide.
Defining Authorization tasks for workflows
There are two ways you can do this,
Option 1 : Using JSON code in the guide procedure
- Go to - Define Authorizations for Workflows
- Copy the code sample in Step 6
- Go to your Workspace in SAP Web IDE Full-Stack
- Select the workflow file (DocumentReview) under the workflow project (DocumentReview)
- Right click and Open with > Code Editor
- Replace the existing code in the file with code copied from IPD Administration Guide
- Search for and replace "NEW_WORKFLOW_NAME" with the name that you entered (DocumentReview), and then save the changes
- Close the code editor and open the workflow in Workflow Editor
- You'll see the following snippet;

- On opening the workflow in Workflow Editor, you can view/edit Workflow Properties from the right window (as shown below); make sure the Subject is set to ${context.subject} and Business Key is set to ${context.businessKey}

Option 2 : Using Workflow Editor in SAP Web IDE Full-Stack
- Go to your Workspace in SAP Web IDE Full-Stack
- Select the workflow file (DocumentReview) under the workflow project (DocumentReview)
- Open the file in Workflow Editor
Step 0:
- Input the Workflow Properties from the right window; set theSubject to ${context.subject} and Business Key to ${context.businessKey}
- Select the End Event and check/select/enable the Terminate checkbox
- Select the Start Event
- Go to Gateways select Parallel Gateway
- A Parallel Gateway is added; name it ParallelGateway_Update

Step 1: Creating setReqObjForWFValidation Script Task
- Select the Parallel Gateway
- Go to Tasks and select Script Task

- Input Script Task Name as setReqObjForWFValidation
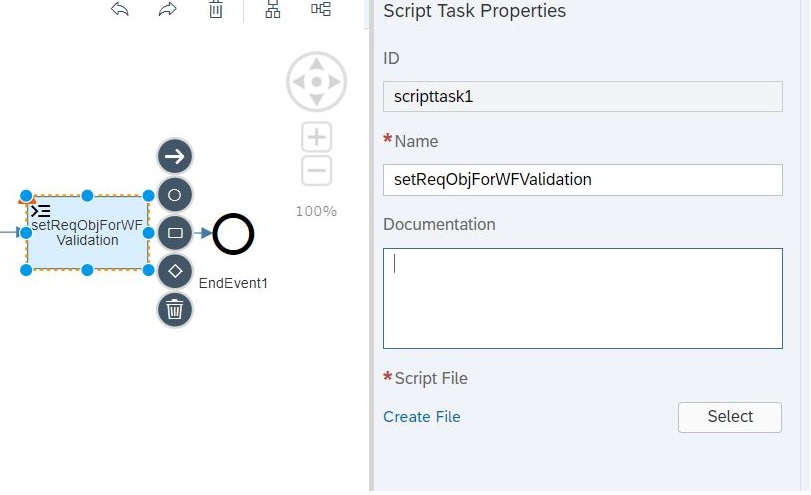
- Create a new Script File with name setReqObjForWFValidation

- Go to - Define Authorizations for Workflows
- Copy the code sample in Step 7 for Script File setReqObjForWFValidation
- Open the setReqObjForWFValidation script file in the SAP Web IDE Full-Stack and paste the copied code
- Save the script and workflow file
Step 2: Creating validateWFInitiatorForCollaboration ServiceTask
- Select the Script Task setReqObjForWFValidation
- Go to Tasks and select ServiceTask and input the Service Task Properties Name as validateWFInitiatorForCollaboration

- Go to Details section of the Service Task Properties; input the Destination as cpdcWF (this destination needs to be configured on the account - ref: Configuring Basic Destinations)
- Select Others in Choose a Service from option
- Input the Path as /service/validate/int/WorkflowValidation
- Select HTTP Method as POST
- Input Request Variable as ${context.reqBody}
- Input Response Variable as ${context.workflow.status}

- Enable the Principal Propagation option and Select Flow Event as the Start Event

- Save the workflow
- Select validateWFInitiatorForCollaboration Script Task
- Go to Gateways select Exclusive Gateway
- An Exclusive Gateway is added; name it isInitiatorValidForCollaboration
Step 3: Creating setInstanceLevelPermission Script Task
- Select the Exclusive Gateway
- Similar to "Step 1: Creating setReqObjForWFValidation Script Task", create the Script Task with name setInstanceLevelPermission
- Save the workflow
Step 4: Creating deleteInstance Script Task
- From the left options panel, go to Tasks and add a Script Task with name deleteInstance
- Select the Exclusive Gateway isInitiatorValidForCollaboration
- Go to Sequence and drag to connect to the Script Task deleteInstance
- Select this newly created Sequence
- Input the Name in the Sequence Flow Properties window on the right as InValidInitiatorSequence and input the Condition as ${context.workflow.status == "DELETE"}

- Select the Sequence Flow from the Exclusive Gateway to Script Task setInstanceLevelPermission
- Input the Name in the Sequence Flow Properties window on the right as ValidInitiatorSequence and select the Default checkbox

- Select Script Task deleteInstance
- Go to Events and select End Event
- Save the workflow
Step 5: Creating setReqObjForFetchingUpdatedUsers Script Task
- From the left options panel, go to Events and add an Intermediate Message Event with name updatePermissionEvent
- Go to the Details section of the Intermediate Message Event Properties window on the right and input the Message Name as updatePermissionMessage
- Select the Parallel Gateway ParallelGateway_Update
- Go to Sequence and drag to connect to the Intermediate Message Event updatePermissionEvent

- Select the Intermediate Message Event updatePermissionEvent
- Similar to "Step 1: Creating setReqObjForWFValidation Script Task", create the Script Task with name setReqObjForFetchingUpdatedUsers
- Save the workflow
Step 6: Creating getUpdatedUsersService Service Task
- Select Script Task setReqObjForFetchingUpdatedUsers
- Go to Tasks and select Service Task
- Input the Service Task Properties Name as getUpdatedUsersService
- Similar to "Step 2: Creating validateWFInitiatorForCollaboration ServiceTask"; go to Details section of the Service Task Properties; input the details as before
- Save the workflow
Step 7: Creating setUpdatedPermissions Script Task
- Similar to "Step 1: Creating setReqObjForWFValidation Script Task", create the Script Task with name setUpdatedPermissions
- Select the Script Task setUpdatedPermissions
- Go to Sequence and drag to connect to the Intermediate Message Event updatePermissionEvent
- Save the workflow
Below is a snippet of how the modeled workflow should look like
Defining custom tasks for workflows
Now you are ready to model the workflow by appending the tasks you want to accomplish. We shall take the Document Review tasks to define custom tasks for a workflow for collaboration in IPD.
Adding a User Task for Review and Update step
- Open the workflow(with authorization tasks defined) in Workflow Editor
- Select the Script Task setInstanceLevelPermission
- Go to Tasks and select User Task

- Input the User Task name (Review and Update) in the General section for the User Task Properties on the right window (as shown below); add any additional documentation that you would like the definition to have, make sure the checkbox for Show in inbox workflow log is selected

- Go to Details section for the User Task Properties; select task Priority, input a task Subject(Review and Update), input a task Description, input the Users field as ${context.sContributor} (you would need to configure this property in Workflow Properties application for the account) and if Due Date is required, select the Configure Due Date checkbox

- [updated]Go to User Interface section for the User Task Properties; select Type as SAPUI5 Component, input HTML5 App Name as cpdctask and input SAPUI5 Component as com.sap.s4idea.cpdc.ui.task
- Save the workflow
- User Task for Review and Update step is completed
Adding a User Task for Approve step
- Similar to the previous step, create a User Task for Approve step
- Select the User Task added in the previous step
- Go to Tasks and select User Task

- Input the User Task name (Approve) in the General section for the User Task Properties on the right window; add any additional documentation that you would like the definition to have, make sure the checkbox for Show in inbox workflow log is selected
- Go to Details section for the User Task Properties; select task Priority, input a task Subject(Approve), input a task Description, input the Users field as ${context.sContributor} (user would need to configure this property in Workflow Properties application for the account and if Due Date is required, select the Configure Due Date checkbox
- [updated]Go to User Interface section for the User Task Properties; select Type as SAPUI5 Component, input HTML5 App Name as cpdctask and input SAPUI5 Component as com.sap.s4idea.cpdc.ui.task

- Save the workflow
- User Task for Approve step is completed
- Save the workflow
The workflow definition Document Review is modeled and ready for deployment to cloud platform.

PS - Please share your feedback and write to me if you have any follow-up.
- SAP Managed Tags:
- SAP Workflow Management, workflow capability,
- SAP Business Technology Platform
Labels:
10 Comments
You must be a registered user to add a comment. If you've already registered, sign in. Otherwise, register and sign in.
Labels in this area
-
ABAP CDS Views - CDC (Change Data Capture)
2 -
AI
1 -
Analyze Workload Data
1 -
BTP
1 -
Business and IT Integration
2 -
Business application stu
1 -
Business Technology Platform
1 -
Business Trends
1,658 -
Business Trends
91 -
CAP
1 -
cf
1 -
Cloud Foundry
1 -
Confluent
1 -
Customer COE Basics and Fundamentals
1 -
Customer COE Latest and Greatest
3 -
Customer Data Browser app
1 -
Data Analysis Tool
1 -
data migration
1 -
data transfer
1 -
Datasphere
2 -
Event Information
1,400 -
Event Information
66 -
Expert
1 -
Expert Insights
177 -
Expert Insights
296 -
General
1 -
Google cloud
1 -
Google Next'24
1 -
Kafka
1 -
Life at SAP
780 -
Life at SAP
13 -
Migrate your Data App
1 -
MTA
1 -
Network Performance Analysis
1 -
NodeJS
1 -
PDF
1 -
POC
1 -
Product Updates
4,577 -
Product Updates
342 -
Replication Flow
1 -
RisewithSAP
1 -
SAP BTP
1 -
SAP BTP Cloud Foundry
1 -
SAP Cloud ALM
1 -
SAP Cloud Application Programming Model
1 -
SAP Datasphere
2 -
SAP S4HANA Cloud
1 -
SAP S4HANA Migration Cockpit
1 -
Technology Updates
6,873 -
Technology Updates
420 -
Workload Fluctuations
1
Related Content
- Embracing TypeScript in SAPUI5 Development in Technology Blogs by Members
- Elevating Customer Engagement: Harnessing the Power of SAP Chatbots for a Personalized Experience in Technology Blogs by Members
- Activating Embedded AI – Intelligent GRIR Reconciliation in Technology Blogs by SAP
- Boosting Benchmarking for Reliable Business AI in Technology Blogs by SAP
- SAP Fiori tools 2403 introduces Gen AI capability and more in Technology Blogs by SAP
Top kudoed authors
| User | Count |
|---|---|
| 37 | |
| 25 | |
| 17 | |
| 13 | |
| 7 | |
| 7 | |
| 7 | |
| 6 | |
| 6 | |
| 6 |