
- SAP Community
- Products and Technology
- Enterprise Resource Planning
- ERP Blogs by Members
- Extending Fiori Apps in S/4HANA using the Adaption...
Enterprise Resource Planning Blogs by Members
Gain new perspectives and knowledge about enterprise resource planning in blog posts from community members. Share your own comments and ERP insights today!
Turn on suggestions
Auto-suggest helps you quickly narrow down your search results by suggesting possible matches as you type.
Showing results for
geert-janklaps
Active Contributor
Options
- Subscribe to RSS Feed
- Mark as New
- Mark as Read
- Bookmark
- Subscribe
- Printer Friendly Page
- Report Inappropriate Content
01-29-2019
8:07 AM
During one of my recent S/4HANA implementations I had to extend a standard SAP Fiori App (Manage Supplier Quotations) with an additional input field. Never ever had I thought this could be so easy!
During this blog I'll walk you through:
To setup the Adaption Transport Organizer I followed the official documentation which can be found here.
First we have to create 2 local packages in our system (I chose to stick with the ones proposed in the official documentation):
Next launch transaction S_ATO_SETUP to start the actual configuration. Enter following details:
After entering the details, start the configuration using button "Setup with specific data".

Afterwards the red light should turn green:

This concludes the configuration of the Adaption Transport Organizer.
To be able to continue, you first need to make sure that you've activated following Fiori Apps in the system:

All these apps are only available in a technical catalog, so you'll have to create a custom business catalog and group to gain access to these tiles.
In our example we'd like to add a custom field in the item section of the Supplier Quotation to enter the supplier material number.
Open the Custom Fields and Logic app to add a custom field to the data model.

In the popup enter details for the custom field you'd like to add (in our case the supplier material number) and click the Create and Edit button.

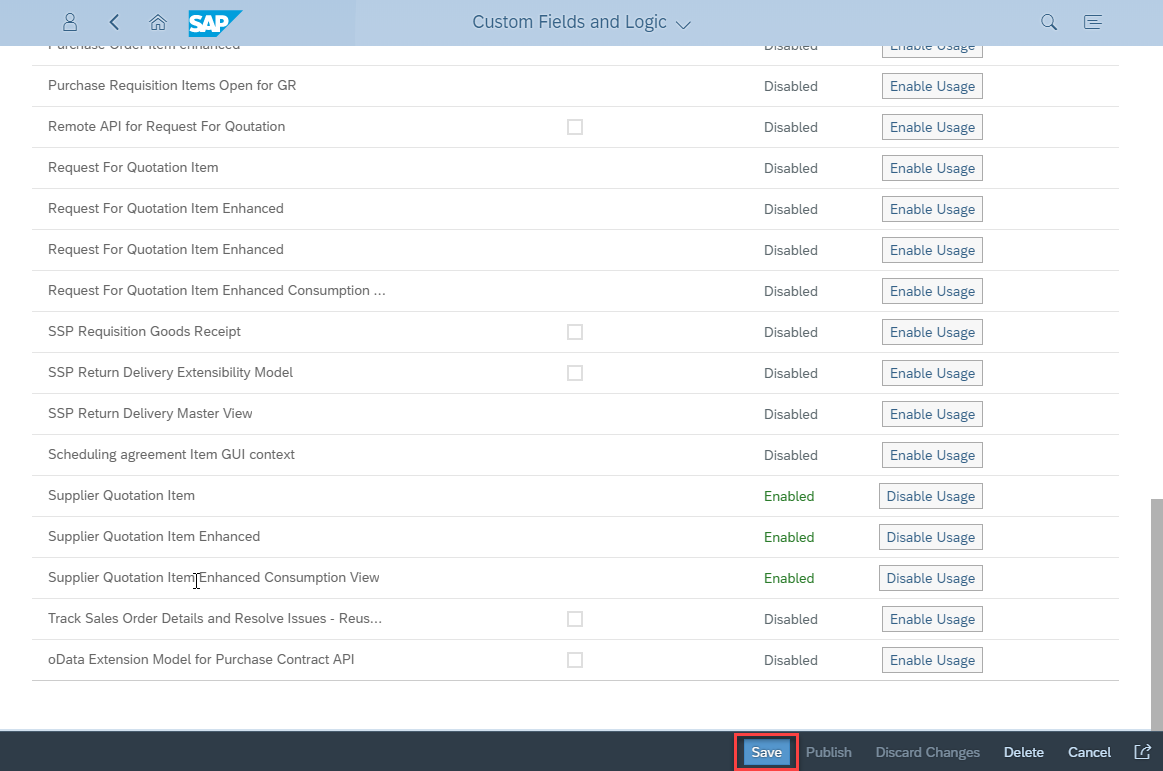
In the next screen, switch to tab UIs and Reports and enable usage in following components:
To find out what you need to extend for your app, you need to review the section App Extensibility of official app documentation. (For the Manage Supplier Quotation app, the documentation can be found here)


Next, save the custom field data using the Save button in the bottom of the screen
After everything is saved, the Publish button will be available. Click this button to actually activate the extension.

Now you'll have to wait until publishing is finished, this can take a while. (In the background the system is now extending tables, CDS views, structures, ...)

The custom field is now availble in the app and is automatically input ready / display only based on the mode the app is in (display / change). It might be possible that you need to add the field to the screen using the configure button in top of the item table.

As you might have noticed, our extension is now created in the local package we assigned to the Adaption Transport Organizer and not yet registered to a transport. To be able to register our extension to a transport we first need to configure a software package.
Open up the Configure Software Packages tile and click the Add Registration button.

Search for your desired package to hold the extension(s), to add it to the list of registered packages.

Next, assign a transport to the package (or enable automatic request / task handling).

The package can now be used to hold the extension we created.
Now we can finally register our extension to the package and transport, to move it through the landscape.
To do this, open up the Register Extensions for Transport app, select the extension and click the Reassign to Package button in the bottom of the screen.
Select the package we registered earlier and wait for the process to complete.

Once the assignment is finished you should see that the extension is now transportable, you can now release the transport to move the extenion(s) through the system landscape.

This concludes the walkthrough on extending standard Fiori Apps using the Adaption Transport Organizer, which was quite easy once you get a hang of it. Hope this saved you quite some time. As always I'm open to your feedback!
During this blog I'll walk you through:
- Setting up the Adaption Transport Organizer (ATO)
- Extending a standard Fiori App (Manage Supplier Quotations)
Setting up the Adaption Transport Organizer
To setup the Adaption Transport Organizer I followed the official documentation which can be found here.
First we have to create 2 local packages in our system (I chose to stick with the ones proposed in the official documentation):
- $YATO_KEY_USER_LOCAL
- $YATO_KEY_USER_SANDBOX
Next launch transaction S_ATO_SETUP to start the actual configuration. Enter following details:
- Local and sandbox package
- Prefix and sandbox prefix
After entering the details, start the configuration using button "Setup with specific data".
Afterwards the red light should turn green:
This concludes the configuration of the Adaption Transport Organizer.
Extending a standard Fiori App
To be able to continue, you first need to make sure that you've activated following Fiori Apps in the system:
- Custom Fields and Logic (documentation)
- Configure Software Packages (documentation)
- Register Extensions for Transport (documentation)
All these apps are only available in a technical catalog, so you'll have to create a custom business catalog and group to gain access to these tiles.
Adding a custom field to the data model
In our example we'd like to add a custom field in the item section of the Supplier Quotation to enter the supplier material number.
Open the Custom Fields and Logic app to add a custom field to the data model.
In the popup enter details for the custom field you'd like to add (in our case the supplier material number) and click the Create and Edit button.
In the next screen, switch to tab UIs and Reports and enable usage in following components:
- Manage Quota Extensibility Model
- Supplier Quotation Item
- Supplier Quotation Item Enhanced
- Supplier Quotation Item Enhanced Consumption View
To find out what you need to extend for your app, you need to review the section App Extensibility of official app documentation. (For the Manage Supplier Quotation app, the documentation can be found here)
Next, save the custom field data using the Save button in the bottom of the screen
After everything is saved, the Publish button will be available. Click this button to actually activate the extension.
Now you'll have to wait until publishing is finished, this can take a while. (In the background the system is now extending tables, CDS views, structures, ...)
The custom field is now availble in the app and is automatically input ready / display only based on the mode the app is in (display / change). It might be possible that you need to add the field to the screen using the configure button in top of the item table.
Configuring a Software Package
As you might have noticed, our extension is now created in the local package we assigned to the Adaption Transport Organizer and not yet registered to a transport. To be able to register our extension to a transport we first need to configure a software package.
Open up the Configure Software Packages tile and click the Add Registration button.
Search for your desired package to hold the extension(s), to add it to the list of registered packages.
Next, assign a transport to the package (or enable automatic request / task handling).
The package can now be used to hold the extension we created.
Register the extension for transport
Now we can finally register our extension to the package and transport, to move it through the landscape.
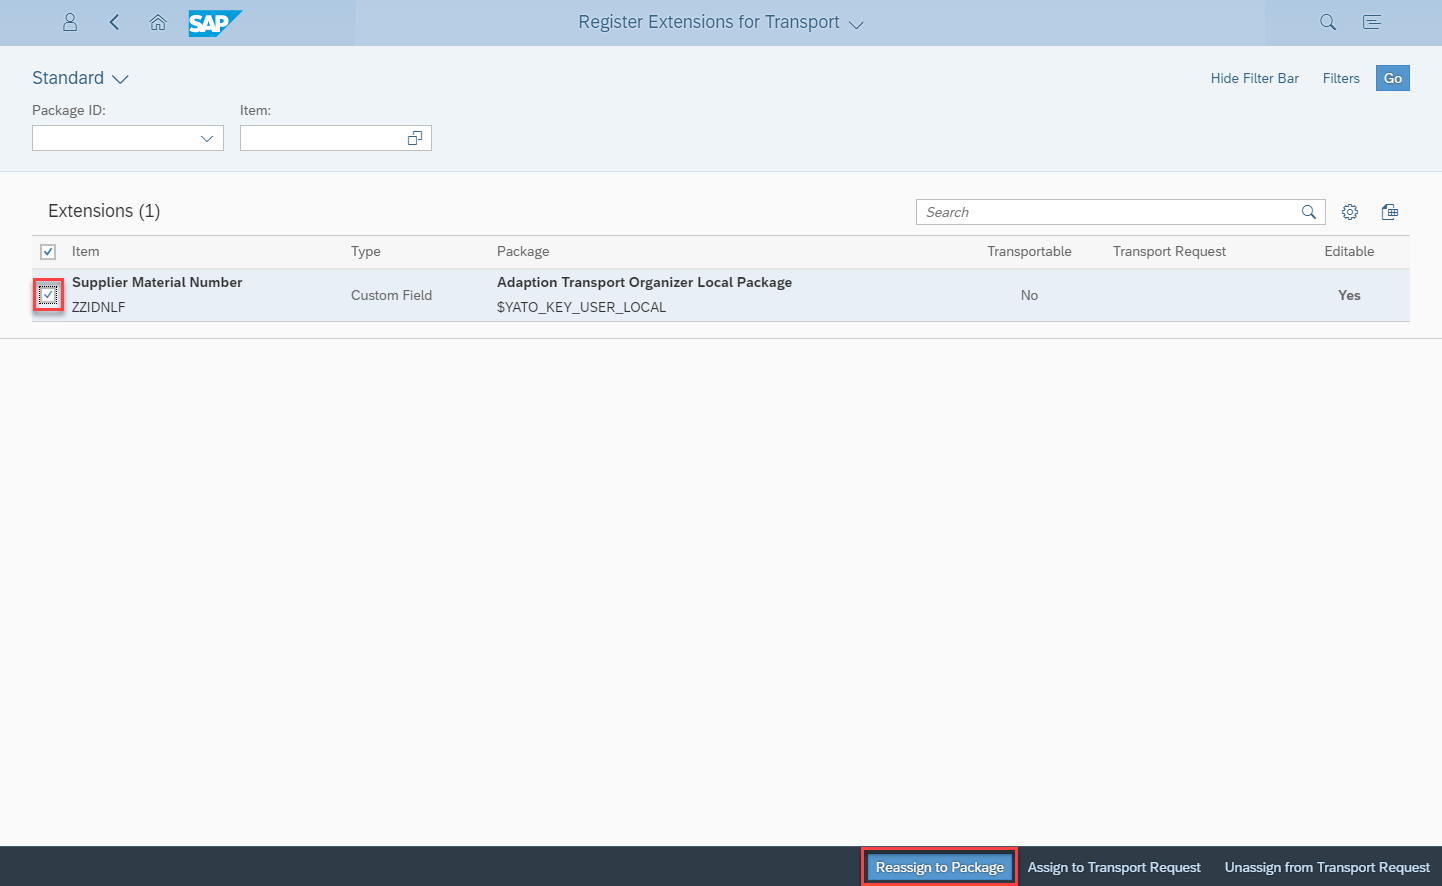
To do this, open up the Register Extensions for Transport app, select the extension and click the Reassign to Package button in the bottom of the screen.
Select the package we registered earlier and wait for the process to complete.
Once the assignment is finished you should see that the extension is now transportable, you can now release the transport to move the extenion(s) through the system landscape.
This concludes the walkthrough on extending standard Fiori Apps using the Adaption Transport Organizer, which was quite easy once you get a hang of it. Hope this saved you quite some time. As always I'm open to your feedback!
- SAP Managed Tags:
- SAP Fiori,
- ABAP Development,
- SAP Fiori for SAP S/4HANA,
- SAP S/4HANA
12 Comments
You must be a registered user to add a comment. If you've already registered, sign in. Otherwise, register and sign in.
Labels in this area
-
"mm02"
1 -
A_PurchaseOrderItem additional fields
1 -
ABAP
1 -
ABAP Extensibility
1 -
ACCOSTRATE
1 -
ACDOCP
1 -
Adding your country in SPRO - Project Administration
1 -
Advance Return Management
1 -
AI and RPA in SAP Upgrades
1 -
Approval Workflows
1 -
ARM
1 -
ASN
1 -
Asset Management
1 -
Associations in CDS Views
1 -
auditlog
1 -
Authorization
1 -
Availability date
1 -
Azure Center for SAP Solutions
1 -
AzureSentinel
2 -
Bank
1 -
BAPI_SALESORDER_CREATEFROMDAT2
1 -
BRF+
1 -
BRFPLUS
1 -
Bundled Cloud Services
1 -
business participation
1 -
Business Processes
1 -
CAPM
1 -
Carbon
1 -
Cental Finance
1 -
CFIN
1 -
CFIN Document Splitting
1 -
Cloud ALM
1 -
Cloud Integration
1 -
condition contract management
1 -
Connection - The default connection string cannot be used.
1 -
Custom Table Creation
1 -
Customer Screen in Production Order
1 -
Data Quality Management
1 -
Date required
1 -
Decisions
1 -
desafios4hana
1 -
Developing with SAP Integration Suite
1 -
Direct Outbound Delivery
1 -
DMOVE2S4
1 -
EAM
1 -
EDI
2 -
EDI 850
1 -
EDI 856
1 -
edocument
1 -
EHS Product Structure
1 -
Emergency Access Management
1 -
Energy
1 -
EPC
1 -
Financial Operations
1 -
Find
1 -
FINSSKF
1 -
Fiori
1 -
Flexible Workflow
1 -
Gas
1 -
Gen AI enabled SAP Upgrades
1 -
General
1 -
generate_xlsx_file
1 -
Getting Started
1 -
HomogeneousDMO
1 -
IDOC
2 -
Integration
1 -
Learning Content
2 -
LogicApps
2 -
low touchproject
1 -
Maintenance
1 -
management
1 -
Material creation
1 -
Material Management
1 -
MD04
1 -
MD61
1 -
methodology
1 -
Microsoft
2 -
MicrosoftSentinel
2 -
Migration
1 -
MRP
1 -
MS Teams
2 -
MT940
1 -
Newcomer
1 -
Notifications
1 -
Oil
1 -
open connectors
1 -
Order Change Log
1 -
ORDERS
2 -
OSS Note 390635
1 -
outbound delivery
1 -
outsourcing
1 -
PCE
1 -
Permit to Work
1 -
PIR Consumption Mode
1 -
PIR's
1 -
PIRs
1 -
PIRs Consumption
1 -
PIRs Reduction
1 -
Plan Independent Requirement
1 -
Premium Plus
1 -
pricing
1 -
Primavera P6
1 -
Process Excellence
1 -
Process Management
1 -
Process Order Change Log
1 -
Process purchase requisitions
1 -
Product Information
1 -
Production Order Change Log
1 -
Purchase requisition
1 -
Purchasing Lead Time
1 -
Redwood for SAP Job execution Setup
1 -
RISE with SAP
1 -
RisewithSAP
1 -
Rizing
1 -
S4 Cost Center Planning
1 -
S4 HANA
1 -
S4HANA
3 -
Sales and Distribution
1 -
Sales Commission
1 -
sales order
1 -
SAP
2 -
SAP Best Practices
1 -
SAP Build
1 -
SAP Build apps
1 -
SAP Cloud ALM
1 -
SAP Data Quality Management
1 -
SAP Maintenance resource scheduling
2 -
SAP Note 390635
1 -
SAP S4HANA
2 -
SAP S4HANA Cloud private edition
1 -
SAP Upgrade Automation
1 -
SAP WCM
1 -
SAP Work Clearance Management
1 -
Schedule Agreement
1 -
SDM
1 -
security
2 -
Settlement Management
1 -
soar
2 -
SSIS
1 -
SU01
1 -
SUM2.0SP17
1 -
SUMDMO
1 -
Teams
2 -
User Administration
1 -
User Participation
1 -
Utilities
1 -
va01
1 -
vendor
1 -
vl01n
1 -
vl02n
1 -
WCM
1 -
X12 850
1 -
xlsx_file_abap
1 -
YTD|MTD|QTD in CDs views using Date Function
1
- « Previous
- Next »
Related Content
- Transport Management in SAP S/4HANA Cloud Public Edition 3-System Landscape: From Basics to Complex in Enterprise Resource Planning Blogs by SAP
- SAP S/4HANA Cloud Private Edition | 2023 FPS01 Release – Part 2 in Enterprise Resource Planning Blogs by SAP
- Can we extend the Employee Business Partner as/to Organization ? in Enterprise Resource Planning Q&A
- Details of released transport in sap public cloud project for development tenant in Enterprise Resource Planning Q&A
- Create a custom SAP Fiori App for a Custom Business Object in SAP S/4HANA and SAP S/4HANA Cloud, private edition in Enterprise Resource Planning Blogs by SAP
Top kudoed authors
| User | Count |
|---|---|
| 2 | |
| 2 | |
| 2 | |
| 2 | |
| 2 | |
| 2 | |
| 1 | |
| 1 | |
| 1 | |
| 1 |