
- SAP Community
- Products and Technology
- Technology
- Technology Blogs by SAP
- Part 11: Upload data from Fiori application into G...
Technology Blogs by SAP
Learn how to extend and personalize SAP applications. Follow the SAP technology blog for insights into SAP BTP, ABAP, SAP Analytics Cloud, SAP HANA, and more.
Turn on suggestions
Auto-suggest helps you quickly narrow down your search results by suggesting possible matches as you type.
Showing results for
divyamary
Contributor
Options
- Subscribe to RSS Feed
- Mark as New
- Mark as Read
- Bookmark
- Subscribe
- Printer Friendly Page
- Report Inappropriate Content
01-15-2019
10:20 AM
Many a times you would like the data present in your Fiori application to be uploaded into cloud storage applications like say Google Drive.
To achieve the scenario, the following high level steps are required :-
The utility functions ExportTypeCSV and Export available in UI5 libraries enables the conversion of any data model ( JSON or OData) into comma separated format and can be used in your UI5 project to quickly convert the data into CSV format.
SAP Cloud Platform Open Connectors provides robust, feature rich, pre-built connectors to various third-party cloud storage application like Google Drive and can be used to upload the generated CSV file to one or more third-party storage application of your choice. The picture below shows the scenario blueprint .
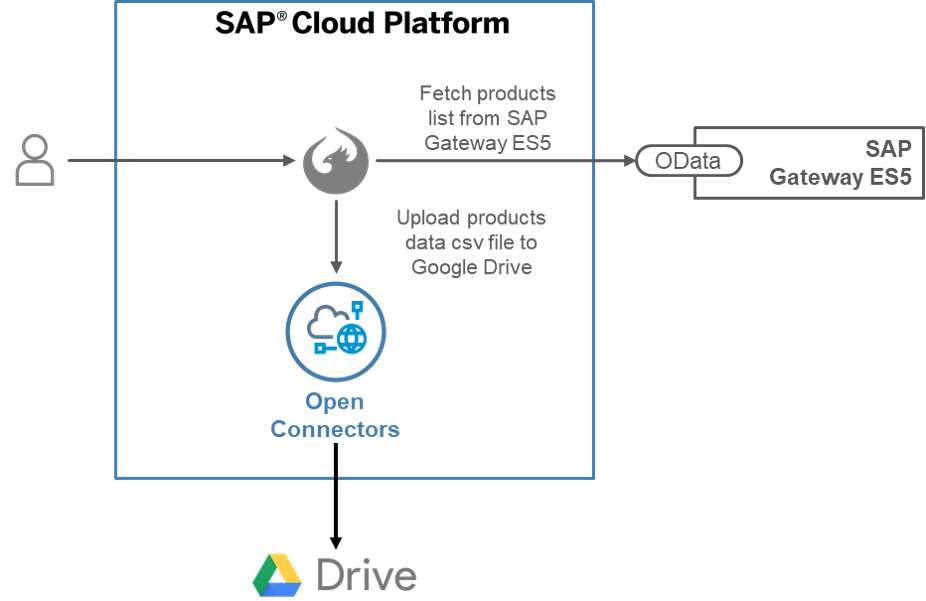
In this blog detailed steps to build and test this scenario has been showcased.
Note:- In this blog, we have used a third-party application from the document hubs which is Google Drive. You are free to use any other third-party application of your choice.
In order to consume Rest APIs of Google Apps an application needs to be created that communicates securely with SAP Cloud Platform Open Connectors. In this blog details steps for creation of the Google Apps has been captured.


In this section, steps to seamlessly and securely connect to the third-party cloud applications via SAP Cloud Platform Open Connectors has been covered. SAP Cloud Platform Open Connectors is available for test, explore and try out in SAP Cloud Platform trial. If you have not enabled SAP Cloud Platform Open Connectors in your trial tenant, refer this blog to enable it.

Note:- Based on your selected third-party application connector, the configuration options in this screen may vary.

Note:- In case your Google OAuth application that you are using in this step is not yet verified by Google, you would see a warning during your re-direct to Google after you click on Create Instance
Note:- After you log-in using your Google credentials , you might be prompted to Allow access to access the resources as a part of the standard OAuth handshake.


Create destination to SAP Cloud Platform Open Connectors and SAP Gateway ES5 demo system
To securely connect to third-party application via SAP Cloud Platform Open Connectors from a Fiori application, destinations can be used. In this section, the steps to create destination to the harmonized REST URLs for the third-party document Hubs APIs is showcased.

The name of this destination would have to be noted and it would be later used in Fiori application (in neo-app.json) file.
Keeping it very simple in this blog we would be building a simple Fiori application which would show all the products from the SAP Gateway ES5 application in a simple list view and would be uploading this product list into Google Drive tenant.


Disclaimer: In this blog, keeping it simple, authorization token has been specified in the JavaScript code. This is not a secure approach as any person can easily read the JavaScript using Browser tools. For productive development the recommendation is to specify these token on the Server side or use an API Management Platform like SAP Cloud Platform API Management. Refer this blog , to securely connect to third-party application from Fiori application using SAP Cloud Platform API Management.


More blogs on SAP Cloud Platform Open Connectors available in SAP Community.
To achieve the scenario, the following high level steps are required :-
- Conversion of the data present in your Fiori application into comma separated value ( CSV ) format.
- Upload of the CSV data to a cloud storage application like Google Drive.
The utility functions ExportTypeCSV and Export available in UI5 libraries enables the conversion of any data model ( JSON or OData) into comma separated format and can be used in your UI5 project to quickly convert the data into CSV format.
SAP Cloud Platform Open Connectors provides robust, feature rich, pre-built connectors to various third-party cloud storage application like Google Drive and can be used to upload the generated CSV file to one or more third-party storage application of your choice. The picture below shows the scenario blueprint .
In this blog detailed steps to build and test this scenario has been showcased.
Prerequisites
- SAP Cloud Platform trial tenant
- SAP Cloud Platform Open Connectors trial tenant.
- SAP Gateway ES5 demo system
- Google Drive account
Note:- In this blog, we have used a third-party application from the document hubs which is Google Drive. You are free to use any other third-party application of your choice.
Google Application Creation:
In order to consume Rest APIs of Google Apps an application needs to be created that communicates securely with SAP Cloud Platform Open Connectors. In this blog details steps for creation of the Google Apps has been captured.
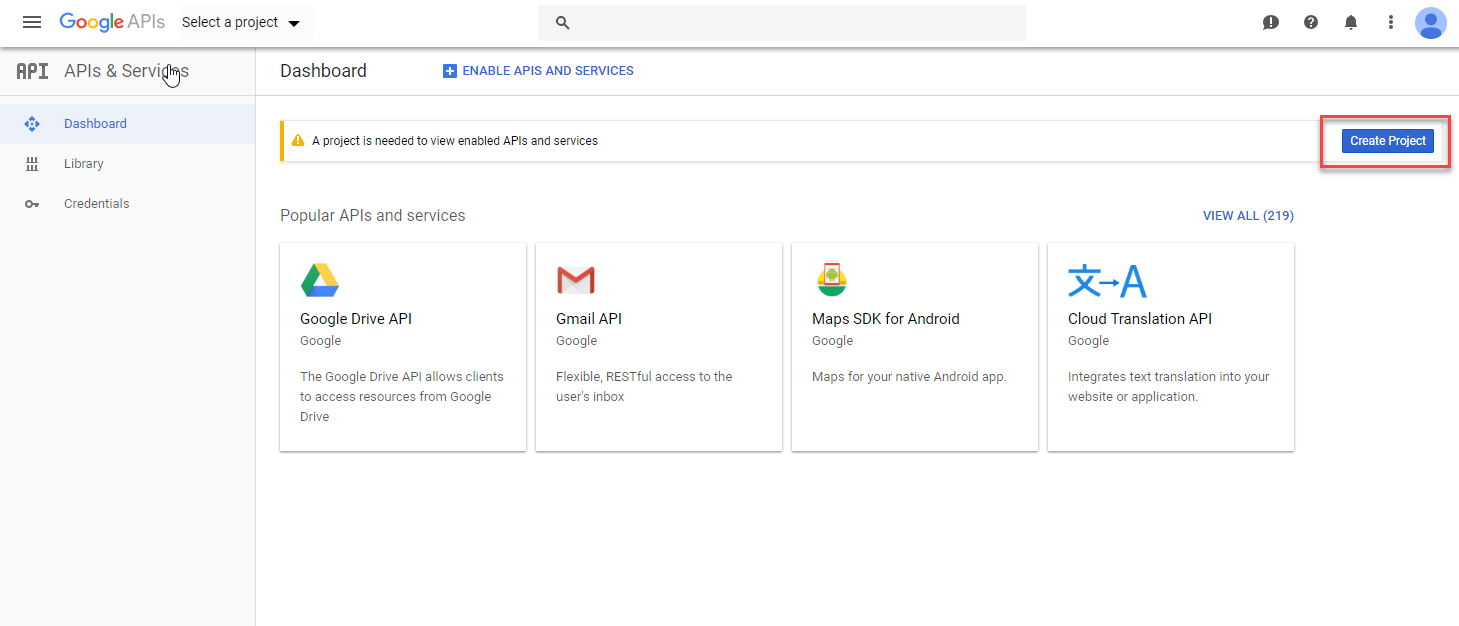
- Login to https://console.developers.google.com
- Create a Project for your application.
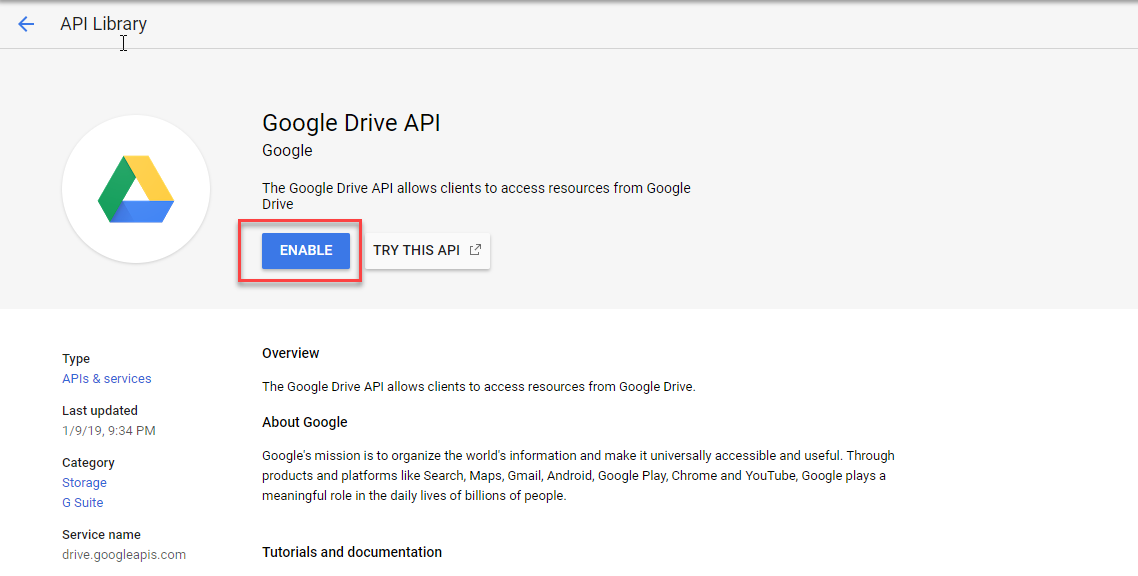
- Enable Google Drive APIs for your project by selecting option Enables APIs and Services
- Search and select for the Google Drive API and then click on Enable to activate the API usage for your project.
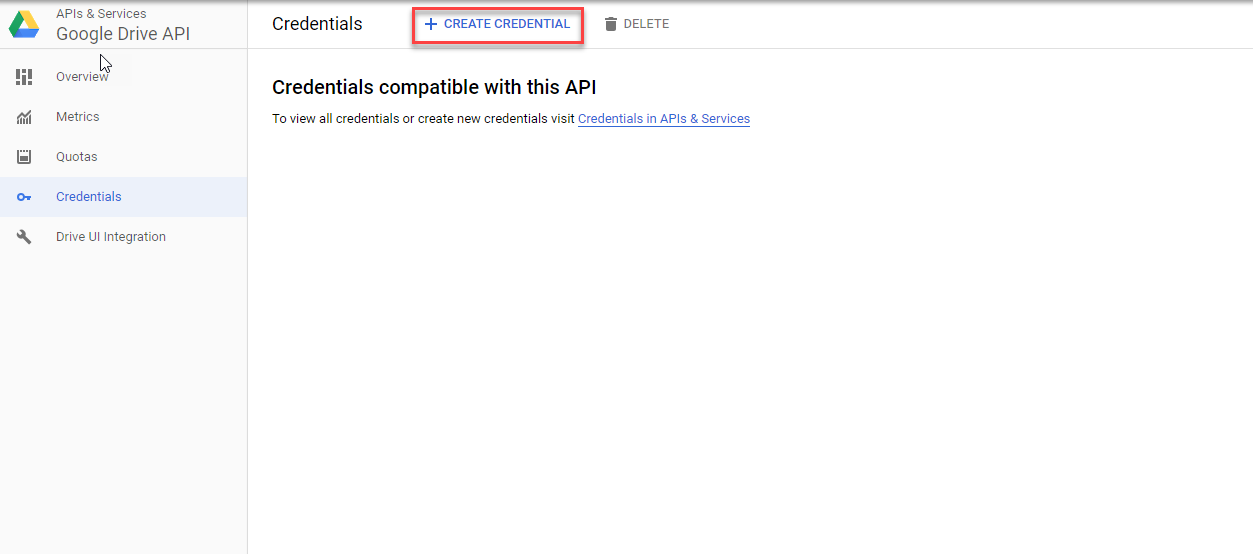
- Click on Credentials and then select Create Credential.
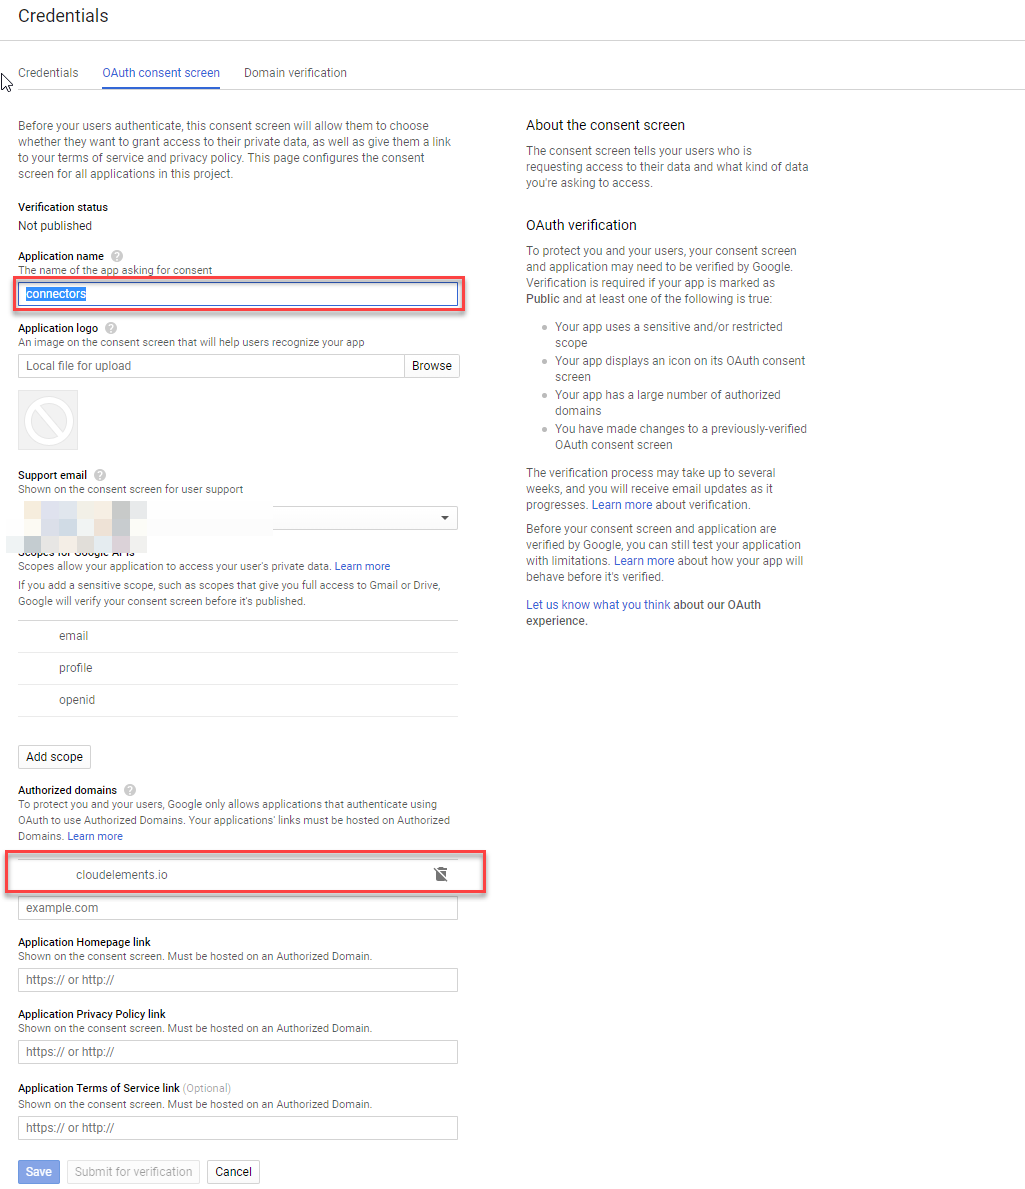
- Navigate to the OAuth consent screen to provide a consent application. Enter an application name say connectors and specify auth.cloudelements.io as the authorized domain.
- Navigate to the Credentials tab, select OAuth Client ID option from the Create credentials button.
- In the Create OAuth client ID form, select Web application as Application type, enter connectors as the Name and enter https://auth.cloudelements.io/oauth as the Authorized redirect URIs and then click on the Create button.
- After the OAuth client application is created, your client ID and client secret is shown in the OAuth client dialog. Copy the client id and client secret. This copied client id and secret will be required in creating an authenticated connectors to your Google Drive application from SAP Cloud Platform Open Connectors.
Connect to Google Drive from SAP Cloud Platform Open Connectors
In this section, steps to seamlessly and securely connect to the third-party cloud applications via SAP Cloud Platform Open Connectors has been covered. SAP Cloud Platform Open Connectors is available for test, explore and try out in SAP Cloud Platform trial. If you have not enabled SAP Cloud Platform Open Connectors in your trial tenant, refer this blog to enable it.
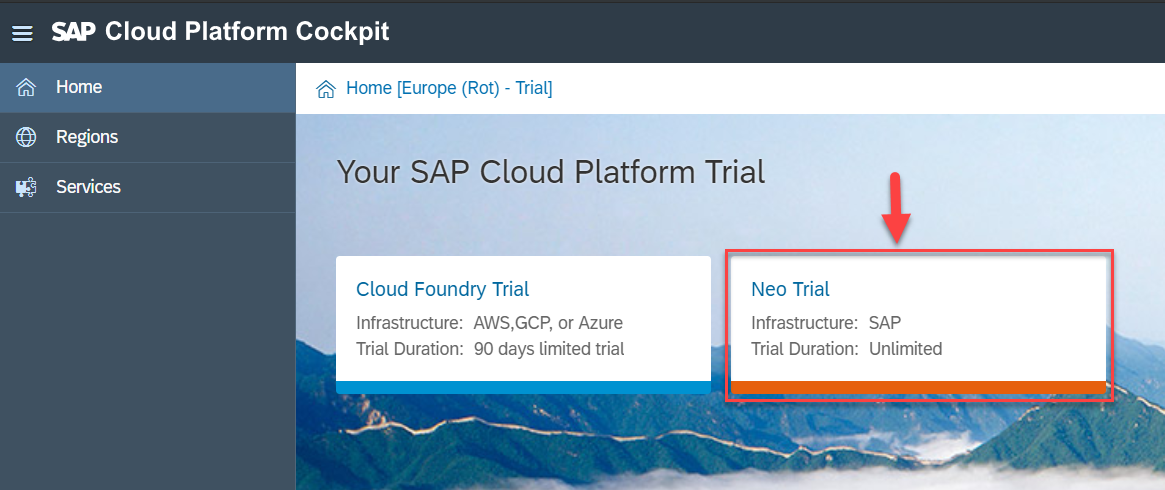
- Logon to your SAP Cloud Platform trial and Navigate to the Neo Trial.
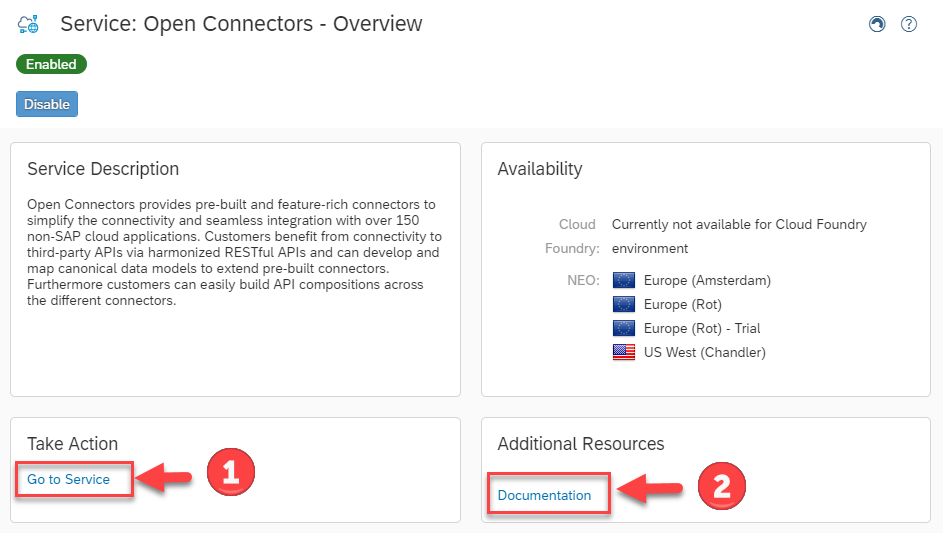
- From the services tab, search and select Open Connectors tile and click on the Go to Service link.
- You would be navigated to SAP Cloud Platform Open Connectors Home or Landing page.
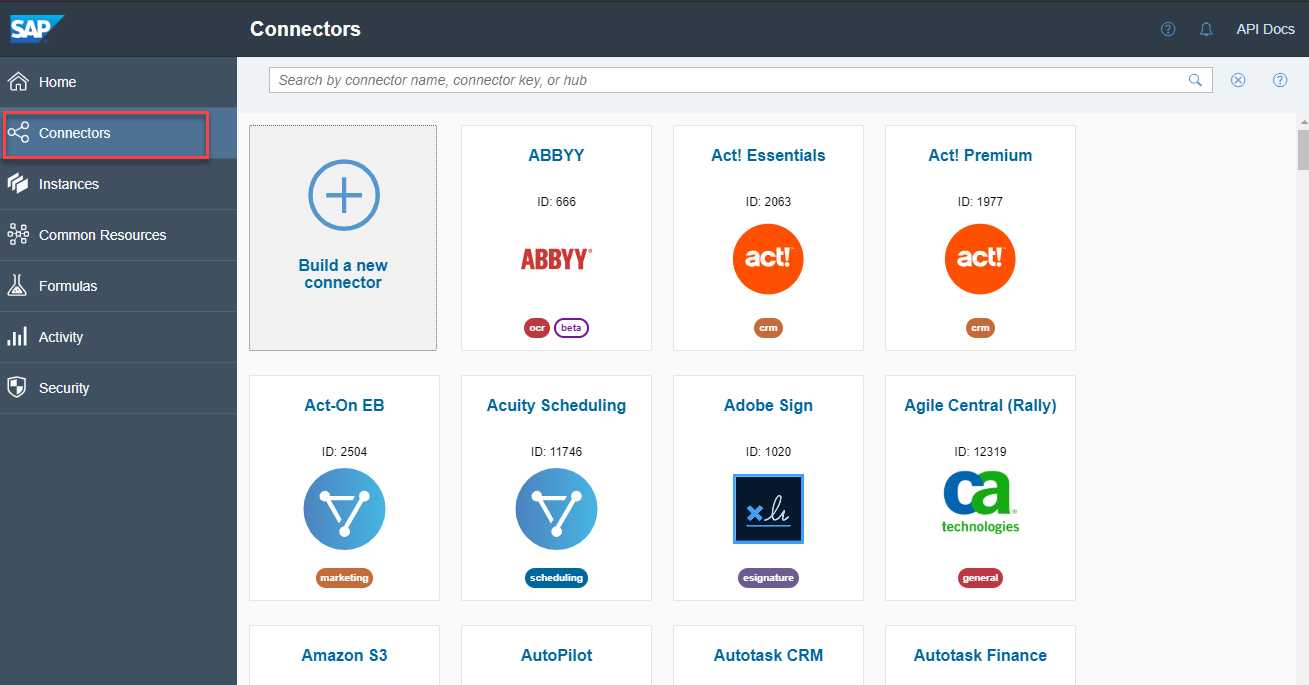
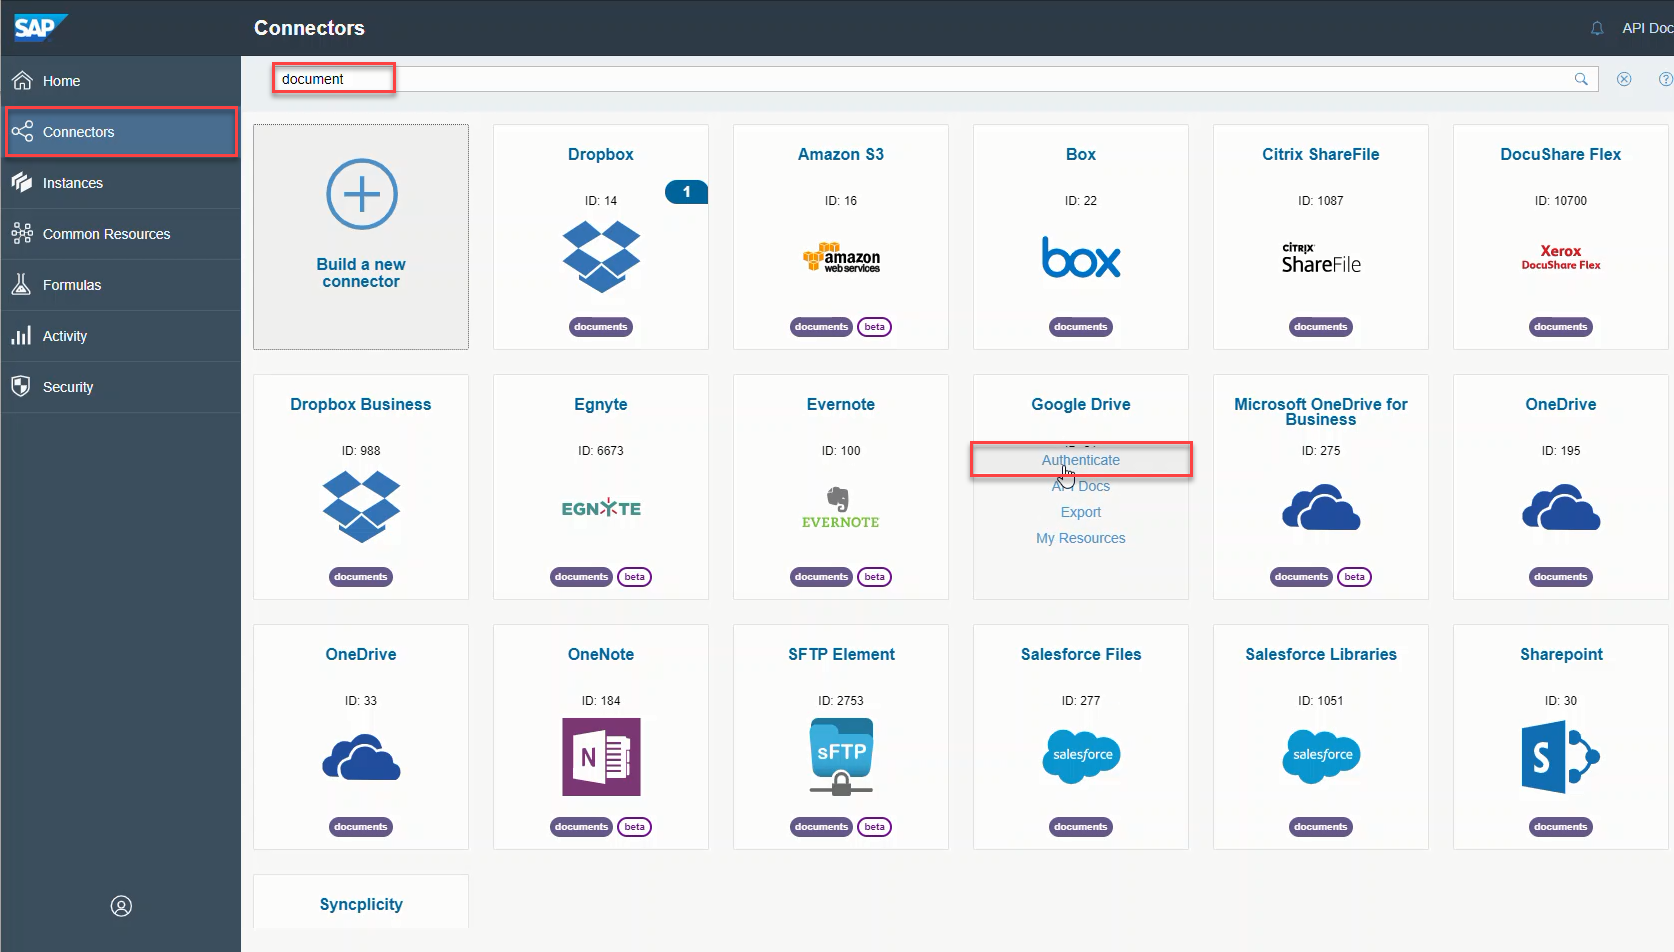
- Click on the Connectors tab to view all the available pre-built, feature rich connectors.
- In the search bar, type in document to view all connectors for third-party document hub. In this exercise, since Google Drive is used and therefore select the Google Drive connectors. You can also explore and try out third-party connectors of your choice from the available connectors catalog.
- Hover over the Google Drive connector and select the option Authenticate to connect to your own Google Drive tenant.
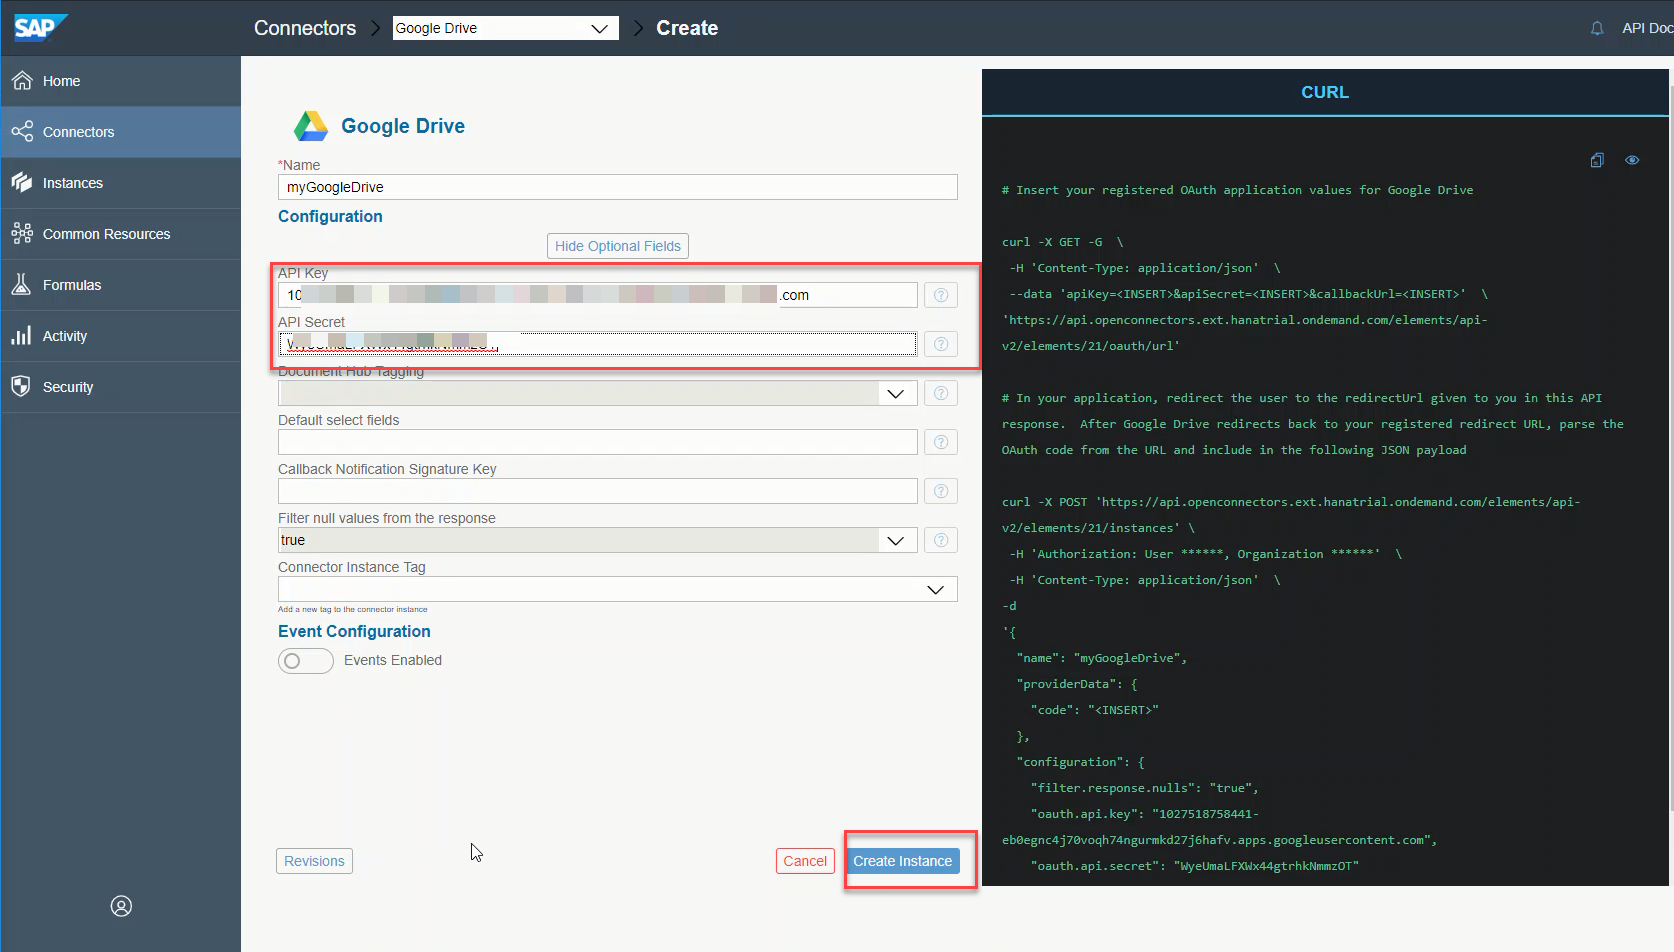
- You would be navigated to the Create Authenticated Connector page, enter a name for your authenticated connector say myGoogleDrive. Then click on the Show Optional Field to enter your Google Drive application API key and secret.
Note:- Based on your selected third-party application connector, the configuration options in this screen may vary.
- In the API Key enter your Google OAuth Client ID copied before and in the API Secret enter your Google OAuth Client secret copied before. Click on Create Instance button.
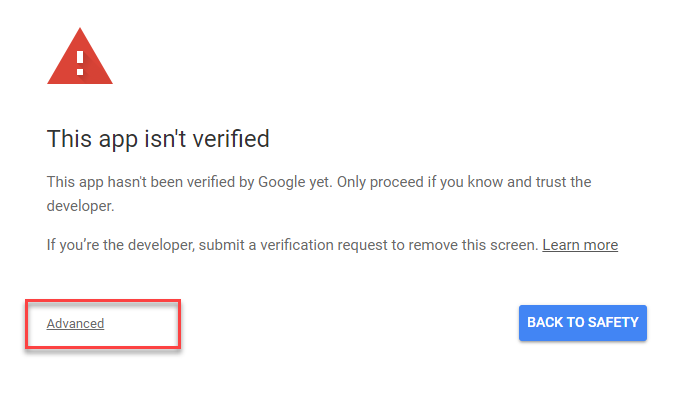
- Once you click on Create Instance button it will open new window to authenticate with your Google Credentials.Proceed with the same and click on allow application to access your Google Drive data.
Note:- In case your Google OAuth application that you are using in this step is not yet verified by Google, you would see a warning during your re-direct to Google after you click on Create Instance
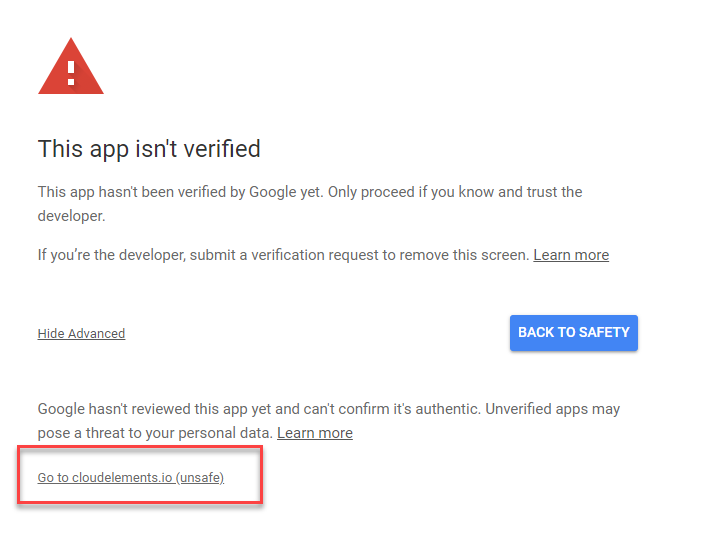
- To the newly created Google OAuth application which is not yet verified by Google, select Advanced link. From the advanced section, select Go to cloudelements.io option to proceed with your Google OAuth flow.
Note:- After you log-in using your Google credentials , you might be prompted to Allow access to access the resources as a part of the standard OAuth handshake.
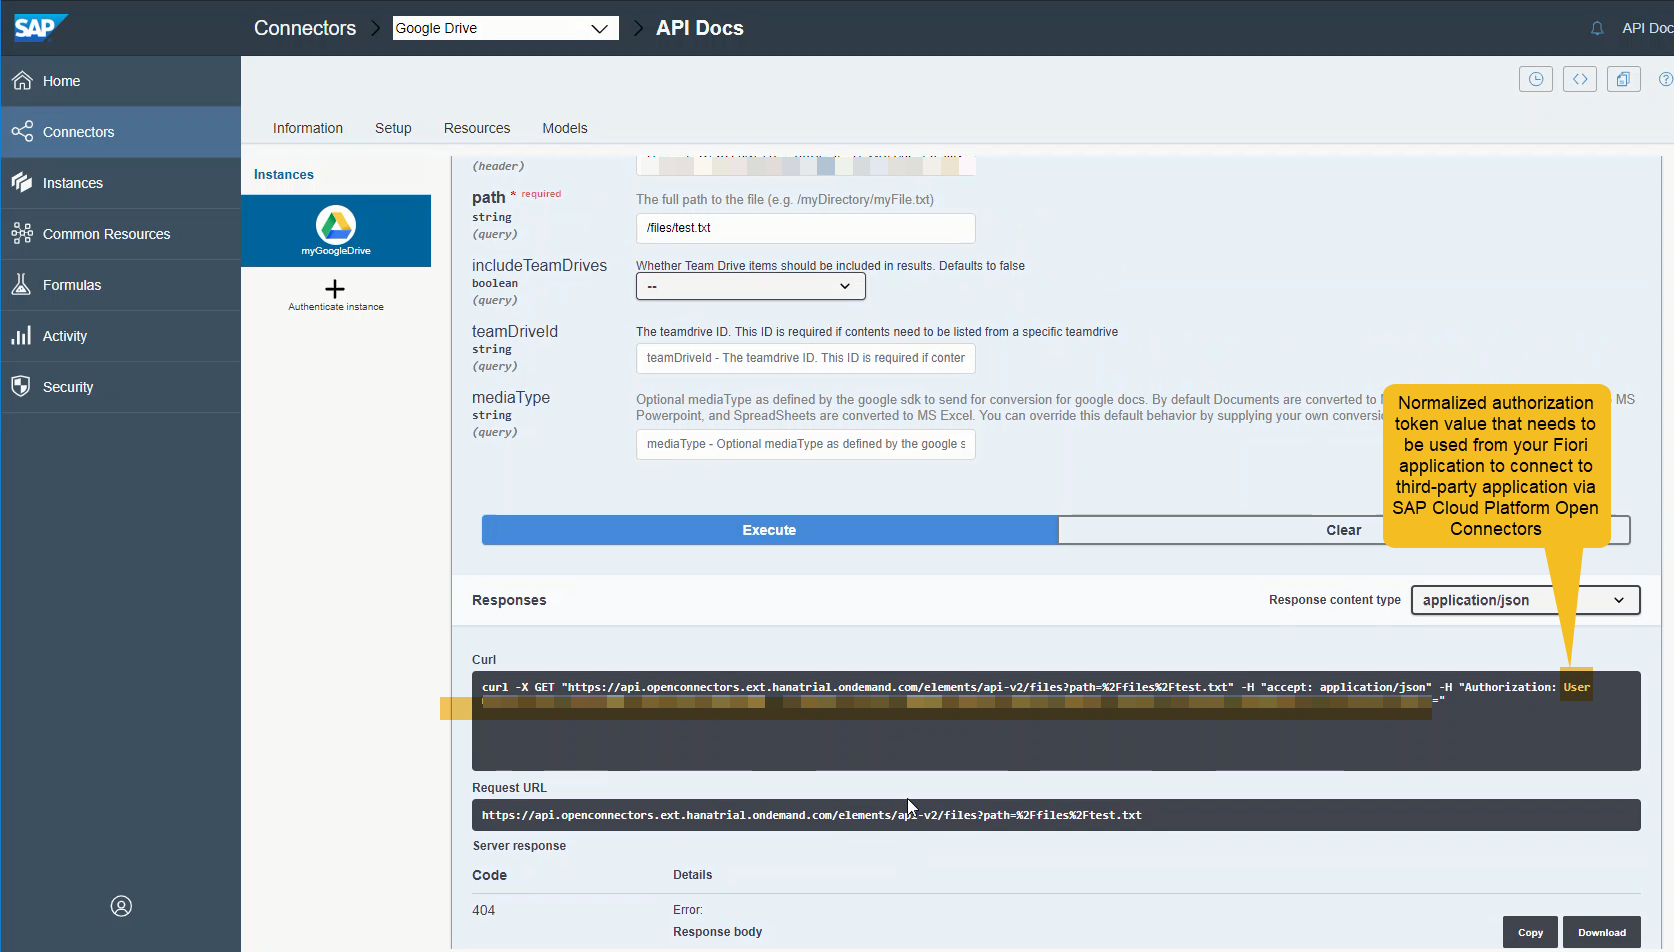
- After the authenticated connection to your third-party application has been created successfully you would be able to test out the connection from SAP Cloud Platform Open Connectors. To try out the REST APIs for the specific third-party application, click on the option Test in the API Docs.
- This would launch the integrated OpenAPI specification based API Documentation for your third-party applications so that you can test and try out the connectors from SAP Cloud Platform Open Connectors.
- Select any of the available Resources say files and click on Try it Out to test the connectivity to third-party applications and then click on the Execute Button
- This would show the CURL command with the harmonized REST URLs to your third-party application and the normalized authentication token which can be used to securely and seamless connect to your third-party application.
- Copy the Authorization token header value and this would be useful in uploading the data from your Fiori application into Google Drive
Create destination to SAP Cloud Platform Open Connectors and SAP Gateway ES5 demo system
To securely connect to third-party application via SAP Cloud Platform Open Connectors from a Fiori application, destinations can be used. In this section, the steps to create destination to the harmonized REST URLs for the third-party document Hubs APIs is showcased.
- Logon to your SAP Cloud Platform trial and navigate to the Neo Trial.
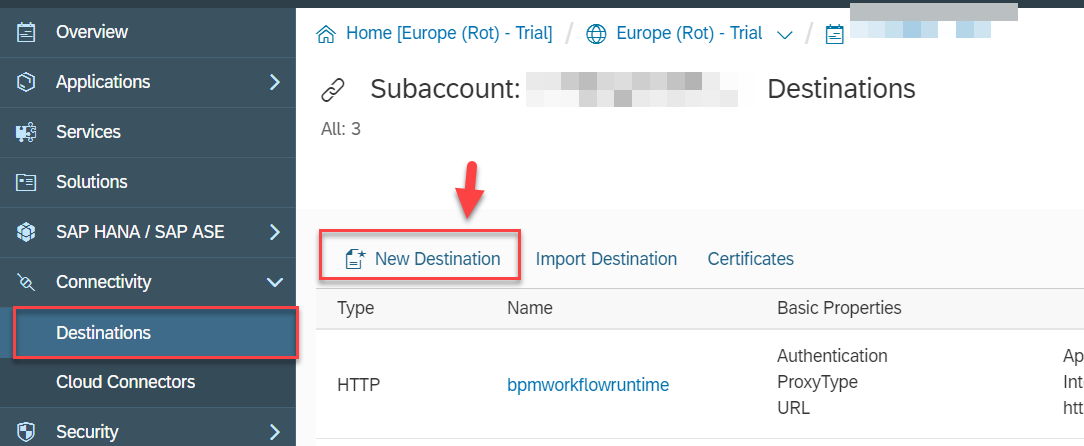
- Select Destinations tab and then select New Destination to create a new destination to SAP Cloud Platform Open Connectors
- Enter the destination name say Open Connectors, Enter the URL to SAP Cloud Platform Open Connectors trial tenant say https://api.openconnectors.ext.hanatrial.ondemand.com/elements/api-v2
- Under the additional properties tab add WebIDEEnabled property and set its value to true. Similarly add TrustAll property and set its value to true.
The name of this destination would have to be noted and it would be later used in Fiori application (in neo-app.json) file.
- In the Fiori application, we would be consuming an OData service from SAP Gateway ES5 system and therefore a destination for SAP Gateway ES5 system as described in this developer tutorial would have to be created.
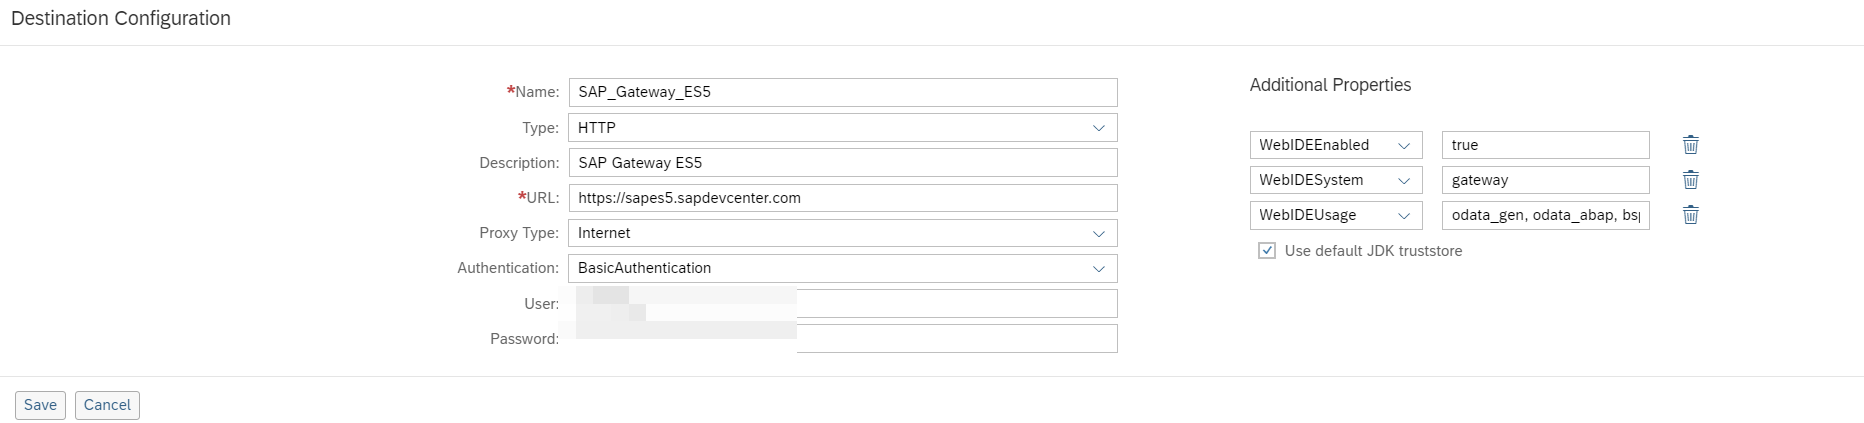
- Select New Destination to create a new destination to SAP Gateway ES5
| Field Name | Value |
|---|---|
| Name | SAP_Gateway_ES5 |
| Type | HTTP |
| Description | SAP Gateway ES5 |
| URL | https://sapes5.sapdevcenter.com |
| Proxy Type | Internet |
| Authentication | BasicAuthentication |
| User | Your ES5 Gateway user (e.g. p123456789) |
| Password | Your ES5 Gateway password |
- Add the following Additional Properties fields by clicking on the New Property button once for each property.
| Field Name | Value |
|---|---|
WebIDEEnabled | true |
WebIDESystem | gateway |
WebIDEUsage | odata_gen, odata_abap, bsp_execute_abap |
Build a simple Fiori application using SAP Web IDE
Keeping it very simple in this blog we would be building a simple Fiori application which would show all the products from the SAP Gateway ES5 application in a simple list view and would be uploading this product list into Google Drive tenant.
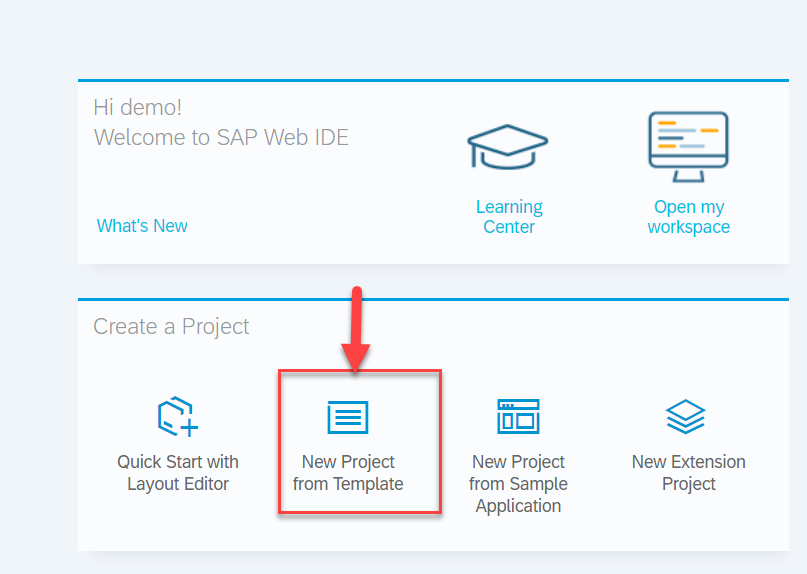
- From the services tab in SAP Cloud Platform cockpit, search and select SAP Web IDE Full-Stack tile and click on the Go to Service link.
- You will be navigated to the SAP Web IDE Full-Stack. Select the option, New project from template to create an SAP UI5 application.
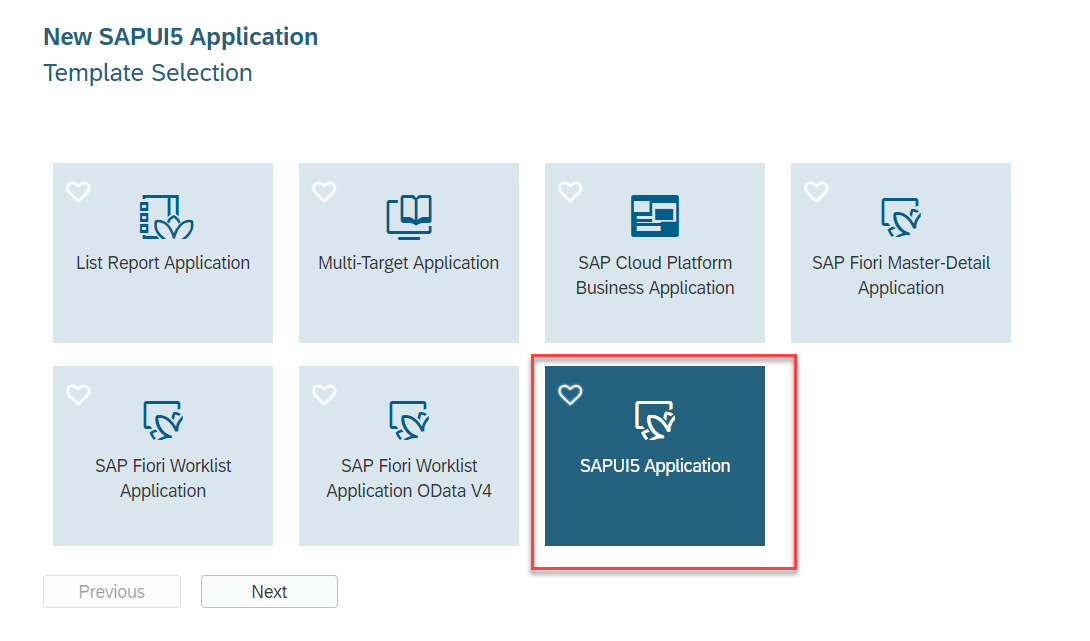
- Select SAP UI5 application from the Template Selection screen and select Next.
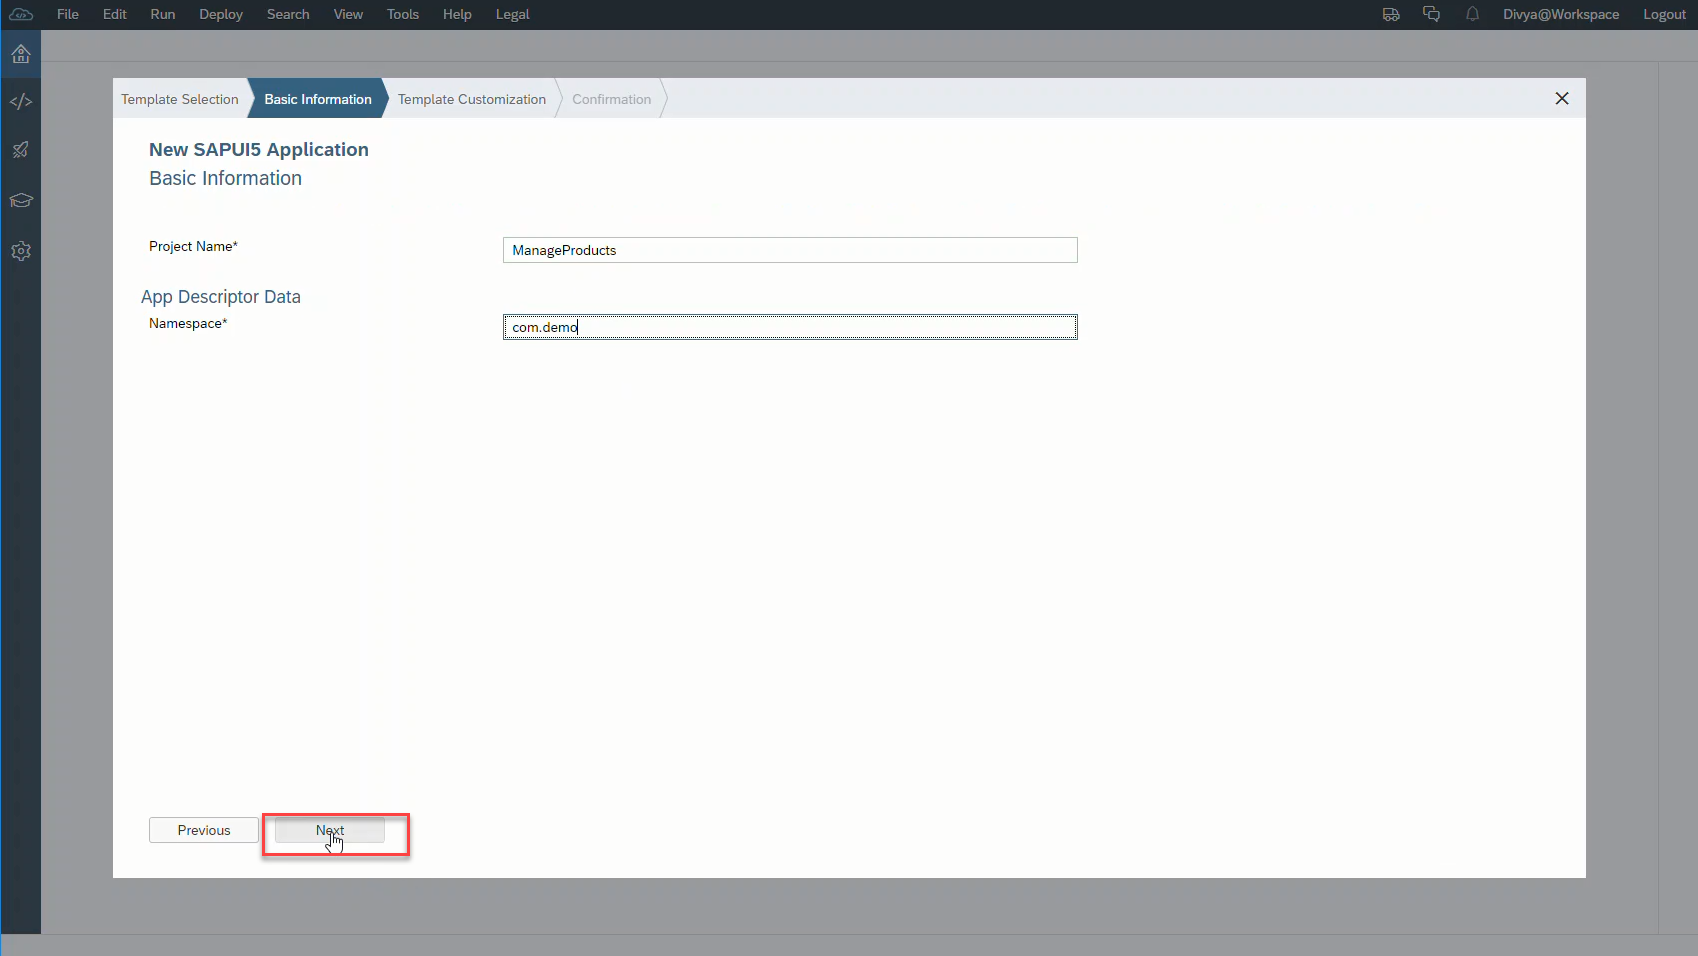
- Enter your Fiori Project name say ManageProducts and namespace say com.demo and select Next.
- Enter the name of your main View say App and select Finish.In this blog, XML View type has been used. Alternatively you can select other View Types as well.
- This would generate a Fiori application.
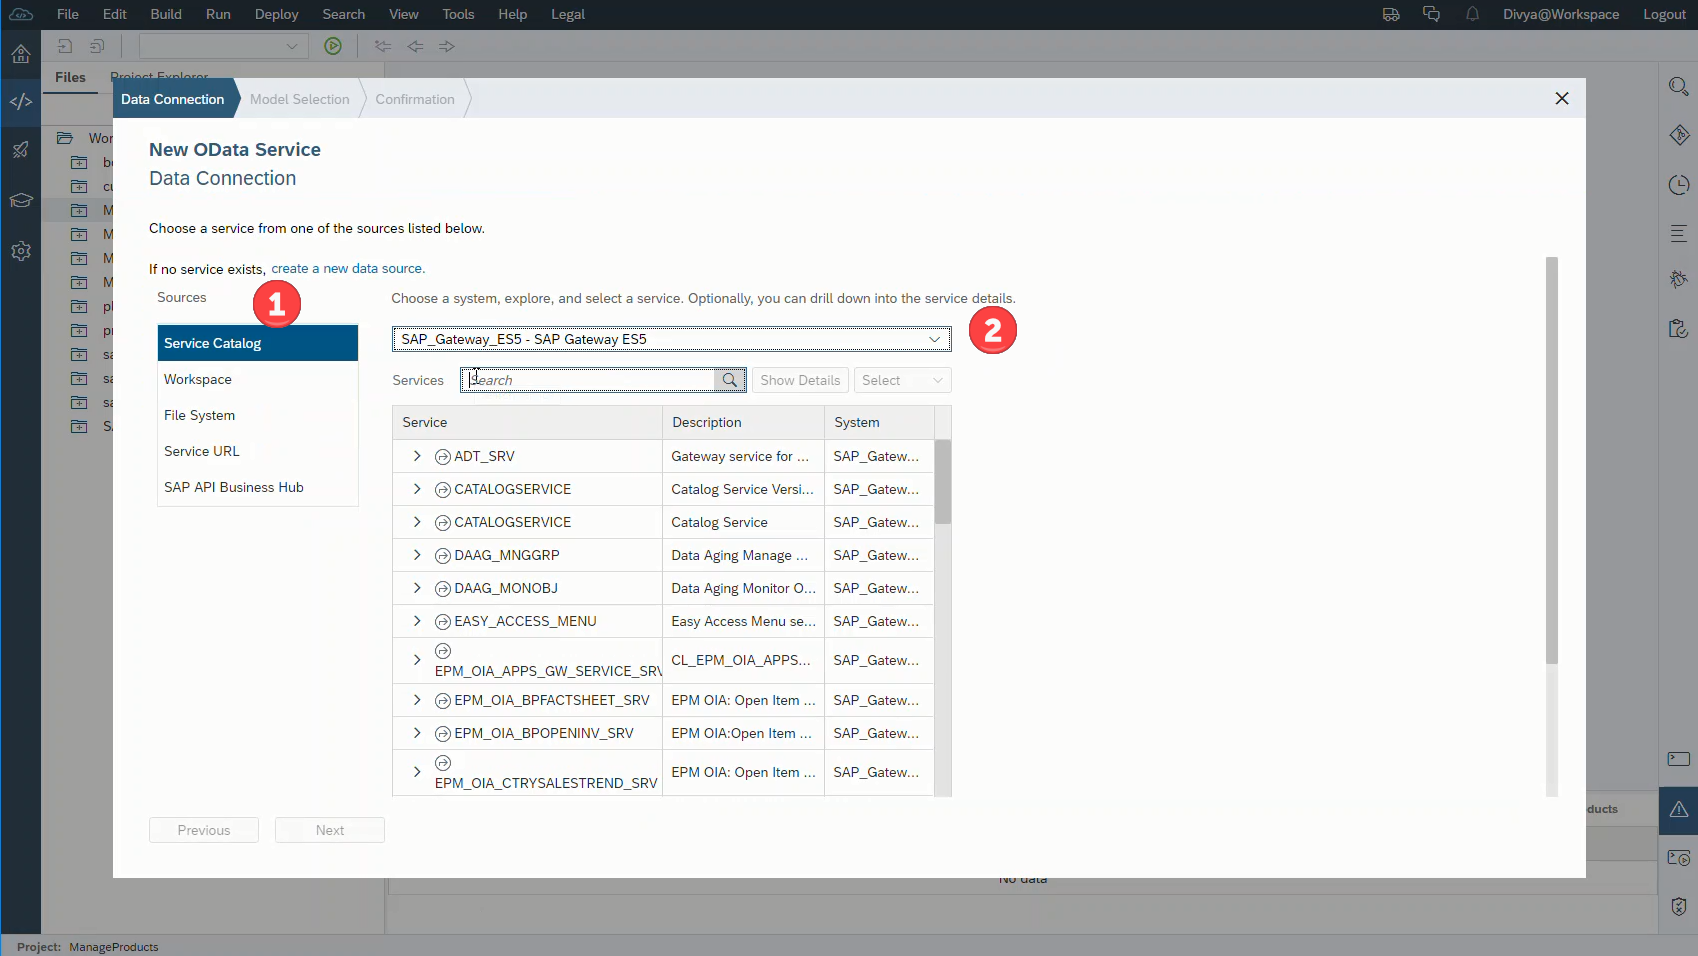
- Add in the reference to the SAP Gateway ES5 OData service to your project and for this right click on the generated project and then select New and then OData service.
- In the New OData Service wizard, select Service Catalog and then select the SAP Gateway ES5 system from the drop box. Wait till all the OData services present in SAP Gateway ES5 system if fetched and shown in the list.
- Search and select the GWSample_Basic service and click on Next.
- Select the option Use default model and then click on Next. In the next Confirmation dialog click on Finish to add the OData service reference to your Fiori application.
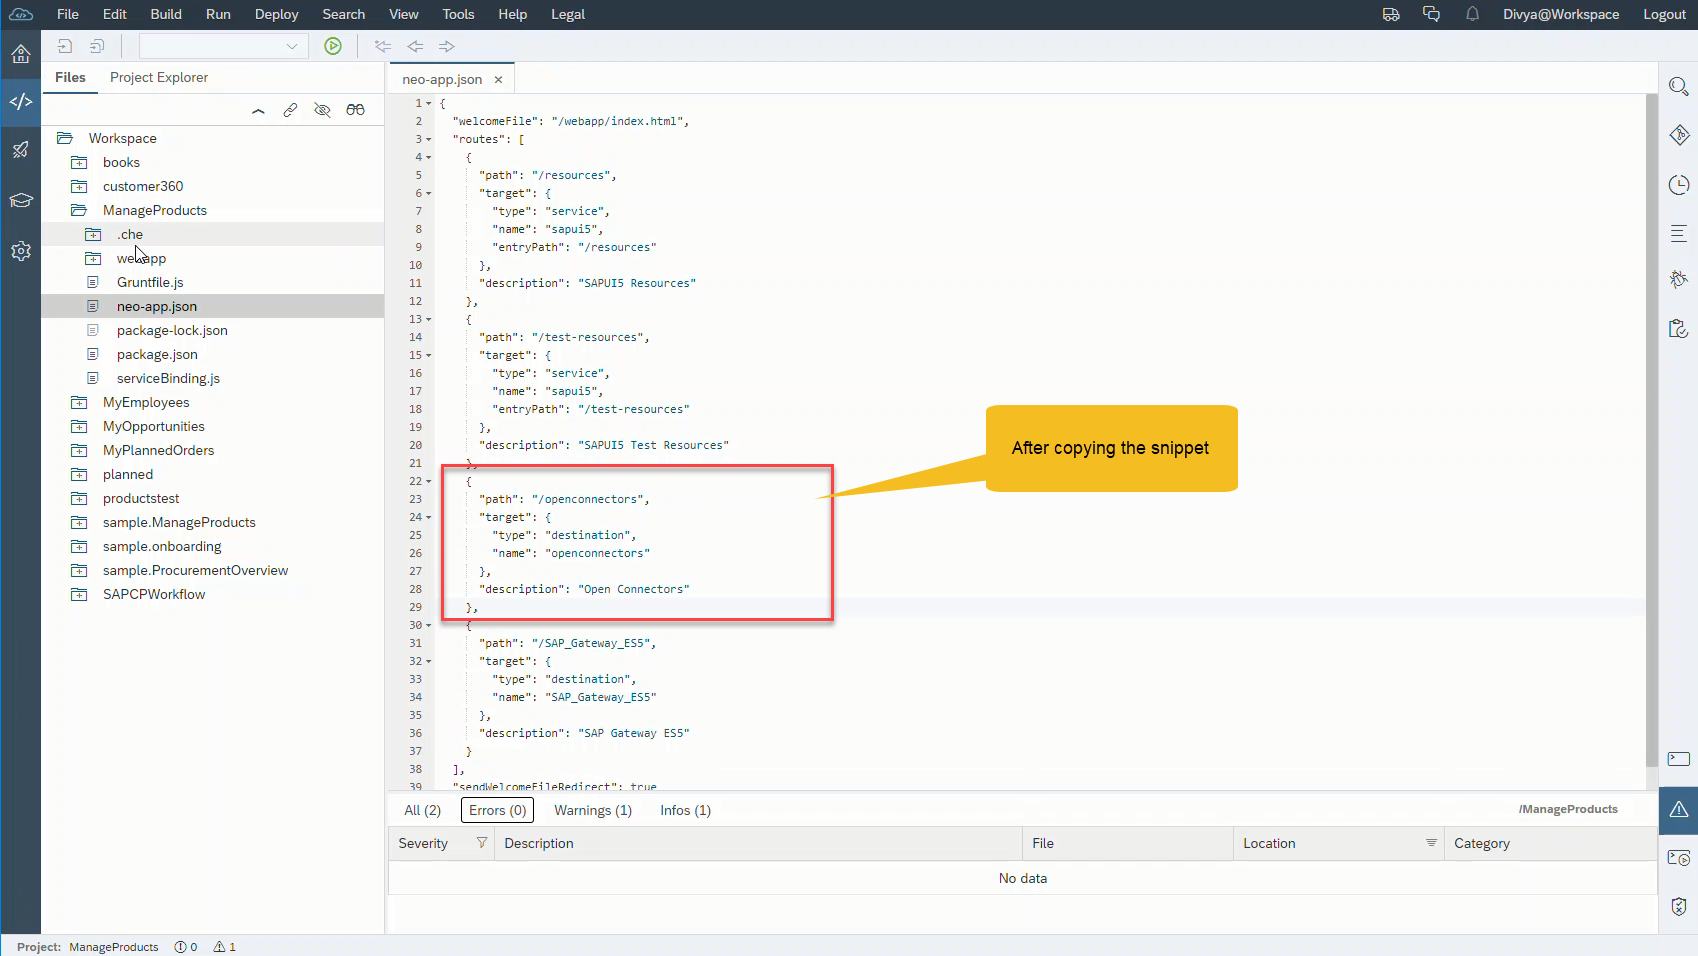
- From the generated Fiori application, expand and select the neo-app.json file and enter SAP Cloud Platform Open Connectors destinations details to seamless connect to third-party application from Fiori application. Copy and paste the below snippet to your generated neo-app.json file. Change the value of the name property to the destination name that you would have used.
{

"path": "/openconnectors",

"target": {

"type": "destination",

"name": "openconnectors"

},

"description": "Open Connectors"

},- Using the data binding, ODataModel can be bound to the UI elements to render the products list in a simple table view. Expand and select the App.view.xml file from the generated code and copy and paste the snippet below.
<Table width="auto" id="productlist" items="{/ProductSet}" updateFinished="onListUpdateFinished" noDataText="No products data"

class="sapUiResponsiveMargin">

<headerToolbar>

<Toolbar id="lineItemsToolbar">

<Button text="Upload to Google Drive" press="onUploadToGoogleDrive"></Button>

</Toolbar>

</headerToolbar>

<columns>

<Column>

<Text text="Product"/>

</Column>

<Column minScreenWidth="Tablet" demandPopin="true">

<Text text="Supplier"/>

</Column>

<Column minScreenWidth="Tablet" demandPopin="true" hAlign="End">

<Text text="Price"/>

</Column>

</columns>

<items>

<ColumnListItem>

<cells>

<ObjectIdentifier title="{Name}" text="{Description}"/>

<Text text="{SupplierName}"/>

<ObjectNumber number="{ path: 'Price', formatter: '.formatter.numberUnit' }" unit="{CurrencyCode}"/>

</cells>

</ColumnListItem>

</items>

</Table>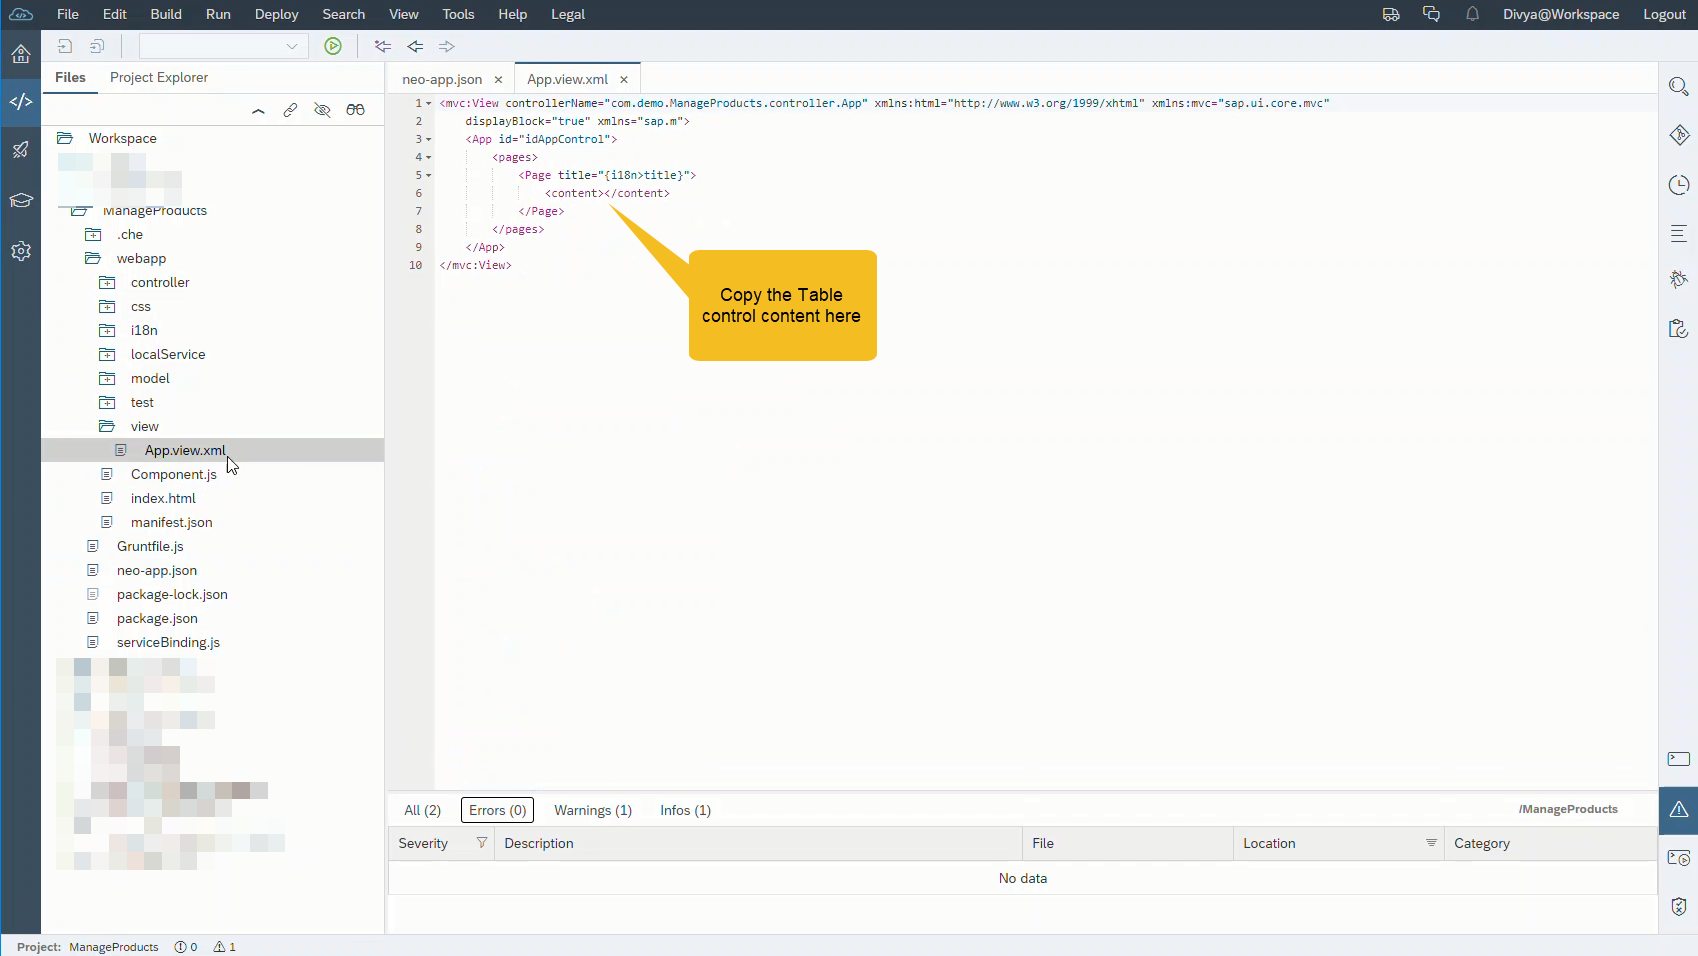

- In the controller App.controller.js, the event listener to the onUploadToGoogleDrive function needs to be added. This event would be invoked when ever the user would press the Upload to Google Drive button.
- In this event handler implementation, the data model associated with the view file would be read and UI5 helper utility ExportTypeCSV and Export function would be used to read the data present in ProductSet collection as the CSV file. This csv file content would then be persisted in Google Drive using SAP Cloud Platform Open Connector in file named data.csv.
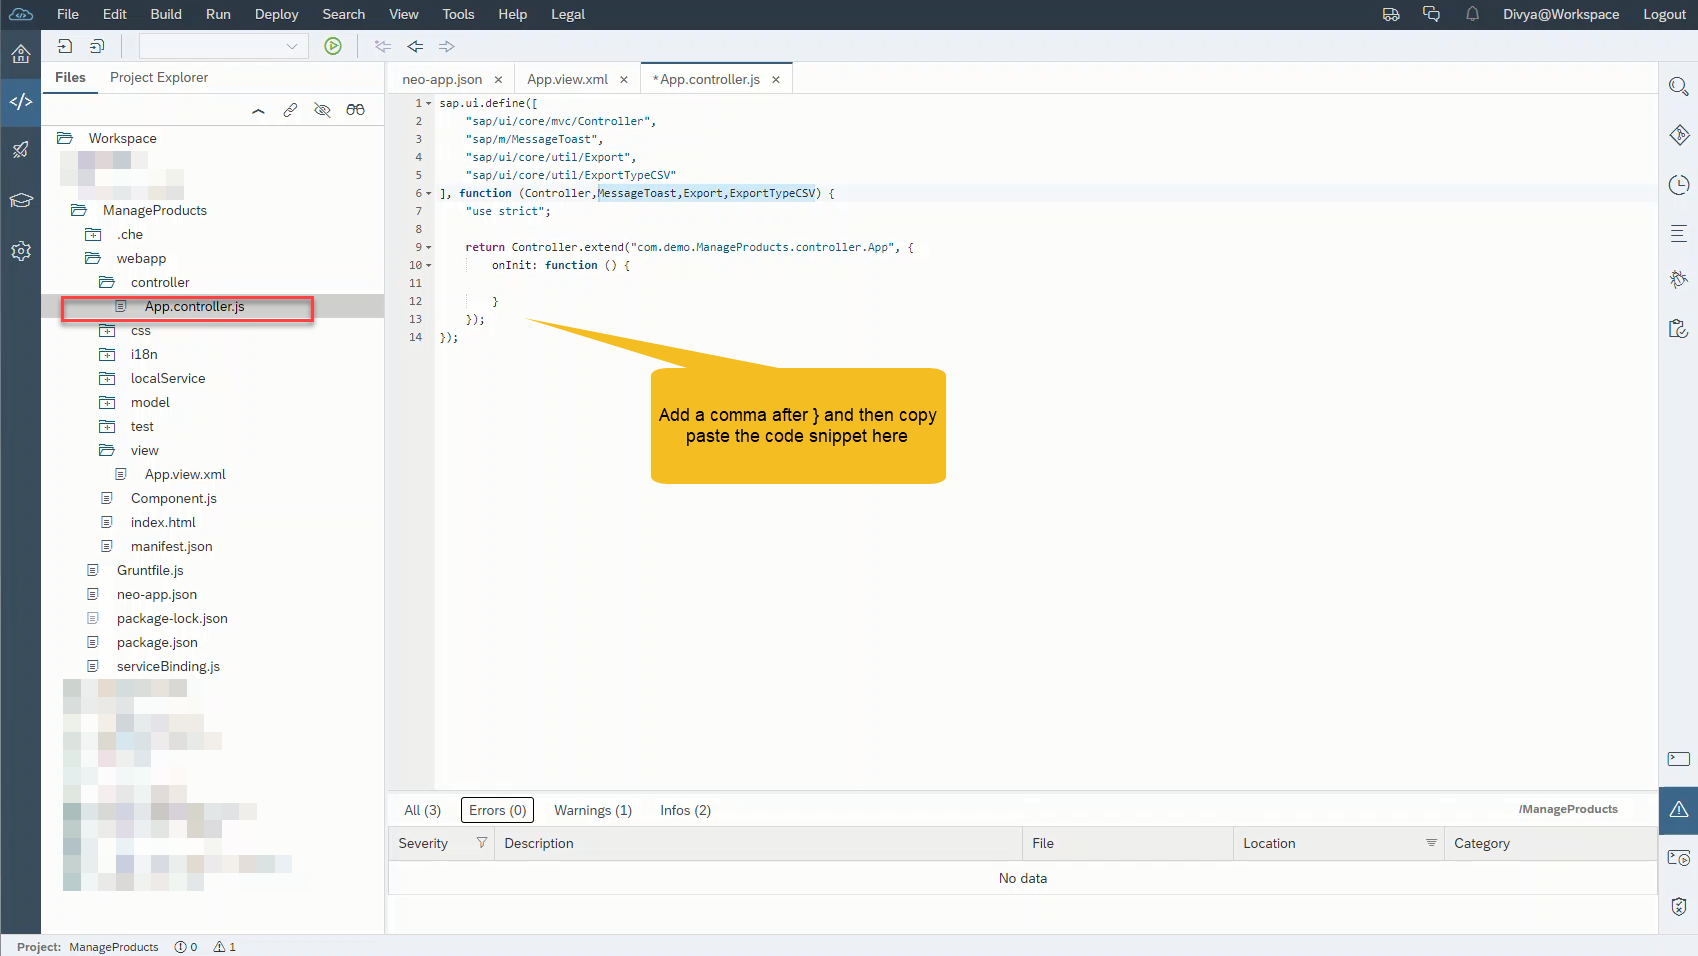
- Expand and select the App.controller.js file from the generated code. Add in the reference for Export, ExportTypeCSV and MessageToast library. The MessageToast library has been used to update the user about the response message returned from SAP Cloud Platform Open Connectors. Copy and paste the snippet below as shown in the screenshot.
"sap/m/MessageToast",

"sap/ui/core/util/Export",

"sap/ui/core/util/ExportTypeCSV"- Update the function(Controller) function to take in MessageToast, Export and ExportTypeCSV input variables as shown in the screenshot below.
- Copy and paste the snippet below for the onUploadToGoogleDrive event handler in the App.controller.js file
onUploadToGoogleDrive: function () {
sap.ui.core.BusyIndicator.show();
var oModel = this.getView().getModel();
var oExport = new sap.ui.core.util.Export({
exportType: new sap.ui.core.util.ExportTypeCSV({
separatorChar: ";",
charSet: "UTF-8"
}),
models: oModel,
rows: {
path: "/ProductSet"
},
columns: [{
name: "Product Name",
template: {
content: {
path: "Name"
}
}
}, {
name: "Description",
template: {
content: {
path: "Description"
}
}
}, {
name: "Supplier",
template: {
content: {
path: "SupplierName"
}
}
}, {
name: "Price",
template: {
content: {
path: "Price"
}
}
}]
});
oExport.generate().done(function (data) {
var xhr = new XMLHttpRequest();
xhr.onreadystatechange = function () {
if (xhr.readyState === XMLHttpRequest.DONE) {
sap.ui.core.BusyIndicator.hide();
MessageToast.show(xhr.responseText);
}
};
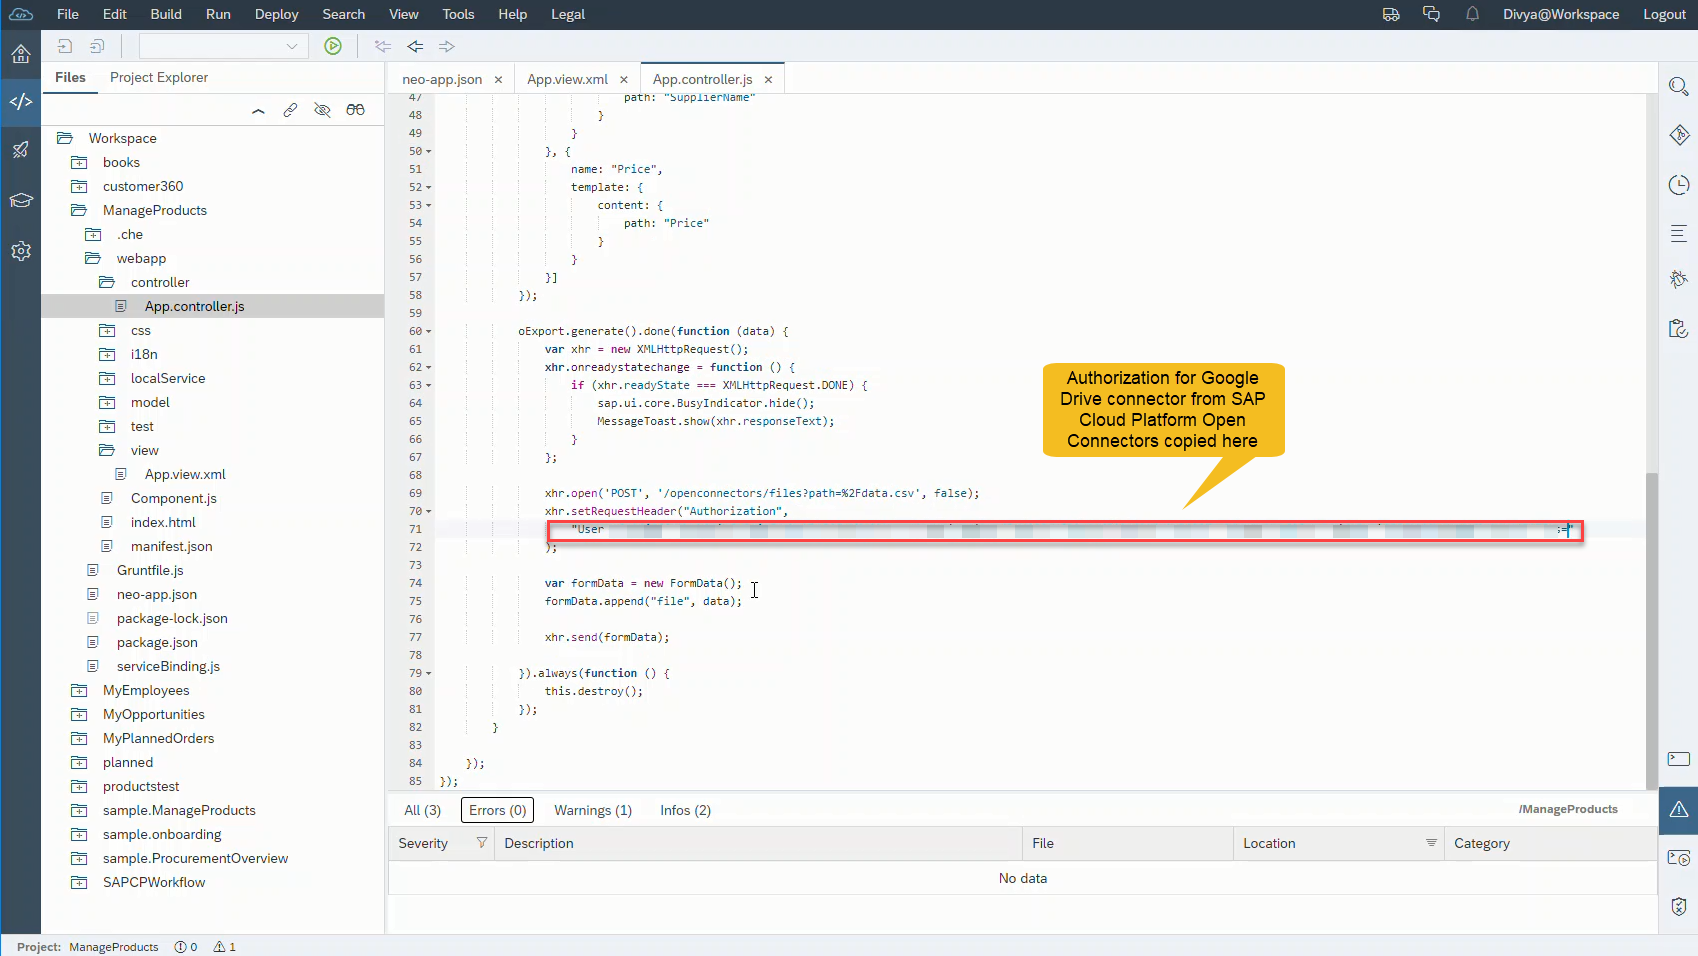
xhr.open('POST', '/openconnectors/files?path=%2Fdata.csv', false);
xhr.setRequestHeader("Authorization","your_openconnectors_googledrive_token"
);
var formData = new FormData();
formData.append("file", data);
xhr.send(formData);
}).always(function () {
this.destroy();
});
}- In the copied code snippet to provide replace value of the authorization token
your_openconnectors_googledrive_token with the authenticated Google Drive connector authorization token from SAP Cloud Platform Open Connectors.
Disclaimer: In this blog, keeping it simple, authorization token has been specified in the JavaScript code. This is not a secure approach as any person can easily read the JavaScript using Browser tools. For productive development the recommendation is to specify these token on the Server side or use an API Management Platform like SAP Cloud Platform API Management. Refer this blog , to securely connect to third-party application from Fiori application using SAP Cloud Platform API Management.
- Click on the Save button to save all changes and then Click on Run/Play button to Run the Web applications.
- This will launch the Fiori application in a new browser tab and after successful user login, list of products from the SAP Gateway ES5 system would be shown. It might take a little while to fetch all the products list from SAP Gateway ES5 system.
Testing Upload to Google Drive flow
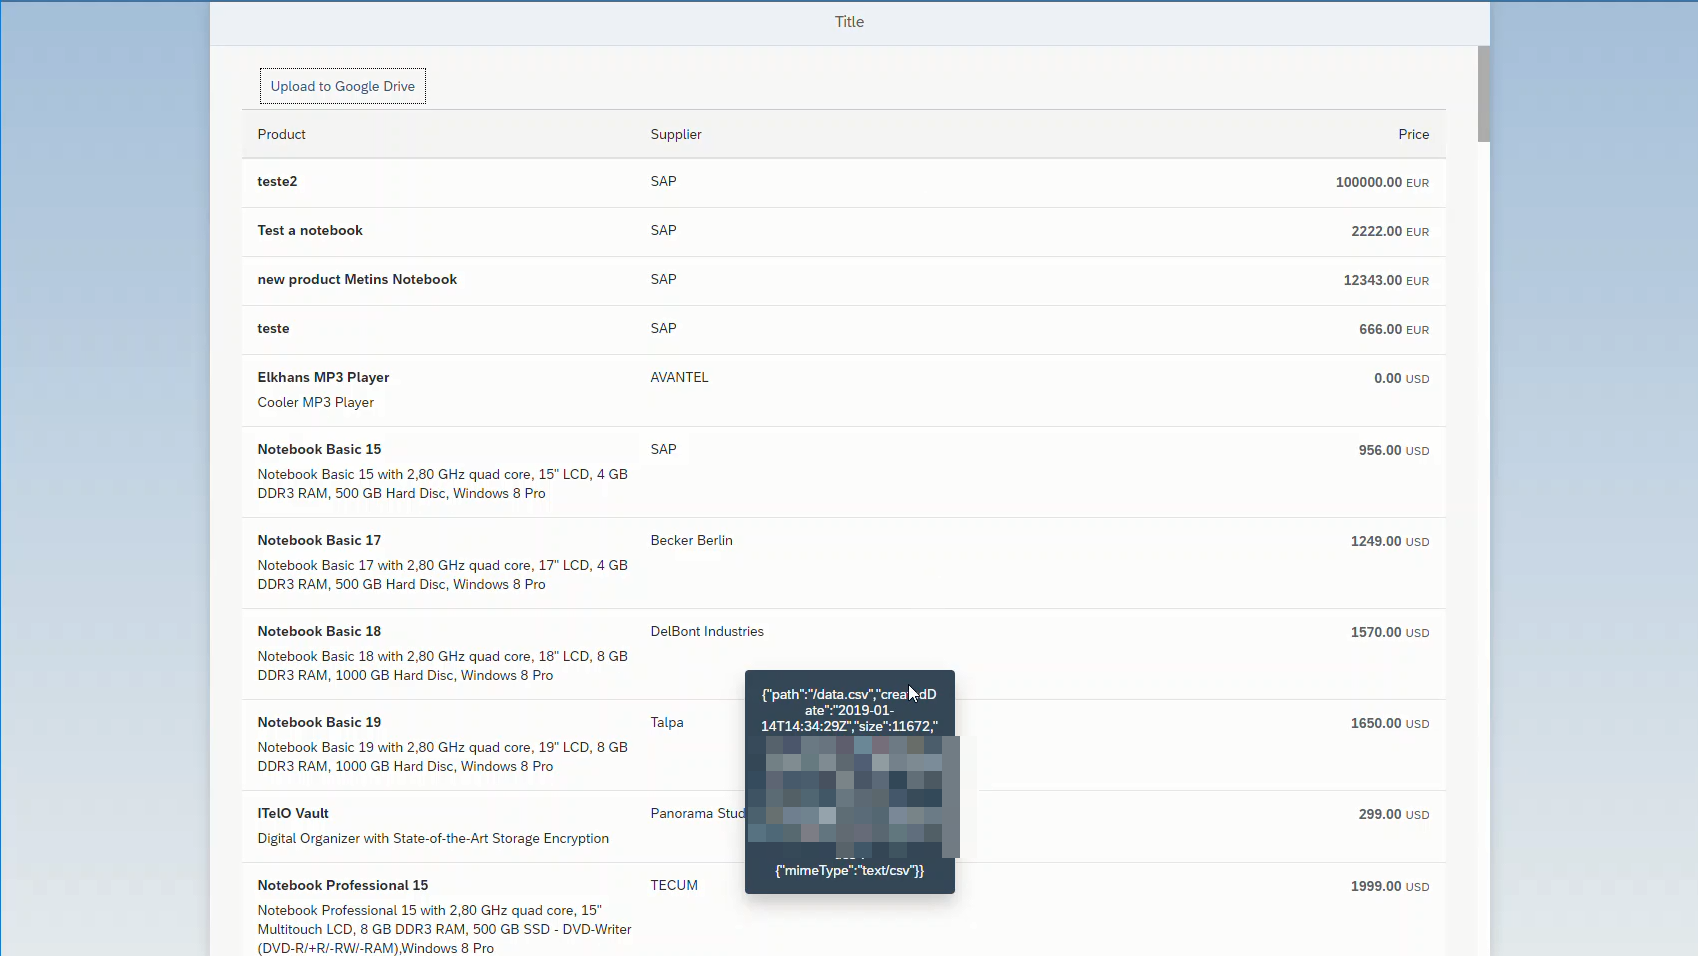
- Once the data is fetched press the Upload to Google Drive button to upload the products list from SAP Gateway ES5 system into your Google Drive tenant.
- Login to your Google Drive tenant and a new file named data.csv would be available in your Google Drive tenant.
More blogs on SAP Cloud Platform Open Connectors available in SAP Community.
- SAP Managed Tags:
- SAP Business Application Studio,
- SAP Fiori Cloud,
- SAP Integration Suite,
- SAP Gateway
Labels:
17 Comments
You must be a registered user to add a comment. If you've already registered, sign in. Otherwise, register and sign in.
Labels in this area
-
ABAP CDS Views - CDC (Change Data Capture)
2 -
AI
1 -
Analyze Workload Data
1 -
BTP
1 -
Business and IT Integration
2 -
Business application stu
1 -
Business Technology Platform
1 -
Business Trends
1,658 -
Business Trends
91 -
CAP
1 -
cf
1 -
Cloud Foundry
1 -
Confluent
1 -
Customer COE Basics and Fundamentals
1 -
Customer COE Latest and Greatest
3 -
Customer Data Browser app
1 -
Data Analysis Tool
1 -
data migration
1 -
data transfer
1 -
Datasphere
2 -
Event Information
1,400 -
Event Information
66 -
Expert
1 -
Expert Insights
177 -
Expert Insights
293 -
General
1 -
Google cloud
1 -
Google Next'24
1 -
Kafka
1 -
Life at SAP
780 -
Life at SAP
13 -
Migrate your Data App
1 -
MTA
1 -
Network Performance Analysis
1 -
NodeJS
1 -
PDF
1 -
POC
1 -
Product Updates
4,577 -
Product Updates
340 -
Replication Flow
1 -
RisewithSAP
1 -
SAP BTP
1 -
SAP BTP Cloud Foundry
1 -
SAP Cloud ALM
1 -
SAP Cloud Application Programming Model
1 -
SAP Datasphere
2 -
SAP S4HANA Cloud
1 -
SAP S4HANA Migration Cockpit
1 -
Technology Updates
6,873 -
Technology Updates
417 -
Workload Fluctuations
1
Related Content
- Onboarding Users in SAP Quality Issue Resolution in Technology Blogs by SAP
- How to use AI services to translate Picklists in SAP SuccessFactors - An example in Technology Blogs by SAP
- IoT - Ultimate Data Cyber Security - with Enterprise Blockchain and SAP BTP 🚀 in Technology Blogs by Members
- Accelerate Business Process Development with SAP Build Process Automation Pre-Built Content in Technology Blogs by SAP
- Configure Custom SAP IAS tenant with SAP BTP Kyma runtime environment in Technology Blogs by SAP
Top kudoed authors
| User | Count |
|---|---|
| 34 | |
| 25 | |
| 12 | |
| 7 | |
| 7 | |
| 6 | |
| 6 | |
| 6 | |
| 5 | |
| 4 |