
- SAP Community
- Products and Technology
- Technology
- Technology Blogs by SAP
- Transfer test cases from Micro Focus ALM to SAP So...
Technology Blogs by SAP
Learn how to extend and personalize SAP applications. Follow the SAP technology blog for insights into SAP BTP, ABAP, SAP Analytics Cloud, SAP HANA, and more.
Turn on suggestions
Auto-suggest helps you quickly narrow down your search results by suggesting possible matches as you type.
Showing results for
Employee
Options
- Subscribe to RSS Feed
- Mark as New
- Mark as Read
- Bookmark
- Subscribe
- Printer Friendly Page
- Report Inappropriate Content
12-23-2018
5:50 AM
This Blog was created together with
Thomas Stoffels (SAP)
Inga Heimbuch (SAP)
Introduction
With the Test Steps Addon, Solution Manager 7.2 now offers the capability to model individual test steps (as opposed to only modelling test cases for which a document could be uploaded). This closes a gap to Micro Focus ALM which has offered modeling test steps ever since. With both tools now sharing the same granularity, the opportunity of a smooth transfer of test assets between tool arises. While transfer of test cases for manual functional is a frequent topic in customer projects, it will be even more so with the growing adoption of Focused Build.
Focused Build offers an integrated Requirements-to-Deploy process. The decision to use Focused Build oftentimes incurs using Solution Manager 7.2’s Test Suite for functional testing.
In this article we outline how to transfer test cases from Micro Focus ALM to Solution Manager Test Steps. This encompasses exporting from ALM to Excel/CSV and then importing from Excel/CSV to Test Steps.
Export from ALM Test Plan
While there are several possible methods to export test cases, we will – for this article at least- focus on exporting from ALM’s Test Plan module by taking advantage of the Excel Report functionality offered by ALM’s Analysis Module.
Using this method, the export can be accomplished in minutes and requires virtually no coding skills or 3rd party tools. (We will assume you have access to a spreadsheet processing tool like Excel or Openoffice Calc though.) This Sample Export was performed on ALM 12.01.
- Logged on to the ALM project to export from, switch to the Dashboard Module ,navigate to Analysis View and add a new Excel Report (via the small context menu next to the “Plus” button):

When prompted, enter a name for the new Excel Report:

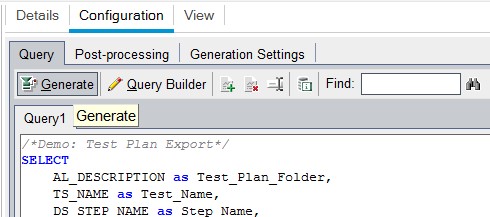
- With the new report highlighted, make sure the configuration à query tab is displayed and copy/paste the SQL statement below to the “Query1“ tab:

- In case you do not want to export the whole test plan of your ALM project, but rather one or several specific test cases (or folders worth of test cases), uncomment the corresponding filter lines.
For our example we will export all test cases from Test Plan Folders containing “outgoing payment within accounts receivable”: – so we adjust the where -clause as follows:

(The “%” serves as a wildcard; Search-term is treated as case-insensitive)Tip: Use the Query Builder to conveniently adjust/test your selection (The Query Builder’s “Run Statement” command will automatically limit selection to 10 rows).
- Click “Generate” and chose a location to export the Excel file to.
 If there is a popup complaining about the report status not being “ready” choose to proceed. (This setting can be made on the “Generation settings” Tab).
- The structure of the resulting excel will (with some formatting applied) look like this:
 Figure 1 Excel ViewWe are looking at 1 excel row per test step and can see that the exported content matches the content in ALM’s test plan module:
 Figure 2 Test Plan View
Prepare import file
The import into the test steps is normally not a problem. However, the import file must have certain characteristics:
- the encoding must be UTF-8
- columns separated by (;)
- no line breaks (CR or LF) in the lines
- no double quotation marks
In order to obtain this format, the following procedures have proven to be helpful. Depending on the Excel version, some steps can already be done in Excel or have to be modified to get the right format at the end. However, it is up to you to optimize these steps.
First, the export file should be edited in Excel.
- Since the semicolon (;) is used as a separator, existing semicolons must be replaced by other characters, e.g. the hyphen (-)
- hard line breaks in the cells must be replaced by another character. Search & Replace is best. The line break is entered in the search field in Excel using the ALT+010 (number pad on the right of the keyboard)
Now the Excel file can be saved as a CSV (delimited) (*.csv) file.
Since the file created in this way can still contain line breaks and double quotation marks and is also created in ANSI format, it is also edited with an editor, e.g. Notepad++.
- remove the line breaks (CR) by searching and replacing them with a space.
Attention: The line feed (LF) must not be replaced. - quotation marks (“) are converted into single quotation marks (')
- the file is converted to UTF-8 format


The file is then saved and ready for import.
If you want the test cases to be stored in separate folders within Solution Manager Test Step Designer, they must be created in Solution Manager beforehand. Folders themselves are not mandatory but make it easier to edit many test steps in the Test Step Designer.
It has turned out that long folder names are impractical. They should therefore be shortened accordingly.

Import to SAP Solution Manager Test Steps
The FIORI app "Administration - Test Suite" is used to create the folders in Solution Manager.

Under the tab "Test Suite Extensions" there is the item "Folders for Steps Designer".

For further processing, it is also important that the test cases have a unique Test_Name.
If you later want to assign the test cases to a process step in the library for each folder, it has proved helpful to split the import file into one subfile for each process step. This is particularly useful if a large number of test cases are assigned to a process step.
The FIORI app "Test Steps Designer" is called for importing.

The button "Upload new Test Cases from file" is used for importing.

The corresponding file is selected there.

In the second step, the columns of the file are mapped with the fields in Solution Manager.
The mapping remains active even after the import until it is locked out, so that further files can be imported after the import of a file without having to make all the settings again.

In the third step, the data is imported:

After importing, the test cases are available in the Test Steps Designer.
Assign Test Steps test cases to Solution Documentation
For assignment in the solution documentation, it makes sense to call up a corresponding process step folder in the library and search for the test cases or for all orphan test cases. If all test cases were previously assigned in the library, only the newly imported test cases are displayed. These can then be assigned to a single process step.

This allows you to very quickly import several or all test cases from ALM into Solution Manager as test steps.
Conclusion
The procedure shown here proves that it is possible to transfer masses of test step test cases from Micro Focus ALM into the new SAP Solution Manager world with simple means. This closes another gap in the application possibilities of SAP Solution Manager. Especially for companies that are planning to consolidate their test landscape or still have old test cases in ALM, this is a great opportunity to switch completely to SAP Solution Manager.
Labels:
9 Comments
You must be a registered user to add a comment. If you've already registered, sign in. Otherwise, register and sign in.
Labels in this area
-
ABAP CDS Views - CDC (Change Data Capture)
2 -
AI
1 -
Analyze Workload Data
1 -
BTP
1 -
Business and IT Integration
2 -
Business application stu
1 -
Business Technology Platform
1 -
Business Trends
1,658 -
Business Trends
91 -
CAP
1 -
cf
1 -
Cloud Foundry
1 -
Confluent
1 -
Customer COE Basics and Fundamentals
1 -
Customer COE Latest and Greatest
3 -
Customer Data Browser app
1 -
Data Analysis Tool
1 -
data migration
1 -
data transfer
1 -
Datasphere
2 -
Event Information
1,400 -
Event Information
66 -
Expert
1 -
Expert Insights
177 -
Expert Insights
296 -
General
1 -
Google cloud
1 -
Google Next'24
1 -
Kafka
1 -
Life at SAP
780 -
Life at SAP
13 -
Migrate your Data App
1 -
MTA
1 -
Network Performance Analysis
1 -
NodeJS
1 -
PDF
1 -
POC
1 -
Product Updates
4,577 -
Product Updates
342 -
Replication Flow
1 -
RisewithSAP
1 -
SAP BTP
1 -
SAP BTP Cloud Foundry
1 -
SAP Cloud ALM
1 -
SAP Cloud Application Programming Model
1 -
SAP Datasphere
2 -
SAP S4HANA Cloud
1 -
SAP S4HANA Migration Cockpit
1 -
Technology Updates
6,873 -
Technology Updates
420 -
Workload Fluctuations
1
Related Content
- Consuming SAP with SAP Build Apps - Mobile Apps for iOS and Android in Technology Blogs by SAP
- How to use AI services to translate Picklists in SAP SuccessFactors - An example in Technology Blogs by SAP
- Improving Time Management in SAP S/4HANA Cloud: A GenAI Solution in Technology Blogs by SAP
- IoT - Ultimate Data Cyber Security - with Enterprise Blockchain and SAP BTP 🚀 in Technology Blogs by Members
- SAP Solution Manager System Availability Reports in Technology Q&A
Top kudoed authors
| User | Count |
|---|---|
| 37 | |
| 25 | |
| 17 | |
| 13 | |
| 7 | |
| 7 | |
| 7 | |
| 6 | |
| 6 | |
| 6 |