
- SAP Community
- Products and Technology
- Human Capital Management
- HCM Blogs by SAP
- Importance of notifications in LMS and customizati...
Human Capital Management Blogs by SAP
Get insider info on HCM solutions for core HR and payroll, time and attendance, talent management, employee experience management, and more in this SAP blog.
Turn on suggestions
Auto-suggest helps you quickly narrow down your search results by suggesting possible matches as you type.
Showing results for
former_member10
Explorer
Options
- Subscribe to RSS Feed
- Mark as New
- Mark as Read
- Bookmark
- Subscribe
- Printer Friendly Page
- Report Inappropriate Content
12-06-2018
3:54 PM
In the current blog, we are going to talk about custom notifications. In my last deployment, the client was looking to customize notification according to their requirement, where I have come across some minor challenges while making changes in the notifications. In this blog, I am going to talk about the importance of notifications in LMS and also cover few scenarios in legacy and launch notification editor.
Importance of notifications in LMS:
Notifications in LMS has its own importance because whenever an event occurs LMS notifies people. For example, schedule offering which is scheduled for future date has been cancelled due to some reason, then a notification needs to be triggered to the user, instructor and facility, so that they can adjust their schedules accordingly. Likewise, there are different notifications in LMS for different events such as learning events, security events and administrative events .All the notifications content can be adjusted in administrative interface.
Notifications triggered to the Employee, Supervisors, Organization Owner, Instructor, Admin and Contacts/Other, Here are the reasons listed below.
There are many reasons why these notifications are being triggered to the Employee, Supervisors, Organization Owner, and Instructor, Admin and Contacts /Other
Here are few examples below.
Before we start with customizing notifications, we need to enable notification settings in SuccessFactors Learning System.


Now let’s quickly move on to notification templates editors which is necessary for everyone working on LMS to have knowledge on how to edit these notifications.
Notification Template Editors:
Notification template define emails delivered to users, instructors, contacts, supervisor and administrators for various triggers. For all system generated email notifications, there is a template which may be modified. Some notification templates are associated with APMs. As part of sound rollout strategy, each notification template that will be in use during the implementation should be reviewed and possibly edited.
There are two ways to customize notifications:
Both the above notification editor has its own advantages and disadvantages that will understand in depth.
Prerequisites for Notification:
Navigate to System admin > Configuration > Global Variables: Ensure that the 'Use Editor Content When Sending Email Notification' is selected.
Navigate to System Admin>Configuration>Global Variables

Overview on Notification Editors:
Legacy Notification Editor:
To customize notification through legacy notification editor basic understanding of HTML coding and Syntax ID is required


Launch Notification Editor: Launch Notification is much easier than legacy notification editor because there is no need to have knowledge on HTML coding.
As you can see in the below screenshot there are different options available in launch editor for editing.


How to edit Notifications:
Firstly, in order to edit the notifications Navigate to System Admin>Configuration>Notification Templates.

Now let’s see few scenarios which are most commonly used based on the client requirement both in legacy and launch notification editor.
Scenario 1: How to insert a direct link and URL in the notifications?
Direct links are used to provide Users a shortcut to a specific place (page) in the User interface.
Legacy Notification Editor:
Step1:
To generate the above link navigate to Learning Admin>System Admin>Tools>Direct Links

Note:
Step2:
Select the desired link from the drop down which you wish to be insert in the notification template and select radio button ,click on Display Link Tab to generate link.

Note: In the same way if wish to insert URL than select URL radio tab, URL will be displayed depending on direct link type selected. Copy URL and paste it in the message body of the notification template.
Step3:
The link will be displayed as shown below, copy link and paste it in the notification template body text.
Note: The below link is displayed only where LMS is integrated with BizX.

Step4:
Navigate to Configuration>Notification Templates and open the desired template to add the link to the template.
Result:
Direct link will be populated with display name as shown below when system registration notification send to user.


Here are few example, if you wish to add company logo and links.
COMPANY LOGO SOURCE – Location (url) of image (logo) for use in notification header.
Link: <p><img src="COMPANY LOGO SOURCE" alt="" width="350" height="58" /></p>

Launch Notification Editor:
Navigate to System Admin>Tools >Direct Links

Step2: The direct link (either a URL or a notification tag) is displayed in a box (as shown in below screenshot), and can then be copied into a direct message to users or into a notification email template.

Note: Generating a direct link in a notification tag may contain syntax tags within quotes. These tags may differ for each notification template. Be sure to compare the syntax tags in the direct link to those available within a template. Some tags may need to be replaced in the link depending on the notification.
Step3: Navigate to System Admin>Configuration>Notification Template and select the desired template to add link.

Step 4:Now place the cursor where you would like to insert the direct link and right click to select “ Insert/Edit link “.

Step 5: Now add direct link directly on notification template as shown below.

(OR)
You can insert link by clicking on insert button as shown in the below screenshot

Now insert copied URL in source and enter image description as desired to be displayed in the mail and click on OK.

Result:
Direct link will be populated with display name as shown below when system registration notification send to user

Scenario 2: How to insert image in the notification?
Legacy Notification Editor:
Basically image can be background of web page or element.
Specify path and filename as value for background property
Steps:

Note: Change the width and height using HTML coding as below.
Launch Notification Editor:
Navigate to system Admin>configuration>notification templates
Go to notification template and click on launch editor to add image to notification


(OR)
Copy image address and paste it in the source URL for the image into the 'Source' field of the attachments dialog window by clicking on insert image.


Note: Image should be stored on SuccessFactors data center for this you need to raise it to SAP they will upload it into data center and provide URL which needs to be inserted in the notification.
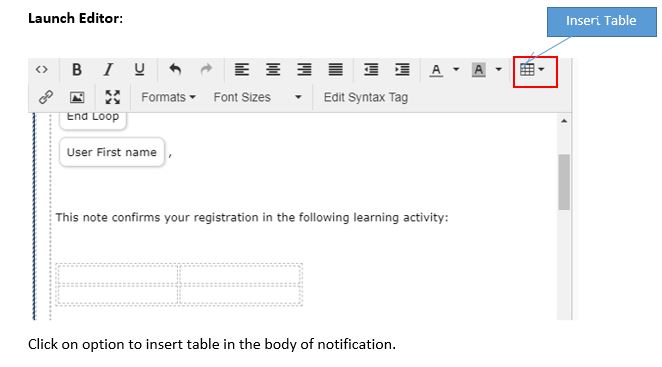
Scenario 3: How to insert a table?
Legacy Notification Editor:
Basic understanding of elements in HTML coding:


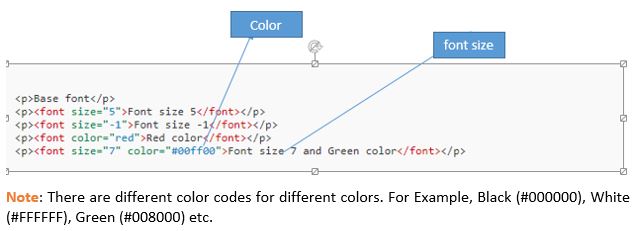
Scenario 4: How to set font size and color of text in the notifications?
Legacy Notification Editor:
Code :<font size="5" color="#ff0000">font size and color</font>

Example: Font 1, Font 2, Font 3, Font 4, Font 5, Font 6, Font 7


Looking at the above scenarios, legacy and launch editor are having some advantages and disadvantages as listed below.
Legacy Notification Editor:
Advantages:
Disadvantages:
Launch Notification Editor:
Advantages:
Disadvantages:
Conclusion: As i mentioned above notification in LMS has its own importance based on the events occuring in system.Apart from that notification editors plays important part in LMS for editing the notifications according to customer requirement.
Importance of notifications in LMS:
Notifications in LMS has its own importance because whenever an event occurs LMS notifies people. For example, schedule offering which is scheduled for future date has been cancelled due to some reason, then a notification needs to be triggered to the user, instructor and facility, so that they can adjust their schedules accordingly. Likewise, there are different notifications in LMS for different events such as learning events, security events and administrative events .All the notifications content can be adjusted in administrative interface.
Notifications triggered to the Employee, Supervisors, Organization Owner, Instructor, Admin and Contacts/Other, Here are the reasons listed below.
- Employee – about status, action required, any changes in the learning plan
- Supervisor – about direct reports
- Organization owner – about organization status
- Instructor – about student registrations, actioned required etc.
- Admin – about system processing, APM results, errors, etc.
- Contacts/Other – about items, facilities, registration etc
There are many reasons why these notifications are being triggered to the Employee, Supervisors, Organization Owner, and Instructor, Admin and Contacts /Other
Here are few examples below.
- An automated process or background job is completed
- A user registers, withdraws from, requests, or is added to a waiting list for a course
- A scheduled offering is rescheduled or canceled
- A competency assessment must be completed
- A User requests for approval for internal and external
Before we start with customizing notifications, we need to enable notification settings in SuccessFactors Learning System.
Now let’s quickly move on to notification templates editors which is necessary for everyone working on LMS to have knowledge on how to edit these notifications.
Notification Template Editors:
Notification template define emails delivered to users, instructors, contacts, supervisor and administrators for various triggers. For all system generated email notifications, there is a template which may be modified. Some notification templates are associated with APMs. As part of sound rollout strategy, each notification template that will be in use during the implementation should be reviewed and possibly edited.
There are two ways to customize notifications:
- Legacy Notification Editor
- Launch Notification Editor
Both the above notification editor has its own advantages and disadvantages that will understand in depth.
Prerequisites for Notification:
Navigate to System admin > Configuration > Global Variables: Ensure that the 'Use Editor Content When Sending Email Notification' is selected.
- Please tick check box Use Editor when sending Email Notifications as shown below to edit notifications.

- Enable “User Editor Content When Sending Email Notification”
Navigate to System Admin>Configuration>Global Variables
Overview on Notification Editors:
Legacy Notification Editor:
To customize notification through legacy notification editor basic understanding of HTML coding and Syntax ID is required
Launch Notification Editor: Launch Notification is much easier than legacy notification editor because there is no need to have knowledge on HTML coding.
As you can see in the below screenshot there are different options available in launch editor for editing.
How to edit Notifications:
Firstly, in order to edit the notifications Navigate to System Admin>Configuration>Notification Templates.
- Search for the desired notification and click on edit button in order to edit the notification.
- Search for your notification template (search by giving template ID or template description or syntax ID whichever is known).

- Open the notification template and click on Message tab which contains the notification subject line and the message body as shown below.
 Note: Click on the required tabs in order to make changes to the notification templates
Now let’s see few scenarios which are most commonly used based on the client requirement both in legacy and launch notification editor.
Scenario 1: How to insert a direct link and URL in the notifications?
Direct links are used to provide Users a shortcut to a specific place (page) in the User interface.
Legacy Notification Editor:
Step1:
To generate the above link navigate to Learning Admin>System Admin>Tools>Direct Links
Note:
- Direct links can be used in certain templates but not all direct links can be used with all templates.
- When generating the direct link, the tag provided in the “URLENCODE value=” must be found in the list of syntax tag of template you are customizing. Or else data may not be populated.
Step2:
Select the desired link from the drop down which you wish to be insert in the notification template and select radio button ,click on Display Link Tab to generate link.
Note: In the same way if wish to insert URL than select URL radio tab, URL will be displayed depending on direct link type selected. Copy URL and paste it in the message body of the notification template.
Step3:
The link will be displayed as shown below, copy link and paste it in the notification template body text.
Note: The below link is displayed only where LMS is integrated with BizX.
Step4:
Navigate to Configuration>Notification Templates and open the desired template to add the link to the template.
Result:
Direct link will be populated with display name as shown below when system registration notification send to user.
Here are few example, if you wish to add company logo and links.
COMPANY LOGO SOURCE – Location (url) of image (logo) for use in notification header.
Link: <p><img src="COMPANY LOGO SOURCE" alt="" width="350" height="58" /></p>
Launch Notification Editor:
Navigate to System Admin>Tools >Direct Links
Step2: The direct link (either a URL or a notification tag) is displayed in a box (as shown in below screenshot), and can then be copied into a direct message to users or into a notification email template.
Note: Generating a direct link in a notification tag may contain syntax tags within quotes. These tags may differ for each notification template. Be sure to compare the syntax tags in the direct link to those available within a template. Some tags may need to be replaced in the link depending on the notification.
Step3: Navigate to System Admin>Configuration>Notification Template and select the desired template to add link.
Step 4:Now place the cursor where you would like to insert the direct link and right click to select “ Insert/Edit link “.
Step 5: Now add direct link directly on notification template as shown below.
(OR)
You can insert link by clicking on insert button as shown in the below screenshot
Now insert copied URL in source and enter image description as desired to be displayed in the mail and click on OK.
Result:
Direct link will be populated with display name as shown below when system registration notification send to user
Scenario 2: How to insert image in the notification?
Legacy Notification Editor:
Basically image can be background of web page or element.
Specify path and filename as value for background property
- Specify background color in case image not available or not supported.
Steps:
- Upload the image.
- Open your HTML file.
- Type <img src=’’’’>
- Insert the image URL between the quote marks.
Note: Change the width and height using HTML coding as below.
- <img src="http://example.com/example.png" alt="display this" width=200 height=200> (Number of pixels, or the more phone-friendly "CSS pixels" in HTML5.)[5][6]
- or <img src="http://example.com/example.png" width=100% height=10%>(Percentage of web page dimensions, or percentage of HTML element containing the image.)
Launch Notification Editor:
Navigate to system Admin>configuration>notification templates
Go to notification template and click on launch editor to add image to notification
(OR)
Copy image address and paste it in the source URL for the image into the 'Source' field of the attachments dialog window by clicking on insert image.
Note: Image should be stored on SuccessFactors data center for this you need to raise it to SAP they will upload it into data center and provide URL which needs to be inserted in the notification.
Scenario 3: How to insert a table?
Legacy Notification Editor:
Basic understanding of elements in HTML coding:
Scenario 4: How to set font size and color of text in the notifications?
Legacy Notification Editor:
- The FONT element specifies the size and color of the font.
Code :<font size="5" color="#ff0000">font size and color</font>
- Specify the number from 1(small) to (large).
Example: Font 1, Font 2, Font 3, Font 4, Font 5, Font 6, Font 7
Looking at the above scenarios, legacy and launch editor are having some advantages and disadvantages as listed below.
Legacy Notification Editor:
Advantages:
- All direct links are supportable in legacy notification editor.
- HTML option allows you to view and edit the notification HTML code directly.
- It got various text formatting options, including bold, italic or underline text.
- It got undo and redo option for text editing.
- It also offers different options for text alignment, including left, center and right justified.
- It also offers various options for formatting text color and text background color.
- It got various options to insert tables with collapsed borders, headings, borders and captions etc.
- It allows to different type of insert links/images into notifications like adding email link, floating image, moving image etc.
- It also allows you to change front format and size.
Disadvantages:
- Legacy notification editor is tedious than launch editor because it involves creation of customized system labels and a knowledge of HTML.
Launch Notification Editor:
Advantages:
- Launch editor is easier to use than legacy notification editor were they can see the text and syntax they are using, as well as add images, links and text styles quiet easily.
Disadvantages:
- Not all direct links are supported in Launch Notification editor.
Conclusion: As i mentioned above notification in LMS has its own importance based on the events occuring in system.Apart from that notification editors plays important part in LMS for editing the notifications according to customer requirement.
- SAP Managed Tags:
- SAP SuccessFactors Learning,
- SAP Learning Solution
Labels:
1 Comment
You must be a registered user to add a comment. If you've already registered, sign in. Otherwise, register and sign in.
Labels in this area
-
1H 2023 Product Release
3 -
2H 2023 Product Release
3 -
Business Trends
104 -
Business Trends
4 -
Cross-Products
13 -
Event Information
75 -
Event Information
9 -
Events
5 -
Expert Insights
26 -
Expert Insights
19 -
Feature Highlights
16 -
Hot Topics
20 -
Innovation Alert
8 -
Leadership Insights
4 -
Life at SAP
67 -
Life at SAP
1 -
Product Advisory
5 -
Product Updates
499 -
Product Updates
40 -
Release
6 -
Technology Updates
408 -
Technology Updates
10
Related Content
- SAP Quality Notification creation from action box doesn't work in Human Capital Management Q&A
- Wrong manager is receiving the notification for document routing. in Human Capital Management Q&A
- The 1H 2024 Release of SAP SuccessFactors Learning – Release Highlights in Human Capital Management Blogs by Members
- Unable to get the legacy report bundle expiry notification. in Human Capital Management Q&A
- Can we get all the direct reports names reporting to a manager for using in email notification in Human Capital Management Q&A
Top kudoed authors
| User | Count |
|---|---|
| 7 | |
| 4 | |
| 3 | |
| 2 | |
| 2 | |
| 2 | |
| 2 | |
| 2 | |
| 2 | |
| 2 |