
- SAP Community
- Products and Technology
- Technology
- Technology Blogs by SAP
- Build, Deploy and Run a Full Stack SAP Cloud Busin...
Technology Blogs by SAP
Learn how to extend and personalize SAP applications. Follow the SAP technology blog for insights into SAP BTP, ABAP, SAP Analytics Cloud, SAP HANA, and more.
Turn on suggestions
Auto-suggest helps you quickly narrow down your search results by suggesting possible matches as you type.
Showing results for
former_member38
Discoverer
Options
- Subscribe to RSS Feed
- Mark as New
- Mark as Read
- Bookmark
- Subscribe
- Printer Friendly Page
- Report Inappropriate Content
12-02-2018
10:22 AM
This blog emphasizes on building, deploying a full stack application created using the SAP Cloud Application Programming Model to Cloud Foundry and launching the Fiori Launchpad to showcase the apps.
The SAP Cloud Application Programming Model
This is a new programming model on cloud which has been created to make the development of a full stack application an easy approach with minimal technical efforts. You can read the blog from Yuval Anafi for developing Business Applications using this model.
Creation of a full stack application is made easy in webIDE using the templates provided. This blog showcases an example on how to create of a full stack Application without the Fiori launchpad using predefined templates in webIDE.
It is important to know on how to build a created full stack application, deploy it on cloud and launch it on a Fiori Launchpad to showcase the same. This blog explains it in simple steps.
To get started, create a full stack application as shown in the blog mentioned above and do the following:
Add a Fiori Launchpad module to the project.
- Click on the project and do the following:

- Enter the module name and click on "finish".


Changes to be done to the App Router and Fiori Launchpad modules.
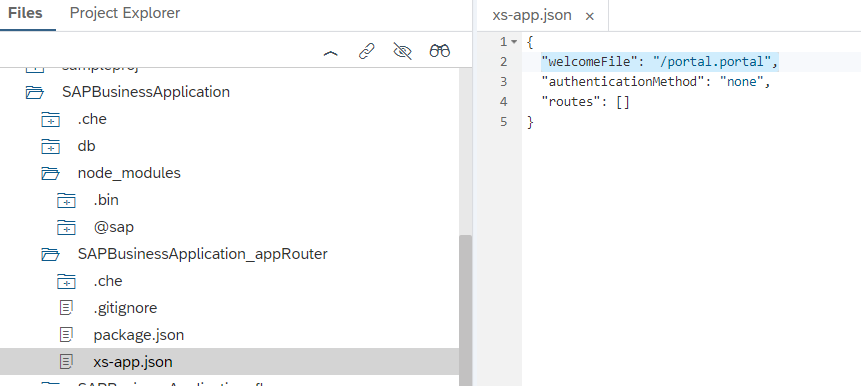
- Add the selected change needed in xs-app.json file of app router module for the portal to be invoked from app router.
- Add the UI tile to the Fiori Launchpad module by following the below steps:
1. In CommonDataModel folder of the module, you will need to add the UI tile to the module by clicking on the "+".

2. Select the UI (Details which is shown here can be changed in UI module's manifest.json file before you select it) you want to add to the tile and click on "Select" and save the file.


Build and deploy the project.
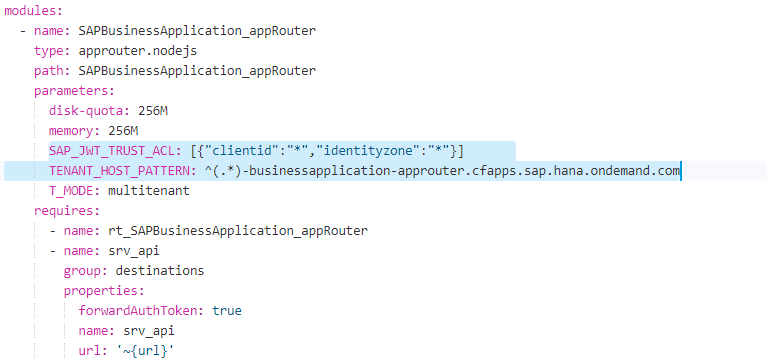
Before building the project, do the below changes to app router module in mta.yaml so that the required custom route is created for the app router.
- Build the entire project by following the below step:

- webIDE will generate the mtar file under "mta_archives" folder. Click on the mtar file generated and do the following.

- Choose the API endpoint for Cloud foundry, organization and space for the mtar to be deployed and click on "Deploy".

Launch the Fiori Launchpad.
- Once the entire project is deployed, app router must be launched.
- Before we launch the app router, we should make sure that the route which is created for the app router is correct.
It must have the format like this:
<subdomain> - <host-name> . <domain-name>
For example, If subdomain is "sap-test" for your tenant, the app router route will look like this:
https://sap-test-businessapplication-approuter.cfapps.sap.hana.ondemand.com
Note: In case the route is not created in this format, you might need to create a route and bind to the app router.
- You will be redirected to the IDP where you will need to give the credentials.
- Once the credentials are provided, app router will redirect to the fiori launchpad and the UI tile will be visible.

- Click on the tile so that the UI will be launched.

How to run UI locally in webIDE?
Note: You might need to check the builder settings of the project in webIDE before you run the UI locally.
To run the UI module locally, do the following steps:
- select UI module -> Run -> Run Configurations.

- Choose "flpSandboxMockService.html" under File Name and choose "Run with mock data" to run the UI with generated values and then click "Save and Run".

Note: if you want to test UI with actual values from the database that you have bound, then choose "flpSandbox.html" instead but this needs the whole project to be deployed first since the database cds artifacts need to be present in the database which is bound to the application for the oData to work with actual data.
- UI will be opened locally and the mock data will be loaded in the UI by clicking on "Go".
You can refer to the tutorials page for more information on working with this model.
More information on setting destination and token exchange can be found in the below blogs:
https://blogs.sap.com/2018/08/24/create-a-destination-to-access-a-cf-odataservice-secured-with-oauth...
https://blogs.sap.com/2018/12/02/token-exchange-from-fiori-launchpad-flp-to-a-business-service-in-sa...
- SAP Managed Tags:
- SAP Cloud Application Programming Model,
- SAP Web IDE,
- SAP Fiori Launchpad,
- Cloud,
- User Interface
Labels:
You must be a registered user to add a comment. If you've already registered, sign in. Otherwise, register and sign in.
Labels in this area
-
ABAP CDS Views - CDC (Change Data Capture)
2 -
AI
1 -
Analyze Workload Data
1 -
BTP
1 -
Business and IT Integration
2 -
Business application stu
1 -
Business Technology Platform
1 -
Business Trends
1,661 -
Business Trends
87 -
CAP
1 -
cf
1 -
Cloud Foundry
1 -
Confluent
1 -
Customer COE Basics and Fundamentals
1 -
Customer COE Latest and Greatest
3 -
Customer Data Browser app
1 -
Data Analysis Tool
1 -
data migration
1 -
data transfer
1 -
Datasphere
2 -
Event Information
1,400 -
Event Information
64 -
Expert
1 -
Expert Insights
178 -
Expert Insights
274 -
General
1 -
Google cloud
1 -
Google Next'24
1 -
Kafka
1 -
Life at SAP
784 -
Life at SAP
11 -
Migrate your Data App
1 -
MTA
1 -
Network Performance Analysis
1 -
NodeJS
1 -
PDF
1 -
POC
1 -
Product Updates
4,577 -
Product Updates
329 -
Replication Flow
1 -
RisewithSAP
1 -
SAP BTP
1 -
SAP BTP Cloud Foundry
1 -
SAP Cloud ALM
1 -
SAP Cloud Application Programming Model
1 -
SAP Datasphere
2 -
SAP S4HANA Cloud
1 -
SAP S4HANA Migration Cockpit
1 -
Technology Updates
6,886 -
Technology Updates
407 -
Workload Fluctuations
1
Related Content
- Corporate Git Setup on SAP BTP versus connecting to Corporate Git directly from SAP BAS in Technology Q&A
- SAP HANA Cloud Vector Engine: Quick FAQ Reference in Technology Blogs by SAP
- Capture Your Own Workload Statistics in the ABAP Environment in the Cloud in Technology Blogs by SAP
- 10+ ways to reshape your SAP landscape with SAP BTP - Blog 4 Interview in Technology Blogs by SAP
- 10+ ways to reshape your SAP landscape with SAP Business Technology Platform – Blog 4 in Technology Blogs by SAP
Top kudoed authors
| User | Count |
|---|---|
| 13 | |
| 10 | |
| 10 | |
| 7 | |
| 7 | |
| 6 | |
| 5 | |
| 5 | |
| 5 | |
| 4 |