
- SAP Community
- Products and Technology
- Technology
- Technology Blogs by SAP
- SAP Landscape Management (LaMa) REST API Testing
Technology Blogs by SAP
Learn how to extend and personalize SAP applications. Follow the SAP technology blog for insights into SAP BTP, ABAP, SAP Analytics Cloud, SAP HANA, and more.
Turn on suggestions
Auto-suggest helps you quickly narrow down your search results by suggesting possible matches as you type.
Showing results for
Advisor
Options
- Subscribe to RSS Feed
- Mark as New
- Mark as Read
- Bookmark
- Subscribe
- Printer Friendly Page
- Report Inappropriate Content
11-22-2018
5:32 AM
Introduction
SAP Landscape Management (LaMa) has REST Application Programming Interface that can be used to further automate your operations. You can call the APIs from other applications or your own scripts. This is a basic how-to on testing LaMa REST APIs to help you understand what you can do with this feature. After going through the steps below, hopefully you will be in a better position to do some interesting integration via REST API calls to your LaMa instance.
We will first do some tests with a popular REST client known as “Postman”. Next, we will repeat the tests using Curl from the command prompt. Through these 2 methods you will then feel more comfortable to write your REST API calls from your choice of platform such as shell scripts, Python, Java, Javascript, C etc.
Prerequisite
You should have a non-production LaMa available when first starting to play with these APIs. You can easily mess things up if you do it in production.
Sections
Test with Postman (HTTP)
Test with Postman using SSL (HTTPS)
The procedure is similar to testing with HTTP but you use the URL https://<IP address of LaMa>:50001/lama-api. The port 50001 is the default but could be a different one set by the admin. This assumes that SSL has been enabled for LaMa. If you are testing against a CAL deployed LaMa appliance then follow these steps to enable HTTPS using a self signed certificate (for testing purposes only).
7. If the SSL status is green then we are good to go and can jump to step 8. If status is red then we need to follow SAP Note 2510099.
8. Now you should be able to go to https://<IP address of LaMa>:50001/lama-api via a browser (using Administrator login) and see the standard page for LaMa API
9. Now we are ready for Postman via SSL and you can perform the same testing steps covered in the section for HTTP except for the following differences:

Test with Postman using X.509 Client Certificate Authentication
This is a variation of the SSL method above but authentication is based on certificate rather than username/password. If configured correctly in Netweaver where LaMa runs you will not be prompted for username/password.
Test with Postman using OAuth 2.0 Authentication
This section is similar to testing with SSL except that authentication is based on OAuth 2.0. This assumes that you have OAuth 2.0 set up in your LaMa environment. This blog describes the steps to set up OAuth in LaMa.
Before you start ensure that you have the following from the OAuth administrator:
To authenticate in postman the steps are:
Now you can follow the steps described in the sections for postman testing with HTTP/HTTPS and using the above for authentication.
Test with Curl (HTTP)
Postman also gives you code that you can execute outside of the application such as Curl, Python, Java etc. However, please note that you will need to specify authentication method as this is not included in the code snippet.
1. After executing an operation in Postman, you can click on “code”

2. First let’s get the X-CSRF-Token
3. Run the command
4. Since we used the “--verbose” flag we will see the token value displayed in the output. Copy the token value to your clipboard for use in the next step.
5. Assign the token value to a variable for ease. In case of LaMa API version 3.0.9.0 or later assign the value 'deprecated'
6. If Mac or Cygwin
7. If Windows command prompt
8. Add the data we need to send to LaMa into file “data.json”
9. Now we are ready to make the PATCH call to LaMa using the files cookiejar.dat (so that the token is accepted) and data.json (the data that we are sending).
10. Mac or Cygwin
11. Windows command prompt:
12. If you do not want to be prompted for password, you can specify it as “--user Administrator:<password>”
13. You should get a response that UPDATE was performed like what you got in Postman but less nicely formatted.
Test with CURL using SSL (HTTPS)
The steps are identical as in section above for HTTP except for the following:
If you are testing against a CAL deployed LaMa appliance then follow the steps in the postman testing section to enable HTTPS
Test with CURL using X.509 Client Certificate Authentication
This is a variation of the SSL method above but authentication is based on certificate rather than username/password.
All steps are similar to CURL testing with HTTP except for the following:
Old command (HTTP with basic authentication)
New command (HTTPS with certificate based authentication; certificate location is current directory)
New command with no certificate verification (cert location is current directory)
Test with CURL using OAuth 2.0 Authentication
This is a variation of the curl with SSL method above but authentication is based on OAuth 2.0 rather than username/password.
All steps are similar to CURL testing with HTTP except for the following:
Conclusion:
The above covered the basics of using the REST APIs and you should now feel comfortable tackling more advanced procedures with these APIs. For further information please refer to the following documentation:
SAP Landscape Management (LaMa) has REST Application Programming Interface that can be used to further automate your operations. You can call the APIs from other applications or your own scripts. This is a basic how-to on testing LaMa REST APIs to help you understand what you can do with this feature. After going through the steps below, hopefully you will be in a better position to do some interesting integration via REST API calls to your LaMa instance.
We will first do some tests with a popular REST client known as “Postman”. Next, we will repeat the tests using Curl from the command prompt. Through these 2 methods you will then feel more comfortable to write your REST API calls from your choice of platform such as shell scripts, Python, Java, Javascript, C etc.
Prerequisite
You should have a non-production LaMa available when first starting to play with these APIs. You can easily mess things up if you do it in production.
Sections
- Test with Postman (HTTP)
- Test with Postman using SSL (HTTPS)
- Test with Postman using X.509 Client Certificate Authentication
- Test with Postman using OAuth 2.0 Authentication
- Test with curl (HTTP)
- Test with curl using SSL (HTTPS)
- Test with curl using X.509 Client Certificate Authentication
- Test with curl using OAuth 2.0 Authentication
Test with Postman (HTTP)
- Download and install Postman from https://www.getpostman.com/apps (please register for free – Installation steps are self-explanatory so are not covered here). Note: I used version 6.5.2 for Windows 64.
- Note down the IP address of LaMa.
- Make sure you can access the following link from your browser:
http://<IP address of LaMa>:50000/lama-api - Perform a basic GET operation in browser to ensure it works.
http://<IP address of LaMa>:50000/lama-api/instances - Repeat above basic GET operation in Postman
- 5a. Launch Postman
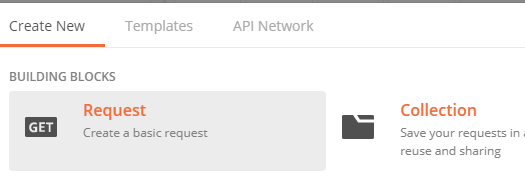
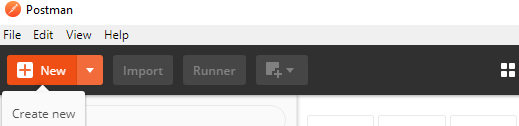
- 5b. Click on New

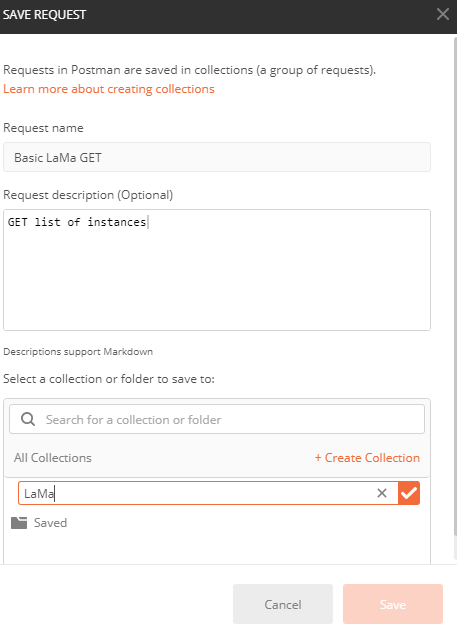
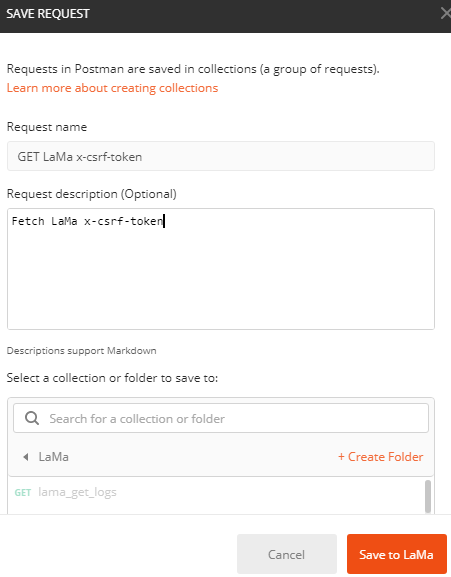
- 5c. Select “Get Request …” and give it a name and description and then save it
- 5d. Fill in the URL for GET instances previously tested in the browser

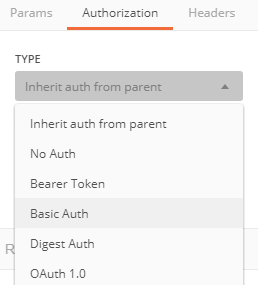
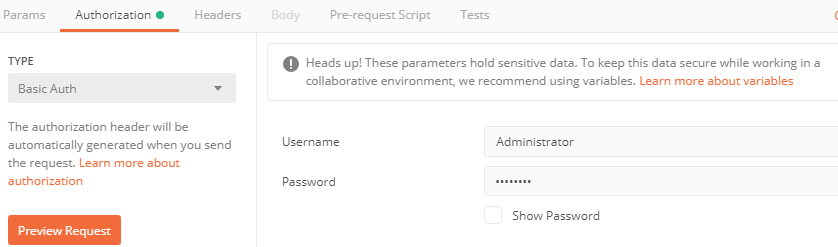
- 5e. Select tab “Authorization” and choose Type of “Basic Auth” and fill in the Username and Password of LaMa

- 5f. Click on “Send”

- 5g. You should now see a response from LaMa such as below:

- Now let’s get ready to perform a PATCH operation which is an update operation. Other operations that perform updates are POST, PUT and DELETE.
- 6a. First note down the instance ID from the previous GET operation
- 6b. In our example this is from line 7: DatabaseName.ATD.DatabaseType.HDB.DatabaseHost.saphdbatd.example.com
- 6c. For any operation that makes a change we need to use Cross-Site-Request-Forgery token “x-csrf-token”. This first needs to be obtained from LaMa using a Fetch as described below. The token expires after a few minutes (30 mins is the default), so you may need to fetch it again. After it is fetched it needs to be used in any update operation.
- PLEASE NOTE: As of LaMa API version 3.0.9.0 "GET /xsrftoken" method is deprecated. If you have this version or later you can skip the step to fetch x-csrf-token. You will however, still need to include the token in the header (without a value) when performing the PATCH operation below.
- Fetch x-csrf-token
- 7a. Create a new basic GET request
- 7b. Click on New
- 7c. Select “Get Request …” and give it a name and description and then save it

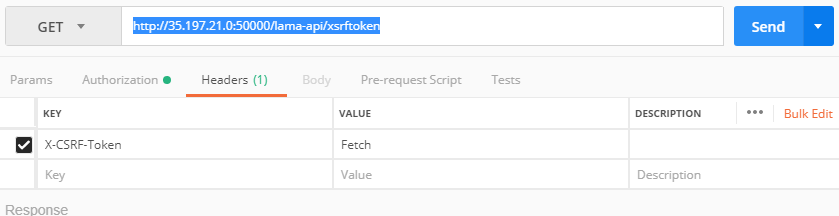
- 7d. Fill in the following URL replacing the IP address with your LaMa IP address. Note the API call is “xsrftoken”

- 7e. Select tab Authorization and choose Type of “Basic Auth” and fill in the Username and Password of LaMa

- 7f. We also need to fill in the header information. By default, the call will not return anything unless we have the key “X-CSRF-Token” and value of “Fetch” in the header
- 7g. Click on “Headers” tab and fill in as below:

- 7h. Click on Send
- 7i. Click on “Headers” tab in the output section. You will now get an output as below:

- 7j. Copy the token into the Clipboard. We will use this for every API call that performs an update such as POST, PATCH, PUT, DELETE (if it is not expired)
- Perform a PATCH operation
- 8a. We will perform a PATCH operation on the instance ID we noted previously
- 8b. Click on New

- 8c. Select “Get Request …” and give it a name and description and then save it


- 8d. Change the GET to a PATCH in Postman

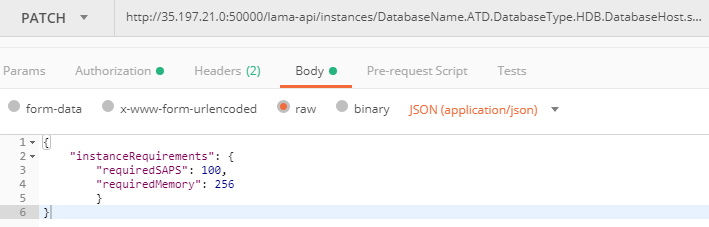
- 8e. Fill in the URL using the instance ID - http://<LaMa IP>:50000/lama-api/instances/DatabaseName.ATD.DatabaseType.HDB.DatabaseHost.saphdbatd.example.com

- 8f. Select tab “Authorization” and choose Type of “Basic Auth” and fill in the Username and Password of LaMa


- 8g. Click on “Preview Request” – you should get the message below.

- 8h. Click on “Body” tab

- 8i. Click on radio button "raw":

- 8j. Change “Text” to “JSON”

- 8k. Enter the following JSON data that we will send to LaMa as part of the PATCH method call
- 8l. Click on “Headers” tab

- 8m. Enter the X-CSRF-Token info:
- PLEASE NOTE: As mentioned earlier, in LaMa API version 3.0.9.0 or later "GET /xsrftoken" method is deprecated. If you have this version, include the key "X-CSFR-Token" in the header but leave the value empty.

- 8n. Click on Send
- 8o. You should see a response as below with status of OK (200):

- 8p. If you get an error or status shows something like “Forbidden” you may need to fetch the token again as it may have expired in the meantime.
- 8q. Check the change in your LaMa instance (see below)

Test with Postman using SSL (HTTPS)
The procedure is similar to testing with HTTP but you use the URL https://<IP address of LaMa>:50001/lama-api. The port 50001 is the default but could be a different one set by the admin. This assumes that SSL has been enabled for LaMa. If you are testing against a CAL deployed LaMa appliance then follow these steps to enable HTTPS using a self signed certificate (for testing purposes only).
- Make sure that SAP Note 1451753 is used to ensure you can connect to the Netweaver Administrator console
- cd /usr/sap/<SID>/SYS/global/security/data (e.g. /usr/sap/J2E/SYS/global/security/data)
- vi icm_filter_rules.txt
- Comment out all entries (note this is not secure so save the orig file so you revert back after done with Netweaver administration steps)
- Restart LaMa
- sudo su - <SID>adm (e.g. j2eadm)
- stopsap && startsap
- In your browser go to http://<IP address of LaMa>:50000/nwa and login as Administrator
- Go to 'Configuration' tab
- Click on SSL
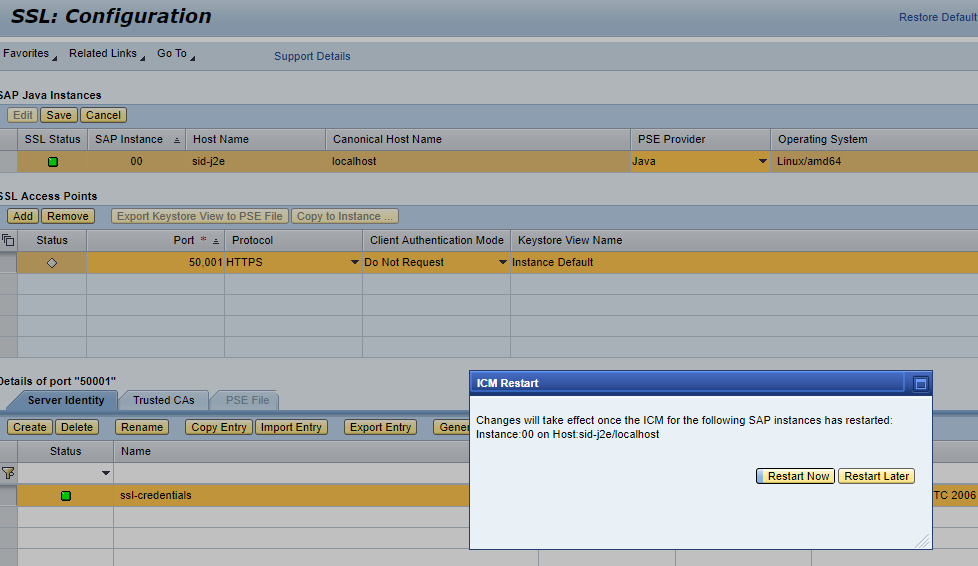
- Edit -> Add
- Enter the port 50001 followed by Save. You will now be prompted to restart ICM - respond with Restart Now
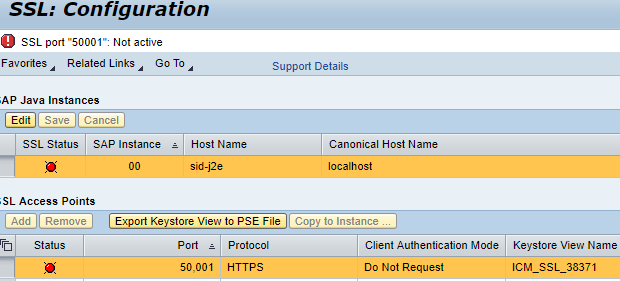
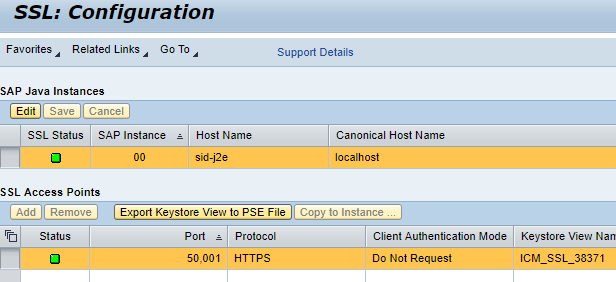
7. If the SSL status is green then we are good to go and can jump to step 8. If status is red then we need to follow SAP Note 2510099.
- Restart LaMa
- sudo su - <SID>adm (e.g. j2eadm)
- stopsap && startsap
- Verify SSL Status
8. Now you should be able to go to https://<IP address of LaMa>:50001/lama-api via a browser (using Administrator login) and see the standard page for LaMa API
9. Now we are ready for Postman via SSL and you can perform the same testing steps covered in the section for HTTP except for the following differences:
- Use https instead of http
- Use port 50001 instead of 50000
- If you used self-signed SSL certificates then you will need to ensure that SSL certificate verification is turned off
Test with Postman using X.509 Client Certificate Authentication
This is a variation of the SSL method above but authentication is based on certificate rather than username/password. If configured correctly in Netweaver where LaMa runs you will not be prompted for username/password.
- Make sure that certificate based authentication is enabled and the LaMa administrator has provided a private certificate for you to use (refer to blog on how to configure X.509 based authentication in LaMa). This section assumes that the certificate will allow you to authenticate as Administrator or an account with appropriate privileges.
- Verify with browser (Google Chrome used in this exercise)
- Go to URL https://<IP address of LaMa>:50001:/lama-api
- You should be prompted for username/password -- DO NOT LOGIN
- If you are not prompted for username/password then make sure all cookies for LaMa are deleted
- Settings -> Advanced -> Privacy and Security
- Check mark "Cookies and other site data" and click clear data
- You should now be prompted for username/password -- DO NOT LOGIN
- Import the certificate to your browser
- Settings -> Advanced -> Privacy and Security -> Manage Certificates
- Personal Tab -> Import
- In the wizard click Next -> Browse to location of the certificate provided (on Windows usually a file with .pfx extension)
- Complete the import
- Go to the URL again and this time you will not be prompted for username/password and be automatically authenticated
- Now that we know the certificate works we can import the certificate into Postman
- File Menu -> Settings -> Certificates -> Add Certificate
- Specify the Host https URL as <IP address of LaMa> and port 50001
- Add the PFX file as well as the passphrase (if you got CRT and KEY files instead of PFX file then fill out the corresponding fields
- Example:

- The testing with Postman is the same as in steps for HTTP except the "Authorization" method and URL for HTTPS. Certificate based authentication must use HTTPS.
- For all tests ensure authorization method is always set to type of "No Auth"
- URL should always start with https://<IP address of LaMa>:50001/lama-api/....
Test with Postman using OAuth 2.0 Authentication
This section is similar to testing with SSL except that authentication is based on OAuth 2.0. This assumes that you have OAuth 2.0 set up in your LaMa environment. This blog describes the steps to set up OAuth in LaMa.
Before you start ensure that you have the following from the OAuth administrator:
- Client is registered for OAuth and obtain a client ID
- Scope (can be one or more)
- Callback URL
- Auth URL (endpoint of the authorization server)
- Access Token URL
- Client Secret (optional)
To authenticate in postman the steps are:
- Set Authorization to Type OAuth 2.0

- Click on "Get New Access Token"

- Fill in the parameters for your OAuth environment and click on Request Token. Example screenshot below

- If the parameters are correct, postman will open a new window prompting you to authorize the request. The RFC for OAuth 2.0 requires that the authorize step is interactive.

- You will now be assigned a token in postman which will automatically use it in the header when making a GET or PATCH request
Now you can follow the steps described in the sections for postman testing with HTTP/HTTPS and using the above for authentication.
Test with Curl (HTTP)
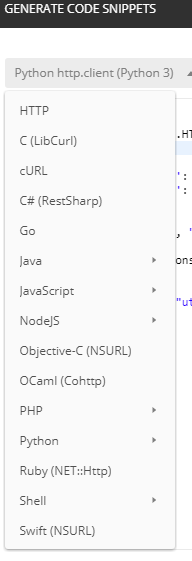
Postman also gives you code that you can execute outside of the application such as Curl, Python, Java etc. However, please note that you will need to specify authentication method as this is not included in the code snippet.
1. After executing an operation in Postman, you can click on “code”
We will use a command line utility called “Curl” to perform the same procedure we did with Postman. Curl stands for Client URL and can be used to perform basic interaction with web servers.
Note that the x-csrf-token value needs to be used in the same session. This is part of the security mechanism to ensure the key cannot be used in another session. Postman handles it for us but with Curl you need to use cookies to tell it is the same session.
If you are on a Mac, then the command “curl” should already exist. If on Windows 10 then you should also have Curl. Just try running “curl --version” from the command prompt. If you have an older Windows version, then you can get the Curl utility from http://www.curl.com/download/.
Other options are to use Cygwin shell which includes the curl command but an overkill for what we are doing unless you already have it installed.
2. First let’s get the X-CSRF-Token
We will collect cookie information in the file cookiejar.dat which we will use in the subsequent call to perform an update.
PLEASE NOTE: As of LaMa API version 3.0.9.0 "GET /xsrftoken" method is deprecated. If you have this version or later you will get the value of x-csrf-token as deprecated. You will however, still need to include the token in the header (without a value or any value as it will be ignored) when performing the PATCH operation below.
3. Run the command
curl --user Administrator --header "X-CSRF-Token: Fetch" --cookie-jar cookiejar.dat --verbose http://<LaMa IP address>:50000/lama-api/xsrftoken4. Since we used the “--verbose” flag we will see the token value displayed in the output. Copy the token value to your clipboard for use in the next step.
“< x-csrf-token: ZTOsMK5wwj_3Mp6IpR5oqYOgV869lDgYRgA”
"< x-csrf-token: deprecated" -- for LaMa API version 3.0.9.0 or later
5. Assign the token value to a variable for ease. In case of LaMa API version 3.0.9.0 or later assign the value 'deprecated'
6. If Mac or Cygwin
export CSRFTOKEN=ZTOsMK5wwj_3Mp6IpR5oqYOgV869lDgYRgA7. If Windows command prompt
set CSRFTOKEN=ZTOsMK5wwj_3Mp6IpR5oqYOgV869lDgYRgA8. Add the data we need to send to LaMa into file “data.json”
{

          "instanceRequirements": {

                "requiredSAPS": 100,

                "requiredMemory": 256

          }

}
9. Now we are ready to make the PATCH call to LaMa using the files cookiejar.dat (so that the token is accepted) and data.json (the data that we are sending).
10. Mac or Cygwin
curl --user Administrator --header "Content-Type: application/json" --header "X-CSRF-Token: $CSRFTOKEN" --cookie cookiejar.dat --verbose --data @data.json -X PATCH http://<LaMa IP Address>:50000/lama-api/instances/DatabaseName.ATD.DatabaseType.HDB.DatabaseHost.saphdbatd.example.com11. Windows command prompt:
curl --user Administrator --header "Content-Type: application/json" --header "X-CSRF-Token: %CSRFTOKEN%" --cookie cookiejar.dat --verbose --data @data.json -X PATCH http://<LaMa IP Address>:50000/lama-api/instances/DatabaseName.ATD.DatabaseType.HDB.DatabaseHost.saphdbatd.example.com12. If you do not want to be prompted for password, you can specify it as “--user Administrator:<password>”
13. You should get a response that UPDATE was performed like what you got in Postman but less nicely formatted.
{"responses":[{"entity":{"entityType":"INSTANCE","entityId":"DatabaseName.ATD.DatabaseType.HDB.DatabaseHost.saphdbatd.example.com","links":[{"href":"http://35.230.112.24:50000/lama-api/instances/DatabaseName.ATD.DatabaseType.HDB.DatabaseHost.saphdbatd.example.com","rel":"self","method":"GET"}]},"operation":"UPDATE","status":200}]}Test with CURL using SSL (HTTPS)
The steps are identical as in section above for HTTP except for the following:
- Your URL will be different and will start with -- https://<IP address of LaMa>
- Your port will be different -- 50001 instead of 50000 (e.g. https://<IP address of LaMa>:50001)
- If your certificate is self signed you will need to use the flag "-k" for all curl commands to disable certificate verification
If you are testing against a CAL deployed LaMa appliance then follow the steps in the postman testing section to enable HTTPS
Test with CURL using X.509 Client Certificate Authentication
This is a variation of the SSL method above but authentication is based on certificate rather than username/password.
All steps are similar to CURL testing with HTTP except for the following:
- Your URL will be different and will start with -- https://<IP address of LaMa>
- Your port will be different -- 50001 instead of 50000 (e.g. https://<IP address of LaMa>:50001)
- You will need to specify the certificate(s) with each CURL command instead of "--user" such as below
Old command (HTTP with basic authentication)
curl --user Administrator --header "X-CSRF-Token: Fetch" --cookie-jar cookiejar.dat --verbose http://<LaMa IP address>:50000/lama-api/xsrftokenNew command (HTTPS with certificate based authentication; certificate location is current directory)
curl -E ./openssl_admin.crt --key ./openssl_admin_nopass.key --header "X-CSRF-Token: Fetch" --cookie-jar cookiejar.dat --verbose https://<LaMa IP address>:50001/lama-api/xsrftoken- If your certificate is self signed you will need to use the flag "-k" for all curl commands to disable certificate verification. Just add the "-k" flag anywhere such as at the end of the above command as shown below
New command with no certificate verification (cert location is current directory)
curl -E ./openssl_admin.crt --key ./openssl_admin_nopass.key --header "X-CSRF-Token: Fetch" --cookie-jar cookiejar.dat --verbose https://<LaMa IP address>:50001/lama-api/xsrftoken -k- Optional Step: Normally the primary key file (with extension of .key) has a passphrase assigned. If you want to remove the passphrase you can use the openssl command to strip this and create a new key file. Below was performed on a Linux system
openssl rsa -in ./openssl_admin.key -out ./openssl_admin_nopass.keyTest with CURL using OAuth 2.0 Authentication
This is a variation of the curl with SSL method above but authentication is based on OAuth 2.0 rather than username/password.
All steps are similar to CURL testing with HTTP except for the following:
- Obtain the following
- Ensure client is registered for OAuth and obtain a client ID
- Scope (can be one or more)
- Callback URL
- Auth URL (endpoint of the authorization server)
- Access Token URL
- Client Secret (optional)
- Since the RFC for OAuth 2.0 dictates that authorization step to obtain a token should be interactive, we will first use a browser. Once token is granted then we use curl commands
- Open a browser and enter the URL based on the information obtained from OAuth administrator
- https://<Auth URL>?response_type=code&client_id=<client ID>&redirect_uri=<Callback URL>&scope=<scope1 scope2>
- Example:
https://35.202.195.153:50001/oauth/authorize?response_type=code&client_id=b0eab52a-78e2-11e9-b539-00...
- After the login you will see the authorization code within the URL (ignore any error that shows up on the screen but focus on the URL which should have changed and the authorization code added)
- Note down the authorization code. Note that this code has a short expiry window so we will need to complete the next step to obtain the token before it expires
- Now use Curl to obtain token with the authorization code from above
- curl -X POST -H "Content-Type: application/x-www-form-urlencoded" -d "grant_type=authorization_code&code=<Authorization Code>&redirect_uri=<Callback URL>&client_id=<client ID" <Access Token URL>
- Example:
curl -X POST -H "Content-Type: application/x-www-form-urlencoded" -d "grant_type=authorization_code&code=46093cee7b4911e9cc780000003a8cde&redirect_uri=https://35.202.195.153:50001/lama-api/instances&client_id=b0eab52a-78e2-11e9-b539-0000003a8cde" https://35.202.195.153:50001/oauth/token
- You may need to add the flag "-k" if you are using self signed SSL certificates
- You will now be granted the "access token" with an output similar to:
{"access_token":"300ad1e510edd66bb870738d47161ca1","token_type":"Bearer","expires_in":1800,"refresh_token":"ad40862c5974909ce93ffe0798519b8","scopes":["SAP_OAUTH_USER","SAP_OAUTH_ADMIN"]}
- Now you can use the access token (sent in the header) for subsequent curl commands to perform a GET or PATCH operation.
- Example:
curl 'https://35.202.195.153:50001/lama-api/instances' -H 'Authorization: Bearer 300ad1e510edd66bb870738d47161ca1'--cookie-jar cookiejar.dat
- Please note that cookiejar.dat information (above example) can be captured using the chrome browser developer tool
- Start developer tool
- Go to Network tab
- Do something such as obtaining the authorization code
- Right click on the request in the developer tool and select "Copy as cURL (Bash)'
- Paste into the file cookiejar.dat
- Edit the content so that only the cookie info is left such as below
com.sap.engine.security.authentication.original_application_url=xxxxxxx

MYSAPSSO2=xxxxxxxxxxxx

saplb_* (J2EE3837120)3837150

JSESSIONID      xxxxxxxxxxxx

JSESSIONMARKID  xxxxxxxxxxxx
Conclusion:
The above covered the basics of using the REST APIs and you should now feel comfortable tackling more advanced procedures with these APIs. For further information please refer to the following documentation:
- Developer Guide (REST Application Programming Interface)
- Help documentation for LaMa REST API: SAP API Business Hub
- Blog on setting up various authentication methods in NetWeaver Java/LaMa for API testing
- Security Considerations: https://help.sap.com/viewer/lama_security
- Authentication Methods Supported in Netweaver Java
- SAP Managed Tags:
- SAP HANA,
- SAP Landscape Management,
- SAP Landscape Management, enterprise edition,
- SAP NetWeaver
Labels:
4 Comments
You must be a registered user to add a comment. If you've already registered, sign in. Otherwise, register and sign in.
Labels in this area
-
ABAP CDS Views - CDC (Change Data Capture)
2 -
AI
1 -
Analyze Workload Data
1 -
BTP
1 -
Business and IT Integration
2 -
Business application stu
1 -
Business Technology Platform
1 -
Business Trends
1,661 -
Business Trends
87 -
CAP
1 -
cf
1 -
Cloud Foundry
1 -
Confluent
1 -
Customer COE Basics and Fundamentals
1 -
Customer COE Latest and Greatest
3 -
Customer Data Browser app
1 -
Data Analysis Tool
1 -
data migration
1 -
data transfer
1 -
Datasphere
2 -
Event Information
1,400 -
Event Information
64 -
Expert
1 -
Expert Insights
178 -
Expert Insights
273 -
General
1 -
Google cloud
1 -
Google Next'24
1 -
Kafka
1 -
Life at SAP
784 -
Life at SAP
11 -
Migrate your Data App
1 -
MTA
1 -
Network Performance Analysis
1 -
NodeJS
1 -
PDF
1 -
POC
1 -
Product Updates
4,578 -
Product Updates
323 -
Replication Flow
1 -
RisewithSAP
1 -
SAP BTP
1 -
SAP BTP Cloud Foundry
1 -
SAP Cloud ALM
1 -
SAP Cloud Application Programming Model
1 -
SAP Datasphere
2 -
SAP S4HANA Cloud
1 -
SAP S4HANA Migration Cockpit
1 -
Technology Updates
6,886 -
Technology Updates
397 -
Workload Fluctuations
1
Related Content
- 10+ ways to reshape your SAP landscape with SAP Business Technology Platform – Blog 4 in Technology Blogs by SAP
- Top Picks: Innovations Highlights from SAP Business Technology Platform (Q1/2024) in Technology Blogs by SAP
- How to delete an ABAP system from Cloud ALM Landscape Management? in Technology Q&A
- Consuming SAP with SAP Build Apps - Connectivity options for low-code development - part 2 in Technology Blogs by SAP
- Unlocking Full-Stack Potential using SAP build code - Part 1 in Technology Blogs by Members
Top kudoed authors
| User | Count |
|---|---|
| 11 | |
| 11 | |
| 10 | |
| 9 | |
| 7 | |
| 7 | |
| 7 | |
| 7 | |
| 6 | |
| 5 |