
- SAP Community
- Groups
- Interest Groups
- Application Development
- Blog Posts
- Hosting a Netweaver ABAP Developer System on Googl...
Application Development Blog Posts
Learn and share on deeper, cross technology development topics such as integration and connectivity, automation, cloud extensibility, developing at scale, and security.
Turn on suggestions
Auto-suggest helps you quickly narrow down your search results by suggesting possible matches as you type.
Showing results for
ceedee666
Active Contributor
Options
- Subscribe to RSS Feed
- Mark as New
- Mark as Read
- Bookmark
- Subscribe
- Printer Friendly Page
- Report Inappropriate Content
11-16-2018
12:33 PM
Disclaimer: This blog aims to provide a reference to students and teachers at universities on how to easily host an SAP Netweaver ABAP Developer system on the Google cloud platform. Also some of the information is specific to people teaching at universities the general approach might also be interesting for ABAP developers looking for an alternative approach to installing the SAP Netweaver ABAP Developer in a virtual machine or via docker.
The blog consists of two main parts. First, there is a detailed description on how to set up SAP Netweaver ABAP Trail in the Google cloud platform using the SAP Cloud Appliance Library. Second, there is a description how teachers at universities can request free Google cloud credits for their classes.
Setting up an SAP Netweaver ABAP Developer system on the Google cloud platform consists of five major steps:
In the following sections each of these steps is described in detail.
I assume that everyone has reading this blog already has a Google account. If not, this is the time to create one.
Open the GCP console: https://console.cloud.google.com/. On the GCP console click on the projects link.

This link will open up the pop up shown below. In this pop up you will be able to create a new project. In the screenshot there are already some projects present. If you just create your account the project list is still empty.

Create a project for your SAP Netweaver Trail system. In my case the project is named Netweaver ABAP 752 (which is actually a bit misleading because the SAP Netweaver ABAP Trail system is a Netweaver 7.51 but anyway....). It will take about half a minute until the project is ready.
Actually, the next step is to configure the project you just created. This consists of tow steps:
The next step is to create a service account for your project. Later in the set up process the SAP Cloud Appliance Library uses this service account to deploy the SAP Netweaver Trail system into the GCP.
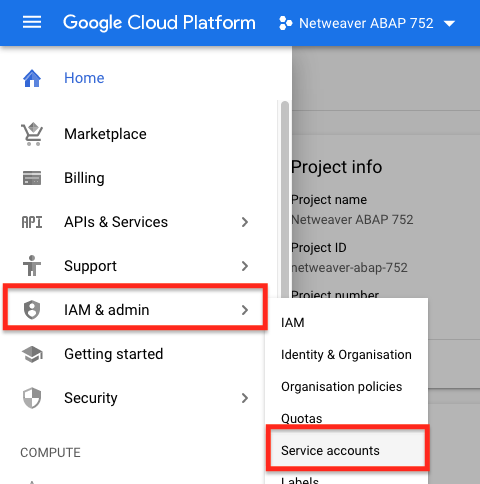
In your project click on the menu icon to toggle the menu.

In the menu select the menu item "IAM & admin -> Service accounts".
Click on the "Create Service Account" link and create a service account.
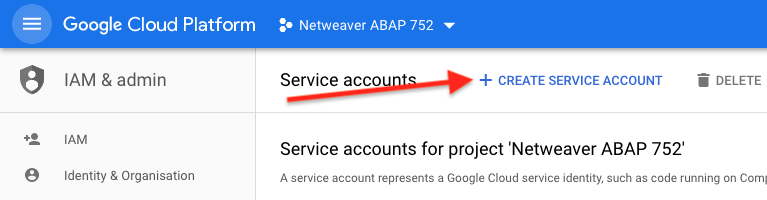
The service account in this example is named "sa-nw-trial".

After the service account has been create additional roles need to be granted to the service account. In order for the deployment of the SAP Netweaver ABAP Developer system using the CAL to succeed, the service account requires the following roles:

Once the roles have been added to the service account click on continue. On the next screen create a private key for the service account and store it in JSON format. Clicking on create will download the private key to you local computer. This key required later to allow the CAL to connect to the GCP.
Finally click on done to finish setting up the service account.


In order to allow the CAL to deploy the SAP Netweaver Developer System to the GCP certain APIs need to be enabled.
in the GCP menu select "API & Services"

In the API & Services dashboard click on "Enable APIs and Services"

On the next page search for the following APIs and enable all of them:
Enabling the Compute Engine API requires you to enable billing for the account. Accept this option. You will need to create a billing account and link it to you project. Here is now some important information for teacher and students.
The next step is to create a SAP Cloud Appliance Library (CAL) account. Navigate to https://cal.sap.com/. On the main page click on "Log on". This will open a pop up of the SAP ID Service. Existing SAP accounts (e.g. for accessing the SAP community network) can also be used to access the CAL. If you don't have an SAP account click on "Register" to create one.

One the account has been created log on to the CAL.
On the CAL console search for SAP NetWeaver AS ABAP 7.51 SP02 on ASE.

Click on "Create Instance" and accept the license agreement. On the next page give the new instance a name and select "Google Cloud Platform" as the cloud provider. Next upload the JSON file that was downloaded at the end of Step 2.

After the upload the zones and regions need to be set. I used "europe-west1" and "Zone B". Next, set a password to access the instance. This password will also be used to log into the SAP system af
ter the installation. Finally, c
reate the new instance. Initially the creation takes about 30min.

Once the instance is created it is also automatically activated. After this process completed it is possible to connect to the instance by clicking on the connect button. Before doing this there are two additional configurations necessary. Clicking on the instance name navigates to the details view. in this view click on "Edit".
First set the tick mark for "Public Static IP Address".

After this add the following ports to the Linux instance:

Finally, save the changes. Now it is possible to connect to the SAP Netweaver ABAP Developer system using both, the SAP GUI and ABAP in Eclipse.
Before the system can be used for ABAP development it is necessary to install a valid license. The description below is copied from julie.plummer great blog https://blogs.sap.com/2017/09/04/sap-as-abap-7.51-sp2-developer-edition-to-download-concise-installa....
The system is now ready an can be used for developing. As a running instance results in higher cost make sure to always suspend the instance if it is not used. Starting and suspending the instance can be done using the CAL console.
In order to being able to use the debugger as well as the ABAP documentation in ABAP in eclipse it is also necessary to edit the hosts file. How this is done depends on the operation system. On Windows the hosts file is located in the folder
The following line need to be added to the end of the hosts file:
In this line <xxx.xxx.xxx.xxx> need to be replaced with the public static IP of the Linux External IP Address of the SAP Netweaver ABAP Developer system. The Linux External IP Address can be found in the details view of the instance in the CAL.
Usually, teachers at universities request SAP system for their courses via the SAP University Alliance. The University Competence Centers provide hosted systems as well as additional service around these systems. Most of the time this is the go to solution (e.g. for teaching introduction courses to SAP ERP using GBI). However, for simple ABAP introduction courses this approach is in my opinion to complex and expensive.
In the past I usually installed a SAP Netweaver ABAP Developer system in a virtual machine and distributes this virtual machine to the students. However, this approach was very error prone as a lot of the students struggled with using the virtual machines (e.g. due to missing disk space on their computers etc.). Since I found out about the Google Cloud Education Grants hosting SAP Netweaver ABAP Developer system on GCP is my preferred solution.
Google offers free education grants here: https://lp.google-mkto.com/CloudEduGrants_Faculty.html
When I requested these grants I got 100$ vouchers for each teacher and 50$ vouchers for each student. 50$ is more then enough to run SAP Netweaver ABAP Developer system for a term. Therefore, this is the approach I'm currently using in all of my classes.
I want to mention noboru.ota great blog on running S/4HANA on GCP (https://blogs.sap.com/2018/07/12/a-do-it-yourself-step-by-step-guide-how-to-set-up-your-on-premise-s...). It provided the basis for this blog. Furthermore, the second part of this blog also shows how to connect to a SAP system running in GCP using ABAP in Eclipse.
The blog consists of two main parts. First, there is a detailed description on how to set up SAP Netweaver ABAP Trail in the Google cloud platform using the SAP Cloud Appliance Library. Second, there is a description how teachers at universities can request free Google cloud credits for their classes.
Setting Up SAP Netweaver ABAP Developer in the Google Cloud Platform
Setting up an SAP Netweaver ABAP Developer system on the Google cloud platform consists of five major steps:
- Registering an account on the Google cloud platform (GCP)
- Setting up a project on the GCP to host the SAP Netweaver ABAP Developer
- Registering an account in the SAP Cloud Appliance Library
- Deploying the SAP Netweaver ABAP Developer system using the SAP Cloud Appliance Library (CAL)
- Post-install steps on the SAP Netweaver ABAP Developer system
In the following sections each of these steps is described in detail.
Step 1: Google cloud platform account
I assume that everyone has reading this blog already has a Google account. If not, this is the time to create one.
Creating a project
Open the GCP console: https://console.cloud.google.com/. On the GCP console click on the projects link.
This link will open up the pop up shown below. In this pop up you will be able to create a new project. In the screenshot there are already some projects present. If you just create your account the project list is still empty.
Create a project for your SAP Netweaver Trail system. In my case the project is named Netweaver ABAP 752 (which is actually a bit misleading because the SAP Netweaver ABAP Trail system is a Netweaver 7.51 but anyway....). It will take about half a minute until the project is ready.
Step 2: Configure the cloud platform account
Actually, the next step is to configure the project you just created. This consists of tow steps:
- creating a d configuring a service account
- enabling certain APIs.
Create a service account
The next step is to create a service account for your project. Later in the set up process the SAP Cloud Appliance Library uses this service account to deploy the SAP Netweaver Trail system into the GCP.
In your project click on the menu icon to toggle the menu.
In the menu select the menu item "IAM & admin -> Service accounts".
Click on the "Create Service Account" link and create a service account.
The service account in this example is named "sa-nw-trial".
After the service account has been create additional roles need to be granted to the service account. In order for the deployment of the SAP Netweaver ABAP Developer system using the CAL to succeed, the service account requires the following roles:
- Compute Instance Admin (v1),
- Compute Network Admin
- Compute Security Admin
Once the roles have been added to the service account click on continue. On the next screen create a private key for the service account and store it in JSON format. Clicking on create will download the private key to you local computer. This key required later to allow the CAL to connect to the GCP.
Finally click on done to finish setting up the service account.
Enable the required APIs
In order to allow the CAL to deploy the SAP Netweaver Developer System to the GCP certain APIs need to be enabled.
in the GCP menu select "API & Services"
In the API & Services dashboard click on "Enable APIs and Services"
On the next page search for the following APIs and enable all of them:
- Cloud Resource Manager API
- Compute Engine API
Enabling the Compute Engine API requires you to enable billing for the account. Accept this option. You will need to create a billing account and link it to you project. Here is now some important information for teacher and students.
- Teachers: Go to the section Google Cloud Credits for Education for a description on how to get free cloud credits.
- Students: If you teacher provided you with a link to retrieve Google cloud credits voucher open this link and request the voucher. In the billing view you created above you will be able to redeem this voucher.
Step 3: SAP Cloud Appliance Library Account
The next step is to create a SAP Cloud Appliance Library (CAL) account. Navigate to https://cal.sap.com/. On the main page click on "Log on". This will open a pop up of the SAP ID Service. Existing SAP accounts (e.g. for accessing the SAP community network) can also be used to access the CAL. If you don't have an SAP account click on "Register" to create one.
One the account has been created log on to the CAL.
Step 4: Deploying the SAP Netweaver ABAP Developer System
On the CAL console search for SAP NetWeaver AS ABAP 7.51 SP02 on ASE.
Click on "Create Instance" and accept the license agreement. On the next page give the new instance a name and select "Google Cloud Platform" as the cloud provider. Next upload the JSON file that was downloaded at the end of Step 2.
After the upload the zones and regions need to be set. I used "europe-west1" and "Zone B". Next, set a password to access the instance. This password will also be used to log into the SAP system af
ter the installation. Finally, c
reate the new instance. Initially the creation takes about 30min.
Once the instance is created it is also automatically activated. After this process completed it is possible to connect to the instance by clicking on the connect button. Before doing this there are two additional configurations necessary. Clicking on the instance name navigates to the details view. in this view click on "Edit".
First set the tick mark for "Public Static IP Address".
After this add the following ports to the Linux instance:
- HTTPS - 44300
- HTTP - 8000
- TCP - 30125
- TCP 3300.
Finally, save the changes. Now it is possible to connect to the SAP Netweaver ABAP Developer system using both, the SAP GUI and ABAP in Eclipse.
Step 5: Post-install steps
Before the system can be used for ABAP development it is necessary to install a valid license. The description below is copied from julie.plummer great blog https://blogs.sap.com/2017/09/04/sap-as-abap-7.51-sp2-developer-edition-to-download-concise-installa....
- Log on to the system, client 000 as user SAP* and the password you set during the installation. In transaction SLICENSE , ascertain your hardware key. If the SAP GUI is installed you can connect by simply clicking on the connect button of your CAL instance.
- Request the license key for your trial version at SAP Sneak Preview License Key Request.
- Select NPL – SAP NetWeaver 7.x (Sybase ASE) as System ID.
- Enter your personal data and agree to the License Agreement.
- Choose Generate bottom right corner of screen.)
- The web site automatically generates a .txt file for this system/key. Download and save this file, eg on the desktop for convenience.
- Go to transaction SLICENSE and install the license file:
- In the tab Digitally signed licenses, delete the existing license, then choose Install. This opens the text file you got and installs the new license key.
- Log out.
The system is now ready an can be used for developing. As a running instance results in higher cost make sure to always suspend the instance if it is not used. Starting and suspending the instance can be done using the CAL console.
Editing the hosts file
In order to being able to use the debugger as well as the ABAP documentation in ABAP in eclipse it is also necessary to edit the hosts file. How this is done depends on the operation system. On Windows the hosts file is located in the folder
C:\Windows\System32\drivers\etcThe following line need to be added to the end of the hosts file:
<xxx.xxx.xxx.xxx> vhcalnplci vhcalnplci.dummy.nodomainIn this line <xxx.xxx.xxx.xxx> need to be replaced with the public static IP of the Linux External IP Address of the SAP Netweaver ABAP Developer system. The Linux External IP Address can be found in the details view of the instance in the CAL.
Google Cloud Credits for Education
Usually, teachers at universities request SAP system for their courses via the SAP University Alliance. The University Competence Centers provide hosted systems as well as additional service around these systems. Most of the time this is the go to solution (e.g. for teaching introduction courses to SAP ERP using GBI). However, for simple ABAP introduction courses this approach is in my opinion to complex and expensive.
In the past I usually installed a SAP Netweaver ABAP Developer system in a virtual machine and distributes this virtual machine to the students. However, this approach was very error prone as a lot of the students struggled with using the virtual machines (e.g. due to missing disk space on their computers etc.). Since I found out about the Google Cloud Education Grants hosting SAP Netweaver ABAP Developer system on GCP is my preferred solution.
Google offers free education grants here: https://lp.google-mkto.com/CloudEduGrants_Faculty.html
When I requested these grants I got 100$ vouchers for each teacher and 50$ vouchers for each student. 50$ is more then enough to run SAP Netweaver ABAP Developer system for a term. Therefore, this is the approach I'm currently using in all of my classes.
References
I want to mention noboru.ota great blog on running S/4HANA on GCP (https://blogs.sap.com/2018/07/12/a-do-it-yourself-step-by-step-guide-how-to-set-up-your-on-premise-s...). It provided the basis for this blog. Furthermore, the second part of this blog also shows how to connect to a SAP system running in GCP using ABAP in Eclipse.
- SAP Managed Tags:
- ABAP Development
14 Comments
You must be a registered user to add a comment. If you've already registered, sign in. Otherwise, register and sign in.
Labels in this area
-
A Dynamic Memory Allocation Tool
1 -
ABAP
8 -
abap cds
1 -
ABAP CDS Views
14 -
ABAP class
1 -
ABAP Cloud
1 -
ABAP Development
4 -
ABAP in Eclipse
1 -
ABAP Keyword Documentation
2 -
ABAP OOABAP
2 -
ABAP Programming
1 -
abap technical
1 -
ABAP test cockpit
7 -
ABAP test cokpit
1 -
ADT
1 -
Advanced Event Mesh
1 -
AEM
1 -
AI
1 -
API and Integration
1 -
APIs
8 -
APIs ABAP
1 -
App Dev and Integration
1 -
Application Development
2 -
application job
1 -
archivelinks
1 -
Automation
4 -
BTP
1 -
CAP
1 -
CAPM
1 -
Career Development
3 -
CL_GUI_FRONTEND_SERVICES
1 -
CL_SALV_TABLE
1 -
Cloud Extensibility
8 -
Cloud Native
7 -
Cloud Platform Integration
1 -
CloudEvents
2 -
CMIS
1 -
Connection
1 -
container
1 -
Debugging
2 -
Developer extensibility
1 -
Developing at Scale
4 -
DMS
1 -
dynamic logpoints
1 -
Eclipse ADT ABAP Development Tools
1 -
EDA
1 -
Event Mesh
1 -
Expert
1 -
Field Symbols in ABAP
1 -
Fiori
1 -
Fiori App Extension
1 -
Forms & Templates
1 -
IBM watsonx
1 -
Integration & Connectivity
10 -
JavaScripts used by Adobe Forms
1 -
joule
1 -
NodeJS
1 -
ODATA
3 -
OOABAP
3 -
Outbound queue
1 -
Product Updates
1 -
Programming Models
13 -
Restful webservices Using POST MAN
1 -
RFC
1 -
RFFOEDI1
1 -
SAP BAS
1 -
SAP BTP
1 -
SAP Build
1 -
SAP Build apps
1 -
SAP Build CodeJam
1 -
SAP CodeTalk
1 -
SAP Odata
1 -
SAP UI5
1 -
SAP UI5 Custom Library
1 -
SAPEnhancements
1 -
SapMachine
1 -
security
3 -
text editor
1 -
Tools
17 -
User Experience
5
Top kudoed authors
| User | Count |
|---|---|
| 4 | |
| 2 | |
| 2 | |
| 2 | |
| 2 | |
| 1 | |
| 1 | |
| 1 | |
| 1 | |
| 1 |