We at SAP Web IDE know that developing SAP Fiori applications can be a bit overwhelming at first.
There's so much to learn!
The move from SAPGUI to SAP Web IDE, from ABAP to SAPUI5... You have to learn Git, Qunit, OPA... and one of the most challenging tasks is connecting your on-premise system to SAP Web IDE in order to consume services from and deploy applications to it.
In SAP Web IDE, we provide many tools to lower the entry barrier: a rich repository of application templates, sample apps, code-completion, code-validations, wizards for creating automated tests, Storyboard and Layout Editor tools for high productivity, and more.
We also provide help through several channels, such as documentation, tutorials, videos in our YouTube channel, blogs, etc.
However, still we get feedback from newcomers that connecting the on-prem system is complicated. So, it's time to tackle this challenge as well... and starting from our latest release (181108), it's possible to create a data source (destination) from within SAP Web IDE, in a way that we think is less confusing.
Let me describe it, as always, in a flow:
1. Create an SAP Fiori App in SAP Web IDE
Let's say I'm a person who wants to create a very simple demo/PoC of a Fiori app.
Obviously, I will choose SAP Web IDE because I don't like installing anything, and I need an outcome fast.
1.1 Create a Trial account on SAP Cloud Platform
If not done already, I will first
create a Trial account for myself, and
open SAP Web IDE.
1.2 Create a new app from a template
The fastest way to create a new application is to use one of the templates provided in SAP Web IDE.
- Click File > New > Project from Template.
- Select the SAP Fiori Master-Detail Application template.
- Enter a Name, Title, and a Namespace, and click Next.
- Reach the Data Connection step.
1.3 Easily connect my app to a service
Now I want to consume a service and show real data in my app.
Since I'm creating a demo app, the simplest option is to connect to the
ES5 Gateway Demo System (to which I created a user in advance).
For this I need a destination in the cockpit, BUT
I can now do it now directly from this step!

- Click on create a new data source.
- Fill out the details (optionally, you can provide your credentials for ES5).
Notice the Proxy Type is Internet because ES5 is open to the internet.
If you are connecting your on-premise system, a Cloud Connector configuration is needed and then the Proxy Type should be OnPremise.
- Click Create.

Now the ES5 system is available from the dropdown list. I can select it and choose a service.

Let's do another example, but this time let's consume the
Northwind OData V4 service.
- Go back to the Template Selection step and select the SAP Fiori Worklist Application OData V4 template.
- Enter a Name, Title, and a Namespace again, and click Next.
- Now you can create a new data source from the Service URL option on the left.
- Click create a new data source.

- Fill out the details. Note that the WebIDEUsage property was automatically selected because we selected the Service URL option.

- Click Create.
- Enter / as the Relative URL and click Test.
- After binding some fields to OData properties and finishing the wizard, the app is ready in my workspace.
2. Visualize my app using the Storyboard
To help me understand what was created for me, I open my project in the Storyboard:
- Enable the Storyboard extension from the User Preferences.
- Select the project and open the Storyboard.

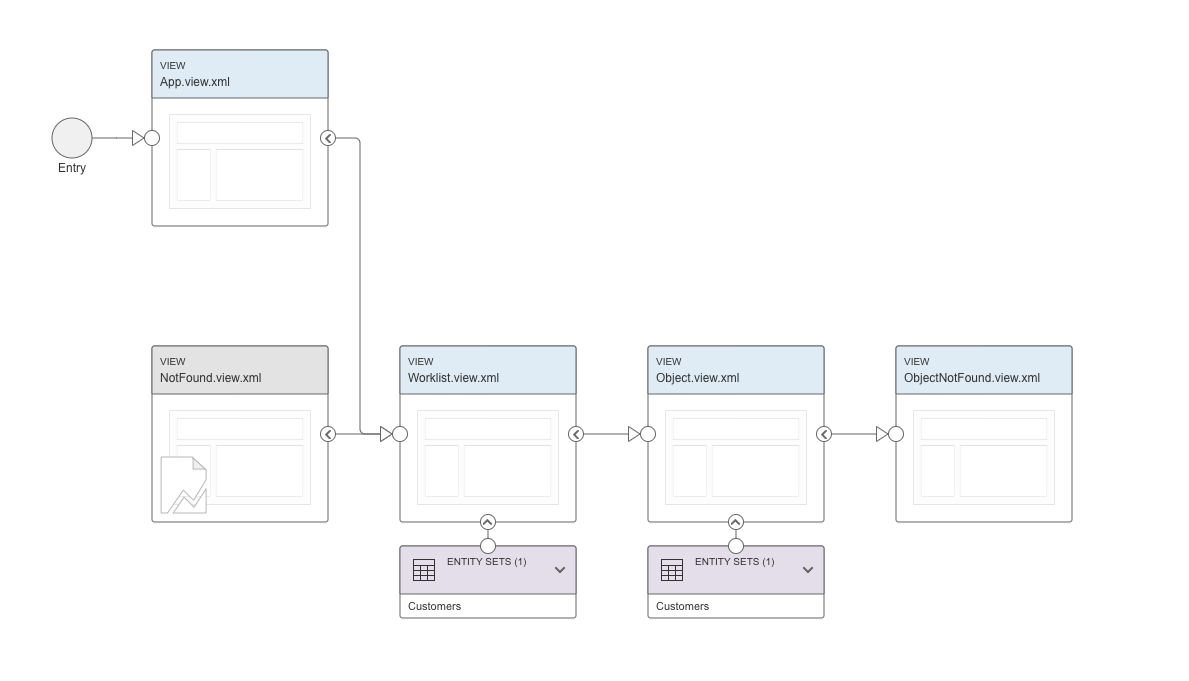
A
visual representation of the Worklist application is displayed: its views, navigations, and entity-sets.
This helps me understand the flow of my app.
- From the Storyboard I can run my app and view it.
- I can also perform more actions from the Storyboard such as add a new view and configure navigations. See more details in my dedicated Storyboard blog.
Summary
What did we do?
We created a simplified flow for newcomers to SAP Fiori development.
You can sign up to a new account and use SAP Web IDE to develop SAP Fiori applications that consume data from a remote data source. You can complete all the data source setup from within your development environment, getting all the help you need to maintain destinations that are consumable by SAP Web IDE.
Setting up destinations is not an easy task and it often requires reading documentation and blogs, but now it should be easier.
