
- SAP Community
- Products and Technology
- Technology
- Technology Blogs by Members
- Fun and Games with SAP Cloud Domains
Technology Blogs by Members
Explore a vibrant mix of technical expertise, industry insights, and tech buzz in member blogs covering SAP products, technology, and events. Get in the mix!
Turn on suggestions
Auto-suggest helps you quickly narrow down your search results by suggesting possible matches as you type.
Showing results for
pjcools
Active Contributor
Options
- Subscribe to RSS Feed
- Mark as New
- Mark as Read
- Bookmark
- Subscribe
- Printer Friendly Page
- Report Inappropriate Content
11-01-2018
10:37 AM
There was a business requirement in one of the latest projects I have been involved with to create and utilise a cloud domain rather than providing users with links that don't really mean anything. This opened up my eyes to the world of cloud domains. I had seen this option before but had not really dabbled in it but I must say after having some experience with this I really like the use of it. Definitely allows a company to customise their Portal sites for the betterment of the user experience. In previous projects I usually compiled a URL register for the client so they know the URL's involved in accessing Portal Site Admin, OData Provisioning and of course the specific FLP's or Freestyle sites that have been created per sub-account. With Cloud Domains this is no longer necessary as the URL's are easy to remember! As such, I am now recommending to all clients to think about implementing Cloud Domains - just another element added to the mix to really improve the user experience!
Just as an example, this would change the following:
https://flpnwc-subaccountname.dispatcher.ap1.hana.ondemand.com/sites/freestylesitename#Home-Show
to
https:/fioridev.companyname.com.au/sites/freestylesitename#Home-Show
This of course is an example for an entire freestyle site but you can set specific cloud domain values for individual applications if desired.
When thinking about rolling solutions out to the user base a number of different options are involved. It is a bit of a black art and I've seen a number of options utilised including:
Another option is to create a cloud domain name that is easy enough for users to remember. Most of the time organisations already have their own domain so it is more a task of extending it to include new cloud domain values. So, let's go through how this can be achieved. Firstly, let me include some links that I referenced when creating and setting up the cloud domain.
This link is quite good and has a diagram explaining the steps involved as well as the involved parties.
https://blogs.sap.com/2015/06/24/set-up-your-custom-application-url/
This is the standard SAP Cloud Platform help site which has some great information as well.
https://help.sap.com/viewer/65de2977205c403bbc107264b8eccf4b/Cloud/en-US/98e655aacd1d4fc6a6ab23475b1...
The following SAP Cloud Platform capabilities site I also referenced. The video is great although I had to pause and rewind the video a few times as it went through the steps quickly. 🙂
https://cloudplatform.sap.com/capabilities/product-info.Custom-Domain.2386628a-b819-4a83-9890-828efa...
Now, before we get into the detailed steps let's cover the pre-requisites - these are required to start this entire process.
There are a number of prerequisites required when carrying out the set up of the cloud domain, including:
Additionally - you will see the User parameter used throughout the Neo commands below. This user is the email address for your SAP Cloud Platform login. It should always be the same.
To download the console client you need to visit the SAP Development tools website and navigate to the Cloud category -> https://tools.hana.ondemand.com/#cloud. To carry out the Cloud Domain set up you need to download the SAP Cloud Platform Neo Environment SDK as shown below. There are a number of versions and they change regularly so just download the latest version.

Figure:1 SAP Cloud Platform Neo Environment SDK download screen
Steps include:
Here is an excerpt from the Readme file for some additional information.
#############################################################
# Welcome to the SAP Cloud Platform SDK for Neo Environment #
#############################################################
Runtime : Java Web Tomcat 8
Version : 3.59.20.3
Build Date : 2018-07-13
1. Introduction
The SAP Cloud Platform SDK for Neo environment contains everything required to build SAP Cloud Platform applications.
The following section will show you its inner structure.
It gives you the libraries required for compilation of SAP Cloud Platform applications, contains documentation, samples, and the tools for command line usage.
2. File System Structure
<root>
|- api Platform API JARs required for compilation of SAP Cloud Platform applications
|- javadoc JavaDoc of the above platform API
|- license Licenses of third party components contained in the SAP Cloud Platform SDK for Neo environment
|- repository Repository from which the local server runtime can be installed
|- samples Samples demonstrating how to develop for SAP Cloud Platform
|- server Initially not present, but created once you install a local server runtime
|- tools SAP Cloud Platform console client required for development, e.g. to install a SAP Cloud Platform local runtime
|- readme.txt Brief introduction into the SAP Cloud Platform SDK for Neo environment, its content and how to set it up
|- sdk.version SAP Cloud Platform SDK for Neo environment version information for use by other tools interacting with the SDK
This is what the extracted zip file looks like.

Figure:2 SDK extracted files
As highlighted above the key folder for the cloud domain set up is the tools directory. For more information check out this link.
https://help.sap.com/viewer/65de2977205c403bbc107264b8eccf4b/Cloud/en-US/7613843c711e1014839a8273b0e...
Now that we have the SAP Cloud Platform Neo SDK tools installed it is time to start setting up the cloud domain.
For all the steps involved I used the Command Prompt (for Windows machines).
NOTE: The steps can be carried out at all different times so perform the above two steps every time you need to carry out a step as part of the overall Cloud Domain set up process.
At this point as mentioned previously we need to first check whether in fact a cloud domain is available. If a different cloud domain is required per SAP Cloud Platform subaccount then they will need to be purchased via the normal methods.
You can use the list-ssl-hosts command to do this. This will show how many cloud domains are available.
COMMAND = list-ssl-hosts
The following information is referenced in the List SSL hosts command including:
You will then need to run a specific command to list the SSL hosts.
As you can see at this point we have only 1 available - this is the Account quota number detailed below. All SSL hosts will be listed here if in fact more have been set up. At this point in the process I had created an SSL for a single SAP Cloud Platform subaccount and had used the quota.

Figure:3 SSL hosts and Cloud Domains quota
OK, now that we have checked this we can now go through the steps of creating and setting up the Cloud Domain.
There are a number of steps involved that I will now cover.
We will now go through all of these steps and along the way cover some additional learnings throughout the process.
The first step in setting up a Cloud Domain is to create a new SSL host. This will actually serve your custom domain. You will need an SSL host for each cloud domain you want to utilise which would typically match the number of SAP Cloud Platform subaccounts you have if in fact you are creating a cloud domain for each. All other steps will ultimately relate to the SSL host so this is an important step.
Result of this step: Creation of an SSL host name – something like the following - APnnnnnnnnnnn.ssl.ondemand.com where the AP stands for the Region - Asia Pacific (AP) in this case.
The following command is used to create the SSL host. When this is created you will actually be able to ping it with successful connectivity.
The following information is referenced in the Create SSL host command including:
You will then need to run a specific command to create the SSL host.
When you run any command you will prompted to enter your Password (for the user you included in the command). This is your SAP Cloud Platform Neo account password that you would normally enter when navigating to the SAP Cloud Platform Cockpit. Once entered the SSL host will be created successfully and you will receive the following message:
“A new SSL host ‘mysslhostname’ was created and is now accessible on ‘APnnnnnnnnnnn.ssl.ondemand.com’. The ssl host name that is created here will need to be used by the Network team to associate internal URL’s with the external SSL host. This is covered in later steps.You can also ping the site and you will see at this point it should connect.

Figure:4 Step:1 Create SSL Host
If you create an SSL host in error you can delete it. Look in the last section of this blog to find out how you can delete an SSL host after creating it.
The next step in the process is to create a Certificate Signing Request (CSR). This will typically be sent to a Certificate Authority to be digitally signed and be warned they do cost money – between $700 and $1000 AUD for each certificate.
Similar to the SSL host creation step this needs to be performed in the Console client. You will need to determine the following information as part of this step.
Here is a full example of what the parameters could be set to.
The generate CSR command needs to be entered in the following format.
The result of this step is that a Certificate Signing Request is generated. When this is generated you will need to copy the CSR into a text file and send through to your certificate authority to get it signed. Copy all of the text including the -----BEGIN CERTIFICATE ----- and -----END CERTIFICATE ----- text.

Figure:5 Step:2 Generate CSR (Certificate Signing Request)
This request is then signed.
The certificate authority needs to sign the above CSR and provide a PEM file for the signed certificate. Once the CSR is signed by the certificate authority it will need to be loaded using the Console client.
NOTE: You cannot load any certificate here, a certificate signed directly from the CSR only can be uploaded. Here is some more information about the certificate.
The certificate must be in Privacy-enhanced Electronic Mail (PEM) format (128 or 256 bits) with private key (2048-4096 bits).
https://help.sap.com/viewer/65de2977205c403bbc107264b8eccf4b/Cloud/en-US/77cf0e6cd32e496c9cc8eeac4be...
The certificate should be in a PEM format. It doesn't have to be .pem file. It can also be .cer, .crt.
But p7b file is in PKCS#7 format which is not supported.
When the signed certificate comes back from the certificate authority it can be uploaded using the console client. This is normally 24-48 hours after the CSR is generated so you will need to run the command prompt again and navigate to the correct directory for the Neo commands (tools as mentioned previously). A number of file formats are permissible here but the ideal one is a .PEM file. There is not normally a password required when uploading this certificate.
The following information is referenced in the Upload Certificate command including:
The upload domain certificate command needs to be entered in the following format. Again, like the other commands you will need to enter your Password.
NOTE: The certificate .pem file will need to be located in the SDK\tools folder for the above command to work.
The result from this step is that the SSL certificate will be loaded into SAP Cloud Platform for the sub-account and hostname and be identified by the certificateidentifier.

Figure:6 Step:4 Upload Certificate
The message that is displayed is as follows:
SSL certificate ‘certificateidentifier’ uploaded.
Once the certificate has been uploaded the next step will be to bind the certificate to the SSL host.
***NOTE***
I encountered an issue when uploading the certificate initially and dealt with SAP support and received the following information.
The next step in the process is to bind the uploaded certificate to the created SSL host so that it can be used as SSL certificate for requests to this SSL host. The result out of this step is that the certificate will be bound to the SSL host name of the custom domain. Once successful the message displayed will state that the certificate (name) is bound to the SSL host (ssl host name).
The following information is referenced in the bind certificate command including:
You will then need to run a specific command to bind the domain certificate.

Figure:7 Step:5 Bind Certificate to SSL Host
The certificate will then be bound to the new SSL host name which will eventually become the cloud domain.
One of the final steps is to add the custom domain. This is one of the steps that brings it all together.
The following information is referenced in the Add Custom Domain command including:
You will then need to run a specific command to add the custom domain.

Figure:8 Step:6 Add Custom Domain
After this step the custom domain is set - there are now only a couple of steps left.
The second last change is to modify the DNS name with your website provider. This usually involves changing of the CNAME. The following information is required to complete this step.
This is normally carried out by internal infrastructure/network resources and I won't go into detail here.
The last step in all of this set up is to actually use the cloud domain within the sub-account on SAP Cloud Platform. There is a particular tab page on the Trust settings within the Security area.
The following settings need to be made here:

Figure:9 Step:8 Configure Custom Domain
This now completes the steps involved in creating a custom domain. If you run your new cloud domain URL (followed by the relevant application specifics) you will see the website come up successfully.

If you click on the lock you can view the certificate information and the Issued To: should match to your Cloud domain name.
This concludes the cloud domain set up. I will finish off the main part of this blog with an architecture diagram - did not want to scare you off initially with architecture :-).

Figure:10 Cloud Domain Architecture
I will now cover some other notes - more helpful hints for other commands that might be required along on the way. Hope you have enjoyed the ride so far.
During this exercise I have found a few other things that are worth noting. Some of these involve use of other console commands but are notable inclusions as you go through the Cloud domain set up process. Hopefully they help you as much as they did me!
When I was implementing Cloud domains I actually did need to delete it – so this next Delete command came in handy. It is important to spend some time up front determining exactly what the cloud domain names should be – especially when designing this for multiple sub-accounts. It needs to make sense. Initially when I did create them we had hyphens in the host name so I used the delete-ssl-host command to delete it and create a new one without hyphens. 🙂
This is not really part of the entire cloud domain set up however I have included in case you create the SSL host in error.
The following information is referenced in the Delete SSL host command including:
You will then need to run a specific command to delete the SSL host.

Figure:11 Deleting an SSL Host
As stated previously you may not need to use the above delete ssl host command but I included this just in case you do.
You can check on the domain certificates that are loaded at any point in time by using the list domain command.
COMMAND = list-domain-certificates
The following information is referenced in the list domain certificates command including:
You will then need to run a specific command to list the domain certificates.
There are two steps involved when a domain certificate you have bound previously needs to be deleted. This means there are 2 commands involved.
Unbind Domain Certificate
The following information is referenced in the Unbind domain certificate command including:
You will then need to run a specific command to unbind the domain certificate from the SSL host.
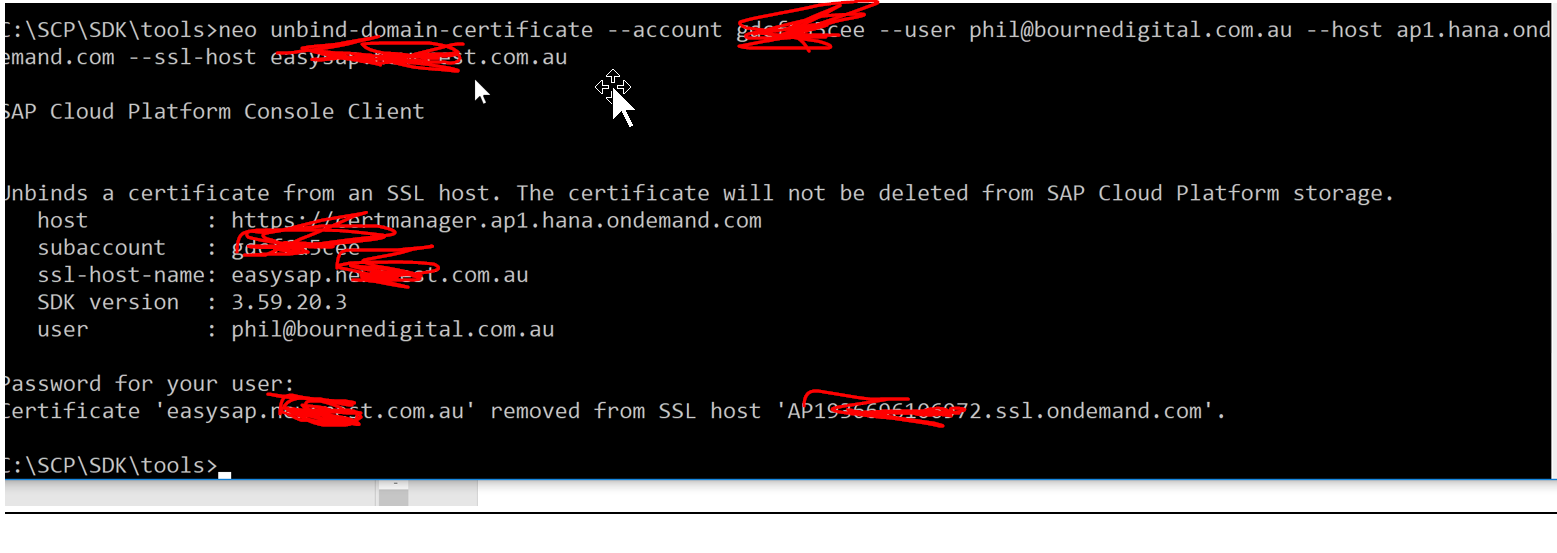
Figure:12 Unbinding the Domain Certificate from SSL Host
You will see the return message displayed "Certificate 'xxxxxxx' removed from SSL host 'APnnnnnn.ssl.ondemand.com'.
The domain certificate has been removed from the SSL host at this step.
Delete Domain Certificate
The following information is referenced in the Delete domain certificate command including:
You will then need to run a specific command to unbind the domain certificate from the SSL host.

Figure:13 Deleting the Domain Certificate
You will see the return message displayed "Certificate certificateidentifier deleted.
Overall I had plenty of fun and games going through and learning all about cloud domains and I wrote this blog because I believe the requirement for this will only increase in the future. So hopefully this reference will be useful out in the SAP Community.
Thanks for reading and please add more information or contribute in some way if you feel it is required.
Also happy for comments!
Just as an example, this would change the following:
https://flpnwc-subaccountname.dispatcher.ap1.hana.ondemand.com/sites/freestylesitename#Home-Show
to
https:/fioridev.companyname.com.au/sites/freestylesitename#Home-Show
This of course is an example for an entire freestyle site but you can set specific cloud domain values for individual applications if desired.
When thinking about rolling solutions out to the user base a number of different options are involved. It is a bit of a black art and I've seen a number of options utilised including:
- Sending out the links to the FLP via email. This starts to get tricky if users need to access multiple FLP's.
- Producing a QR code that points to the FLP site. I quite like this one but probably only makes sense if the FLP is to consumed on a mobile device and via SAP Fiori Client.
- Embedding of the link in an intranet site, possibly Office 365 link. This is more adding the link to a central place that most users go to on a daily basis.
- Self-service by users entering the link into their SAP Fiori Client application on their mobile device. This again gets complicated when you have users testing the application.
Another option is to create a cloud domain name that is easy enough for users to remember. Most of the time organisations already have their own domain so it is more a task of extending it to include new cloud domain values. So, let's go through how this can be achieved. Firstly, let me include some links that I referenced when creating and setting up the cloud domain.
This link is quite good and has a diagram explaining the steps involved as well as the involved parties.
https://blogs.sap.com/2015/06/24/set-up-your-custom-application-url/
This is the standard SAP Cloud Platform help site which has some great information as well.
https://help.sap.com/viewer/65de2977205c403bbc107264b8eccf4b/Cloud/en-US/98e655aacd1d4fc6a6ab23475b1...
The following SAP Cloud Platform capabilities site I also referenced. The video is great although I had to pause and rewind the video a few times as it went through the steps quickly. 🙂
https://cloudplatform.sap.com/capabilities/product-info.Custom-Domain.2386628a-b819-4a83-9890-828efa...
Now, before we get into the detailed steps let's cover the pre-requisites - these are required to start this entire process.
Prerequisites
There are a number of prerequisites required when carrying out the set up of the cloud domain, including:
- Domain Name. This is the first pre-requisite however most companies already have a domain name that they own.If not, or if a different domain name is required for the custom domain then it will need to be purchased.
- Custom Domain. This is obviously absolutely required. For customers signing up to the SAP Fiori Cloud subscription you will receive 1 complimentary cloud domain with your SAP Fiori Cloud subscription however most organisations would use this for a Production environment. I will detail below how you can check if you have a free cloud domain with your SAP Cloud Platform subscription.
- Console Client. Management of the custom domain and full set up takes place through the SAP Cloud Platform console client. Commands are used to carry out the necessary instructions to not only set up the custom domain but to create the Certificate signing request, to load the certificate and to create the SSL host. All of this will be described in more detail below. I used the command prompt as I used a Windows 10 laptop to perform the tasks.https://help.sap.com/viewer/65de2977205c403bbc107264b8eccf4b/Cloud/en-US/9341b7dc-322d-4523-ac64-b62...
Additionally - you will see the User parameter used throughout the Neo commands below. This user is the email address for your SAP Cloud Platform login. It should always be the same.
Console Client
To download the console client you need to visit the SAP Development tools website and navigate to the Cloud category -> https://tools.hana.ondemand.com/#cloud. To carry out the Cloud Domain set up you need to download the SAP Cloud Platform Neo Environment SDK as shown below. There are a number of versions and they change regularly so just download the latest version.
Figure:1 SAP Cloud Platform Neo Environment SDK download screen
Steps include:
- Download the ZIP file by clicking on the link as highlighted above. I believe you can download either version but in my case I downloaded the Java Web Tomcat 8 version. Specifically click on the neo-java-web-sdk-3.65.7.zip.
- Extract the ZIP file into a preferred location. In my case I created a new folder on my local drive called SCP and a sub-directory called SDK. Tip: Look at the Readme.txt file for more detailed information about the SDK.
Here is an excerpt from the Readme file for some additional information.
#############################################################
# Welcome to the SAP Cloud Platform SDK for Neo Environment #
#############################################################
Runtime : Java Web Tomcat 8
Version : 3.59.20.3
Build Date : 2018-07-13
1. Introduction
The SAP Cloud Platform SDK for Neo environment contains everything required to build SAP Cloud Platform applications.
The following section will show you its inner structure.
It gives you the libraries required for compilation of SAP Cloud Platform applications, contains documentation, samples, and the tools for command line usage.
2. File System Structure
<root>
|- api Platform API JARs required for compilation of SAP Cloud Platform applications
|- javadoc JavaDoc of the above platform API
|- license Licenses of third party components contained in the SAP Cloud Platform SDK for Neo environment
|- repository Repository from which the local server runtime can be installed
|- samples Samples demonstrating how to develop for SAP Cloud Platform
|- server Initially not present, but created once you install a local server runtime
|- tools SAP Cloud Platform console client required for development, e.g. to install a SAP Cloud Platform local runtime
|- readme.txt Brief introduction into the SAP Cloud Platform SDK for Neo environment, its content and how to set it up
|- sdk.version SAP Cloud Platform SDK for Neo environment version information for use by other tools interacting with the SDK
This is what the extracted zip file looks like.
Figure:2 SDK extracted files
As highlighted above the key folder for the cloud domain set up is the tools directory. For more information check out this link.
https://help.sap.com/viewer/65de2977205c403bbc107264b8eccf4b/Cloud/en-US/7613843c711e1014839a8273b0e...
Now that we have the SAP Cloud Platform Neo SDK tools installed it is time to start setting up the cloud domain.
For all the steps involved I used the Command Prompt (for Windows machines).
- Using the Run option bring up the MS windows command prompt.
- Navigate to the SDK tools directory. This includes batch commands that need to be executed.
NOTE: The steps can be carried out at all different times so perform the above two steps every time you need to carry out a step as part of the overall Cloud Domain set up process.
At this point as mentioned previously we need to first check whether in fact a cloud domain is available. If a different cloud domain is required per SAP Cloud Platform subaccount then they will need to be purchased via the normal methods.
List SSL Hosts
You can use the list-ssl-hosts command to do this. This will show how many cloud domains are available.
COMMAND = list-ssl-hosts
The following information is referenced in the List SSL hosts command including:
- Neo Sub-Account name.
- User - email address of the SAP Cloud Platform user (S or P number).
- Host name e.g. ap1.hana.ondemand.com
You will then need to run a specific command to list the SSL hosts.
neo list-ssl-hosts --account subaccountname --user phil@company.com.au --host ap1.hana.ondemand.com
As you can see at this point we have only 1 available - this is the Account quota number detailed below. All SSL hosts will be listed here if in fact more have been set up. At this point in the process I had created an SSL for a single SAP Cloud Platform subaccount and had used the quota.
Figure:3 SSL hosts and Cloud Domains quota
OK, now that we have checked this we can now go through the steps of creating and setting up the Cloud Domain.
There are a number of steps involved that I will now cover.
| Task | Task Description |
| 1 | Create SSL Host |
| 2 | Generate CSR |
| 3 | Sign Certificate |
| 4 | Upload Domain Certificate |
| 5 | Bind Certificate to the SSL Host |
| 6 | Map custom domain |
| 7 | Configure DNS |
| 8 | Configure Single Sign On |
We will now go through all of these steps and along the way cover some additional learnings throughout the process.
1. Create SSL Host
The first step in setting up a Cloud Domain is to create a new SSL host. This will actually serve your custom domain. You will need an SSL host for each cloud domain you want to utilise which would typically match the number of SAP Cloud Platform subaccounts you have if in fact you are creating a cloud domain for each. All other steps will ultimately relate to the SSL host so this is an important step.
Result of this step: Creation of an SSL host name – something like the following - APnnnnnnnnnnn.ssl.ondemand.com where the AP stands for the Region - Asia Pacific (AP) in this case.
The following command is used to create the SSL host. When this is created you will actually be able to ping it with successful connectivity.
COMMAND = create-ssl-host
The following information is referenced in the Create SSL host command including:
- Neo Sub-Account name.
- User - email address of the SAP Cloud Platform user (S or P number).
- Host name e.g. ap1.hana.ondemand.com
- SSL host name to be created. This is usually the cloud domain you would like. For e.g. fioridev.company.com.au
You will then need to run a specific command to create the SSL host.
neo create-ssl-host --account mysubaccount --user phil@company.com.au --host ap1.hana.ondemand.com --name mysslhostname
When you run any command you will prompted to enter your Password (for the user you included in the command). This is your SAP Cloud Platform Neo account password that you would normally enter when navigating to the SAP Cloud Platform Cockpit. Once entered the SSL host will be created successfully and you will receive the following message:
“A new SSL host ‘mysslhostname’ was created and is now accessible on ‘APnnnnnnnnnnn.ssl.ondemand.com’. The ssl host name that is created here will need to be used by the Network team to associate internal URL’s with the external SSL host. This is covered in later steps.You can also ping the site and you will see at this point it should connect.
Figure:4 Step:1 Create SSL Host
If you create an SSL host in error you can delete it. Look in the last section of this blog to find out how you can delete an SSL host after creating it.
2. Create CSR
The next step in the process is to create a Certificate Signing Request (CSR). This will typically be sent to a Certificate Authority to be digitally signed and be warned they do cost money – between $700 and $1000 AUD for each certificate.
COMMAND = generate-csr
Similar to the SSL host creation step this needs to be performed in the Console client. You will need to determine the following information as part of this step.
- Certificate Identifier - this is a certificate identifier to be used in later steps it is not specifically included as part of the CSR. An example would be companynamedevcert.
- Certificate Distinguished Name - also referred to as the Common Name (CN). This is usually the host name you want to create.
- Subject Alternative Name (SAN – this can be the same as the Certificate Distinguished Name and can also have additional descriptors.
- Locality – usually the suburb or city of the company name
- Organisational Unit (OU) – the department for which the CSR relates to. Typically this is IT.
- Organisation (O) – typically the Company Name and includes Pty. Ltd based on the type of company.
- State or Province (ST) – the state or province the company is located.
- Country (C) – this is a 2-digit country code. AU for Australia.
Here is a full example of what the parameters could be set to.
| Parameter Name | Value |
| Common Name (CN) | fioridev.company123.com.au |
| Subject Alternative Name (SAN) | fioridev.company123.com.au |
| Email Address (EMAIL) | |
| Locality (L) | Melbourne |
| Organisational Unit (OU) | IT |
| Organisation (O) | Company Name |
| State or Province (ST) | Victoria |
| Country (C) | AU |
| Domain Component (DC) |
The generate CSR command needs to be entered in the following format.
neo generate-csr --account mysubaccount --user phil@company.com.au --host ap1.hana.ondemand.com --name certificateidentifier –-certificate-distinguished-name “C=XX,O=XXXXX,L=XXXX,ST=XXXXXX,CN=xxxxxxxx” –subject-alternative-name “xxxxxxxxxxxxxxxxxxxxxxx”
The result of this step is that a Certificate Signing Request is generated. When this is generated you will need to copy the CSR into a text file and send through to your certificate authority to get it signed. Copy all of the text including the -----BEGIN CERTIFICATE ----- and -----END CERTIFICATE ----- text.
Figure:5 Step:2 Generate CSR (Certificate Signing Request)
This request is then signed.
3. Sign Certificate
The certificate authority needs to sign the above CSR and provide a PEM file for the signed certificate. Once the CSR is signed by the certificate authority it will need to be loaded using the Console client.
NOTE: You cannot load any certificate here, a certificate signed directly from the CSR only can be uploaded. Here is some more information about the certificate.
The certificate must be in Privacy-enhanced Electronic Mail (PEM) format (128 or 256 bits) with private key (2048-4096 bits).
https://help.sap.com/viewer/65de2977205c403bbc107264b8eccf4b/Cloud/en-US/77cf0e6cd32e496c9cc8eeac4be...
The certificate should be in a PEM format. It doesn't have to be .pem file. It can also be .cer, .crt.
But p7b file is in PKCS#7 format which is not supported.
4. Upload Domain Certificate
When the signed certificate comes back from the certificate authority it can be uploaded using the console client. This is normally 24-48 hours after the CSR is generated so you will need to run the command prompt again and navigate to the correct directory for the Neo commands (tools as mentioned previously). A number of file formats are permissible here but the ideal one is a .PEM file. There is not normally a password required when uploading this certificate.
COMMAND = upload-domain-certificate
The following information is referenced in the Upload Certificate command including:
- Neo Sub-Account name.
- User - the email address of the SAP Cloud Platform user (S or P number).
- Host name e.g. ap1.hana.ondemand.com
- Certificate Identifier that was used in the CSR request step. An example would be companynamedevcert.
- Certificate file name (.pem)
The upload domain certificate command needs to be entered in the following format. Again, like the other commands you will need to enter your Password.
neo upload-domain-certificate --account mysubaccount --user phil@company.com.au --host ap1.hana.ondemand.com --name certificateidentifier –-location ./certificatefilename.pem
NOTE: The certificate .pem file will need to be located in the SDK\tools folder for the above command to work.
The result from this step is that the SSL certificate will be loaded into SAP Cloud Platform for the sub-account and hostname and be identified by the certificateidentifier.
Figure:6 Step:4 Upload Certificate
The message that is displayed is as follows:
SSL certificate ‘certificateidentifier’ uploaded.
Once the certificate has been uploaded the next step will be to bind the certificate to the SSL host.
***NOTE***
I encountered an issue when uploading the certificate initially and dealt with SAP support and received the following information.
For the initial error, it is caused by this bug on BigIP F5 load balancer and a workaround for it is to use a different name.
5. Bind Certificate to the SSL Host
The next step in the process is to bind the uploaded certificate to the created SSL host so that it can be used as SSL certificate for requests to this SSL host. The result out of this step is that the certificate will be bound to the SSL host name of the custom domain. Once successful the message displayed will state that the certificate (name) is bound to the SSL host (ssl host name).
COMMAND = bind-domain-certificate
The following information is referenced in the bind certificate command including:
- Neo Sub-Account name.
- User - email address of the SAP Cloud Platform user (S or P number).
- Host name e.g. ap1.hana.ondemand.com
- SSL Host Name - from Step 1. For e.g. fioridev.company.com.au
- Certificate Identifier that was used in the CSR request and in the upload step. An example would be companynamedevcert.
You will then need to run a specific command to bind the domain certificate.
neo bind-domain-certificate --account mysubaccount --user phil@company.com.au --host ap1.hana.ondemand.com --ssl-host mysslhostname --certificate certificateidentifier
Figure:7 Step:5 Bind Certificate to SSL Host
The certificate will then be bound to the new SSL host name which will eventually become the cloud domain.
6. Add/Map Custom Domain
One of the final steps is to add the custom domain. This is one of the steps that brings it all together.
COMMAND = add-custom-domain
The following information is referenced in the Add Custom Domain command including:
- Neo Sub-Account name.
- user - email address of the SAP Cloud Platform user (S or P number).
- Host name e.g. ap1.hana.ondemand.com
- Custom domain name (in this case this equals the mysslhostname). Usually this would be the same as the SSL host name.
- Application URL - basically the flp URL up to the sites part.
- SSL host name - equals the SSL host created in the first step. For e.g. fioridev.company.com.au
You will then need to run a specific command to add the custom domain.
neo add-custom-domain --account mysubaccount --user phil@company.com.au --host ap1.hana.ondemand.com --custom-domain clouddomainname --application-url https://flpnwc-mysubaccount.dispatcher.ap1.hana.ondemand.com --ssl-host mysslhostname --certificate certificateidentifier
Figure:8 Step:6 Add Custom Domain
After this step the custom domain is set - there are now only a couple of steps left.
7. Configure DNS
The second last change is to modify the DNS name with your website provider. This usually involves changing of the CNAME. The following information is required to complete this step.
- The SSL host name that was provided after Step 1. You may recall this was in the format of APnnnnnnnnnnn.ssl.ondemand.com. To check connectivity you can actually ping this address in the command prompt.
- The SSL host or Cloud Domain you have created. You need to basically create an Alias for the above APnnnnnn host name and point it to the new cloud domain created.
This is normally carried out by internal infrastructure/network resources and I won't go into detail here.
8. Configure Custom Domain / Single Sign-On
The last step in all of this set up is to actually use the cloud domain within the sub-account on SAP Cloud Platform. There is a particular tab page on the Trust settings within the Security area.
The following settings need to be made here:
- Click on [Edit] button to change the settings.
- Use Custom Application Domain checkbox -> set to Active.
- Central Redirect URL = https://authn.ap1.hana.ondemand.com (this is usually prefilled)
- Custom Domain URLs = https://*.customdomainname/saml2/sp/slo/subaccountname/subaccountname
Figure:9 Step:8 Configure Custom Domain
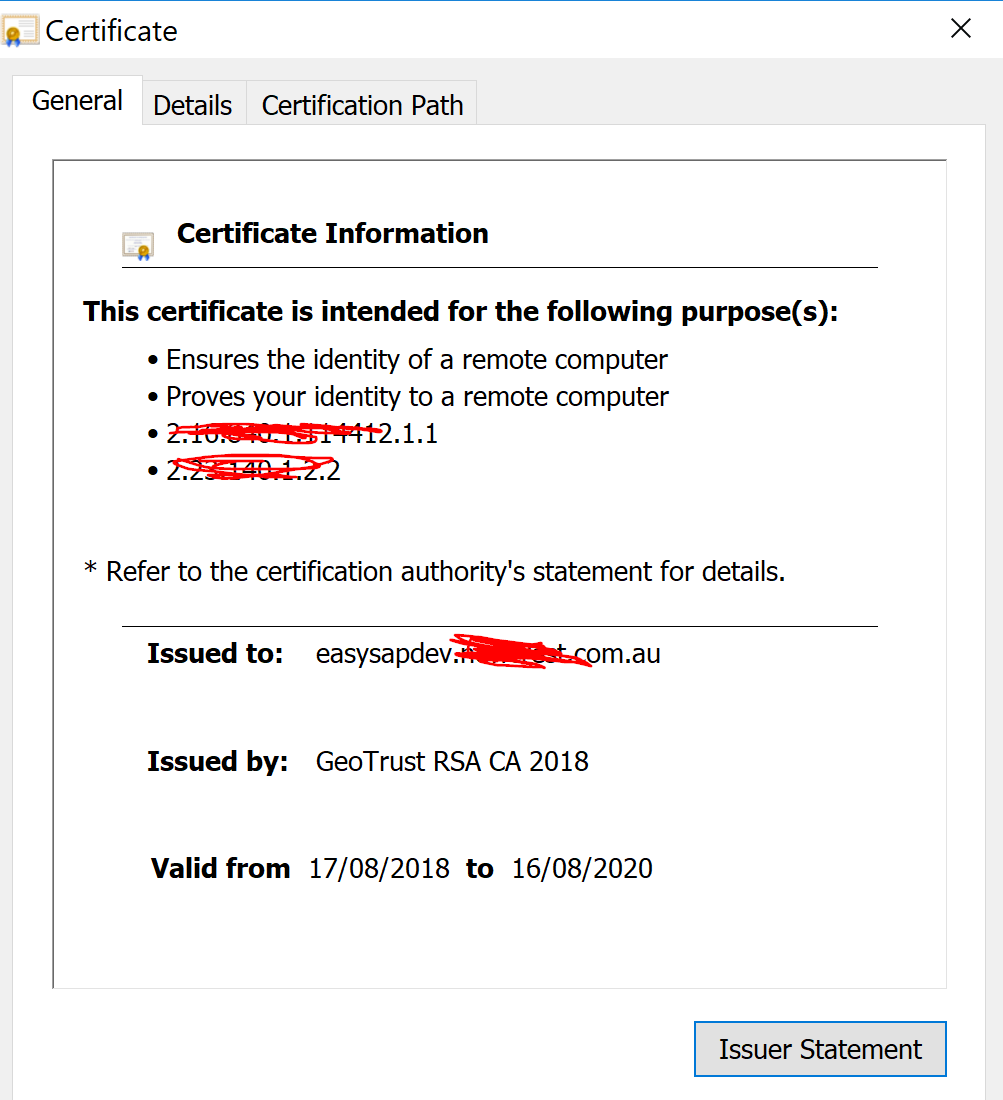
This now completes the steps involved in creating a custom domain. If you run your new cloud domain URL (followed by the relevant application specifics) you will see the website come up successfully.
If you click on the lock you can view the certificate information and the Issued To: should match to your Cloud domain name.
This concludes the cloud domain set up. I will finish off the main part of this blog with an architecture diagram - did not want to scare you off initially with architecture :-).
Figure:10 Cloud Domain Architecture
I will now cover some other notes - more helpful hints for other commands that might be required along on the way. Hope you have enjoyed the ride so far.
Other Notes
During this exercise I have found a few other things that are worth noting. Some of these involve use of other console commands but are notable inclusions as you go through the Cloud domain set up process. Hopefully they help you as much as they did me!
Deleting an SSL Host
When I was implementing Cloud domains I actually did need to delete it – so this next Delete command came in handy. It is important to spend some time up front determining exactly what the cloud domain names should be – especially when designing this for multiple sub-accounts. It needs to make sense. Initially when I did create them we had hyphens in the host name so I used the delete-ssl-host command to delete it and create a new one without hyphens. 🙂
This is not really part of the entire cloud domain set up however I have included in case you create the SSL host in error.
COMMAND = delete-ssl-host
The following information is referenced in the Delete SSL host command including:
- Neo Sub-Account name.
- User - email address of the SAP Cloud Platform user (S or P number).
- Host name e.g. ap1.hana.ondemand.com
- SSL host name as what was initially created. For e.g. fioridev.company.com.au
You will then need to run a specific command to delete the SSL host.
neo delete-ssl-host --account mysubaccount --user phil@company.com.au --host ap1.hana.ondemand.com --name mysslhostname
Figure:11 Deleting an SSL Host
As stated previously you may not need to use the above delete ssl host command but I included this just in case you do.
List Domain Certificates
You can check on the domain certificates that are loaded at any point in time by using the list domain command.
COMMAND = list-domain-certificates
The following information is referenced in the list domain certificates command including:
- Neo Sub-Account name.
- Email address of the SAP Cloud Platform user (S or P number).
- Host name e.g. ap1.hana.ondemand.com
- SSL host name as what was initially created. For e.g. fioridev.company.com.au
You will then need to run a specific command to list the domain certificates.
neo list-domain-certificates --account subaccountname --user phil@company.com.au --host ap1.hana.ondemand.com
Deleting Domain Certificates
There are two steps involved when a domain certificate you have bound previously needs to be deleted. This means there are 2 commands involved.
COMMAND = unbind-domain-certificate
COMMAND = delete-domain-certificate
Unbind Domain Certificate
The following information is referenced in the Unbind domain certificate command including:
- Neo Sub-Account name.
- User - email address of the SAP Cloud Platform user (S or P number).
- Host name e.g. ap1.hana.ondemand.com
- SSL host name as what was initially created. For e.g. fioridev.company.com.au
You will then need to run a specific command to unbind the domain certificate from the SSL host.
neo unbind-domain-certificate --account subaccountname --user phil@company.com.au --host ap1.hana.ondemand.com --ssl-host mysslhostname
Figure:12 Unbinding the Domain Certificate from SSL Host
You will see the return message displayed "Certificate 'xxxxxxx' removed from SSL host 'APnnnnnn.ssl.ondemand.com'.
The domain certificate has been removed from the SSL host at this step.
Delete Domain Certificate
The following information is referenced in the Delete domain certificate command including:
- Neo Sub-Account name.
- User - email address of the SAP Cloud Platform user (S or P number).
- Host name e.g. ap1.hana.ondemand.com
- Certificate Identifier that was used in the CSR request and in the upload step. An example would be companynamedevcert.
You will then need to run a specific command to unbind the domain certificate from the SSL host.
neo delete-domain-certificate --account subaccountname --user phil@company.com.au --host ap1.hana.ondemand.com --name certificateidentifier
Figure:13 Deleting the Domain Certificate
You will see the return message displayed "Certificate certificateidentifier deleted.
SDK Version No Longer Supported
- SDK version no longer supported.The SDK versions are upgraded regularly so at some point a version that you downloaded may be old and invalid. When this occurs you will actually see notes in the Console.
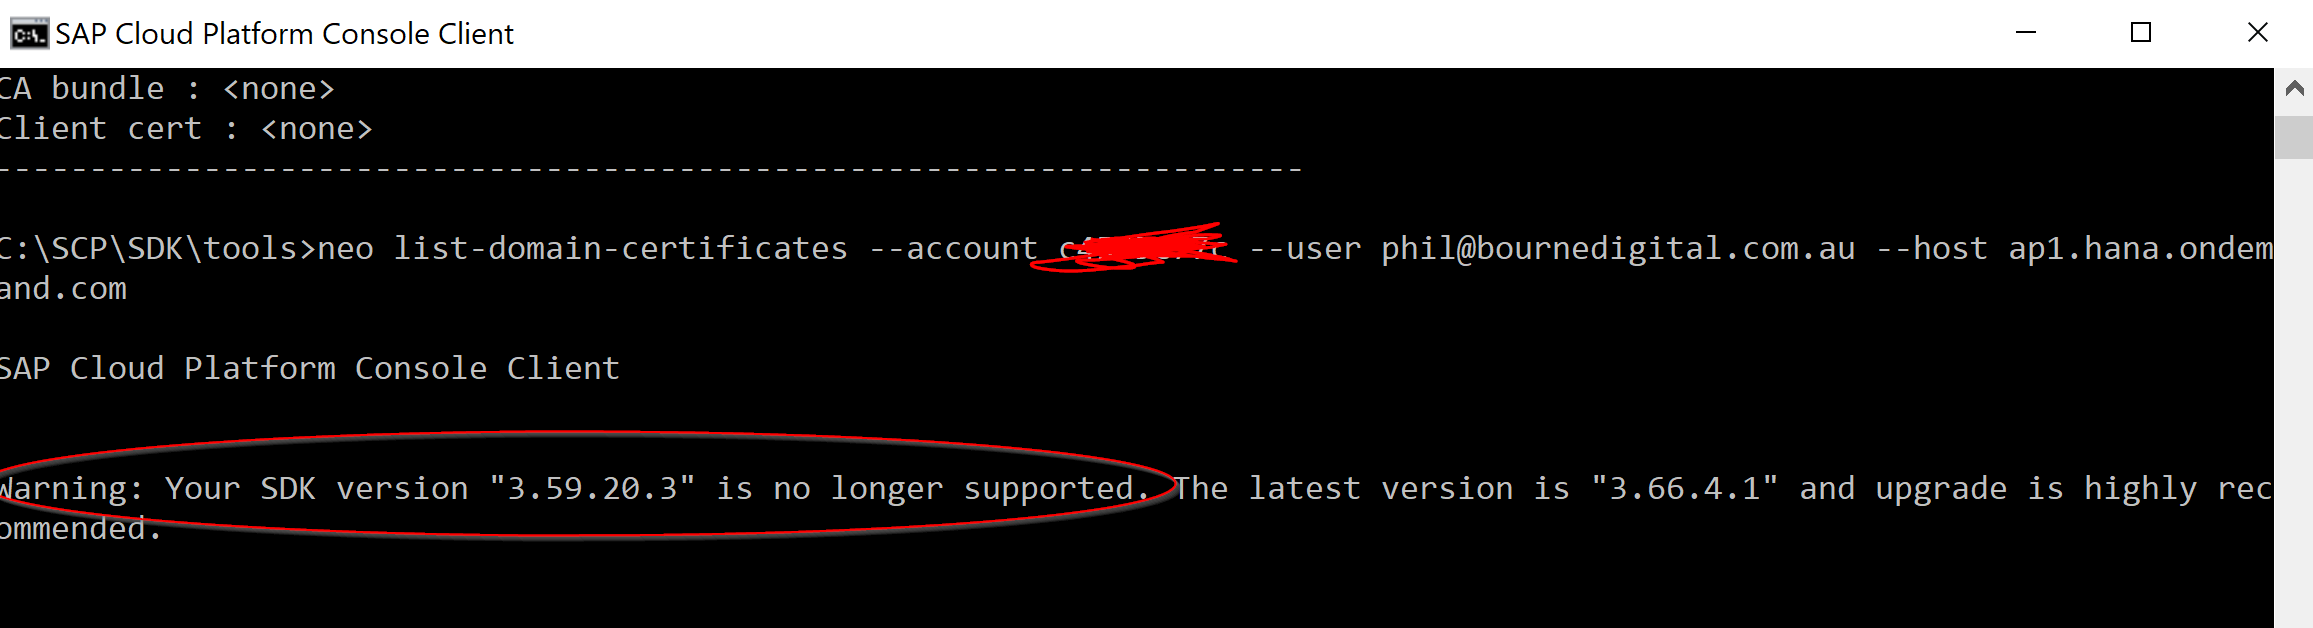 Figure:14 SDK Version Not Supported messageAs it states, it is recommended to keep upgrading the SDK version on your machine to the latest.
Overall I had plenty of fun and games going through and learning all about cloud domains and I wrote this blog because I believe the requirement for this will only increase in the future. So hopefully this reference will be useful out in the SAP Community.
Thanks for reading and please add more information or contribute in some way if you feel it is required.
Also happy for comments!
- SAP Managed Tags:
- SAP Cloud Portal service,
- SAP Business Technology Platform
5 Comments
You must be a registered user to add a comment. If you've already registered, sign in. Otherwise, register and sign in.
Labels in this area
-
"automatische backups"
1 -
"regelmäßige sicherung"
1 -
"TypeScript" "Development" "FeedBack"
1 -
505 Technology Updates 53
1 -
ABAP
14 -
ABAP API
1 -
ABAP CDS Views
2 -
ABAP CDS Views - BW Extraction
1 -
ABAP CDS Views - CDC (Change Data Capture)
1 -
ABAP class
2 -
ABAP Cloud
2 -
ABAP Development
5 -
ABAP in Eclipse
1 -
ABAP Platform Trial
1 -
ABAP Programming
2 -
abap technical
1 -
absl
2 -
access data from SAP Datasphere directly from Snowflake
1 -
Access data from SAP datasphere to Qliksense
1 -
Accrual
1 -
action
1 -
adapter modules
1 -
Addon
1 -
Adobe Document Services
1 -
ADS
1 -
ADS Config
1 -
ADS with ABAP
1 -
ADS with Java
1 -
ADT
2 -
Advance Shipping and Receiving
1 -
Advanced Event Mesh
3 -
AEM
1 -
AI
7 -
AI Launchpad
1 -
AI Projects
1 -
AIML
9 -
Alert in Sap analytical cloud
1 -
Amazon S3
1 -
Analytical Dataset
1 -
Analytical Model
1 -
Analytics
1 -
Analyze Workload Data
1 -
annotations
1 -
API
1 -
API and Integration
3 -
API Call
2 -
Application Architecture
1 -
Application Development
5 -
Application Development for SAP HANA Cloud
3 -
Applications and Business Processes (AP)
1 -
Artificial Intelligence
1 -
Artificial Intelligence (AI)
5 -
Artificial Intelligence (AI) 1 Business Trends 363 Business Trends 8 Digital Transformation with Cloud ERP (DT) 1 Event Information 462 Event Information 15 Expert Insights 114 Expert Insights 76 Life at SAP 418 Life at SAP 1 Product Updates 4
1 -
Artificial Intelligence (AI) blockchain Data & Analytics
1 -
Artificial Intelligence (AI) blockchain Data & Analytics Intelligent Enterprise
1 -
Artificial Intelligence (AI) blockchain Data & Analytics Intelligent Enterprise Oil Gas IoT Exploration Production
1 -
Artificial Intelligence (AI) blockchain Data & Analytics Intelligent Enterprise sustainability responsibility esg social compliance cybersecurity risk
1 -
ASE
1 -
ASR
2 -
ASUG
1 -
Attachments
1 -
Authorisations
1 -
Automating Processes
1 -
Automation
2 -
aws
2 -
Azure
1 -
Azure AI Studio
1 -
B2B Integration
1 -
Backorder Processing
1 -
Backup
1 -
Backup and Recovery
1 -
Backup schedule
1 -
BADI_MATERIAL_CHECK error message
1 -
Bank
1 -
BAS
1 -
basis
2 -
Basis Monitoring & Tcodes with Key notes
2 -
Batch Management
1 -
BDC
1 -
Best Practice
1 -
bitcoin
1 -
Blockchain
3 -
bodl
1 -
BOP in aATP
1 -
BOP Segments
1 -
BOP Strategies
1 -
BOP Variant
1 -
BPC
1 -
BPC LIVE
1 -
BTP
12 -
BTP Destination
2 -
Business AI
1 -
Business and IT Integration
1 -
Business application stu
1 -
Business Application Studio
1 -
Business Architecture
1 -
Business Communication Services
1 -
Business Continuity
1 -
Business Data Fabric
3 -
Business Partner
12 -
Business Partner Master Data
10 -
Business Technology Platform
2 -
Business Trends
4 -
CA
1 -
calculation view
1 -
CAP
3 -
Capgemini
1 -
CAPM
1 -
Catalyst for Efficiency: Revolutionizing SAP Integration Suite with Artificial Intelligence (AI) and
1 -
CCMS
2 -
CDQ
12 -
CDS
2 -
Cental Finance
1 -
Certificates
1 -
CFL
1 -
Change Management
1 -
chatbot
1 -
chatgpt
3 -
CL_SALV_TABLE
2 -
Class Runner
1 -
Classrunner
1 -
Cloud ALM Monitoring
1 -
Cloud ALM Operations
1 -
cloud connector
1 -
Cloud Extensibility
1 -
Cloud Foundry
4 -
Cloud Integration
6 -
Cloud Platform Integration
2 -
cloudalm
1 -
communication
1 -
Compensation Information Management
1 -
Compensation Management
1 -
Compliance
1 -
Compound Employee API
1 -
Configuration
1 -
Connectors
1 -
Consolidation Extension for SAP Analytics Cloud
2 -
Control Indicators.
1 -
Controller-Service-Repository pattern
1 -
Conversion
1 -
Cosine similarity
1 -
cryptocurrency
1 -
CSI
1 -
ctms
1 -
Custom chatbot
3 -
Custom Destination Service
1 -
custom fields
1 -
Customer Experience
1 -
Customer Journey
1 -
Customizing
1 -
cyber security
3 -
cybersecurity
1 -
Data
1 -
Data & Analytics
1 -
Data Aging
1 -
Data Analytics
2 -
Data and Analytics (DA)
1 -
Data Archiving
1 -
Data Back-up
1 -
Data Flow
1 -
Data Governance
5 -
Data Integration
2 -
Data Quality
12 -
Data Quality Management
12 -
Data Synchronization
1 -
data transfer
1 -
Data Unleashed
1 -
Data Value
8 -
database tables
1 -
Datasphere
3 -
datenbanksicherung
1 -
dba cockpit
1 -
dbacockpit
1 -
Debugging
2 -
Delimiting Pay Components
1 -
Delta Integrations
1 -
Destination
3 -
Destination Service
1 -
Developer extensibility
1 -
Developing with SAP Integration Suite
1 -
Devops
1 -
digital transformation
1 -
Documentation
1 -
Dot Product
1 -
DQM
1 -
dump database
1 -
dump transaction
1 -
e-Invoice
1 -
E4H Conversion
1 -
Eclipse ADT ABAP Development Tools
2 -
edoc
1 -
edocument
1 -
ELA
1 -
Embedded Consolidation
1 -
Embedding
1 -
Embeddings
1 -
Employee Central
1 -
Employee Central Payroll
1 -
Employee Central Time Off
1 -
Employee Information
1 -
Employee Rehires
1 -
Enable Now
1 -
Enable now manager
1 -
endpoint
1 -
Enhancement Request
1 -
Enterprise Architecture
1 -
ETL Business Analytics with SAP Signavio
1 -
Euclidean distance
1 -
Event Dates
1 -
Event Driven Architecture
1 -
Event Mesh
2 -
Event Reason
1 -
EventBasedIntegration
1 -
EWM
1 -
EWM Outbound configuration
1 -
EWM-TM-Integration
1 -
Existing Event Changes
1 -
Expand
1 -
Expert
2 -
Expert Insights
2 -
Exploits
1 -
Fiori
14 -
Fiori Elements
2 -
Fiori SAPUI5
12 -
Flask
1 -
Full Stack
8 -
Funds Management
1 -
General
1 -
General Splitter
1 -
Generative AI
1 -
Getting Started
1 -
GitHub
8 -
Grants Management
1 -
GraphQL
1 -
groovy
1 -
GTP
1 -
HANA
6 -
HANA Cloud
2 -
Hana Cloud Database Integration
2 -
HANA DB
2 -
HANA XS Advanced
1 -
Historical Events
1 -
home labs
1 -
HowTo
1 -
HR Data Management
1 -
html5
8 -
HTML5 Application
1 -
Identity cards validation
1 -
idm
1 -
Implementation
1 -
input parameter
1 -
instant payments
1 -
Integration
3 -
Integration Advisor
1 -
Integration Architecture
1 -
Integration Center
1 -
Integration Suite
1 -
intelligent enterprise
1 -
iot
1 -
Java
1 -
job
1 -
Job Information Changes
1 -
Job-Related Events
1 -
Job_Event_Information
1 -
joule
4 -
Journal Entries
1 -
Just Ask
1 -
Kerberos for ABAP
8 -
Kerberos for JAVA
8 -
KNN
1 -
Launch Wizard
1 -
Learning Content
2 -
Life at SAP
5 -
lightning
1 -
Linear Regression SAP HANA Cloud
1 -
local tax regulations
1 -
LP
1 -
Machine Learning
2 -
Marketing
1 -
Master Data
3 -
Master Data Management
14 -
Maxdb
2 -
MDG
1 -
MDGM
1 -
MDM
1 -
Message box.
1 -
Messages on RF Device
1 -
Microservices Architecture
1 -
Microsoft Universal Print
1 -
Middleware Solutions
1 -
Migration
5 -
ML Model Development
1 -
Modeling in SAP HANA Cloud
8 -
Monitoring
3 -
MTA
1 -
Multi-Record Scenarios
1 -
Multiple Event Triggers
1 -
Myself Transformation
1 -
Neo
1 -
New Event Creation
1 -
New Feature
1 -
Newcomer
1 -
NodeJS
2 -
ODATA
2 -
OData APIs
1 -
odatav2
1 -
ODATAV4
1 -
ODBC
1 -
ODBC Connection
1 -
Onpremise
1 -
open source
2 -
OpenAI API
1 -
Oracle
1 -
PaPM
1 -
PaPM Dynamic Data Copy through Writer function
1 -
PaPM Remote Call
1 -
PAS-C01
1 -
Pay Component Management
1 -
PGP
1 -
Pickle
1 -
PLANNING ARCHITECTURE
1 -
Popup in Sap analytical cloud
1 -
PostgrSQL
1 -
POSTMAN
1 -
Process Automation
2 -
Product Updates
4 -
PSM
1 -
Public Cloud
1 -
Python
4 -
Qlik
1 -
Qualtrics
1 -
RAP
3 -
RAP BO
2 -
Record Deletion
1 -
Recovery
1 -
recurring payments
1 -
redeply
1 -
Release
1 -
Remote Consumption Model
1 -
Replication Flows
1 -
research
1 -
Resilience
1 -
REST
1 -
REST API
2 -
Retagging Required
1 -
Risk
1 -
Rolling Kernel Switch
1 -
route
1 -
rules
1 -
S4 HANA
1 -
S4 HANA Cloud
1 -
S4 HANA On-Premise
1 -
S4HANA
3 -
S4HANA_OP_2023
2 -
SAC
10 -
SAC PLANNING
9 -
SAP
4 -
SAP ABAP
1 -
SAP Advanced Event Mesh
1 -
SAP AI Core
8 -
SAP AI Launchpad
8 -
SAP Analytic Cloud Compass
1 -
Sap Analytical Cloud
1 -
SAP Analytics Cloud
4 -
SAP Analytics Cloud for Consolidation
3 -
SAP Analytics Cloud Story
1 -
SAP analytics clouds
1 -
SAP BAS
1 -
SAP Basis
6 -
SAP BODS
1 -
SAP BODS certification.
1 -
SAP BTP
21 -
SAP BTP Build Work Zone
2 -
SAP BTP Cloud Foundry
6 -
SAP BTP Costing
1 -
SAP BTP CTMS
1 -
SAP BTP Innovation
1 -
SAP BTP Migration Tool
1 -
SAP BTP SDK IOS
1 -
SAP Build
11 -
SAP Build App
1 -
SAP Build apps
1 -
SAP Build CodeJam
1 -
SAP Build Process Automation
3 -
SAP Build work zone
10 -
SAP Business Objects Platform
1 -
SAP Business Technology
2 -
SAP Business Technology Platform (XP)
1 -
sap bw
1 -
SAP CAP
2 -
SAP CDC
1 -
SAP CDP
1 -
SAP CDS VIEW
1 -
SAP Certification
1 -
SAP Cloud ALM
4 -
SAP Cloud Application Programming Model
1 -
SAP Cloud Integration for Data Services
1 -
SAP cloud platform
8 -
SAP Companion
1 -
SAP CPI
3 -
SAP CPI (Cloud Platform Integration)
2 -
SAP CPI Discover tab
1 -
sap credential store
1 -
SAP Customer Data Cloud
1 -
SAP Customer Data Platform
1 -
SAP Data Intelligence
1 -
SAP Data Migration in Retail Industry
1 -
SAP Data Services
1 -
SAP DATABASE
1 -
SAP Dataspher to Non SAP BI tools
1 -
SAP Datasphere
9 -
SAP DRC
1 -
SAP EWM
1 -
SAP Fiori
2 -
SAP Fiori App Embedding
1 -
Sap Fiori Extension Project Using BAS
1 -
SAP GRC
1 -
SAP HANA
1 -
SAP HCM (Human Capital Management)
1 -
SAP HR Solutions
1 -
SAP IDM
1 -
SAP Integration Suite
9 -
SAP Integrations
4 -
SAP iRPA
2 -
SAP Learning Class
1 -
SAP Learning Hub
1 -
SAP Odata
2 -
SAP on Azure
1 -
SAP PartnerEdge
1 -
sap partners
1 -
SAP Password Reset
1 -
SAP PO Migration
1 -
SAP Prepackaged Content
1 -
SAP Process Automation
2 -
SAP Process Integration
2 -
SAP Process Orchestration
1 -
SAP S4HANA
2 -
SAP S4HANA Cloud
1 -
SAP S4HANA Cloud for Finance
1 -
SAP S4HANA Cloud private edition
1 -
SAP Sandbox
1 -
SAP STMS
1 -
SAP successfactors
3 -
SAP SuccessFactors HXM Core
1 -
SAP Time
1 -
SAP TM
2 -
SAP Trading Partner Management
1 -
SAP UI5
1 -
SAP Upgrade
1 -
SAP Utilities
1 -
SAP-GUI
8 -
SAP_COM_0276
1 -
SAPBTP
1 -
SAPCPI
1 -
SAPEWM
1 -
sapmentors
1 -
saponaws
2 -
SAPS4HANA
1 -
SAPUI5
4 -
schedule
1 -
Script Operator
1 -
Secure Login Client Setup
8 -
security
9 -
Selenium Testing
1 -
Self Transformation
1 -
Self-Transformation
1 -
SEN
1 -
SEN Manager
1 -
service
1 -
SET_CELL_TYPE
1 -
SET_CELL_TYPE_COLUMN
1 -
SFTP scenario
2 -
Simplex
1 -
Single Sign On
8 -
Singlesource
1 -
SKLearn
1 -
soap
1 -
Software Development
1 -
SOLMAN
1 -
solman 7.2
2 -
Solution Manager
3 -
sp_dumpdb
1 -
sp_dumptrans
1 -
SQL
1 -
sql script
1 -
SSL
8 -
SSO
8 -
Substring function
1 -
SuccessFactors
1 -
SuccessFactors Platform
1 -
SuccessFactors Time Tracking
1 -
Sybase
1 -
system copy method
1 -
System owner
1 -
Table splitting
1 -
Tax Integration
1 -
Technical article
1 -
Technical articles
1 -
Technology Updates
14 -
Technology Updates
1 -
Technology_Updates
1 -
terraform
1 -
Threats
2 -
Time Collectors
1 -
Time Off
2 -
Time Sheet
1 -
Time Sheet SAP SuccessFactors Time Tracking
1 -
Tips and tricks
2 -
toggle button
1 -
Tools
1 -
Trainings & Certifications
1 -
Transformation Flow
1 -
Transport in SAP BODS
1 -
Transport Management
1 -
TypeScript
2 -
ui designer
1 -
unbind
1 -
Unified Customer Profile
1 -
UPB
1 -
Use of Parameters for Data Copy in PaPM
1 -
User Unlock
1 -
VA02
1 -
Validations
1 -
Vector Database
2 -
Vector Engine
1 -
Visual Studio Code
1 -
VSCode
1 -
Vulnerabilities
1 -
Web SDK
1 -
work zone
1 -
workload
1 -
xsa
1 -
XSA Refresh
1
- « Previous
- Next »
Related Content
- Demystifying the Common Super Domain for SAP Mobile Start in Technology Blogs by SAP
- Empowering Retail Business with a Seamless Data Migration to SAP S/4HANA in Technology Blogs by Members
- 10+ ways to reshape your SAP landscape with SAP Business Technology Platform – Blog 4 in Technology Blogs by SAP
- SAP BTP and Third-Party Cookies Deprecation in Technology Blogs by SAP
- SAP Datasphere - Space, Data Integration, and Data Modeling Best Practices in Technology Blogs by SAP
Top kudoed authors
| User | Count |
|---|---|
| 5 | |
| 5 | |
| 5 | |
| 4 | |
| 4 | |
| 4 | |
| 4 | |
| 4 | |
| 3 | |
| 3 |