
- SAP Community
- Products and Technology
- Technology
- Technology Blogs by SAP
- Step by Step with the SAP Cloud Platform SDK for A...
Technology Blogs by SAP
Learn how to extend and personalize SAP applications. Follow the SAP technology blog for insights into SAP BTP, ABAP, SAP Analytics Cloud, SAP HANA, and more.
Turn on suggestions
Auto-suggest helps you quickly narrow down your search results by suggesting possible matches as you type.
Showing results for
Product and Topic Expert
Options
- Subscribe to RSS Feed
- Mark as New
- Mark as Read
- Bookmark
- Subscribe
- Printer Friendly Page
- Report Inappropriate Content
10-15-2018
5:35 PM
Previous (Authentication) Home Next (Online OData)
The SDK provides a separate log file for an application which can be periodically uploaded to the SAP Cloud Platform Mobile Services server. This ability enables a developer to periodically review the uploaded client log files to see if there are any exceptions or unexpected issues occurring in the deployed application.
A root logger has a log level that can be set in the application or can be remotely set using the SAP Cloud Platform Mobile Services cockpit and the Storage Service feature.
The SDK components themselves have loggers whose log level can be individually set or if not set, inherit their level from the root logger. When a problem occurs in the app, the log level of a specific component can be increased resulting in more information being logged.
The SAP Android SDK uses SLF4J as a facade and logback-android as the underlying logging system.
The following are some additional sources of documentation on logging with the SAP Android SDK.
Logging
Logging in API Reference
Upload Client Logs in REST API
See How Logging Can Be Used in Your Android Application
The following examples attempt to demonstrate key functionality of the Logger.
Initiating and Using a Logger
Setting the Log Level of an SDK Library
Uploading the Log
Viewing the Uploaded Log
Accessing the Logs on an Emulator
In this section an error will be introduced to the registration call. Then the logger for the authentication component will have its log level raised to help identify the error.
The client log previously uploaded can be viewed in the management cockpit.
Previous (Authentication) Home Next (Online OData)
The SDK provides a separate log file for an application which can be periodically uploaded to the SAP Cloud Platform Mobile Services server. This ability enables a developer to periodically review the uploaded client log files to see if there are any exceptions or unexpected issues occurring in the deployed application.
A root logger has a log level that can be set in the application or can be remotely set using the SAP Cloud Platform Mobile Services cockpit and the Storage Service feature.
The SDK components themselves have loggers whose log level can be individually set or if not set, inherit their level from the root logger. When a problem occurs in the app, the log level of a specific component can be increased resulting in more information being logged.
The SAP Android SDK uses SLF4J as a facade and logback-android as the underlying logging system.
The following are some additional sources of documentation on logging with the SAP Android SDK.
Logging
Logging in API Reference
Upload Client Logs in REST API
See How Logging Can Be Used in Your Android Application
The following examples attempt to demonstrate key functionality of the Logger.
Initiating and Using a Logger
Setting the Log Level of an SDK Library
Uploading the Log
Viewing the Uploaded Log
Accessing the Logs on an Emulator
Initiating and Using a Logger
- In the variable declaration section of MainActivity, add the following variables.
private org.slf4j.Logger myLogger;

private ch.qos.logback.classic.Logger myRootLogger;
- In MainActivity, in the onCreate method, before the call to onRegister, add the following code to initialize the root logger, set its level to error and to create a new logger for the MainActivity.
Logging.ConfigurationBuilder cb = new Logging.ConfigurationBuilder()

    .logToConsole(true)

    .initialLevel(Level.ERROR);  //levels in order are all, trace, debug, info, warn, error, off

//cb.logFileCount(4);

//cb.logFileSize("1MB");

Logging.initialize(this.getApplicationContext(), cb);

myRootLogger = Logging.getRootLogger();

myLogger =  LoggerFactory.getLogger(MainActivity.class);
- In the onLogALine method add the following code.
myLogger.warn("Logged with warn, log level is {}", ((ch.qos.logback.classic.Logger)myLogger).getEffectiveLevel());  //not logged as myLogger inherits from RootLogger

myRootLogger.warn("Logged with warn, log level is {}", myRootLogger.getEffectiveLevel()); //not logged as rootLog was set to error in onCreate

((ch.qos.logback.classic.Logger)myLogger).setLevel(ch.qos.logback.classic.Level.WARN);

myLogger.warn("Logged with warn, log level is {}", ((ch.qos.logback.classic.Logger)myLogger).getEffectiveLevel());  //logged

myRootLogger.warn("Logged with warn, log level is {}", myRootLogger.getEffectiveLevel()); //not logged as rootLog was set to error in onCreate

myRootLogger.error("Logged with error, log level is {}", myRootLogger.getEffectiveLevel());  //logged


//StatusPrinter.print(((ch.qos.logback.classic.Logger)myLogger).getLoggerContext());  //shows where the log is on the device

//String p = Logging.getConsoleLoggerPattern(); //pattern used for the log can be seen and changed via setConsoleLoggerPattern
Note in the above code that {} is used as a placeholder in the string for a variable. For further details see Parameterized Logging. - The logcat below shows the result of pressing the Log a Line button. If you do not see the expected results, make sure the ADB filter is cleared. In the onCreate method, the root logger has its initial log level set to ERROR. A logger named myLogger is created which inherits the root logger's log level until explicitly set. The first time the app is run, the root logger and myLogger's log level are initially set to ERROR.

Notice above that the line logged by myLogger contains the class name MainActivity and the line logged by the root logger says ROOT.
Setting the Log Level of an SDK Library Component
In this section an error will be introduced to the registration call. Then the logger for the authentication component will have its log level raised to help identify the error.
- In MyApplication, comment out the line that calls registerActivityLifecycleCallbacks which enables the basic authentication dialog to be shown.
- Uninstall the app and install it again.
- Examine the Logcat output. The application has failed to authenticate but the reason why is not shown.

- Increase logging for the component we are interested in by adding the below two lines to the top of the onRegister method.
Logger authLogger = (ch.qos.logback.classic.Logger) LoggerFactory.getLogger("com.sap.cloud.mobile.foundation.authentication");

authLogger.setLevel(Level.DEBUG);
- Apply the changes and this time notice that the Logcat view contains additional logged lines indicating the problem.

- Uncomment the line in MyApplication.java to correct the problem before continuing.
Uploading the Log
- In the variable declaration section of MainActivity, add the following variable.
private Logging.UploadListener myLogUploadListener;
- Replace the onUploadLog method with the below code.
public void onUploadLog(View view) {

    Log.d(myTag, "In onUploadLog");


    myLogUploadListener = new Logging.UploadListener() {

        @Override

        public void onSuccess() {

            Log.d(myTag, "log upload complete, successful!");

            toastAMessage("Log upload completed and was successful!");

            Logging.removeLogUploadListener(myLogUploadListener);

        }


        @Override

        public void onError(@NonNull Throwable throwable) {

            Log.d(myTag, "log upload encountered an error with message: " + throwable.getMessage());

            toastAMessage("Log upload failed with error message: " + throwable.getMessage());

            Logging.removeLogUploadListener(myLogUploadListener);

        }


        @Override

        public void onProgress(int percentUploaded) {

            Log.d(myTag,"log upload progress: " + percentUploaded);

        }

    };

    Logging.addLogUploadListener(myLogUploadListener);


    try {

        SettingsParameters sp = new SettingsParameters(serviceURL, appID, deviceID, "1.0");

        Logging.uploadLog(myOkHttpClient, sp, Logging.UploadType.MERGE);

    } catch (MalformedURLException e) {

        myLogger.error("MalformedURLException: " + e.getMessage(), e);

    }

}
A more typical approach for adding the upload listener and removing it would be in the onCreate and onDestroy methods. The code is placed here to keep the logging code in one place. - In the management cockpit, the log upload client policy must be enabled. If this is not checked the uploadLog call will fail with a 403 error.

- Log some lines and press the Upload Log button. Examine the output in the LogCat view.

- The Logging.uploadLog method makes use of the Client Log Upload REST API.
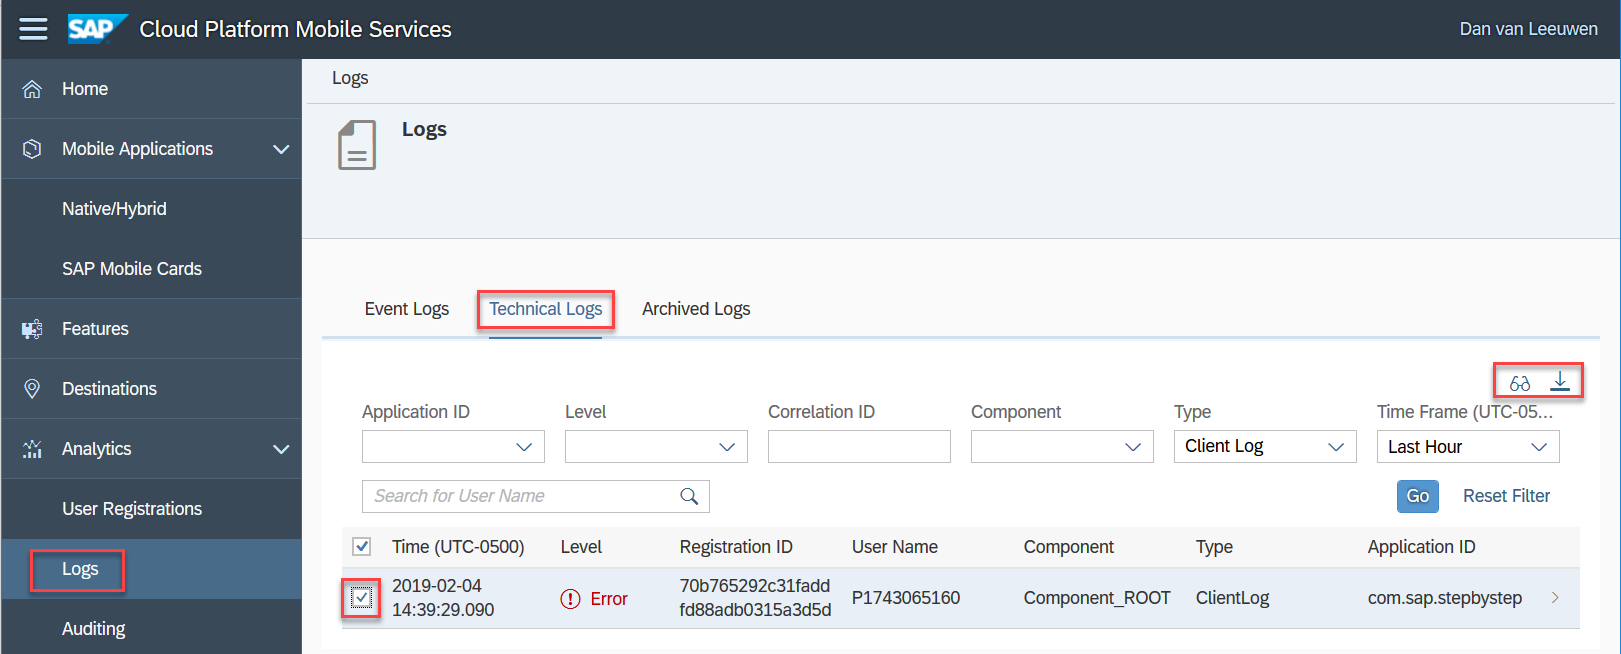
Viewing the Uploaded Log
The client log previously uploaded can be viewed in the management cockpit.
- Filters can be applied to limit the shown logs to match the application id (com.sap.stepbystep) and on the type (Client Log).
Accessing the Logs on an Emulator
- The file system of an Android emulator can be browsed using the Device File Explorer to view the log files as shown below.
Remember to click the Log a Line button if there are no contents shown in log.0.log.
To refresh the contents in the open log.0.log file, close and reopen the file in Android Studio.
Finally, notice that the log file is cleared after the call to Logging.uploadLog completes.

The location of the log file was shown by uncommenting the line StatusPrinter.print.
/data/user/o/com.sap.stepbystep/files/log.0.log
Also note that more than one log file is shown. The number of log files and the maximum size of the log files can be configured in the call to Logging.initialize.
Previous (Authentication) Home Next (Online OData)
- SAP Managed Tags:
- SAP Mobile Services,
- SAP BTP SDK for Android
Labels:
You must be a registered user to add a comment. If you've already registered, sign in. Otherwise, register and sign in.
Labels in this area
-
ABAP CDS Views - CDC (Change Data Capture)
2 -
AI
1 -
Analyze Workload Data
1 -
BTP
1 -
Business and IT Integration
2 -
Business application stu
1 -
Business Technology Platform
1 -
Business Trends
1,661 -
Business Trends
86 -
CAP
1 -
cf
1 -
Cloud Foundry
1 -
Confluent
1 -
Customer COE Basics and Fundamentals
1 -
Customer COE Latest and Greatest
3 -
Customer Data Browser app
1 -
Data Analysis Tool
1 -
data migration
1 -
data transfer
1 -
Datasphere
2 -
Event Information
1,400 -
Event Information
64 -
Expert
1 -
Expert Insights
178 -
Expert Insights
270 -
General
1 -
Google cloud
1 -
Google Next'24
1 -
Kafka
1 -
Life at SAP
784 -
Life at SAP
11 -
Migrate your Data App
1 -
MTA
1 -
Network Performance Analysis
1 -
NodeJS
1 -
PDF
1 -
POC
1 -
Product Updates
4,578 -
Product Updates
323 -
Replication Flow
1 -
RisewithSAP
1 -
SAP BTP
1 -
SAP BTP Cloud Foundry
1 -
SAP Cloud ALM
1 -
SAP Cloud Application Programming Model
1 -
SAP Datasphere
2 -
SAP S4HANA Cloud
1 -
SAP S4HANA Migration Cockpit
1 -
Technology Updates
6,886 -
Technology Updates
395 -
Workload Fluctuations
1
Related Content
- New webcast series on “SAP BTP DevOps and Observability in Action” in Technology Blogs by SAP
- Gamifying SAP C4C with BTP, the Flutter or Build Apps way. in Technology Blogs by SAP
- Language Code for SAP Business Warehouse Application Server Power BI Connector in Technology Q&A
- SAP PI/PO migration? Why you should move to the Cloud with SAP Integration Suite! in Technology Blogs by SAP
- First hand experience at SAP Build Code - Learn, Try it out, Get a badge, SAP Discovery Centre in Technology Blogs by SAP
Top kudoed authors
| User | Count |
|---|---|
| 11 | |
| 10 | |
| 10 | |
| 9 | |
| 8 | |
| 7 | |
| 7 | |
| 7 | |
| 7 | |
| 6 |