
- SAP Community
- Products and Technology
- Technology
- Technology Blogs by SAP
- Step by Step with the SAP Cloud Platform SDK for A...
Technology Blogs by SAP
Learn how to extend and personalize SAP applications. Follow the SAP technology blog for insights into SAP BTP, ABAP, SAP Analytics Cloud, SAP HANA, and more.
Turn on suggestions
Auto-suggest helps you quickly narrow down your search results by suggesting possible matches as you type.
Showing results for
Product and Topic Expert
Options
- Subscribe to RSS Feed
- Mark as New
- Mark as Read
- Bookmark
- Subscribe
- Printer Friendly Page
- Report Inappropriate Content
10-15-2018
5:58 PM
Table of Contents
Overview
Setup
Installing Android Studio
Installing the SAP Cloud Platform SDK for Android
Initial Project
Creating the Project
Running the Project
Modifying the Project
Debugging the Project
Adding the SDK Libraries to the Project
Development Tips
Android Studio Tips and Shortcuts
More on Java, Android Studio and Android Development
Using the SAP Cloud Platform SDK
Enabling the SAP Cloud Platform Mobile Services and Configuring an App
Authentication
Logging
Online OData
Offline OData
Syncing an Offline Store
Using a Foreground Service when Syncing
Using ILOData
Remembering Credentials using the Secure Store
Client Usage
Configuration Provider and the Discovery Service
SAML and OAuth
Using Fiddler to Trace Client Network Requests
Server Logging and Tracing
Overview
This tutorial covers the SAP Cloud Platform SDK for Android which was released in September 2018. The SDK enables integrating features of the SAP Cloud Platform such as authentication, logging, online OData, offline OData, UI controls from SAP Fiori for Android, push notifications, a secure store and a configuration provider.
The SAP Cloud Platform and SDK are available as a free trial.
Questions on the SDK can be viewed using the search Questions tagged with SAP Cloud Platform SDK for Android.
Blogs on the SDK can be viewed using the search Blogs tagged with SAP Cloud Platform SDK for Android.
The Dec 2018 release of the roadmap is available at SAP Cloud Platform Mobile Services Road Map .
The Learning Journey contains links to further content including videos.
A few other people to follow that blog on the Android SDK are britt.womelsdorf and michael.jess. Examples include SAP Cloud Platform SDK for Android, version 2.0 is here! and Cloud Shipment: A small step for us, but a huge leap for the community.
Features can be requested at SAP Cloud platform SDK for Android Continuous Influence Session.
SAP provides multiple tools and SDKs to create mobile apps including an SDK for use with iOS. See also Getting Started with the SAP Cloud Platform SDK for iOS.
This blog series does not go into detail on the topic of SAP Fiori for Android. This is covered at Explore SAP Fiori for Android, Customizing the Wizard Generated Application, Create an Android SAP Cloud Platform App using Kotlin and SAP Fiori Mentor and Fiori UI Demo Application.
This blog series also does not make use of the Flows library which is new in 2.0. The flows library provides a higher level API for onboarding with Mobile Services. For additional details see the tutorial Use Flows with SAP Cloud Platform SDK for Android.
My goal in writing this blog series is to provide step by step instructions that demonstrate some of the key functionality provided by the SDK in a simple application. Feedback/suggestions are appreciated so this content can be improved.
Installing Android Studio
- Android Studio is available for free from the Android Studio website.
Download the version Android Studio that matches the version of the SDK that you are using.
SAP Cloud Platform SDK for Android
Android Studio
1.1.0
3.1.4
1.1.100
3.2.0
1.1.2 & 1.1.4
3.2.1
2.0.0
3.3.0
2.1.0
3.3.2
2.1.1
3.4
2.2
3.5
- Check Android Virtual Device and on the next screen, Intel HAXM if you wish to use an emulator.


Installing the SAP Cloud Platform SDK for Android
- Download the SAP Cloud Platform SDK for Android from trials and downloads or SAP Cloud Platform SDK for Android from software downloads.
- Unzip the contents to SAP\AndroidSDK.
- Run the .\install.bat (Windows) ./install (Mac) which will copy the libraries to Users\user_name\.m2\repository and install a plugin into Android Studio.

- Notes about the release can be found in the what's new section of the documentation as shown below.

Initial Project
A new project will be created. Then the project will be modified to include a series of buttons and add handlers for when they are clicked. The project will be debugged, and finally, the steps to add one of the SAP Android SDK libraries will be shown.
Creating the Project
The following steps demonstrate how to create a new project that will be used in the subsequent parts of this guide. The app will contain a button that when pressed, updates a variable numberOfPresses and prints the value to the LogCat view in Android Studio. A breakpoint will be set and using the debugger, the variable numberOfPresses will be changed from positive to negative.
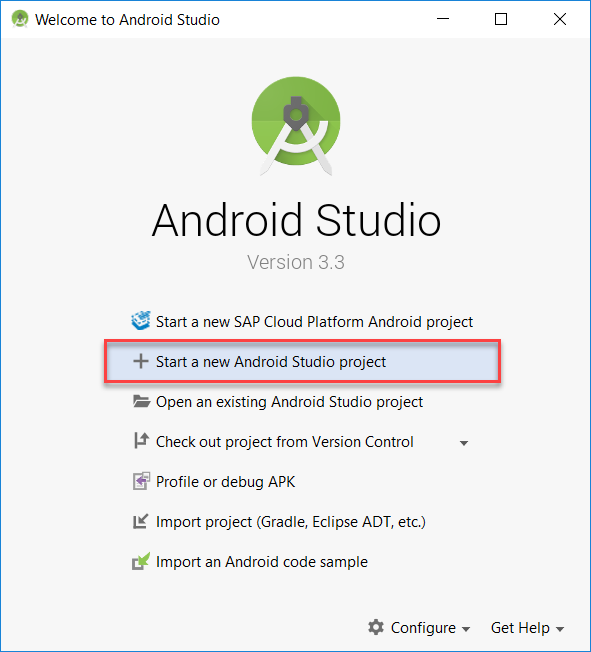
- Create the project.
The SAP Android SDK provides a wizard that can generate a project which uses many of the SAP Android SDK's API's. This blog series will create a project from scratch and introduce features one at a time. After reading about and trying out a new feature it may be helpful to examine a more complete example of the feature as generated by the wizard. See the tutorial group Get Started with SAP Cloud Platform SDK for Android and the documentation at Running the SAP Cloud Platform SDK for Android Wizard for additional details. 
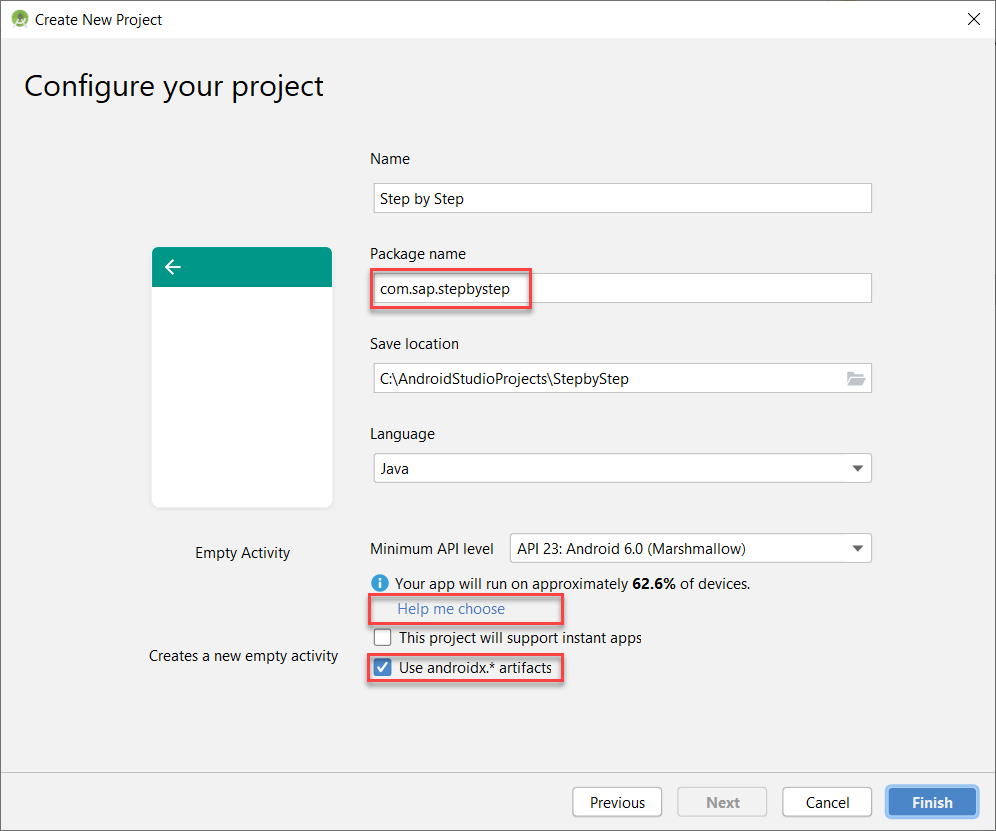
It is important that the package name is the one shown above to make it easier to copy and paste code.
Pressing help me choose shows the percentage of users on different versions of Android and a list of new features introduced in the selected version.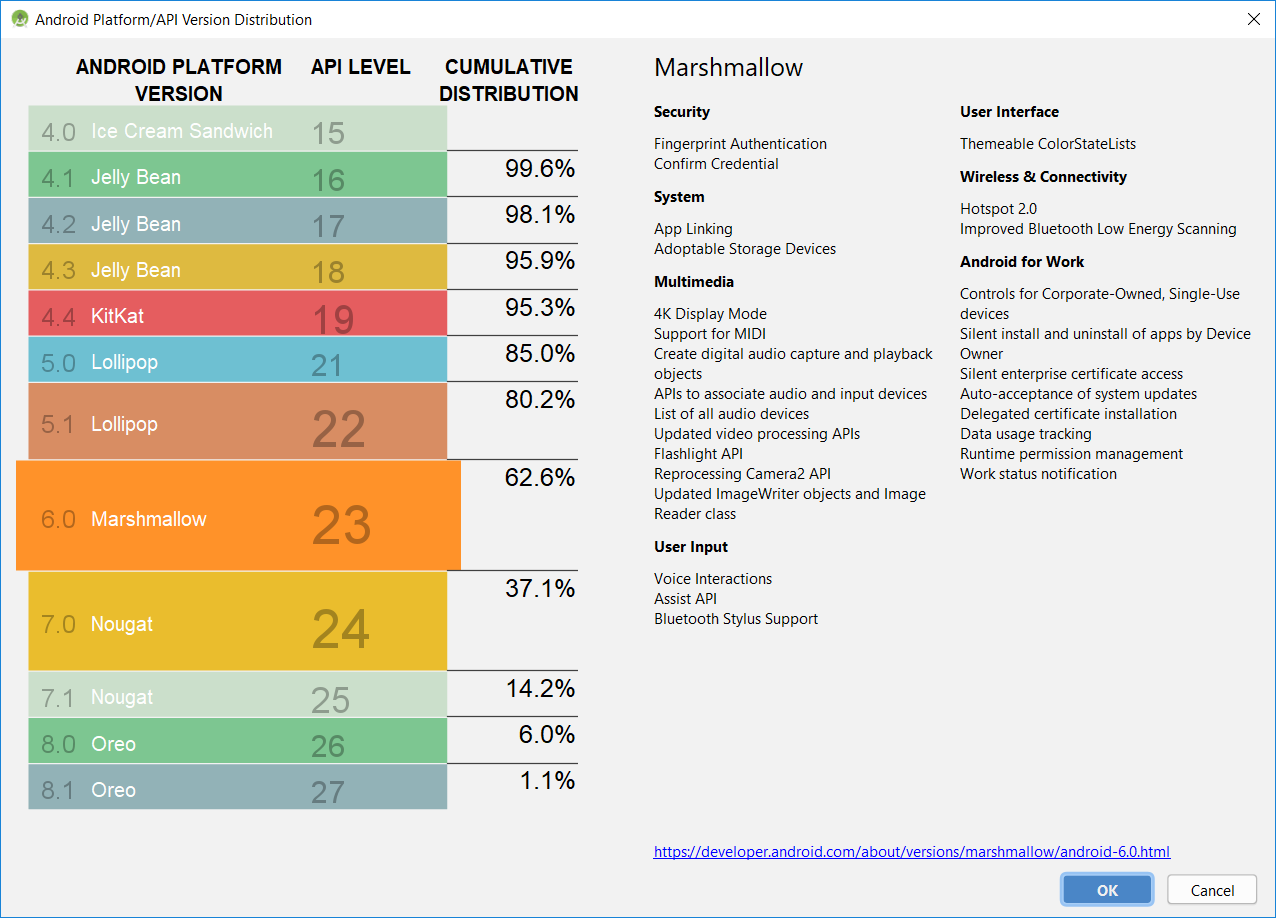
Note that the SAP Cloud Platform SDK for Android supports API 23 or Android 6.0 and above.
Running the Project
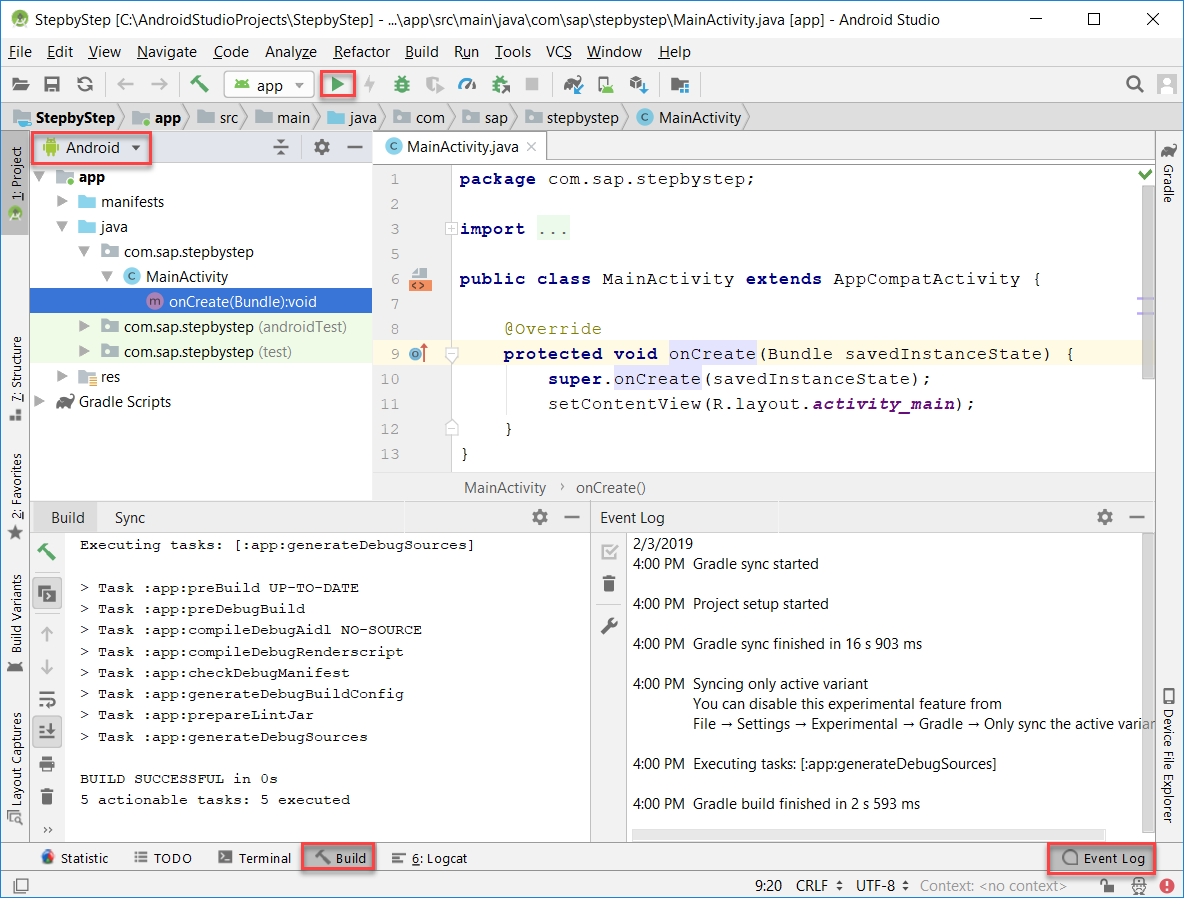
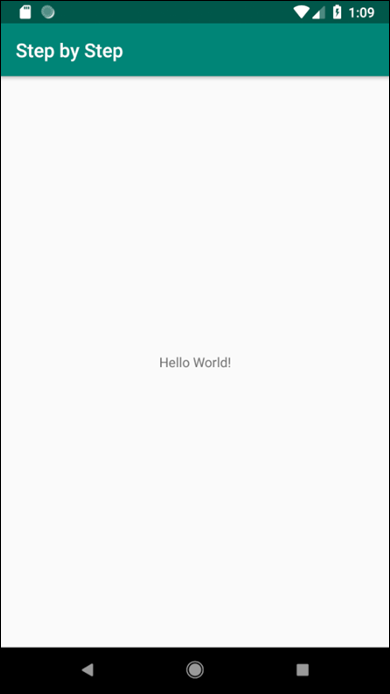
- If all went well, you should be able to run the app.

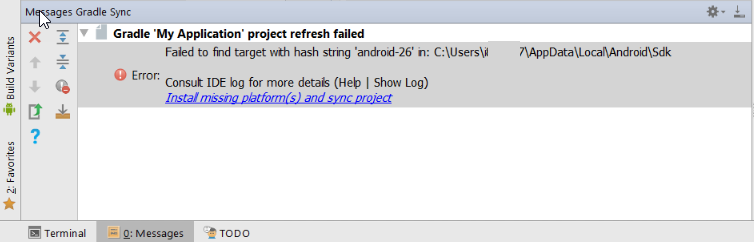
- If an error is shown, the following suggestions may help.If you see this error, click on Install missing platform(s) which will install the missing components of the Android SDK.
 If you see errors like these and your internet uses a proxy, it may be due to missing https proxy info for gradle.
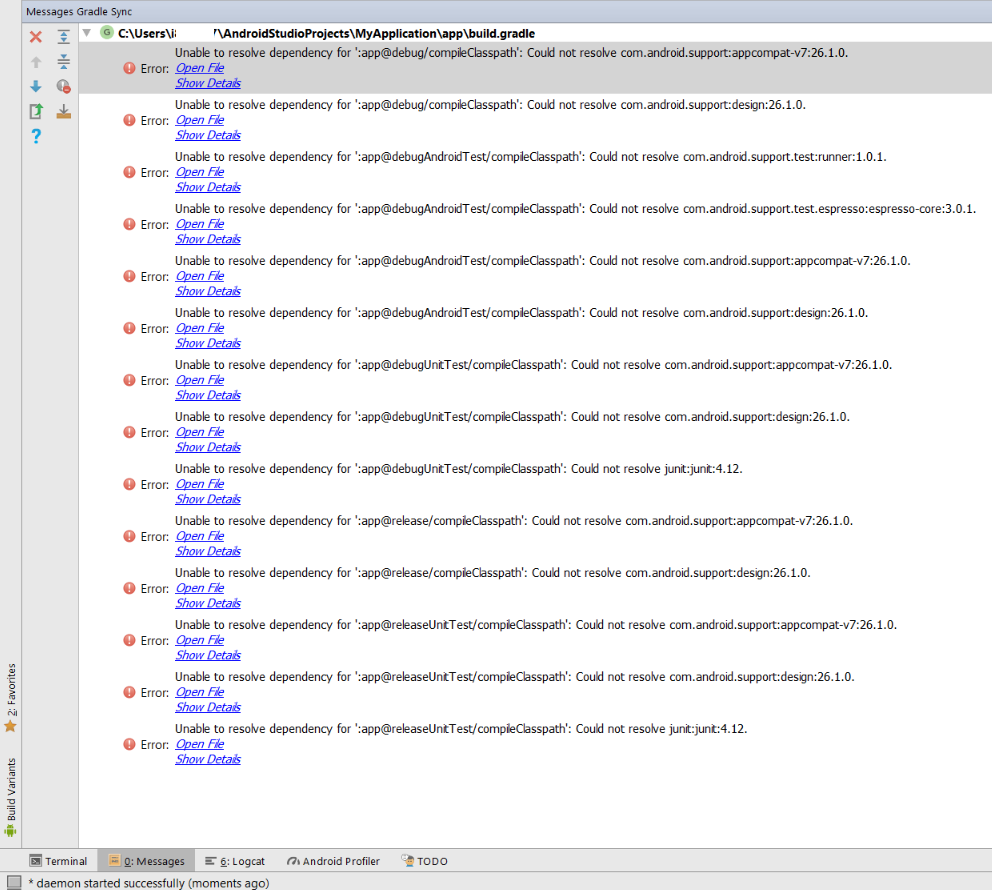 Ensure that HTTPS proxy info is set. Proxy info can be set in the following locations.


Note, the gradle.properties (Global Properties) exists at the location below.
users/user/.gradle/gradle.properties
The following free course, How to Install Android Studio may also be of use if you are new to Android Studio as it covers the installation and running of your first Android app in more detail.
Modifying the Project
- Open the res/layout/activity_main.xml file, switch to the Text view and replace its contents with those shown below.

<?xml version="1.0" encoding="utf-8"?>

<androidx.constraintlayout.widget.ConstraintLayout xmlns:android="http://schemas.android.com/apk/res/android"

    xmlns:app="http://schemas.android.com/apk/res-auto"

    xmlns:tools="http://schemas.android.com/tools"

    android:layout_width="match_parent"

    android:layout_height="match_parent"

    tools:context="com.sap.stepbystep.MainActivity">


    <ScrollView

        android:layout_width="match_parent"

        android:layout_height="match_parent">


        <LinearLayout

            android:layout_width="match_parent"

            android:layout_height="match_parent"

            android:orientation="vertical">


            <TextView

                android:layout_width="wrap_content"

                android:layout_height="wrap_content"

                android:text="Hello World!" />


            <Button

                android:id="@+id/b_logALine"

                android:layout_width="wrap_content"

                android:layout_height="wrap_content"

                android:onClick="onLogALine"

                android:text="Log A Line" />


            <Button

                android:id="@+id/b_register"

                android:layout_width="wrap_content"

                android:layout_height="wrap_content"

                android:onClick="onRegister"

                android:text="Register" />


            <Button

                android:id="@+id/b_uploadLog"

                android:layout_width="wrap_content"

                android:layout_height="wrap_content"

                android:onClick="onUploadLog"

                android:enabled="false"

                android:text="Upload Log" />


            <Button

                android:id="@+id/b_odata"

                android:layout_width="wrap_content"

                android:layout_height="wrap_content"

                android:onClick="onOnlineOData"

                android:enabled="false"

                android:text="Online OData" />


            <Button

                android:id="@+id/b_offlineOData"

                android:layout_width="wrap_content"

                android:layout_height="wrap_content"

                android:onClick="onOfflineOData"

                android:enabled="false"

                android:text="Offline OData" />


        </LinearLayout>

    </ScrollView>

</androidx.constraintlayout.widget.ConstraintLayout>
- Replace the content in MainActivity.java with the code shown below.
package com.sap.stepbystep;


import android.os.Bundle;

import androidx.appcompat.app.AppCompatActivity;

import android.util.Log;

import android.view.View;


public class MainActivity extends AppCompatActivity {

    private Integer numberOfPresses = 0;

    private final String myTag = "myDebuggingTag";


    @Override

    protected void onCreate(Bundle savedInstanceState) {

        super.onCreate(savedInstanceState);

        Log.d(myTag, "onCreate");

        setContentView(R.layout.activity_main);

    }


    public void onLogALine(View view) {

        Log.d(myTag, "In onLogALine");

        numberOfPresses = numberOfPresses + 1;

        Log.d(myTag, "Button pressed " + numberOfPresses + " times");

    }


    public void onRegister(View view) {

        Log.d(myTag, "In onRegister");

    }


    public void onUploadLog(View view) {

        Log.d(myTag, "In onUploadLog");

    }


    public void onOnlineOData(View view) {

        Log.d(myTag, "In onOnlineOData");

    }


    public void onOfflineOData(View view) {

        Log.d(myTag, "In onOfflineOData");

    }

}
- If the project is still running on a device or emulator it can be updated by pressing the Apply Changes button. If it isn't, press the run button again to deploy and run the project.


- Open the Logcat view and notice that when the Log A Line button is pressed, the logged content is visible.
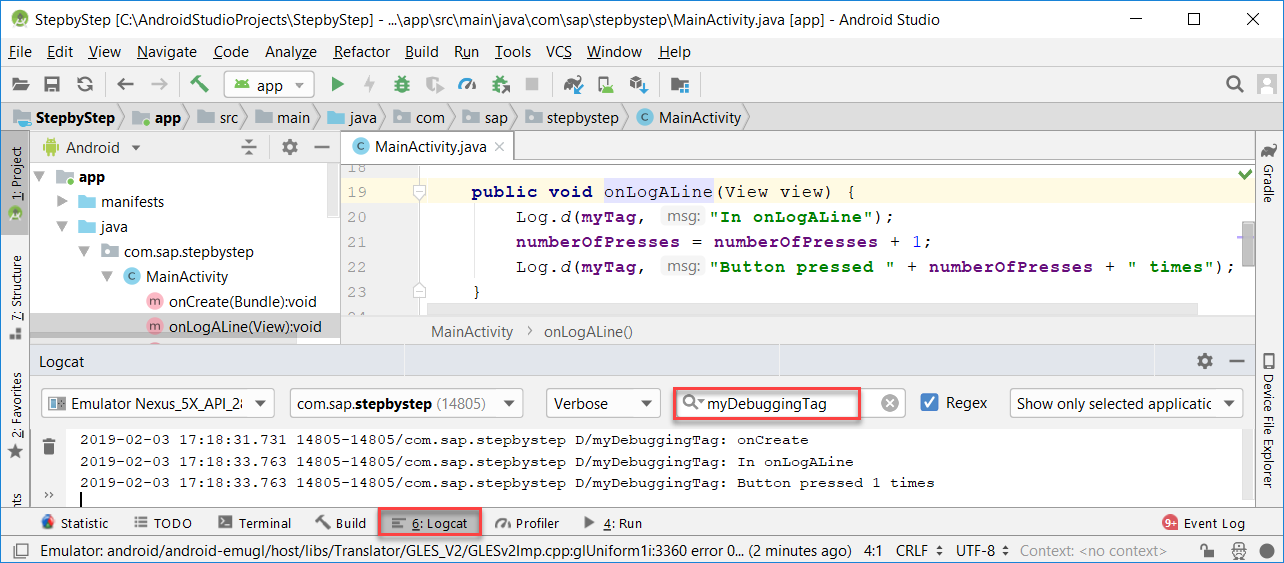
- Note that the Logcat view, if not present in the sidebar, can be added via View > Tool Windows > Logcat.
Clicking a tab in the Sidebar such as Logcat will minimize or show the content.
Double tapping on the top of the Logcat view will maximize the window.
Right clicking on the top of the Logcat view will show the options menu allowing the view to be detached from Android Studio (Floating Mode).
Debugging the Project
- Debug the project.

- Press the Log A Line button three times.
- Add a breakpoint in the first line of the method onLogALine.
Press the Log A Line button in the running app which will cause the debugger to stop at the breakpoint.

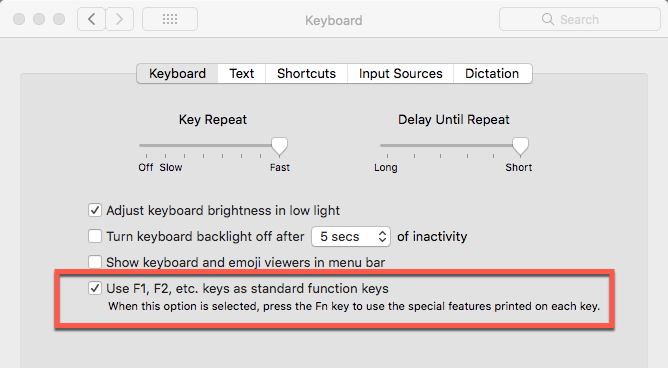
- The below controls can be used to Resume (F9 Windows, Command + Option + R Mac), Step Over (F8), Step Into (F7), Step Out (Shift F8) and Evaluate Expression (Alt + F8 Windows, Option + F8 Mac).
 Note that on a Mac, the Function Key behavior can be configured as shown below.
- Step over the line that logs in onLogALine.
Press the Evaluate Expression and enter the below text.
numberOfPresses = numberOfPresses * -1

Close the evaluate dialog and then press Resume on the debugger and notice that it is possible to affect the values of the variables during debugging in this way.

Adding the SDK Libraries to the Android Studio Project
The following steps will demonstrate how the SAP Android SDK libraries can be added to the project.
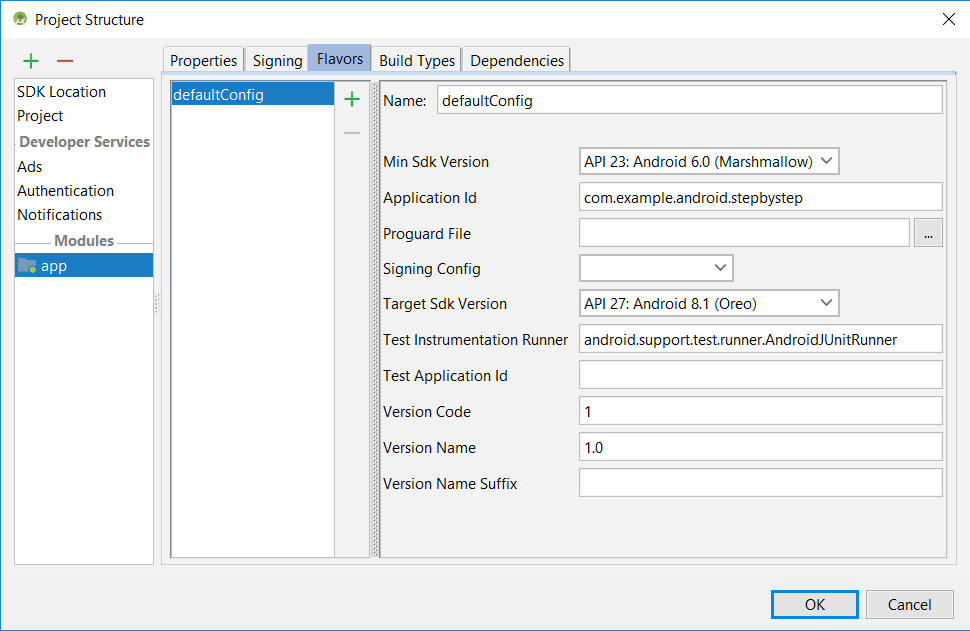
- First, examine the libraries that currently are included in the project. There are a variety of ways to do that as shown below.
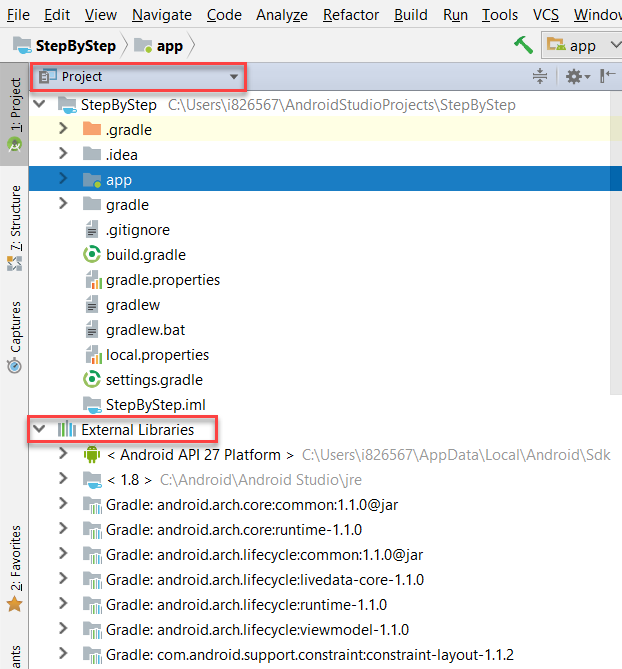 File, Project Structure


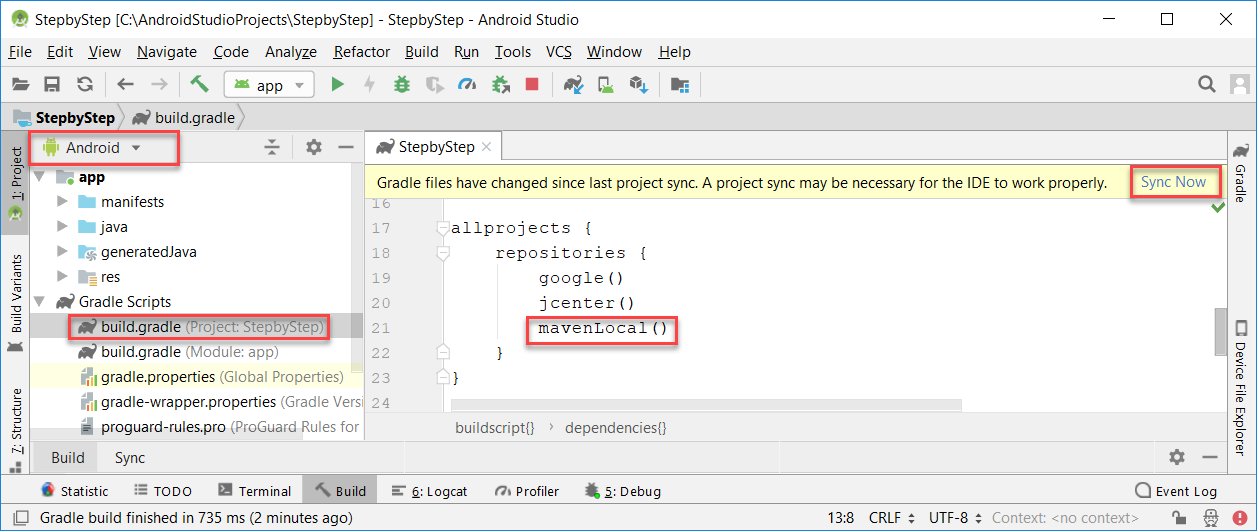
- In the project's build.gradle file, under the allprojects section, specify where the Android SDK libraries can be found. Using mavenLocal is a convenient way to specify the location to search for the libraries without hardcoding the path.
mavenLocal()
The value mavenLocal() will resolve to the folder C:\Users\user_name\.m2\repository.
- In the app's build.gradle file add the following to the dependencies section.
implementation 'com.sap.cloud.android:foundation:2.2.0'

    implementation 'org.slf4j:slf4j-api:1.7.28'

    implementation 'com.github.tony19:logback-android:2.0.0'
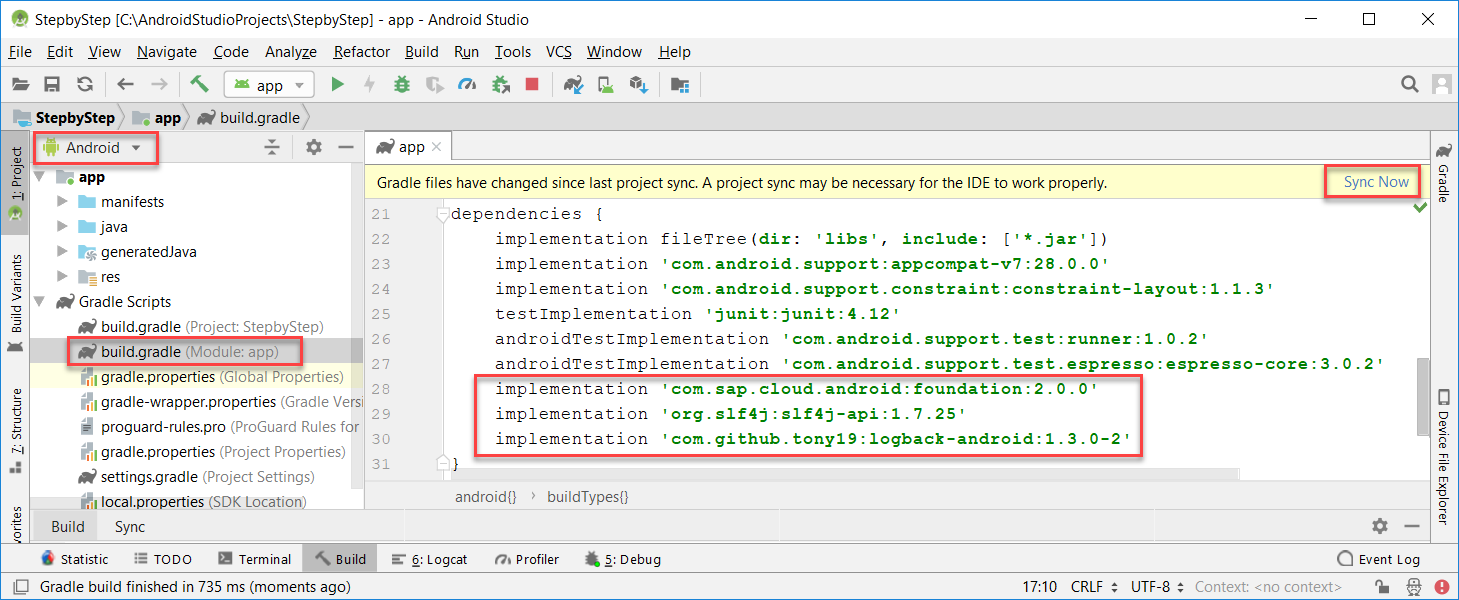
Note the version string can be found by examining the C:\Users\user_name\.m2\repository\com\sap\cloud\android\foundation folder. There may be multiple versions of the libraries such as 1.1.4, 2.0.0, or 2.1.0.
Note the slf4j and logback libraries are required by the SAP SDK as it uses these libraries for logging. - The SDK by default sets the allowBackup to false. In manifests\AndroidManifest.xml file, change the below setting from true to false to avoid the following error.
android:allowBackup="false"
C:\Users\dan\AndroidStudioProjects\StepbyStep\app\src\main\AndroidManifest.xml:6:9-35 Error:

Attribute application@allowBackup value=(true) from AndroidManifest.xml:6:9-35

is also present at [com.sap.cloud.android:foundation:1.1.0] AndroidManifest.xml:13:18-45 value=(false).

Suggestion: add 'tools:replace="android:allowBackup"' to <application> element at AndroidManifest.xml:5:5-19:19 to override.

:app:processDebugManifest
For further information on backups and how to configure this setting see Android Backup. - Notice that the foundation library is now ready to be used.
Gradle for Android and Java may be helpful if you wish to learn more about gradle and how it is used by Android Studio. - See also Cloud Shipment
Android Studio Tips and Shortcuts
The following are a collection of things that may be helpful when starting out with Android Studio. See also Keyboard Shortcuts.
- Android Studio automatically auto saves files. There is no need to save changes before running or debugging.
- The Project Structure (File, Project Structure) can be useful to see details on the project.
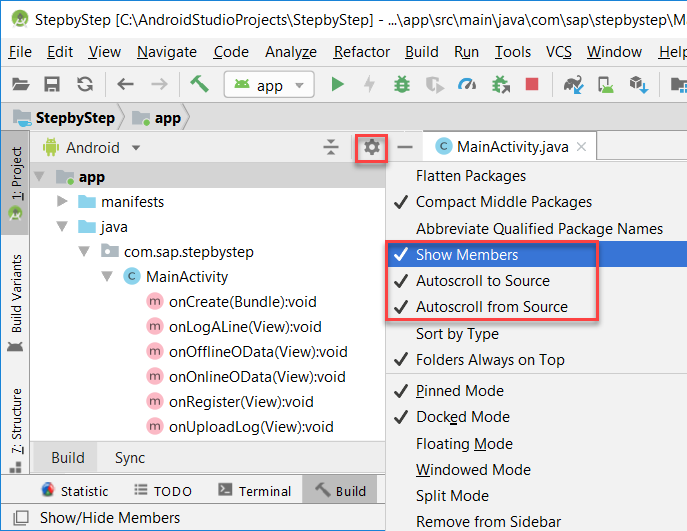
- The project navigator can be configured to show methods and sync between source and navigator.
- If you encounter a compilation error as shown below, more details can be seen by clicking on the Toggle view button in the Build Tool window.


- When running or debugging a project, it is possible to specify the target and to check Use same device for future launches via Run..., Edit Configurations... dialog.

- To quickly open an existing file, press Ctrl + N on Windows or Command O on a Mac.
- To move to a method in the currently open file, press Ctrl + F12 on Windows or Command F12 (or Shift Command F12) on a Mac.
- To move to the start of a method press Ctrl { or to the end with Ctrl } on Windows. Select a { or } and press Ctrl + M on a Mac.
- To navigate to the previously opened file press Ctrl + Alt + Left Arrow on Windows or on a Mac Command [.
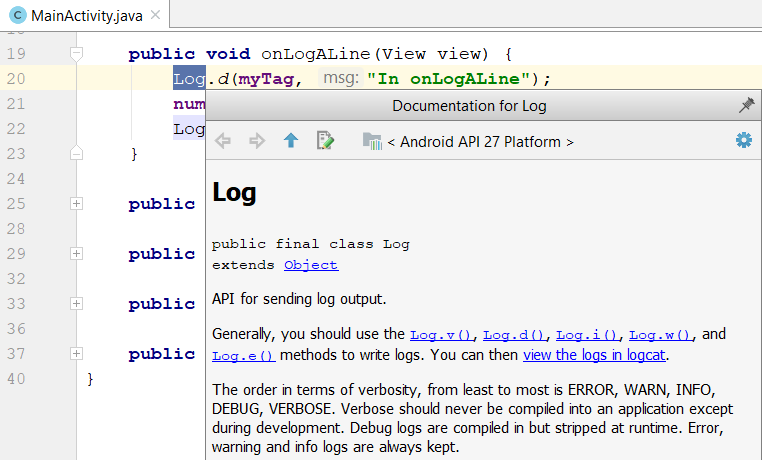
- Select a method or class and press Ctrl + Q for help on Windows or Ctrl + J on a Mac.
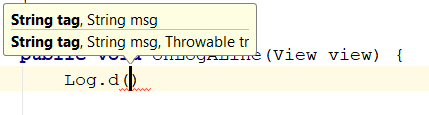
- Method completion appears if you press Ctrl + P on Windows or Command P on a Mac.
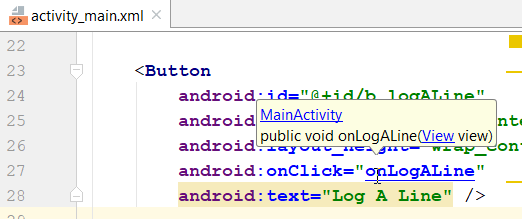
- Holding down Ctrl on Windows or Command on a Mac and holding the mouse over some code will show its declaration. Clicking on it will jump to its declaration. This also works with XML files.
- Selecting text and then pressing Ctrl + / on Windows or Command + / on a Mac will comment or uncomment.
- Ctrl + Alt + O on Windows or Ctrl + Option + O on a Mac will organize imports.
- Selecting a problem and pressing Alt + Enter on Windows or Option + Enter on a Mac will attempt to correct the problem.
In the image below, the Log.d method is expecting a String and an int is provided.

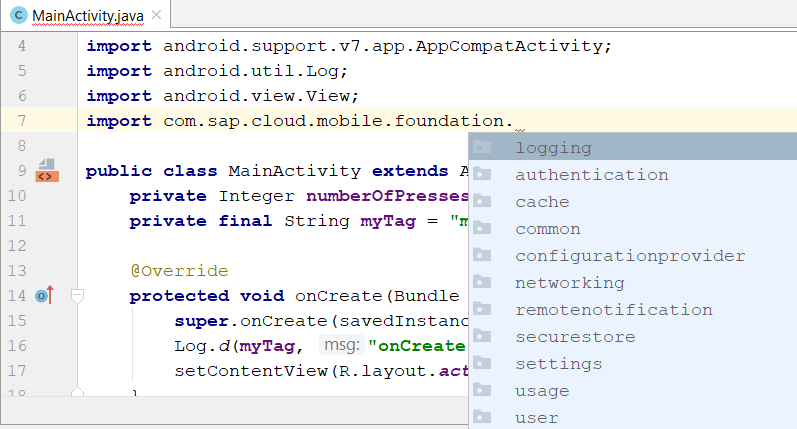
- Under the Android Studio Editor settings, under General, Auto Import, there is a checkbox named Add unambiguous imports on the fly. This can be very helpful when pasting in code as the imports will be automatically added.
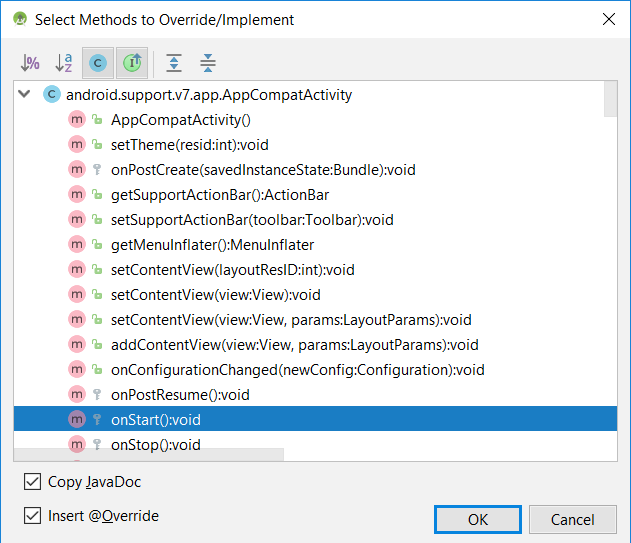
- Ctrl + O shows the available methods that can be overridden and will add the code when selected.
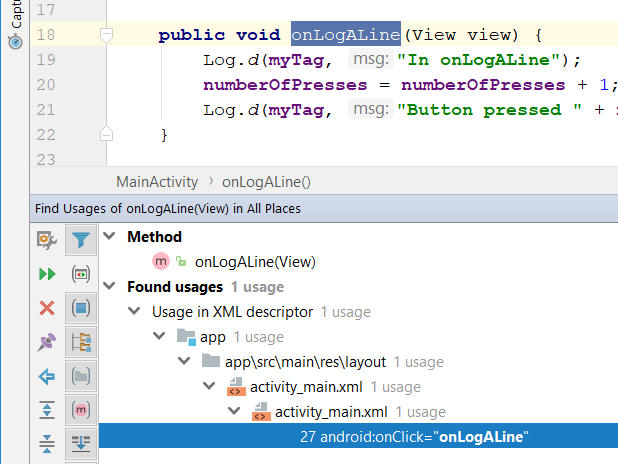
- Alt + F7 on Windows or Option + F7 on a Mac will show the usages of the selected text.
- Ctrl + F on Windows or Command + F on a Mac to find text in a single file.
Ctrl + Shift + F on Windows or Command + Shift + F to find in all files.
Shift Shift will open the search everywhere dialog.
More on Java, Android Studio and Android Development
There are many great tutorials on these topics. Here are a few to get started with.
Android Developer Guides
Developing Android Apps
Android related courses on Udacity
Using the SAP Cloud Platform SDK
The following parts provide step by step instructions demonstrating some key features of the SAP Cloud Platform SDK for Android.
Enabling the SAP Cloud Platform Mobile Services and Configuring an App
Registration
Logging
Online OData
Offline OData
Syncing an Offline Store
Using a Foreground Service when Syncing
Using ILOData
Remembering Credentials using the Secure Store
Usage
Configuration Provider and the Discovery Service
OAuth
Using Fiddler to Trace Client Network Requests
Server Logging and Tracing
Next (Mobile Services)
- SAP Managed Tags:
- SAP Mobile Services,
- SAP BTP SDK for Android
Labels:
18 Comments
You must be a registered user to add a comment. If you've already registered, sign in. Otherwise, register and sign in.
Labels in this area
-
ABAP CDS Views - CDC (Change Data Capture)
2 -
AI
1 -
Analyze Workload Data
1 -
BTP
1 -
Business and IT Integration
2 -
Business application stu
1 -
Business Technology Platform
1 -
Business Trends
1,661 -
Business Trends
86 -
CAP
1 -
cf
1 -
Cloud Foundry
1 -
Confluent
1 -
Customer COE Basics and Fundamentals
1 -
Customer COE Latest and Greatest
3 -
Customer Data Browser app
1 -
Data Analysis Tool
1 -
data migration
1 -
data transfer
1 -
Datasphere
2 -
Event Information
1,400 -
Event Information
64 -
Expert
1 -
Expert Insights
178 -
Expert Insights
270 -
General
1 -
Google cloud
1 -
Google Next'24
1 -
Kafka
1 -
Life at SAP
784 -
Life at SAP
11 -
Migrate your Data App
1 -
MTA
1 -
Network Performance Analysis
1 -
NodeJS
1 -
PDF
1 -
POC
1 -
Product Updates
4,578 -
Product Updates
323 -
Replication Flow
1 -
RisewithSAP
1 -
SAP BTP
1 -
SAP BTP Cloud Foundry
1 -
SAP Cloud ALM
1 -
SAP Cloud Application Programming Model
1 -
SAP Datasphere
2 -
SAP S4HANA Cloud
1 -
SAP S4HANA Migration Cockpit
1 -
Technology Updates
6,886 -
Technology Updates
395 -
Workload Fluctuations
1
Related Content
- Top Picks: Innovations Highlights from SAP Business Technology Platform (Q1/2024) in Technology Blogs by SAP
- Consuming SAP with SAP Build Apps - Connectivity options for low-code development - part 2 in Technology Blogs by SAP
- Consuming CAPM Application's OData service into SAP Fiori Application in Business Application Studio in Technology Blogs by Members
- Enhanced Data Analysis of Fitness Data using HANA Vector Engine, Datasphere and SAP Analytics Cloud in Technology Blogs by SAP
- CAP LLM Plugin – Empowering Developers for rapid Gen AI-CAP App Development in Technology Blogs by SAP
Top kudoed authors
| User | Count |
|---|---|
| 11 | |
| 10 | |
| 10 | |
| 9 | |
| 8 | |
| 7 | |
| 7 | |
| 7 | |
| 7 | |
| 6 |