
- SAP Community
- Products and Technology
- Technology
- Technology Blogs by SAP
- Securing Cloud Platform Business Application
Technology Blogs by SAP
Learn how to extend and personalize SAP applications. Follow the SAP technology blog for insights into SAP BTP, ABAP, SAP Analytics Cloud, SAP HANA, and more.
Turn on suggestions
Auto-suggest helps you quickly narrow down your search results by suggesting possible matches as you type.
Showing results for
Product and Topic Expert
Options
- Subscribe to RSS Feed
- Mark as New
- Mark as Read
- Bookmark
- Subscribe
- Printer Friendly Page
- Report Inappropriate Content
10-10-2018
9:52 PM
CAP Security
ATTENTION: This information on blog has been deprecated! For CAP Security please follow the instructions on: https://cap.cloud.sap/docs/java/security I'm keeping this blog on-line just for reference purposes. |
Pre-requisites
Follow the tutorial on how to create the SCP-Business Application (CAP)
The MTA project should have at least three main modules: db, srv & app.
Java run-time and Maven installed on your PC
Valid SAP Marketplace User with software download privileges
AppRouter
After you finished adding the html5 module as explained in the CAP documentation, there is no need to create a NodeJS module and make it load the AppRouter. If you inspect the html5 module it contains the package.json with all node dependencies and the start script to load the application router. This application will be responsible for users authentication in Cloud Foundry. From there you can "share" the JWT token to the service module.
At this point you should have a working application with an UI front-end such as this one:

This application will never request authentication to you, since it is not really deployed onto CF. Instead WebIDE runs it in test mode, by simply pointing the browser to a resource path from your workspace. The only application you should have on your org/space should be another test application which corresponds to your OData service - a Java Spring based application.

In order to test the authentication from your "embedded" AppRouter, you need to:
- Clean up your trial account (remove any running applications, routes or any other resources). WebIDE will throw a deployment error, but it will not really tell you what's wrong. If this is the first time you've tried CAP or WebIDE full-stack and your CF space is empty, then just hit stop on your service and WebIDE will remove the temporary application instance.
- Build the whole project - which will generate an mtar file on your workspace folder named "mta_archives". By right-clicking on it you can select deploy.
Deployment should take a a fairly long time - but you need to keep in mind that it is doing a lot of work behind the scenes for your. For instance: you no longer need to manually create an xsuaa instance with xs-security.json file, etc.
After deploying the application you should see the following apps and service instances:


Test the app module by opening its URL and see that it now requests user authentication:

CF authentication uses the e-mail address to authenticate. So, don't use the P-User here. Once you open your application the OData service should be called without any issues.
However, the request for authentication here has just protected the front-end UI, not the service.
OData Service Security
As explained before the 'srv' module is a Java Spring application. Therefore we need to use the Spring Security configuration to block access when the OData service is being called outside of the the UI and have it accept the JWT from the UI as authentication method.
This can be accomplished in Spring by two means. Either you create a new configuration class with the security beans in place - Spring will take care of making it secure via dependency injection. Or you could configure it via xml artifacts. Here I've chosen the xml artifacts, since CAP left a "template" configuration that is almost ready to be used.
To enable Spring Security in our Java application do the following:
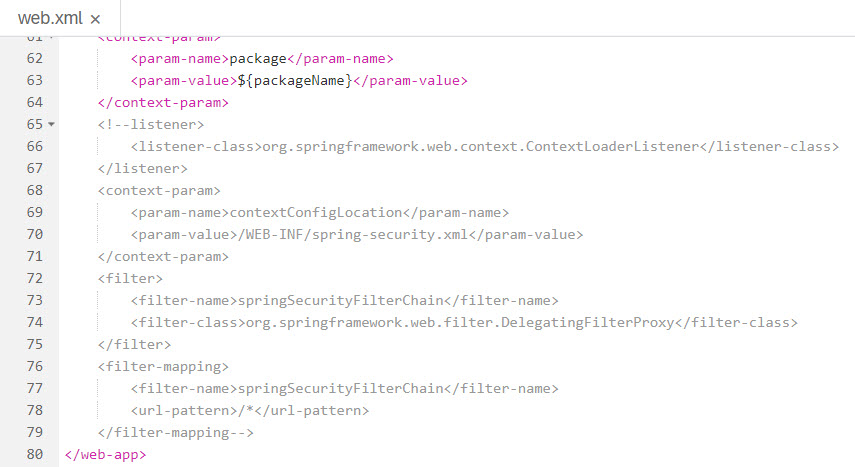
- Open the file "web.xml" that is under the path /srv/src/main/webapp/WEB-INF. The file already comes with the required security filters in place, but you have to enable it by un-commenting last part. Remember to remove only the double dashes and the exclamation mark from the listener and filter mapping tags.
- Update the xsd definitions in the file "security-spring.xml" (under the same folder) to reflect the newer Spring version used by CAP:

Add the following tags to remove CSRF protection (we wont need this protection since all communication will be done internally between the router app and the service app).
Place the following piece of xml right above the tag <sec:intercept-url....> used to intercept the odata/v2 path
<sec:csrf disabled="true"/>The spring-security.xml file should now look like this:

Once this is done, the java application "coding" is ready intercept all calls to the odata/v2 path and will only allow it to pass when there is a JWT present.
However, the way it configured still won't work because we haven't instructed the application where to fetch the required libraries.
XS Java Libraries
WebIDE works with Maven Central by default. Thus, it fetches all required libraries from it. If any dependency is not available in Maven Central, WebIDE won't be able to build the application.
In order to use the Filter Chain you configured via web.xml, your Java project needs to reference the the HANA 2.0 Java Libraries - more specifically the ones related to security. Since they aren't available in Maven Central nor at any other known public maven repositories we need "trick" the maven process and make it "think" it has access to the required libraries via the project's folder structure.
Java Libraries in your PC
We first need to install the libraries in your local maven repository. The following procedure will copy pre-compiled libraries in the expected folder structure under your ".m2" folder.
To do it, download the XS JAVA library from the SAP Marketplace or search it from the following path:
Unzip the XS_JAVA_2-<version>.ZIP to a folder of your choice. Open a terminal window or command prompt and run the following commands:
#]> cd XS_JAVA_2_<version>

#]> mvn clean install
The result should be something very much like this:

Create zip file to import
Now, this is something your need to do on your own. Create two sets of zip files containing the following files/folders (which you should retrieve from your .m2 directory):
NOTE: The paths are important here. So, use your zip utility software to store the paths (the first line where we can clearly see "\com\sap\xs2\secutiry\..." and "\com\sap\security". Under the shown folders you should see another folder for the library version and then the JAR file, POM, etc will be found as well. I am not going to document this procedure but I am confident that you are able to do it on your own.
XS Java Libraries in WebIDE
On WebIDE, create a new folder under your MTA project named "libs". At this point you should have the following folder structure:

Right-click the libs folder and import the libs.zip file you created earlier:

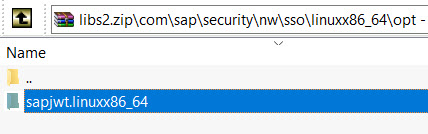
Do the same for the libs2.zip - this time the import screen will tell you that the folder isn't empty. Hit "import" as it is not going to overwrite the imported files from the previous step.

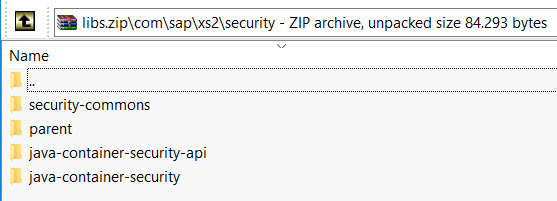
At this point the folder structure should look like this in WebIDE:

Let's take the java-container-security folder as an example of what you should have in terms of files.

Update you POM.xml file to use of XS Java Libraries
Under the OData Module (folder "srv") you will find the file pom.xml. Open open a new line between the </properties> tag and the <build> tag:

Then paste the following lines
<repositories>

  <repository>

    <id>my-local-repo</id>

    <url>file://${project.basedir}/../libs</url>

  </repository>

</repositories>

  <dependencies>

		<!-- Authentication and Authorization imports with Spring Security -->

		<dependency>

			<groupId>com.sap.xs2.security</groupId>

			<artifactId>security-commons</artifactId>

			<version>0.28.6</version>

		</dependency>

		<dependency>

		  <groupId>com.sap.xs2.security</groupId>

		  <artifactId>java-container-security</artifactId> <!-- 1 -->

		  <version>0.28.6</version>

		</dependency>

		<dependency>

		  <groupId>com.sap.xs2.security</groupId>

		  <artifactId>java-container-security-api</artifactId>

		  <version>0.28.6</version>

		</dependency>

		<dependency>

		  <groupId>org.springframework.security</groupId>

		  <artifactId>spring-security-jwt</artifactId>

		  <version>1.0.9.RELEASE</version>

		</dependency>

		<dependency>

		  <groupId>org.springframework.security.oauth</groupId>

		  <artifactId>spring-security-oauth2</artifactId>

		  <version>2.3.3.RELEASE</version>

		</dependency>

		<dependency>

		  <groupId>com.sap.security.nw.sso.linuxx86_64.opt</groupId>

		  <artifactId>sapjwt.linuxx86_64</artifactId>

		  <version>1.1.19</version>

		</dependency>

  </dependencies>
The file should look like this:

These lines will make the OData service module load the security libraries required for the JWT token and all other security libraries. Keep an eye on the "Problems View" in WebIDE. If your pom.xml is invalid there is a high change your 'libs' folder structure isn't correctly set or you need to update the versions in the XML. This blog was written when version 0.28.6 was the latest available. But you could have downloaded a newer version by now. If you place the cursor over the red marker, it will show the libraries that the system didn't find.
Checking the WAR file
Build the OData service project and check that the corresponding library jar files were in fact downloaded from your local 'libs' folder and stored in the generated war file. The best way to find out is to export the war file from the target folder:

When you open the downloaded WAR file you should see the following newly included 'libs' under WEB-INF\lib:

You could also check the the build console and search for these files instead of downloading the whole war file (which is quite huge and may take some time to download).
Checking the security in the OData service:
The security features of your srv module will not work by default as there is no xsuaa dependency for it yet. To make your OData service use the xsuaa service we need to add the following lines on our MTA descriptor (it is exactly the same as the one defined four our ui front-end):
- name: uaa_bookshop2

  properties:

    SAP_JWT_TRUST_ACL: '[{"clientid" : "*", "identityzone" : "*"}]'
Your MTA file should look like this:

Now, if you run the service module, you will get the following error:

This means your service is now protected.
Putting it all together
First we have to make the AppRouter call the OData service destination in an authenticated manner. Therefore, change the property authenticationType from none to xsuaa on the file xs-app.json (this file is at the root of your app's folder):

Keep in mind that this file is only interpreted when it is running in CF. Remember that AppRouter is a NodeJS module (impossible to run it on Neo). If you try running this directly via WebIDE it is not going to share the authentication between apps, simply because WebIDE web application testing doesn't deploy and run the AppRouter. It is intended to test the UI, not the security. Maybe the product team will change this in the future, but I don't hold the answers to such questions.
In a trial instance you must stop the OData service and make sure your org/space is clean of deployed projects due to limited resources.
Build the MTA project again to include the all the changes in the mtar file and deploy it to your org/space.
Check that all applications are really running. Sometimes the db module refuses to start right after deployment has finished. If this happens, just start the db module manually.
Final testing
After deployment is done, you should end-up with the same three applications (db, srv, app):

And an instance of xsuaa service bound to app and srv. In addition to the instance of hanatrial bound to db and srv:

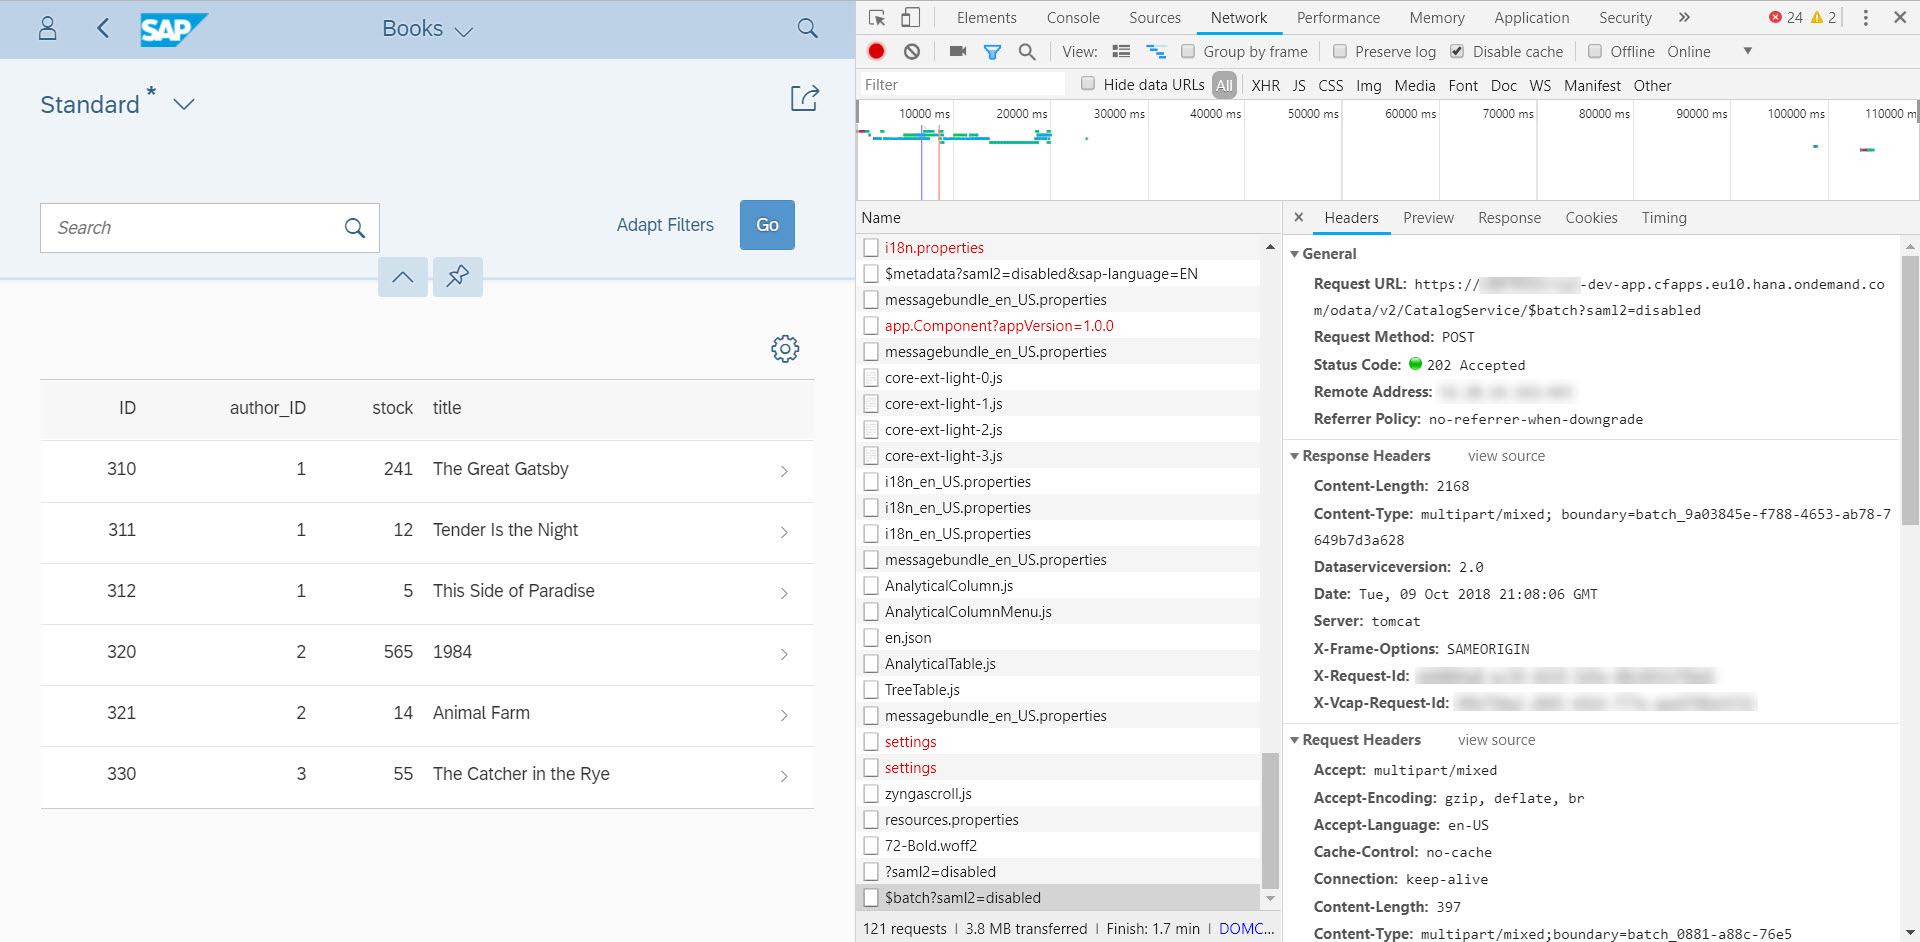
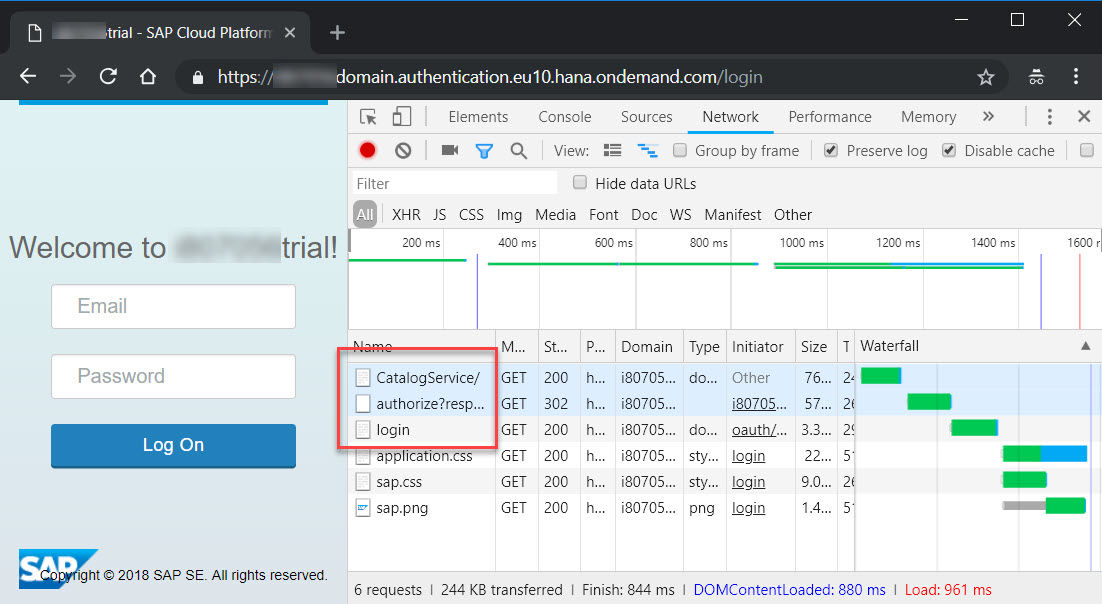
Open the app URL in incognito mode to test the authentication. The CF authentication kicks in and you will be able to load the books table. Notice that the OData service loaded without any errors:

To prove that the OData service will only work after it has been authenticated, you can open the OData end-point from the app application on a new incognito window. It should load the login screen instead.
However, if you try loading the srv URL directly on an incognito window, you should still see the following:

Roles, Scopes, Role Templates and Role Collections
CAP will create a Role Template named "Token_Exchange" with scope named "uaa.user":

However, there is no "role' and no "role collection" created. In fact, there is no need for them in this example. We are simply checking for authenticated users. The service isn't blocking any of the scopes.
If you need a more granular control over the methods of the service then define additional authorization scopes in the AppRouter's "xs-security.json". Then perform checks in the odata service via "spring-security.xml" this way:
<sec:intercept-url pattern="/odata/v2/CatalogService/Books" access="#oauth2.hasScope('${xs.appname}.uaa.user')"  method="GET" />

<sec:intercept-url pattern="/odata/v2/CatalogService/Books"  access="#oauth2.hasScope('${xs.appname}.uaa.admin')" method="POST" />
Once you have the 'app' module deployed, the new scopes and templates will be available to create the required roles based on the templates you defined in the AppRouter.
Roles are assigned to Role Collections which in turn can be assigned to users. This is done via cockpit at the organization level (not the space). Create the Role Collection and assign Roles to it.
Then on the 'Security' open the 'Trust' menu and you will find your IdP link. Click on the link and assign a user to the Role Collection. Remember: users in CF are defined as e-mails.
Cheers!
Ivan Mirisola
- SAP Managed Tags:
- SAP Business Application Studio,
- SAP BTP, Cloud Foundry runtime and environment
Labels:
21 Comments
You must be a registered user to add a comment. If you've already registered, sign in. Otherwise, register and sign in.
Labels in this area
-
ABAP CDS Views - CDC (Change Data Capture)
2 -
AI
1 -
Analyze Workload Data
1 -
BTP
1 -
Business and IT Integration
2 -
Business application stu
1 -
Business Technology Platform
1 -
Business Trends
1,661 -
Business Trends
88 -
CAP
1 -
cf
1 -
Cloud Foundry
1 -
Confluent
1 -
Customer COE Basics and Fundamentals
1 -
Customer COE Latest and Greatest
3 -
Customer Data Browser app
1 -
Data Analysis Tool
1 -
data migration
1 -
data transfer
1 -
Datasphere
2 -
Event Information
1,400 -
Event Information
65 -
Expert
1 -
Expert Insights
178 -
Expert Insights
280 -
General
1 -
Google cloud
1 -
Google Next'24
1 -
Kafka
1 -
Life at SAP
784 -
Life at SAP
11 -
Migrate your Data App
1 -
MTA
1 -
Network Performance Analysis
1 -
NodeJS
1 -
PDF
1 -
POC
1 -
Product Updates
4,577 -
Product Updates
330 -
Replication Flow
1 -
RisewithSAP
1 -
SAP BTP
1 -
SAP BTP Cloud Foundry
1 -
SAP Cloud ALM
1 -
SAP Cloud Application Programming Model
1 -
SAP Datasphere
2 -
SAP S4HANA Cloud
1 -
SAP S4HANA Migration Cockpit
1 -
Technology Updates
6,886 -
Technology Updates
408 -
Workload Fluctuations
1
Related Content
- ABAP Cloud Developer Trial 2022 Available Now in Technology Blogs by SAP
- Hack2Build on Business AI – Highlighted Use Cases in Technology Blogs by SAP
- SAP Partners unleash Business AI potential at global Hack2Build in Technology Blogs by SAP
- It’s Official - SAP BTP is Again a Leader in G2’s Reports in Technology Blogs by SAP
- New Machine Learning features in SAP HANA Cloud in Technology Blogs by SAP
Top kudoed authors
| User | Count |
|---|---|
| 13 | |
| 10 | |
| 10 | |
| 7 | |
| 6 | |
| 5 | |
| 5 | |
| 5 | |
| 4 | |
| 4 |