


- SAP Community
- Products and Technology
- Technology
- Technology Blogs by SAP
- Using the Destination service in SAP BTP, Cloud Fo...
Technology Blogs by SAP
Learn how to extend and personalize SAP applications. Follow the SAP technology blog for insights into SAP BTP, ABAP, SAP Analytics Cloud, SAP HANA, and more.
Turn on suggestions
Auto-suggest helps you quickly narrow down your search results by suggesting possible matches as you type.
Showing results for
Developer Advocate
Options
- Subscribe to RSS Feed
- Mark as New
- Mark as Read
- Bookmark
- Subscribe
- Printer Friendly Page
- Report Inappropriate Content
10-08-2018
3:21 PM
In this blog post, I will briefly explain why there are ‘destinations’ in SAP BTP, Cloud Foundry. I will also show some hands-on examples of how to consume them.
Leveraging existing services and data sources is the core of each cloud-based business application out there. Connecting applications to those destinations is a very crucial element of your application and should be done the right way. SAP BTP recognized the importance of this element and offers with the destination service a scalable solution in the Cloud Foundry Environment.
To keep this post as simple as possible, I won’t dive into the SAP Cloud Connector or the SAP Connectivity Service, which is a proxy service to redirect requests to on-premise systems (I recommend this blog post if you’re interested in this scenario).
Updates:
19th Nov 2020 - Refresh GIFs
29th Jan 2021: Rebranding to SAP BTP
9th Jan 2021: Add video tutorial to test destinations
I think all of us agree that it would be easiest to hardcode the destination information into the codebase. But this (rookie) mistake has several issues, just to name a few:
I recorded a short video tutorial that you can follow to make sure your destination is working as expected. Do you know your destination is already accessible? Then jump ahead to the next section.
The previous section did not only show that information about the endpoints should be stored centrally, but it also showed that there is a need for “business logic” to consume it.
In general, applications shouldn’t be hardwired to resources (like text files or database systems), but be rather coupled loosely to them. Backing services are the best practice to couple resources to applications running in Cloud Foundry environments. Therefore, SAP encapsulates the necessary business logic and the persistence layer for those tasks and makes it easy to consume as a backing service (Destination service).
Your application can access the destinations via a so-called (Destination) service instance.
There are three steps to enable a backend application to access destinations
My colleague Matthieu Pelatan has described this process of retrieving the destination information very detailed in a mini-blog-series (Part 1, Part 2, Part 3). Therefore, I would like to keep this section rather short and simply list the necessary steps here:
The official documentation contains nice code samples for Java and your terminal (curl), so instead, I thought I'd supply some code in JavaScript and Python.
This snippet uses the npm package request, which can be substituted with a module of your choice.
SAP recently announced that the Python runtime is officially supported now! So, I would like to take this as an occasion to include a python script here:
Please note that you need to declare the modules "request" and "cfenv" to your app via a requirements.txt file before deploying the code.
Apart from the reasons above, there is one additional reason why you want to have a destination service for web apps:
Same Origin Policy
I’m sure every web dev out there cursed this mechanism at least once in his/her life. For the “lucky” ones of you who didn’t have to deal with SOP before: It is a security mechanism of your browser that basically blocks all requests your client-side script sends to any web server, except the webserver which delivered this script.
The most common workaround is sending a request to your web server, which proxies the request to the final destination. With the SAP Application Router, on the other side, you don’t need to bother at all! The router knows how to access the destination out-of-box. You don’t need to request a JWT token from the XSUAA service instance and you don’t need to request the destination information from the destinations-service. You don’t even have to implement the authentication strategy. SAP Application Router takes care of all that for you.
Here’s what you have to do in the SAPUI5 application:
There are many good reasons why you should use destinations in the Cloud Foundry, ABAP, and Kubernetes environment, such as preventing the use of anti-patterns, storing your credentials in a safe place (in general just to make your life easier). At first sight, the process of retrieving those destinations in your application might seem confusing. I hope this article could shed some light on this process and prove that’s it’s actually quite simple.
Leveraging existing services and data sources is the core of each cloud-based business application out there. Connecting applications to those destinations is a very crucial element of your application and should be done the right way. SAP BTP recognized the importance of this element and offers with the destination service a scalable solution in the Cloud Foundry Environment.
To keep this post as simple as possible, I won’t dive into the SAP Cloud Connector or the SAP Connectivity Service, which is a proxy service to redirect requests to on-premise systems (I recommend this blog post if you’re interested in this scenario).
Updates:
19th Nov 2020 - Refresh GIFs
29th Jan 2021: Rebranding to SAP BTP
9th Jan 2021: Add video tutorial to test destinations
Why do I need destinations?
I think all of us agree that it would be easiest to hardcode the destination information into the codebase. But this (rookie) mistake has several issues, just to name a few:
- Re-usability
You would need to copy and paste the same information into several modules/apps when you want to re-use it (=> Antipattern)
- Standardized form
Closely related to the re-usability aspect, you need to come up with a standardized format (e.g. do you prefer the properties ‘protocol’, ‘hostname’, ‘port’ or would you rather combine them to ‘URL’?). It’s crucial to enforce this format across all destinations
- Sensitive information in the codebase
Never ever (ever!) add sensitive information, such as passwords, to your code! I think I don’t need to explain this one
- Need to handle various authentication strategies
Authentication strategies vary access different destinations types and you need to implement each single one
- Integration with development tools
Dev tools (like code generators) have virtually no use if they cannot access supporting information
How can I make sure my destinations are set up correctly?
I recorded a short video tutorial that you can follow to make sure your destination is working as expected. Do you know your destination is already accessible? Then jump ahead to the next section.

How does this translate to the “Cloud Foundry world”?
The previous section did not only show that information about the endpoints should be stored centrally, but it also showed that there is a need for “business logic” to consume it.
In general, applications shouldn’t be hardwired to resources (like text files or database systems), but be rather coupled loosely to them. Backing services are the best practice to couple resources to applications running in Cloud Foundry environments. Therefore, SAP encapsulates the necessary business logic and the persistence layer for those tasks and makes it easy to consume as a backing service (Destination service).
Your application can access the destinations via a so-called (Destination) service instance.
Using the destinations-service in the backend
There are three steps to enable a backend application to access destinations
- Enter the information for the destination
I recommend that you enter them on the subaccount level in the Cloud Foundry environment (it’s also possible to add them on the service instance level).
- Create a destinations service instance
This service is able to read and transmit the information you stored in the previous step it securely.
- Create an xsuaa service instance
This service issues a JWT token to authenticate to the destinations service instance.
Same as the previous step, just filter the marketplace for “trust” instead.
My colleague Matthieu Pelatan has described this process of retrieving the destination information very detailed in a mini-blog-series (Part 1, Part 2, Part 3). Therefore, I would like to keep this section rather short and simply list the necessary steps here:
- Read required the environment variables
- Use the retrieved values to request a JWT access token (for the destinations service instance) from the UAA
- Get the destination details from the destination service instance
- Request the resource behind your destination!

The official documentation contains nice code samples for Java and your terminal (curl), so instead, I thought I'd supply some code in JavaScript and Python.
Node.js [JavaScript]
This snippet uses the npm package request, which can be substituted with a module of your choice.
const request = require('request');

const cfenv = require('cfenv');


/*********************************************************************

 *************** Step 1: Read the environment variables ***************

 *********************************************************************/

const oServices = cfenv.getAppEnv().getServices();

const uaa_service = cfenv.getAppEnv().getService('uaa_service');

const dest_service = cfenv.getAppEnv().getService('destination_service');

const sUaaCredentials = dest_service.credentials.clientid + ':' + dest_service.credentials.clientsecret;


const sDestinationName = 'scp';

const sEndpoint = '/secure/';


/*********************************************************************

 **** Step 2: Request a JWT token to access the destination service ***

 *********************************************************************/

const post_options = {

    url: uaa_service.credentials.url + '/oauth/token',

    method: 'POST',

    headers: {

        'Authorization': 'Basic ' + Buffer.from(sUaaCredentials).toString('base64'),

        'Content-type': 'application/x-www-form-urlencoded'

    },

    form: {

        'client_id': dest_service.credentials.clientid,

        'grant_type': 'client_credentials'

    }

}


request(post_options, (err, res, data) => {

    if (res.statusCode === 200) {


        /*************************************************************

         *** Step 3: Search your destination in the destination service ***

         *************************************************************/

        const token = JSON.parse(data).access_token;

        const get_options = {

            url: dest_service.credentials.uri + '/destination-configuration/v1/destinations/' + sDestinationName,

            headers: {

                'Authorization': 'Bearer ' + token

            }

        }


        request(get_options, (err, res, data) => {


            /*********************************************************

             ********* Step 4: Access the destination securely *******

             *********************************************************/

            const oDestination = JSON.parse(data);

            const token = oDestination.authTokens[0];


            const options = {

                method: 'GET',

                url: oDestination.destinationConfiguration.URL + sEndpoint,

                headers: {

                    'Authorization': `${token.type} ${token.value}`

                }

            };


            request(options).on('data', (s) => {

                console.log(s.toString())

            });

        });

    }

});
Python
SAP recently announced that the Python runtime is officially supported now! So, I would like to take this as an occasion to include a python script here:
from cfenv import AppEnv

import requests

import base64


######################################################################

############### Step 1: Read the environment variables ###############

######################################################################


env = AppEnv()

uaa_service = env.get_service(name='uaa_service')

dest_service = env.get_service(name='destination_service')

sUaaCredentials = dest_service.credentials["clientid"] + ':' + dest_service.credentials["clientsecret"]

sDestinationName = 'scp'


######################################################################

#### Step 2: Request a JWT token to access the destination service ###

######################################################################


headers = {'Authorization': 'Basic '+base64.b64encode(sUaaCredentials), 'content-type': 'application/x-www-form-urlencoded'}

form = [('client_id', dest_service.credentials["clientid"] ), ('grant_type', 'client_credentials')]


r = requests.post(uaa_service.credentials["url"] + '/oauth/token', data=form, headers=headers)


######################################################################

####### Step 3: Search your destination in the destination service #######

######################################################################


token = r.json()["access_token"]

headers= { 'Authorization': 'Bearer ' + token }


r = requests.get(dest_service.credentials["uri"] + '/destination-configuration/v1/destinations/'+sDestinationName, headers=headers)


######################################################################

############### Step 4: Access the destination securely ###############

######################################################################


destination = r.json()

token = destination["authTokens"][0]

headers= { 'Authorization': token["type"] + ' ' + token["value"] }


r = requests.get(destination["destinationConfiguration"]["URL"] + '/secure/', headers=headers)

print(r.text)
Please note that you need to declare the modules "request" and "cfenv" to your app via a requirements.txt file before deploying the code.
Using the destination service in the frontend (= SAPUI5 web apps)
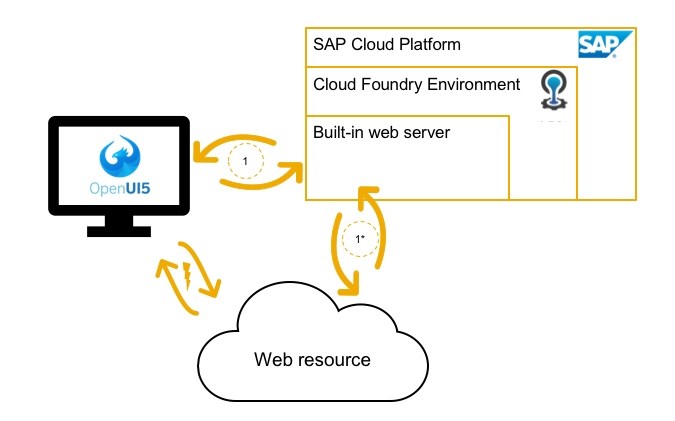
Apart from the reasons above, there is one additional reason why you want to have a destination service for web apps:
Same Origin Policy
I’m sure every web dev out there cursed this mechanism at least once in his/her life. For the “lucky” ones of you who didn’t have to deal with SOP before: It is a security mechanism of your browser that basically blocks all requests your client-side script sends to any web server, except the webserver which delivered this script.
The most common workaround is sending a request to your web server, which proxies the request to the final destination. With the SAP Application Router, on the other side, you don’t need to bother at all! The router knows how to access the destination out-of-box. You don’t need to request a JWT token from the XSUAA service instance and you don’t need to request the destination information from the destinations-service. You don’t even have to implement the authentication strategy. SAP Application Router takes care of all that for you.
Here’s what you have to do in the SAPUI5 application:
- Enter the information for the destination
I recommend that you enter them on the subaccount level in the Cloud Foundry environment (it’s also possible to add them on the service instance level).
- The SAP Business Application Studio should create those resources and bindings by default. Make sure both services are defined ("resources" section) and bound to the app ("requires" section) in the mta.yml file:
resources:

 - name: uaa_service

   parameters:

      path: ./xs-security.json

      service-plan: application

      service: xsuaa

   type: org.cloudfoundry.managed-service


 - name: destination_service

   parameters:

      service-plan: lite

      service: destination

   type: org.cloudfoundry.managed-service
- Add the route to the destination in the file xs-app.json. This descriptor file tells the web server how the requests need to be proxied to the respective destination:
"routes": [{

	  "source": "^/scp/(.*)",

	  "target": "/$1",

	  "destination": "scp"

}...
- Call endpoint from the application
$.get('/scp/secure').then((sMsg)=>{alert(sMsg)});
Conclusion
There are many good reasons why you should use destinations in the Cloud Foundry, ABAP, and Kubernetes environment, such as preventing the use of anti-patterns, storing your credentials in a safe place (in general just to make your life easier). At first sight, the process of retrieving those destinations in your application might seem confusing. I hope this article could shed some light on this process and prove that’s it’s actually quite simple.
- SAP Managed Tags:
- JavaScript,
- SAPUI5,
- SAP BTP, Cloud Foundry runtime and environment,
- SAP Connectivity service,
- Cloud
Labels:
120 Comments
- « Previous
-
- 1
- 2
- 3
- Next »
You must be a registered user to add a comment. If you've already registered, sign in. Otherwise, register and sign in.
Labels in this area
-
ABAP CDS Views - CDC (Change Data Capture)
2 -
AI
1 -
Analyze Workload Data
1 -
BTP
1 -
Business and IT Integration
2 -
Business application stu
1 -
Business Technology Platform
1 -
Business Trends
1,661 -
Business Trends
88 -
CAP
1 -
cf
1 -
Cloud Foundry
1 -
Confluent
1 -
Customer COE Basics and Fundamentals
1 -
Customer COE Latest and Greatest
3 -
Customer Data Browser app
1 -
Data Analysis Tool
1 -
data migration
1 -
data transfer
1 -
Datasphere
2 -
Event Information
1,400 -
Event Information
65 -
Expert
1 -
Expert Insights
178 -
Expert Insights
280 -
General
1 -
Google cloud
1 -
Google Next'24
1 -
Kafka
1 -
Life at SAP
784 -
Life at SAP
11 -
Migrate your Data App
1 -
MTA
1 -
Network Performance Analysis
1 -
NodeJS
1 -
PDF
1 -
POC
1 -
Product Updates
4,577 -
Product Updates
330 -
Replication Flow
1 -
RisewithSAP
1 -
SAP BTP
1 -
SAP BTP Cloud Foundry
1 -
SAP Cloud ALM
1 -
SAP Cloud Application Programming Model
1 -
SAP Datasphere
2 -
SAP S4HANA Cloud
1 -
SAP S4HANA Migration Cockpit
1 -
Technology Updates
6,886 -
Technology Updates
408 -
Workload Fluctuations
1
Related Content
- Usage of Custom Destination Service in BTP, ABAP Environment in Technology Blogs by Members
- Consuming CAPM Application's OData service into SAP Fiori Application in Business Application Studio in Technology Blogs by Members
- Cloud Integration: Manually Sign / Verify XML payload based on XML Signature Standard in Technology Blogs by SAP
- CAP LLM Plugin – Empowering Developers for rapid Gen AI-CAP App Development in Technology Blogs by SAP
- SAP Build Work Zone Content Explorer Can't Show App in Technology Q&A
Top kudoed authors
| User | Count |
|---|---|
| 13 | |
| 11 | |
| 10 | |
| 9 | |
| 9 | |
| 7 | |
| 6 | |
| 5 | |
| 5 | |
| 5 |