
- SAP Community
- Products and Technology
- Technology
- Technology Blogs by SAP
- Create a destination to access a CF oData/service ...
Technology Blogs by SAP
Learn how to extend and personalize SAP applications. Follow the SAP technology blog for insights into SAP BTP, ABAP, SAP Analytics Cloud, SAP HANA, and more.
Turn on suggestions
Auto-suggest helps you quickly narrow down your search results by suggesting possible matches as you type.
Showing results for
former_member58
Explorer
Options
- Subscribe to RSS Feed
- Mark as New
- Mark as Read
- Bookmark
- Subscribe
- Printer Friendly Page
- Report Inappropriate Content
08-24-2018
3:17 PM
This blog explains how a service deployed in CF can be accessed using a destination. For now, destinations can only be created in Neo. The destination in Neo will enable you to make the service/oData accessible through full stack webIDE. You should make sure that you are using the webIDE from the Neo account (not trial) and not from Canary. If you use full stack webIDE from CF, you will not be able to see the destination.
The service/oData exposed can be used to create UI application/Smart Template application as well as CAP full stack application.
First step which you need to do for creating a destination for a service/oData deployed in CF (protected by oAuth2), is to configure the trust between Neo and CF account. If you do not configure this, you will still be able to create the destination, but it will return 401 when you try to access the service/oData. If the service/oData is not secured, then you do not need to configure the trust.
Steps to configure the trust between Neo and CF: -
• Get admin rights on CF and Neo along with security admin rights. You should be able to see the security tab in the left side. Please note that being an administrator alone does not make you security admin.
• Go to the Neo sub account -> Security -> Trust -> Local Service Provider -> Edit -> Choose Configuration type as ‘Custom’ -> Change the name to an alphanumeric value (less than 15 characters) -> Save the file -> Click ‘get metadata’-> Append at the first line in the file -> Replace all the occurrences of SPSSO to IDPSSO -> Save the file.

• Revert the change in the Neo account to Configuration type ‘Default’ and save it.
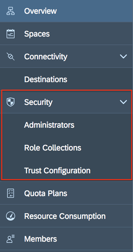
• Go to the CF sub account -> Security -> Trust Configuration -> Upload the metadata file (downloaded from Neo account)-> Save. Once the metadata is uploaded (on save), all the fields will be filled automatically.
• You should be able to see the new trust configuration in the list in the CF account.
After establishing the trust between the Neo and CF account. You can create a destination in Neo account.
There are two ways in which a destination can be created.
If your use case is to create a full stack application from webIDE then it is better to create the destination also from webIDE itself. This will help you save the effort you have to do to fill all the fields while creating the destination manually.
• Create an MTA project.
• File-> New->Project From Template -> Select Multi-Target Application -> Fill in the application name->Finish.
• Right click on the created project->New->HTML5 Module->Select the Template->Fill in the Basic Information Section->Select ‘Service URL’ in Data connection section->Click on ‘Create a New Destination’.

• Provide a name and description for the destination. Make sure you have provided correct username/password (can result in 500 internal server error). Select the Org, Space and the application which is exposing the oData. Click “Ok”. This will create a new destination in Neo account. You can verify it by checking the destinations in the Neo account.
• If the destination is created successfully, you can see it in the dropdown in the ‘Data connection’ tab.

• Provide the relative path (the URL can be checked in the destination created in Neo account. Adding the relative path to this URL should result in list of all the entities). Click on ‘Test’ should result in showing the entities from your service.
• You can select the entity and proceed with the project creation. The destination will be registered in the manifest file of the project.
• Click on Destination -> New Destination -> Select ‘oAuth2SAMLBearerAssertion’ from Authentication dropdown ->Fill other details of the service (URL, Client Id, Client Key etc) for which you want to create the destination.

• Note that you can get the details like client key, Token service user, Token service password from the xsuaa (from vcap services) of your service. Token URL will be the URL which you use to access your service (when using postman). You might need to append ‘alias/sap-icbs.canary’ to the token URL when you create it manually.
You will need to add few additional properties to the destination. This will make it available in the webIDE.
o TrustAll – True
o WebIDEEnabled – True
o WebIDESystem – CF
o WebIDEUsage – odata_gen
Please see the below blogs for more details about SAP Cloud Application Programming Model :-
https://blogs.sap.com/2018/11/29/develop-a-full-stack-business-application-with-cap/
https://blogs.sap.com/2018/12/02/build-deploy-and-run-a-full-stack-sap-cloud-business-application-wi...
https://blogs.sap.com/2018/12/02/token-exchange-from-fiori-launchpad-flp-to-a-business-service-in-sa...
https://blogs.sap.com/2018/12/02/token-exchange-from-fiori-launchpad-flp-to-a-business-service-in-sa...
The service/oData exposed can be used to create UI application/Smart Template application as well as CAP full stack application.
First step which you need to do for creating a destination for a service/oData deployed in CF (protected by oAuth2), is to configure the trust between Neo and CF account. If you do not configure this, you will still be able to create the destination, but it will return 401 when you try to access the service/oData. If the service/oData is not secured, then you do not need to configure the trust.
Steps to configure the trust between Neo and CF: -
• Get admin rights on CF and Neo along with security admin rights. You should be able to see the security tab in the left side. Please note that being an administrator alone does not make you security admin.
• Go to the Neo sub account -> Security -> Trust -> Local Service Provider -> Edit -> Choose Configuration type as ‘Custom’ -> Change the name to an alphanumeric value (less than 15 characters) -> Save the file -> Click ‘get metadata’-> Append at the first line in the file -> Replace all the occurrences of SPSSO to IDPSSO -> Save the file.
• Revert the change in the Neo account to Configuration type ‘Default’ and save it.
• Go to the CF sub account -> Security -> Trust Configuration -> Upload the metadata file (downloaded from Neo account)-> Save. Once the metadata is uploaded (on save), all the fields will be filled automatically.
• You should be able to see the new trust configuration in the list in the CF account.
After establishing the trust between the Neo and CF account. You can create a destination in Neo account.
There are two ways in which a destination can be created.
1. From Neo full stack webIDE.
If your use case is to create a full stack application from webIDE then it is better to create the destination also from webIDE itself. This will help you save the effort you have to do to fill all the fields while creating the destination manually.
• Create an MTA project.
• File-> New->Project From Template -> Select Multi-Target Application -> Fill in the application name->Finish.
• Right click on the created project->New->HTML5 Module->Select the Template->Fill in the Basic Information Section->Select ‘Service URL’ in Data connection section->Click on ‘Create a New Destination’.
• Provide a name and description for the destination. Make sure you have provided correct username/password (can result in 500 internal server error). Select the Org, Space and the application which is exposing the oData. Click “Ok”. This will create a new destination in Neo account. You can verify it by checking the destinations in the Neo account.
• If the destination is created successfully, you can see it in the dropdown in the ‘Data connection’ tab.
• Provide the relative path (the URL can be checked in the destination created in Neo account. Adding the relative path to this URL should result in list of all the entities). Click on ‘Test’ should result in showing the entities from your service.
• You can select the entity and proceed with the project creation. The destination will be registered in the manifest file of the project.
2. Manually in the Neo account using destination tab in the left panel.
• Click on Destination -> New Destination -> Select ‘oAuth2SAMLBearerAssertion’ from Authentication dropdown ->Fill other details of the service (URL, Client Id, Client Key etc) for which you want to create the destination.
• Note that you can get the details like client key, Token service user, Token service password from the xsuaa (from vcap services) of your service. Token URL will be the URL which you use to access your service (when using postman). You might need to append ‘alias/sap-icbs.canary’ to the token URL when you create it manually.
Below is the details for the fields in destination creation.
o URL – URL of the service which is to be exposed via destination.
o Client Key – This is nothing but the client secret from the xsuaa of the service.
o Token Service URL - the URL to get the token for the service.
o Token Service User – This is the client id from the xsuaa.
o Token Service Password – This is the again the client secret from the xsuaa.
You will need to add few additional properties to the destination. This will make it available in the webIDE.
o TrustAll – True
o WebIDEEnabled – True
o WebIDESystem – CF
o WebIDEUsage – odata_gen
Please see the below blogs for more details about SAP Cloud Application Programming Model :-
https://blogs.sap.com/2018/11/29/develop-a-full-stack-business-application-with-cap/
https://blogs.sap.com/2018/12/02/build-deploy-and-run-a-full-stack-sap-cloud-business-application-wi...
https://blogs.sap.com/2018/12/02/token-exchange-from-fiori-launchpad-flp-to-a-business-service-in-sa...
https://blogs.sap.com/2018/12/02/token-exchange-from-fiori-launchpad-flp-to-a-business-service-in-sa...
- SAP Managed Tags:
- SAP BTP, Cloud Foundry runtime and environment
5 Comments
You must be a registered user to add a comment. If you've already registered, sign in. Otherwise, register and sign in.
Labels in this area
-
ABAP CDS Views - CDC (Change Data Capture)
2 -
AI
1 -
Analyze Workload Data
1 -
BTP
1 -
Business and IT Integration
2 -
Business application stu
1 -
Business Technology Platform
1 -
Business Trends
1,661 -
Business Trends
87 -
CAP
1 -
cf
1 -
Cloud Foundry
1 -
Confluent
1 -
Customer COE Basics and Fundamentals
1 -
Customer COE Latest and Greatest
3 -
Customer Data Browser app
1 -
Data Analysis Tool
1 -
data migration
1 -
data transfer
1 -
Datasphere
2 -
Event Information
1,400 -
Event Information
64 -
Expert
1 -
Expert Insights
178 -
Expert Insights
273 -
General
1 -
Google cloud
1 -
Google Next'24
1 -
Kafka
1 -
Life at SAP
784 -
Life at SAP
11 -
Migrate your Data App
1 -
MTA
1 -
Network Performance Analysis
1 -
NodeJS
1 -
PDF
1 -
POC
1 -
Product Updates
4,577 -
Product Updates
324 -
Replication Flow
1 -
RisewithSAP
1 -
SAP BTP
1 -
SAP BTP Cloud Foundry
1 -
SAP Cloud ALM
1 -
SAP Cloud Application Programming Model
1 -
SAP Datasphere
2 -
SAP S4HANA Cloud
1 -
SAP S4HANA Migration Cockpit
1 -
Technology Updates
6,886 -
Technology Updates
401 -
Workload Fluctuations
1
Related Content
- How to Connect a S/4HANA Cloud Private Edition System to SAP Start in Technology Blogs by SAP
- reCAPTCHA with CAP and UI5 in Technology Blogs by Members
- Protect your Kyma workloads from eavesdropping with introspection and BTP destinations in Technology Blogs by SAP
- Protect your Kyma workloads from eavesdropping with JWT access strategy and BTP destinations. in Technology Blogs by SAP
- SAP Cloud Integration: How to use mTLS for calling external App from iFlow (Outbound) in Technology Blogs by SAP
Top kudoed authors
| User | Count |
|---|---|
| 11 | |
| 10 | |
| 9 | |
| 9 | |
| 7 | |
| 7 | |
| 7 | |
| 6 | |
| 6 | |
| 5 |