This blog will cover 4 steps in end to end development and deployment of the app to cf.
Create the Hana database using the Hana Service (DBaaS) on cloud foundry (CF)
Configure Web IDE Full stack to work with cloud foundry.
Deploy the App on CF.
Debugging using webide fullstack.
Step 1: Configure Hana service on CF.
Goto space -> Service marketplace -> SAP Hana Service.

Click on the different plans based on your entitlements.

Set the password and other parameters like size .(eg min size is 32 GB and can be increased in 16GB block increments)

Step 2: Configure Web IDE Full stack to work with cloud foundry.
Web IDE fullstack is available on neo but not on CF.
So , we need to configure the webideFullStack from neo to work with CF. Basically, we need to deploy a builder app that would be used for building/deploying apps built in webidefullstack.
Goto neo subaccount -> Services -> Web IDE Full stack

Click on Configure service and then provide necessary authorizations to your user (say P12345).

Now click on goto service which opens the webide full-stack.
In web ide fullstack, Goto Settings -> cloud foundry ->
Select your CF endpoint. You will be asked for CF login emailed / password. After you enter the login credentials, select the Org & Space to deploy the builder App.


Finally click on the Install builder and save it.
Also enable hana and Node dev features in Web IDE full stack as shown below.


Now if you goto your space in the CF environment, you should be able to see the builder app(webide-builde-sapwebide-ID) under your applications.

Step 3: Deploying a nodejs application to CF.
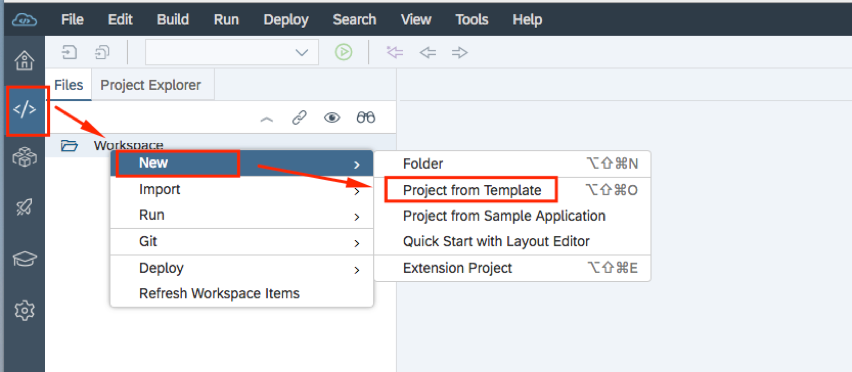
Goto webide fullstack and create a new project from template.
Now create a new Hana Database module in the MTA.(Multitarget application)


Make sure to select the correct version. Based on the info in the Hana service cockpit.

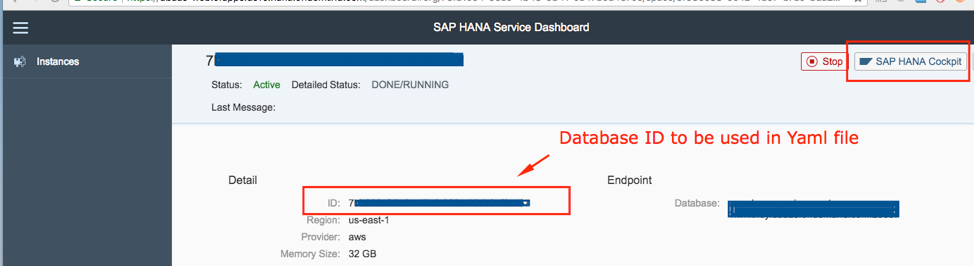
i.e goto the Hana cockpit to find the version info in cloud foundry. CF->space->services -> service market place -> Hana service -> instance

Also make a note of the Database ID highlighted below. Hana service dashboard*****

Now create a new node Js module in webide full stack.

Enable the XSJS support.

Now click on mta.yaml and use the MTA editor.
Click on the nodejs module and select requires(+). And select the db module & save.

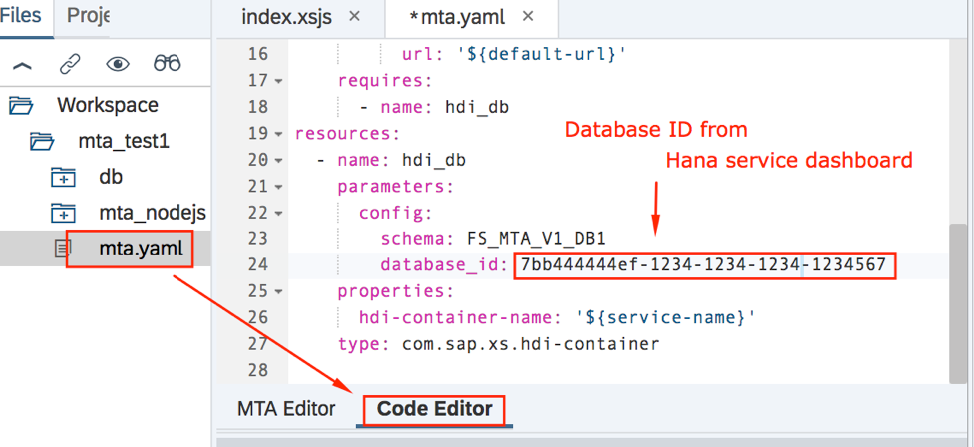
Now edit the mta.yaml file to configure the Hana DBaaS settings. Refer Hana service dashboard*****
above for the database ID. Use space instead of tabs to avoid indentation errors.

First build the DB module and then the nodejs module.i.e right click -> build module.

You can edit the Index.xsjs in the lib folder of the node module to establish a db connection and do a select from the dummy table.
$.response.contentType = "text/html";
var output = "Welcome <br><br>";
var connectn = $.db.getConnection(); //Open a database conn
//PrepareSQL statement on the sys table "DUMMY"
var pstatement = connectn.prepareStatement("select * from DUMMY");
var result = pstatement.executeQuery();
//Check the query result
if (!result.next()) {
$.response.setBody("Failed to retrieve info!!"); // Return error
$.response.status = $.net.http.INTERNAL_SERVER_ERROR;
} else {
output = output + "Query execution result: " + result.getString(1);
}
result.close();
pstatement.close();
connectn.close(); //Close the connections
$.response.setBody(output);
Now , if you click on node module & Run -> Run as node application, you will see a an application deployed and running on CF under applications. This might take couple of minutes.


4.Debugging using WebIDE fullstack.
Start the application.
Click on the debug icon on the right as shown below.
Click on the connect icon to attach the debugger to the application.
Set some breakpoint at the beginning of index.xsjs.
Rerun the application url,


Now you will be able to see the control coming to the breakpoint in index.xsjs.

