Introduction
In this blog, we will discuss how to configure the service group using local integration scenario in SOAMANAGER. This is useful when you want to replicate master data from S/4 to more than one external system (example SAP Cloud for Customer aka C4C and SAP Fieldglass), using Data Replication Framework (DRFOUT). It is recommended to create logical ports based on integration scenarios for service groups, rather than creating logical ports manually in SOAMANAGER.
Note: The approach mentioned in the blog is based on decentralized configuration, where there is no central service registry, but local ABAP service registry is used for publishing and WSDL retrieval. Check SAP note 2605166 for further details.
For Central configuration approach please check the part II of this blog.
For additional information such as prerequisites (Authorizations, Service Users in ABAP Stack, Business Functions etc) and additional explanation of various steps , please refer to
Configuring the SOA Manager for MDG (NW 7.40 or higher) on SAP Help.
In this blog we will configure the service group MDG_BS_SUPPLIERREPLICATEREQ to configure the consumer proxies BusinessPartnerSUITEBulkReplicateRequest_Out (CO_MDG_BP_RPLCTRQ) and BusinessPartnerRelationshipSUITEBulkReplicateRequest_Out (CO_MDG_BP_RELATIONSHIP_OUT)
Configuration in SOAMANAGER
The following steps need to be performed in SOAMANAGER
- Prepare and Upload WSDL
- Publish WSDL to Service Registry
- Create a Profile
- Create a Provider System
- Create Logon Data
- Create Local Integration Scenario
- Create Configuration Objects
Step A: Prepare and Upload WSDL:–
- Obtain WSDL from the provider system.
- Download the WSDL via SE80 for the Consumer Service and adapt the WSDL by adding Binding and Service elements. In case you need more information, please check the Appendix section of my other blog
- Alternatively, with SAP NetWeaver PI the WSDL can be downloaded using the Sender Agreement in case of classical configuration or using Integration configuration object in case of AAE based configuration.
- In SOAMANAGER, upload WSDL for both consumer proxies. Navigation: Tools-> WSDL Upload

Step B: Publish the uploaded WSDL to service registry
- Navigation: Service Registry-> Publication of external WSDL

- Under Service Details tab, provide an internal name
 Note: The Port type name and namespace in the external WSDL should match the corresponding names defined in SE80.
- Select the service state as Configured

- In the Bindings tab, Click Next

- Create a new Physical system, with system type as Third Party (This will make sure the RM protocol is set to SAP RM when the logical ports are created later for asynchronous reliable messaging). This is mandatory to send messages via SAP Cloud platform Integration

- Review the service details and click on finish to publish the WSDL to local service registry

- Perform all the above steps for the other consumer proxies in the service group except for the Physical system. Select the existing system that was already created.

- We can verify the published service definitions using the navigation path: Service Registry-> Published Service Definitions

- Additionally, this will create an IBC (Identifiable Business Context for the physical system) in the service registry. Navigation: Service Registry-> Published IBCs

Step C: Create a profile
- Navigation: Technical Administration->Profiles (Example: Here the profile is used for maintaining proxy settings)

Step 😧 Create a provider system
- Navigation: Technical Administration->Provider Systems. Note: The Provider system name will be used as business system name in DRFIMG. For C4C it is recommended to use the C4C short tenant ID as the provider system.

- Under the service registry, select local service registry (SR_LOCAL) and then select the Third-Party system created earlier as the SLD Identifier. Note: If you do not see the use service registry check box, make sure the note 2600392 is implemented.

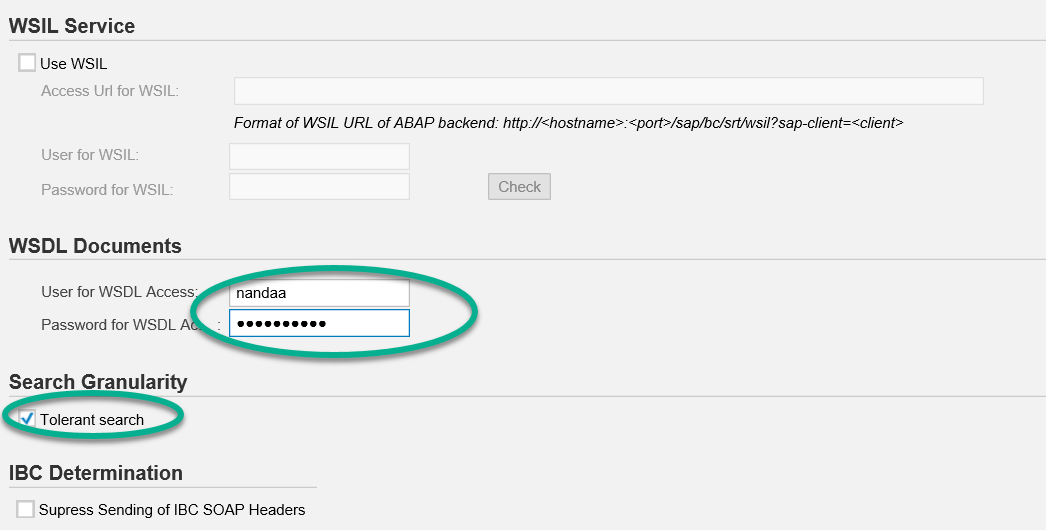
- Maintain user credentials to access WSDL from service registry and check the Tolerant Search
- Under applications, assign the business application (IBC) created earlier

- Activate the provider system

- This will create an IBC reference. Navigation: Service Administration->Identifiable Business Context Reference

Step E: Create Logon Data
Create Log on Data and activate it. Using navigation: Service Administration->Logon Data Management .
Note: This will be used to log on to the provider system (will be used in the logical port created later)
Step F: Create a local integration scenario
- Navigation: Service Administration->Local Integration Scenario Configuration

- Since we are going to use Service Group, we skip the service definitions tab

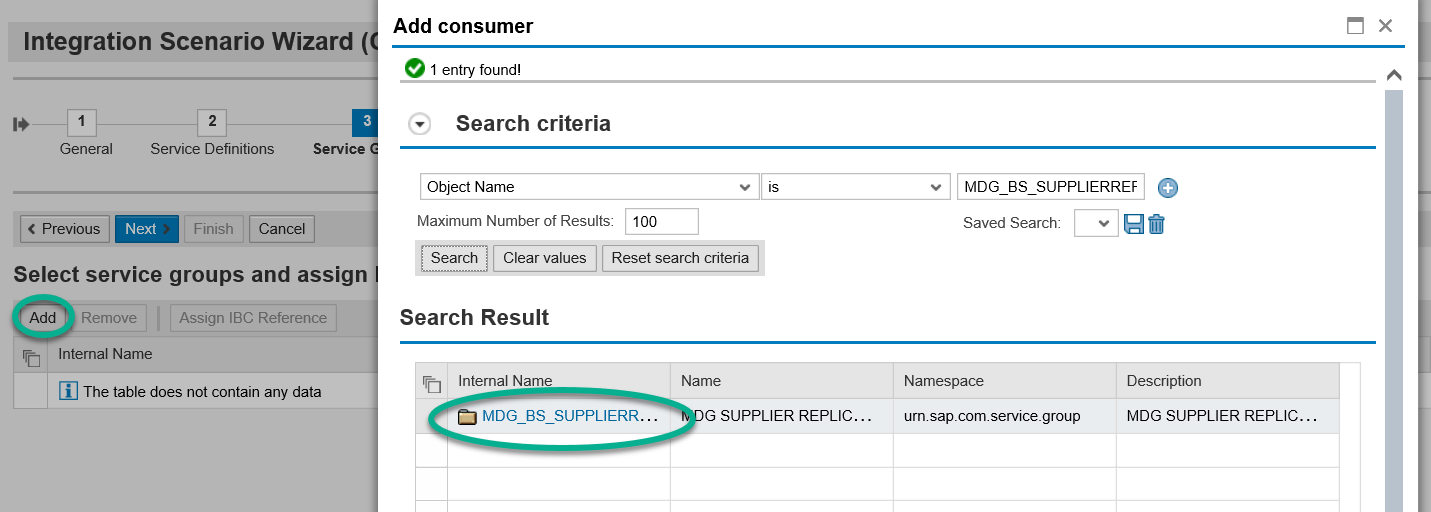
- In the service group tab, add the Service Group Object MDG_BS_SUPPLIERREPLICATEREQ
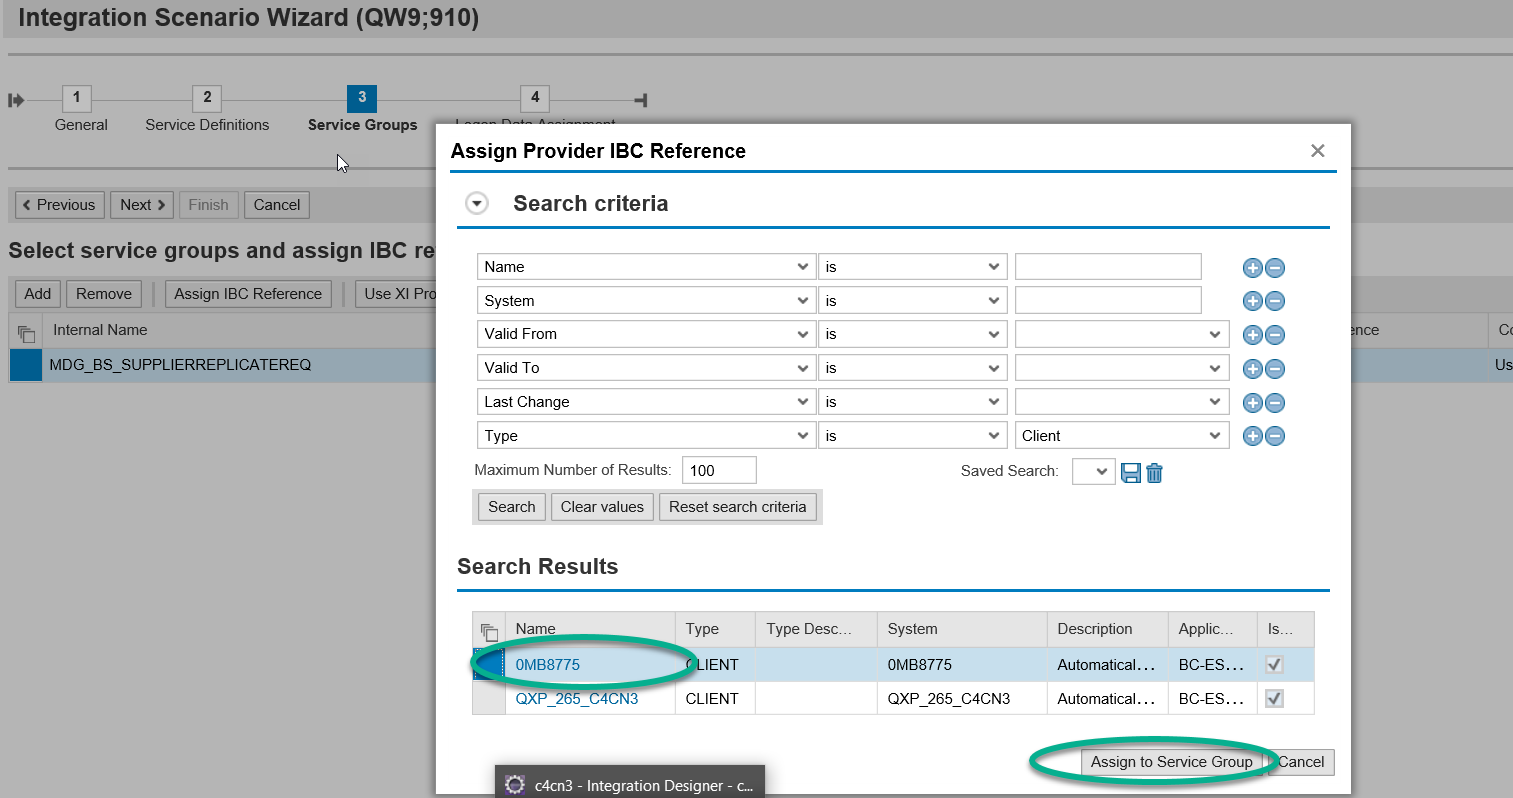
- And assign the IBC reference created earlier

- Assign the Logon Data, created previously

- Finish and activate the Integration Scenario

Step G: Create configuration objects (Logical ports)
- Once the Integration Scenario is activated the system will display a link to configure and activate the consumer proxies using Pending Tasks. Alternatively, use navigation path, Service Administration->Pending Tasks


- Ensure the task list is executed successfully and as a result logical ports will be created using the service registry.

Verify the Configuration
- Navigation: Service Administration-> Web Service Configuration

- In the Configuration tab for the service group, verify the logical ports are created

- In the messaging tab, verify the RM protocol is set to SAP RM (required for CPI based connection

Configuration in IMG
On S/4HANA On-Premise system, transaction code
DRFOUT is used to replicate business partner and business partner relationship messages to external systems.
- The BC switch BSSOAV_WS_ACTIVE should be active in IMG. This is required for DRFOUT to use the service group configuration.

- DRFOUT uses the DRFIMG configuration. To send data to the provider systems, using logical ports created in SOAMANAGER, the following two points must be adapted in the DRFIMG configuration
- In DRFIMG, create a business system with the same name as defined as provider system in SOAMANAGER (For replicating data to C4C, you should use the C4C short tenant ID as the business system name)

- Assign the business system to the replication model

Test the configuration
- Trigger a Business partner message using DRFOUT and check SRT_UTIL (Web Services utilities) message monitor using forward navigation from DRFOUT logs.

- In the payload the RecipientBusinessSystemID in MessageHeader is populated from the Business system name defined in DRFIMG, which is same as the provider system name in SOAMANAGER

- For demonstration purpose, the message was made to fail intentionally, so that we can verify the logical port used by DRFOUT, in Web Service utilities-> Error Log.

- Here we can see the logical port (E04F4306AC351EE89AC862184BA69A12) being used, which is same as created in SOAMANAGER for the service group.
Additional Information:
Similarly consumer proxies
BusinessPartnerSUITEBulkReplicateConfirmation_Out and
BusinessPartnerRelationshipSUITEBulkReplicateConfirmation_Out are grouped under service group
MDG_BS_SUPPLIERREPLICATECONF.
Further references:
Configuring Web Services in SOA Manager
ABAP Connectivity - Web Services ABAP
