
- SAP Community
- Products and Technology
- Technology
- Technology Blogs by SAP
- Step by Step process to create your first Blockcha...
Technology Blogs by SAP
Learn how to extend and personalize SAP applications. Follow the SAP technology blog for insights into SAP BTP, ABAP, SAP Analytics Cloud, SAP HANA, and more.
Turn on suggestions
Auto-suggest helps you quickly narrow down your search results by suggesting possible matches as you type.
Showing results for
Product and Topic Expert
Options
- Subscribe to RSS Feed
- Mark as New
- Mark as Read
- Bookmark
- Subscribe
- Printer Friendly Page
- Report Inappropriate Content
08-03-2018
3:43 PM
Blockchain…!!! This might be one of the words which is buzzing around in SAP for a long time and many developers and consultants have been waiting to explore this opportunity. SAP Blockchain as a Service, specifically Hyperledger Fabric is now made available in the cloud foundry trial account for development and testing activities.
Note: Trial accounts or services always comes with limitations.
In this blog, you will learn the following:
Before you begin, you may want to look at
and have your trail account active.
Once you understand Blockchain, it’s now time to get started with a small example “myfirstblock” in Hyperledger Fabric service.
1. Create SAP Cloud Foundry Trail Account


2. Navigating to your Hypderledger Fabric account

3. Creating a new instance


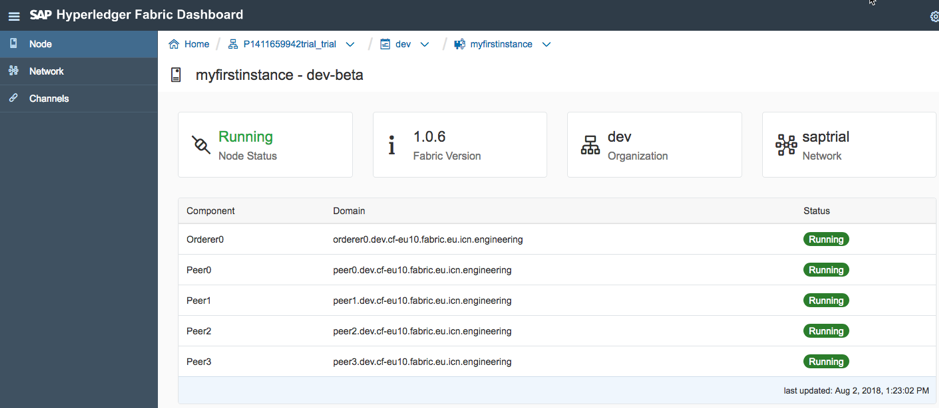
This is a dashboard where you can understand the Node, Peer Status, Fabric Version, Network and Create Channels.


4. Create & Deploy a chaincode


5. Create a Service Key


6. Read/Write operations using Swagger

Once its authorized, close the window.

There you go, you have now successfully made your first POST operation to the blockchain.

7. Validate your read/write in Hyperledger Explorer
Here you can identify that we have totally 3 blocks created, 0 is the Genesis Block, 1 is the Chaincode deployed by us and 2 is the successful transaction from swagger.

Alright, it’s now time to congratulate you J
#HappyLearning…!!!
Regards,
Nagesh
Note: Trial accounts or services always comes with limitations.
In this blog, you will learn the following:
- Create SAP Cloud Foundry Trial Account
- Navigating to your Hypderledger Fabric account
- Creating a new instance
- Create & Deploy chaincode
- Create a Service Key
- Read/Write operations using Swagger
- Validate your read/write in Hyperledger Explorer
Before you begin, you may want to look at
and have your trail account active.
Once you understand Blockchain, it’s now time to get started with a small example “myfirstblock” in Hyperledger Fabric service.
1. Create SAP Cloud Foundry Trail Account
- Login to trial account and click on Cloud Foundry trial
- Select Europe (Frankfurt) and click on ok.
- Your account should now be created and active for 29 days, click on Go to Space
2. Navigating to your Hypderledger Fabric account
- Click on Services and Service Marketplace

- In the list of services, search for Hyperledger Fabric and click on it
- Hyperledger Fabric – Overview with all the documentation, support information, and services plan should be listed.
3. Creating a new instance
- Click on Instances and then click on New Instance.
- Select Plan dev-beta and click on next(Dev-Beta was active for a limited period and no more active. Request you to select Dev, ignore the error message on pricing and continue with the same steps)
- Click next on Specify Parameters (optional) and Assign Application (optional). In the confirm, enter “myfirstinstance” and click on Finish
- The new instance should be created with an option such as Dashboard and Delete Instance under actions. Click on Open Dashboard
- A new tab opens up, enter your login details; same which was used during your cloud platform registration. Note: Do not use P-Number.
This is a dashboard where you can understand the Node, Peer Status, Fabric Version, Network and Create Channels.
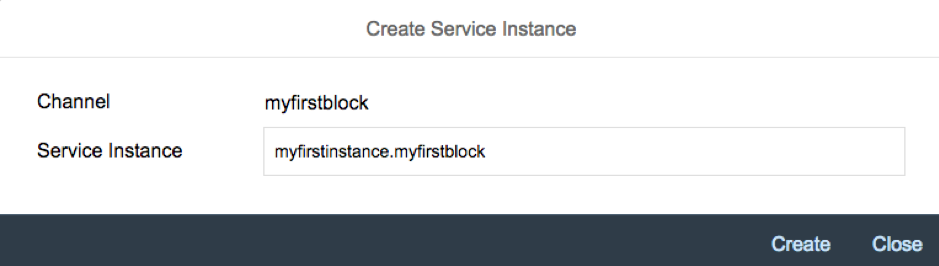
- Now click on Channels, then click on Create Channels and enter the following details. To know more about the channels, please use the hyperlink above.
- Click on Create New Instance for the channel which was just created
- Do not modify the Service Instance name, click on Create.
- Open the service Instance Channel
- From the overview screen, click on Chaincode from the left pane (Refer to 5 Mins to kickstart your blockchain knowledge….!!! Hello World, Simplified…!!! )
4. Create & Deploy a chaincode
- Click on Deploy Code and select the “sample web.zip”. The sample code has been shared on the link, however, to make it easy I have attached the sample code to this link. Below are the files which I have zipped as a package.
- Drag & Drop or Choose the sample web.zip file.
- Click on Deploy and you should be able to see the success message as below
- Click on “Test Chaincode” and a new window opens which is known as swagger.
5. Create a Service Key
- Go back the window Hyperledger Fabric Dashboard and click on Overview and enter the following details under “Service Keys” and click on Create Key
- Expand the key and copy the “clientId” and “clientSecret” which is required for authorization in Swagger
6. Read/Write operations using Swagger
- Go to Swagger tab and click on Authorize button and enter the clientId, clientSecret and authorize
Once its authorized, close the window.
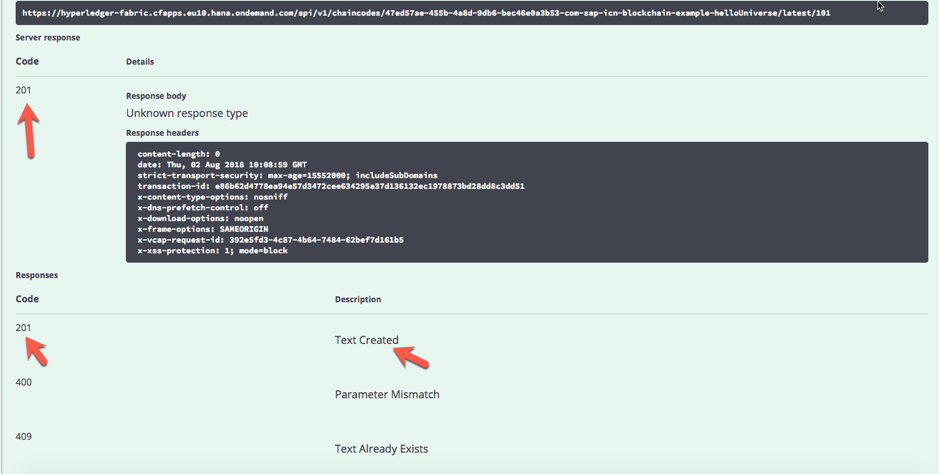
- Now that we have the authorization and we are doing the first transaction to the block, we will try a POST operation, click on the POST and then click on Try it out. Enter the details as shown below and click on execute.
- You should now be able to see the response 201 as shown below
There you go, you have now successfully made your first POST operation to the blockchain.
- Now let us try to read the same data which was written to the block. Click on Get and then click on Try it out. Enter the ID “101” was used in POST operation and click on execute. You should be able to see the response as shown below.
7. Validate your read/write in Hyperledger Explorer
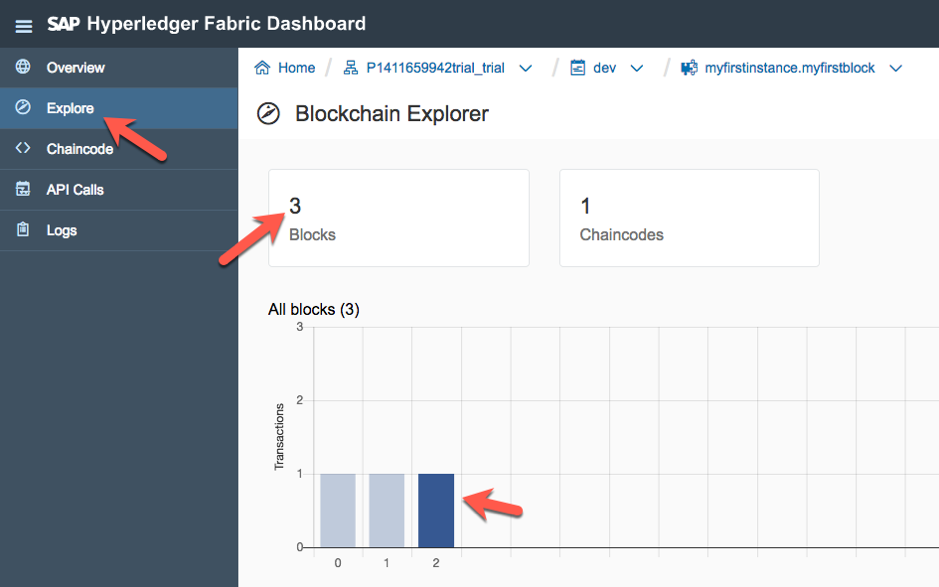
- To validate the same in a Blockchain, we use the Hyperledger Fabric Explorer. Shift to the other tab “Hyperledger Fabric Dashboard” and click on Explorer.
Here you can identify that we have totally 3 blocks created, 0 is the Genesis Block, 1 is the Chaincode deployed by us and 2 is the successful transaction from swagger.
- Click on block 2 to get the details
Alright, it’s now time to congratulate you J
#HappyLearning…!!!
Regards,
Nagesh
- SAP Managed Tags:
- SAPUI5,
- SAP BTP, Cloud Foundry runtime and environment,
- Blockchain,
- SAP Business Technology Platform
30 Comments
You must be a registered user to add a comment. If you've already registered, sign in. Otherwise, register and sign in.
Labels in this area
-
ABAP CDS Views - CDC (Change Data Capture)
2 -
AI
1 -
Analyze Workload Data
1 -
BTP
1 -
Business and IT Integration
2 -
Business application stu
1 -
Business Technology Platform
1 -
Business Trends
1,661 -
Business Trends
88 -
CAP
1 -
cf
1 -
Cloud Foundry
1 -
Confluent
1 -
Customer COE Basics and Fundamentals
1 -
Customer COE Latest and Greatest
3 -
Customer Data Browser app
1 -
Data Analysis Tool
1 -
data migration
1 -
data transfer
1 -
Datasphere
2 -
Event Information
1,400 -
Event Information
65 -
Expert
1 -
Expert Insights
178 -
Expert Insights
280 -
General
1 -
Google cloud
1 -
Google Next'24
1 -
Kafka
1 -
Life at SAP
784 -
Life at SAP
11 -
Migrate your Data App
1 -
MTA
1 -
Network Performance Analysis
1 -
NodeJS
1 -
PDF
1 -
POC
1 -
Product Updates
4,577 -
Product Updates
330 -
Replication Flow
1 -
RisewithSAP
1 -
SAP BTP
1 -
SAP BTP Cloud Foundry
1 -
SAP Cloud ALM
1 -
SAP Cloud Application Programming Model
1 -
SAP Datasphere
2 -
SAP S4HANA Cloud
1 -
SAP S4HANA Migration Cockpit
1 -
Technology Updates
6,886 -
Technology Updates
408 -
Workload Fluctuations
1
Related Content
- Switch on gCTS (for existing packages) in Technology Blogs by SAP
- Empowering Retail Business with a Seamless Data Migration to SAP S/4HANA in Technology Blogs by Members
- It has never been easier to print from SAP with Microsoft Universal Print in Technology Blogs by Members
- Unlocking Full-Stack Potential using SAP build code - Part 1 in Technology Blogs by Members
- Cloud Integration: Manually Sign / Verify XML payload based on XML Signature Standard in Technology Blogs by SAP
Top kudoed authors
| User | Count |
|---|---|
| 13 | |
| 10 | |
| 10 | |
| 9 | |
| 8 | |
| 7 | |
| 6 | |
| 5 | |
| 5 | |
| 5 |