
- SAP Community
- Products and Technology
- Enterprise Resource Planning
- ERP Blogs by SAP
- Year-To-Date Rolling Forecast: How to create a Yea...
Enterprise Resource Planning Blogs by SAP
Get insights and updates about cloud ERP and RISE with SAP, SAP S/4HANA and SAP S/4HANA Cloud, and more enterprise management capabilities with SAP blog posts.
Turn on suggestions
Auto-suggest helps you quickly narrow down your search results by suggesting possible matches as you type.
Showing results for
former_member20
Explorer
Options
- Subscribe to RSS Feed
- Mark as New
- Mark as Read
- Bookmark
- Subscribe
- Printer Friendly Page
- Report Inappropriate Content
07-26-2018
9:15 AM
Use Case:
Jack is a controller and Analytics specialist at company ABC. He frequently creates reports for the business of his team and upper management. Recently they decided to move from a static planning to a rolling forecast based planning. To be able to compare their actual data to the rolling forecast plan, he needs to create a new report. The CDS View I_ACTUALPLANJOURNALENTRTYITEM is the starting point.
Step1:

Step2:

Step 3:

Step 4:
Jack now clicks the “Field Selection” tab.
Step 5:

Step 6:
In the “New Restricted Measure” window Jack enters the following information: (1)
Step 7:

Step 8:

Step 9:

In the “Dimensions” window he enters the following information:
Step 10:

A new Property Category is displayed on the screen.
Step 11:

Step 12:

The result of Jack's selection is displayed on the screen.
Step 13:

Jack needs to add an additional restriction. To do so he clicks “Add Restriction”(1)
Step 14:

The “Dimensions” window opens and Jack enters the following information:
Step 15:

Step 16:


Step 17:

Step 18:

Step 19:

Step 20:


Step 21:

Step 21A:
Step 21B:

Step 21C:
Step 21D:

Step 21E:


Step 21F:


Step 22:

Step 23:


Step 24:

Step 25:
Step 26:
Step 27:


Step 28:
Step 29:

Step 30:

Step 31:

Step 32:


Step 33:

Step 34:

Step 35:


Step 36:

Step 37:

Step 38:

Step 39:


Step 40:

Step 41:

Step 42:


Jack is a controller and Analytics specialist at company ABC. He frequently creates reports for the business of his team and upper management. Recently they decided to move from a static planning to a rolling forecast based planning. To be able to compare their actual data to the rolling forecast plan, he needs to create a new report. The CDS View I_ACTUALPLANJOURNALENTRTYITEM is the starting point.
Step1:
- Jack scrolls down and selects the business catalog “Query Design”.(1)
- Then he clicks the Custom Analytical Queries tile to start the Custom Analytic app. (2)
Step2:
- In the Custom Analytical Queries app, Jack clicks “New” to create a new query.(1)
- In the “New Query” window Jack enters the following information(2):
- The Query Name: “PROFITANDLOSPLANACTQ01”
- The Data View: “I_ACTUALPLANJOURNALENTRYITEM”
- Once he’s done, Jack clicks OK to access the details of the newly created query “YY1_PROFITANDLOSPLANACTQ01”.(3)
Step 3:
- On the query creation screen, he selects the “General” tab.
- On this tab, Jack enters the label “Year To Date - Rolling Forecast” (1) and clicks the “Field Selection” tab. The other fields are filled automatically by the app.
Step 4:
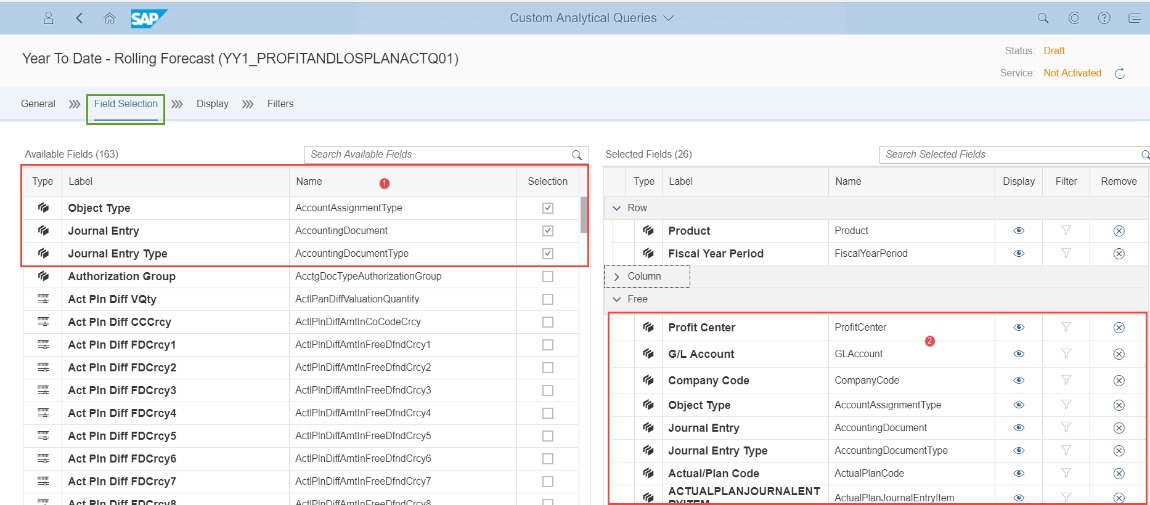
Jack now clicks the “Field Selection” tab.
- He checks the available fields that he can use.(1)
- Then he checks that the fields are automatically transferred to the “Selected Fields” table.(2)
Step 5:
- Jack moves to the “Display” ,tab because he wants to add some measures to meet his requirements. To do so, Jack clicks “Add”.(1)
- Then he selects and double-clicks “Add Restricted Measure”(2)
Step 6:
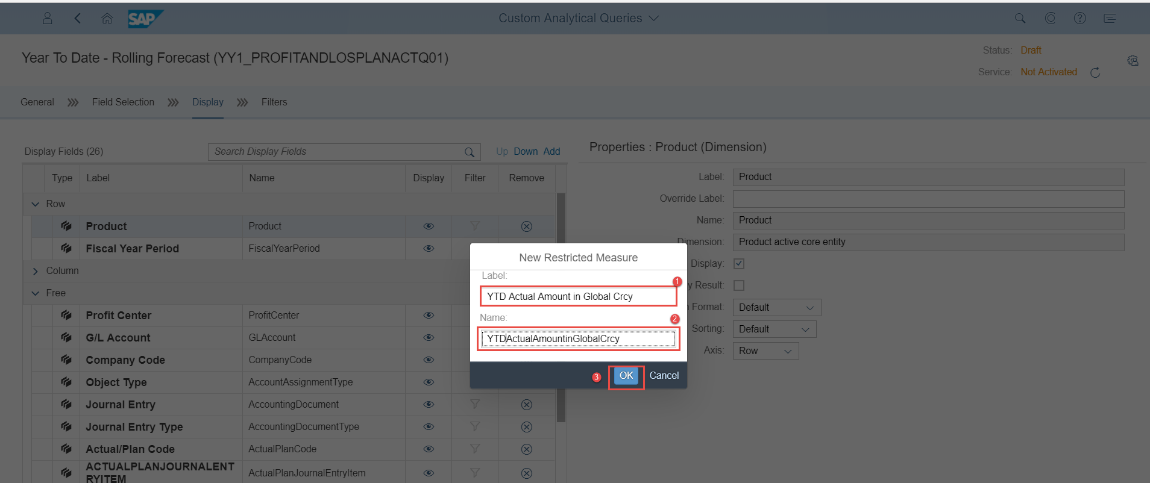
In the “New Restricted Measure” window Jack enters the following information: (1)
- The label “YTD Actual Amount in Global Crcy”
- The Name “YTDActualAmount in Global Crcy” is automatically filled when he positionsthe cursor on that field and clicks Enter.(2)
- Once he’s done, Jack clicks OK to have the newly created entry in the column section of the “Display Fields” (3)
Step 7:
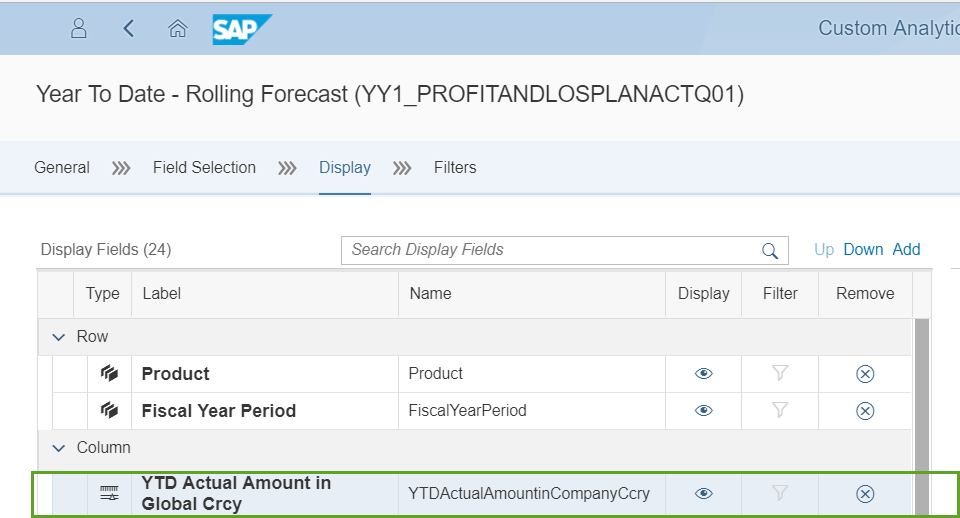
- The newly created measure is now visible on the section column of the “Display Fields”(1)
Step 8:
- while Jack maintains the” YTD Actual Amount in Global Crcy ” selected as shown on the Step 7(1 on the picture from step 1), the detailed information on the "YTD Actual Amount in Global Crcy" is displayed on the properties section
- Jack now clicks “Add Restriction” to add an additional restriction to the measure ”YTD Actual Amount in Global Crcy ”(1)
Step 9:
In the “Dimensions” window he enters the following information:
- Jack enters “Category” in the search fields to speed up the search for “PlanningCategory” dimension for which he is looking for.(1)
- He then double clicks.(2)
Step 10:
A new Property Category is displayed on the screen.
- Jacks then clicks on the value help fields and a new window (Value for Category) opens. (1)
Step 11:
- In the new window “Value for Category” Jack clicks the “Fixed Value” tab. (1)
- On the “Fixed Value” several entries are displayed. From these entries Jack then selects “ACT01”(2)
- Afterwards he clicks OK to validate his selection.(3)
Step 12:
The result of Jack's selection is displayed on the screen.
- Jack, clicks the values help to choose the appropriate measure “Act Amt in Glb Crcy” for the restricted measure “YTD Actual Amount in Global Crcy(1)
Step 13:
Jack needs to add an additional restriction. To do so he clicks “Add Restriction”(1)
Step 14:
The “Dimensions” window opens and Jack enters the following information:
- The “Posting Date” in the search fields to speed up the search for “PostingDate” dimension he is looking for.(1)
- He then double-clicks (2)
Step 15:
- A new Property “Posting Date” is displayed on the screen.
- Jack clicks maintain field next to the “Include” label.(1)
Step 16:
- From the drop down list displayed, Jack selects and double clicks the multiple include condition [..] for the restriction “Posting Date”(1)
- The Property with the fixed value “Posting Date” now looks as shown on the screen.
Step 17:
- Jack has to enter values in the fields(1) and (2).
- He then clicks the value help field(1)
Step 18:
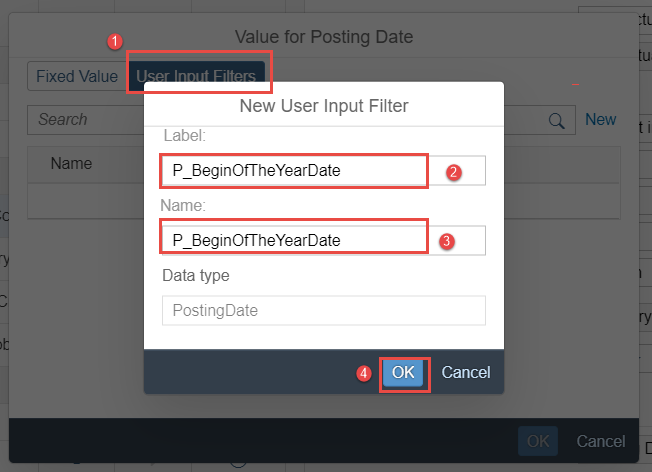
- In the “Value for Posting Date” window Jack selects the “User Input Filters” tab(1) , then clicks “New” to open the window “New User Input Filter” to define the user input filters for the restricted measure “Posting Date”.
- In the “New User Input Filter” window Jack maintains the following:
- The label : “P_BeginOfTheYearDate” (2)and
- The name : “P_BeginOfTheYearDate” (3)
- The data type is automatically derived from PostingDate and maintained with “PostingDate”. Afterwards Jack clicks OK to have the entries validated.(4)
- The “User Input Filters” tab contains the entry “P_BeginOfTheYearDate” and looks as displayed on the screen(above picture).
Step 19:
- Jack creates a second restricted measure for the End Date of the selection. To achieve this, Jack clicks “New”(1).
Step 20:
- On the “Value for Posting Date” window, Jack selects the “User Input Filters” tab(1).
- On the “New User Input Filter” window he maintains:
- The label “P_TodayDate” (2) and
- The name "P_BeginOfTheYearDate" (3)
- The data type is automatically derived from the PostingDate and maintained with “PostingDate”.Afterwards Jack clicks OK to validate the entries.(4)
- The “User Input Filters” tab has now two entries:
- “P_TodayDate” and
- “P_BeginOfTheYearDate”.
- It looks as displayed on the screen
Step 21:
- As Jack wants to check, if the created restricted measures are available and defined as planned, he selects “YTD Actual Amount in Global Crcy” in the column area .
- The properties of the selected column (“YTD Actual Amount in Global Crcy”) are displayed on the properties area: the created restricted measures Categories and Posting Date
Step 21A:
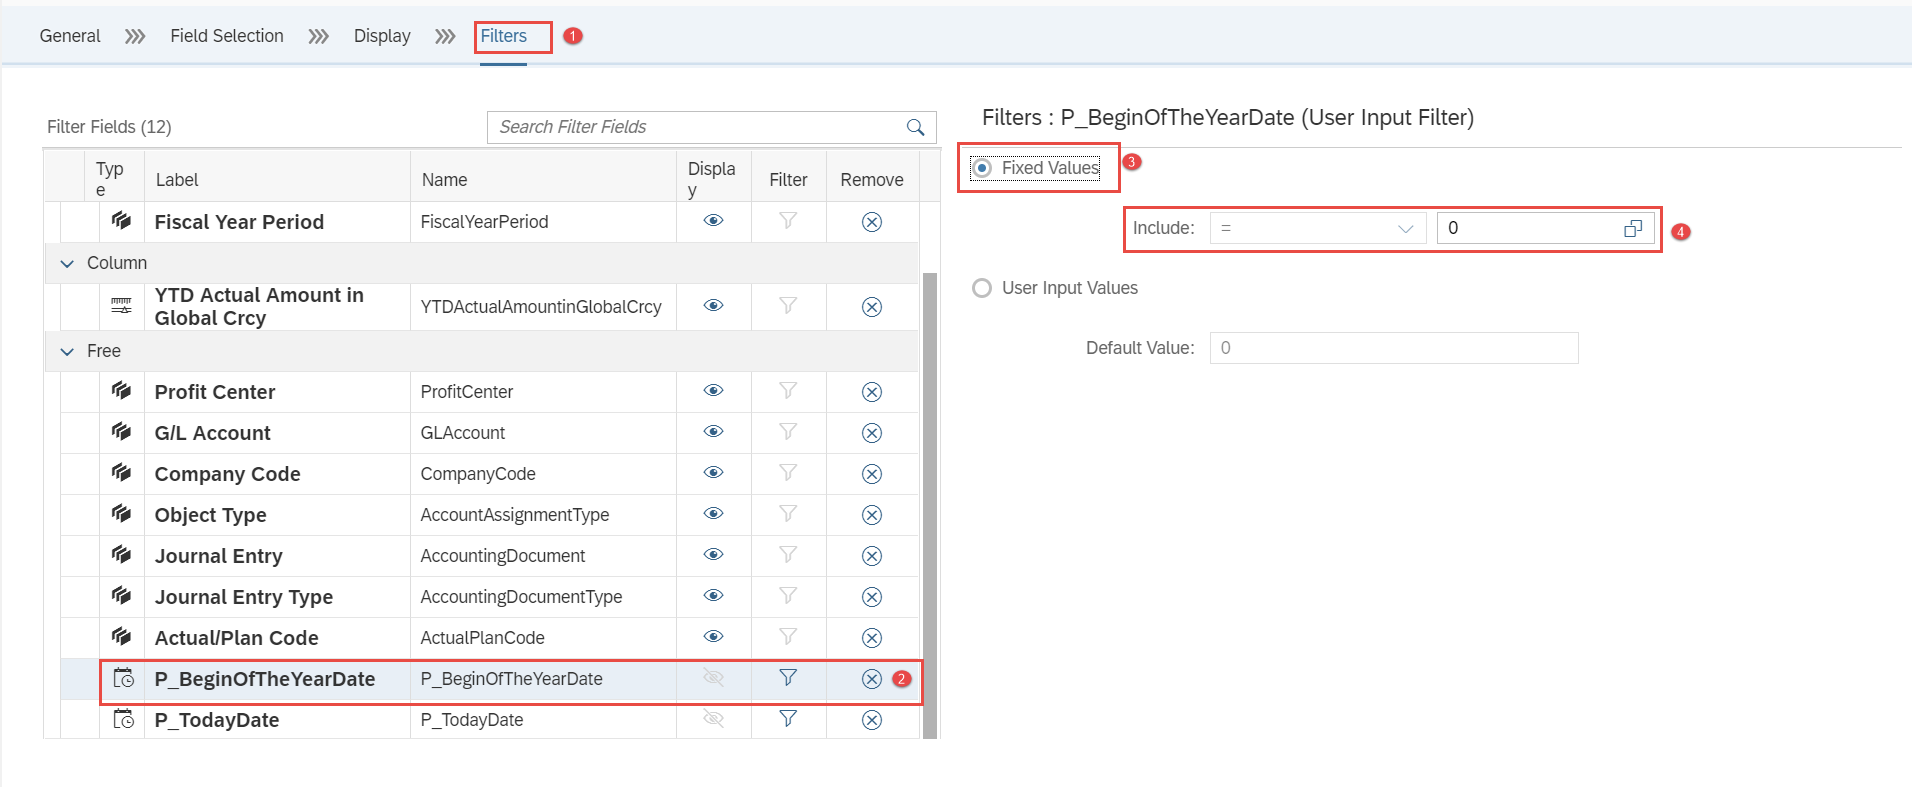
- Jack has now to set the value of “P_BeginOfTheYearDate” .To achieve this , he has to select the Filters Tab (1) and make some setting by using the Date Function futures:
- Jack marks the dimension P_BeginOfTheYearDate(2)
- The check on the button labeled with „Fixed Values“(3)
- Afterwards , he clicks on the F4-Help to select the appropriated value(4)
Step 21B:
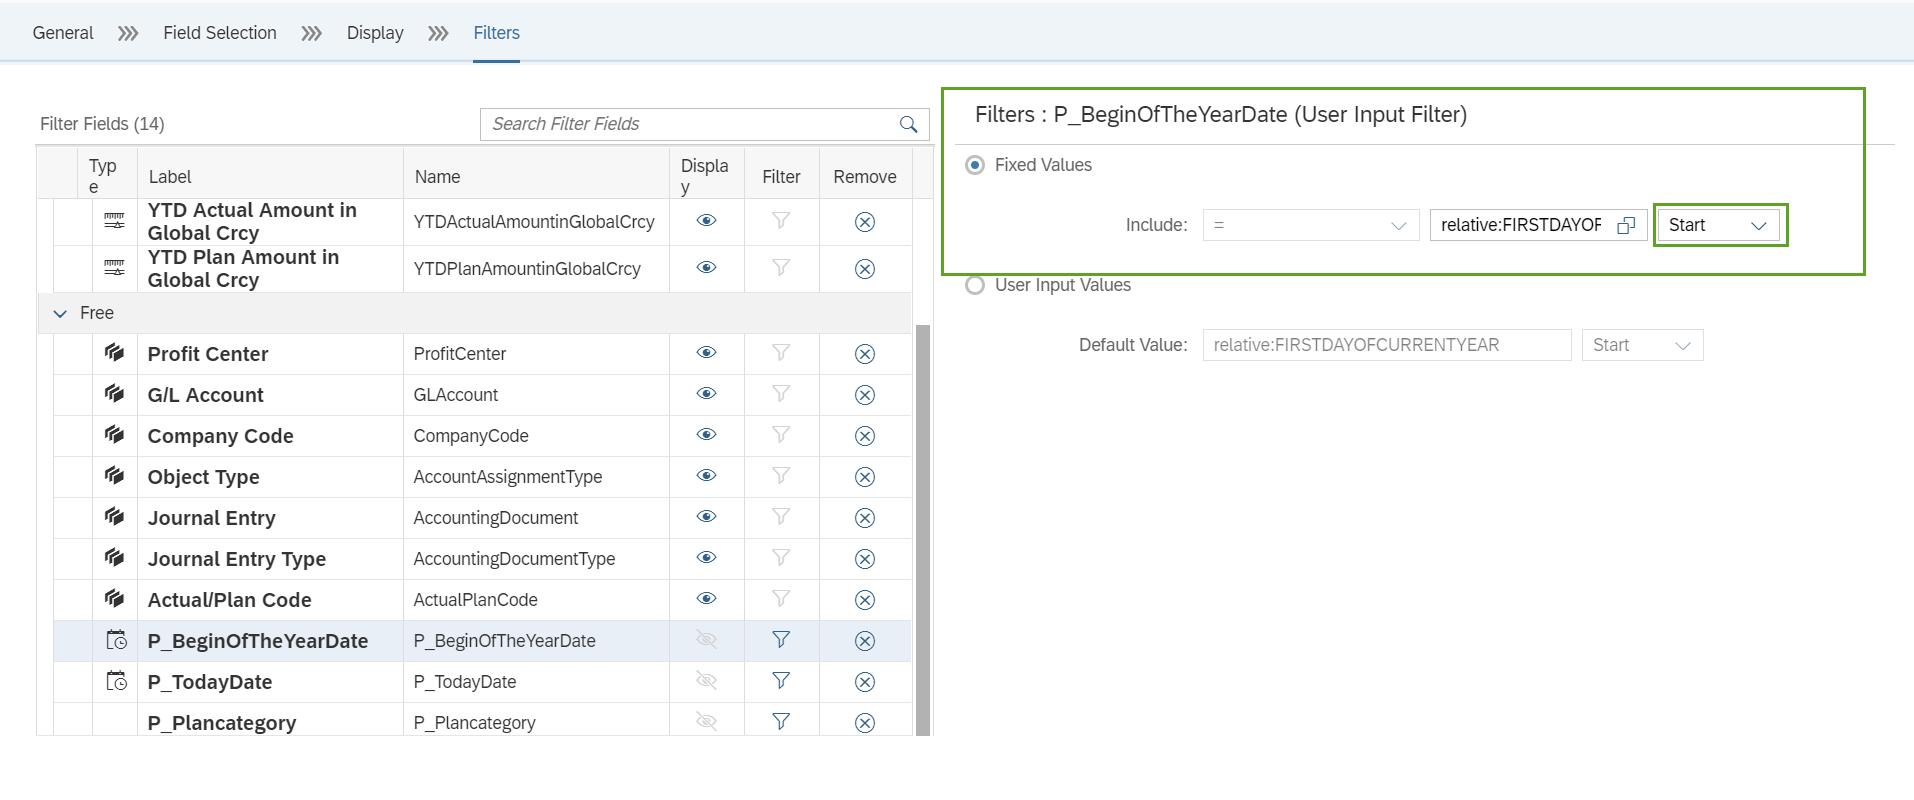
- The “Value for P_BeginOfTheYearDate” window opens. Jack selects the Tab “Relative Date”(1) . On this Tab he chooses “First day of current year”(2) from the selection list and afterwards clicks the OK button to validate his selection(3)
Step 21C:
- Jack has to make sure that the qualifier of the dimension “P_BeginOfTheYearDate” is set to Start
Step 21D:
- Jack must set the value of “P_TodayDate” as well. To achieve this, he selects the Filters Tab (1) and make some setting by using the Date Function futures:
- Jack marks the dimension P_TodayDate(2)
- The check on the button labeled with „Fixed Values “(3)
- Afterwards, he clicks on the F4-Help to select the appropriated value(4)
Step 21E:
- The “Value for P_TodayDate” window opens. Jack selects the Tab “Relative Date” (2). On this Tab he scrolls down and chooses “Today”(2) from the selection list and afterwards clicks the OK button to validate his selection(3)
Step 21F:
- On button labeled with “Fixed Values” of the Filters Tab, Jack has to set the qualifier of the dimension P_TodayDate to “End” (1) and afterwards clicks on Save Draft button to persist the entered values.(2)
Step 22:
- Now Jack wants to add two more columns to his reports to fulfill his requirements. Therefore the next column is another restricted measure that will be labelled “YTD Plan Amount in Global Crcy”.
- The creation step is similar to the one used to create the restricted measure “YTD Actual Amount in Global Crcy”.
- To do so Jack clicks “Add” (1).
- He then selects and double clicks “Add Restricted Measure" (2)
Step 23:
- On the “New Restricted Measure” window Jack enters the following : (1)
- The label “YTD Plan Amount in Global Crcy”
- The name “YTDPlanAmount in Global Crcy” is automatically filled when positioning the cursor on that field and clicking Enter.(2)
- Once he has finished it, Jack licks OK to have the newly created entry in the column section of the “Display Fields”(3)
- The properties of the created restricted measure "YTD Plan Amount in Global Crcy" are displayed.
- Jack clicks “Add Restriction” to add the restriction “Category” to the measure ”YTD Plan Amount in Global Crcy ”(1)
Step 24:
- On the “Dimensions” window Jack enters the following information:
- The “Category” (1) in the search fields to speed up the search for “PlanningCategory” dimension he is looking for. He then double clicks (2) to have access to the user input filter maintenance window.
Step 25:
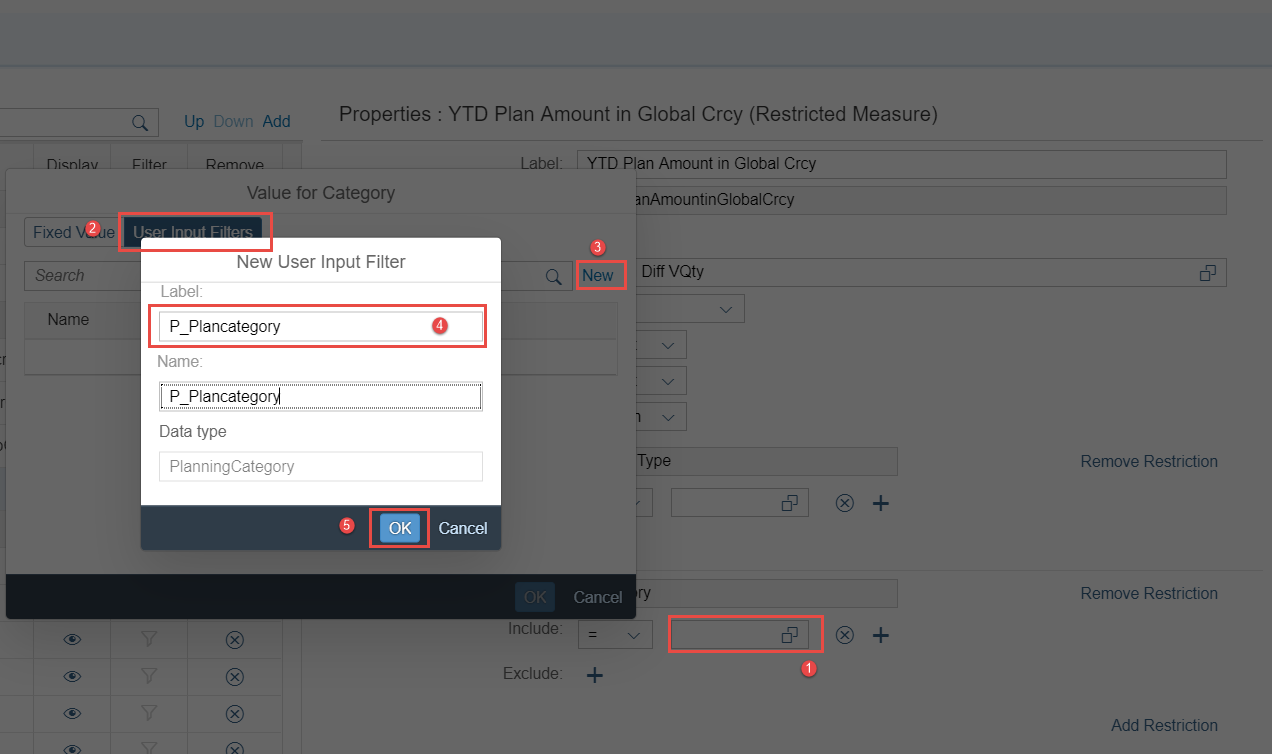
- Jack clicks the value help(1) to maintain the parameter for the planned category. The “Value for Category” window opens.
- From there Jack selects the “User Input Filters” tab (2) and clicks “New” to open the “New User Input Filter” window to create the user input filters for the restricted measure “Category”(3)
- On the “New User Input Filter” window Jack maintains:
- The label “P_Plancategory”(4)and the name “P_Plancategory”
The data type is automatically derived from the PlanningCategory and maintained with “PlanningCategory. - When he has finished, Jack clicks on OK to have the entries validated (5)
- The label “P_Plancategory”(4)and the name “P_Plancategory”
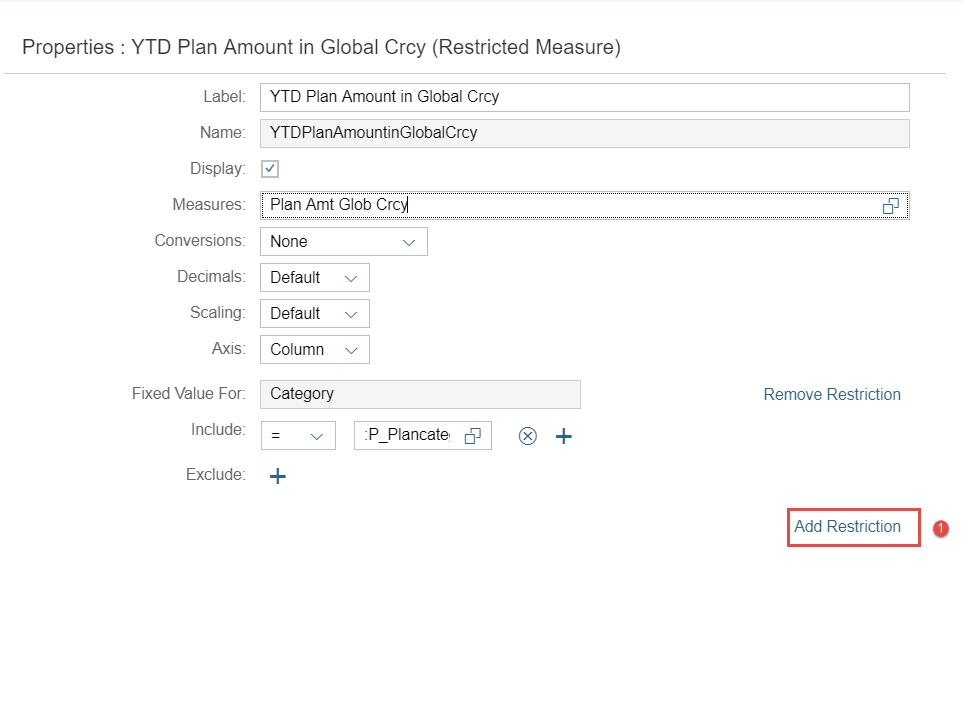
Step 26:
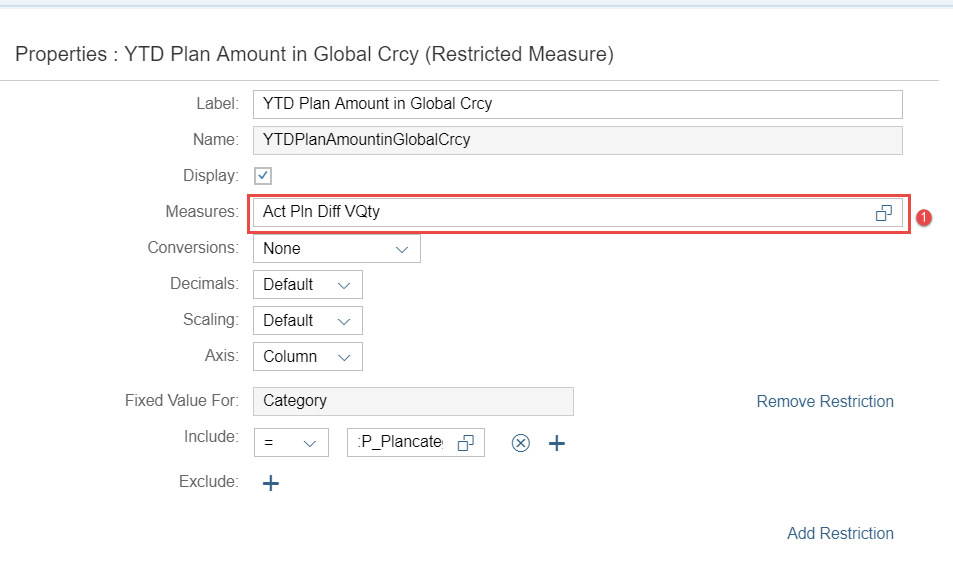
- To maintain the appropriate measure for the newly created restriction, Jack clicks the value help(1)
Step 27:
- To speed up the search as Jack already knows for which measure he is looking for he enters “Plan Amt” (1) .“Plan Amt in CC Crcy” and “Plan Amt Glob Crcy” is displayed. The result “Plan Amt in Glob Crcy” is exactly the measure he wants to maintain So he selects and double clicks “Plan Amt in Glob Crcy” (2)
- The created restriction and its properties are displayed on the screen.
Step 28:
- Jack now adds an additional restriction. To do so he clicks “Add Restriction”(1)
Step 29:
- The “Dimensions” window opens and Jack enters the following :
- The “Posting Date” (1) in the search fields to speed up the search for “PostingDate” dimension he is looking for. He then double clicks (2)
Step 30:
- From the displayed drop down list(1), Jack selects and double clicks the multiple include condition [..] for the restriction “Posting Date”(2)
Step 31:
- He then clicks the value help (1)to maintain the lower parameter of the Posting Date. The “Value for Posting Date” window opens. From there Jack selects the “User Input Filters” tab. The previously created restricted values are displayed:
- “P_BeginOfTheYearDate” (3)and “P_TodayDate”
- Jack selects the restricted value “P_BeginOfTheYearDate” and then clicks OK to validate the selection (4)
Step 32:
- For the maintenance of the second value of the interval of the Posting date, Jack clicks the Value help(1) to maintain the second parameter for the Posting Date . The “Value for Posting Date” window opens.
- From there Jack selects the “User Input Filters” tab (2). The previously created restricted values are displayed: “P_BeginOfTheYearDate” (3)and “P_TodayDate”
- Jack selects the restricted value “P_BeginOfTheYearDate”,then clicks OK to validate the selection for the upper interval of the Posting Date(4)
- The created restriction measure “Posting Date”and its properties are displayed on the screen.
Step 33:
- On the “Display” tab e also wants to add some calculated measures to meet his requirements. To do so, Jack clicks “Add”.(1)
- Then he selects and double clicks “Add Calculated Measure”(2)
- The window “New Calculated Measure”opens with the fields to be maintained as displayed on the screen.
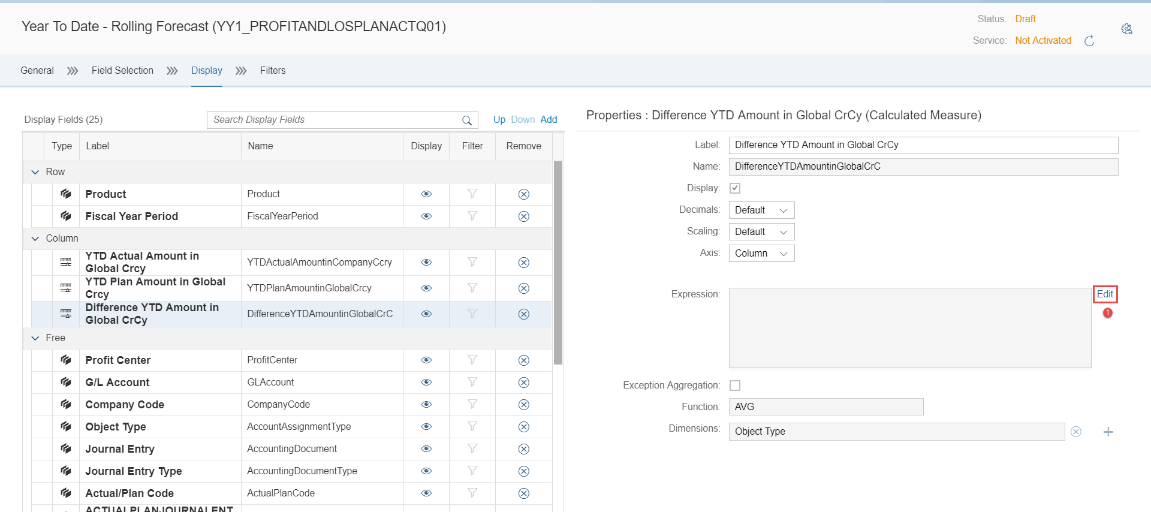
Step 34:
- In the “New Calculated Measure” window Jacks maintains:
- The label "Difference YTD Amount in Global Crcy"(1)
- The name "DifferenceYTDAmountinGlobalCrcy" (2)
- Then Jack clicks OK to validate the entries .(3)
Step 35:
- To define the expression for the calculated measure “Difference YTD Amount in Global Crcy”, Jack clicks “Edit” to open the editor.(1)
- The “Expression Editor” window opens. Jack clicks “Measure” (1). A drop – down list is displayed from where Jack selects “YTD Actual Amount in Global Crcy” (2). He double clicks it to have it inserted in the editor.
- As the value of the column to be displayed is the difference between "YTD Actual Amount In Global Crcy" and "YTD Plan Amount In Global Crcy" the expression he needs to enter in the Expression Editor is: "YTD Actual Amount In Global Crcy" - "YTD Plan Amount In Global Crcy"
- This expression he enters in the editor using "Measures" "User Input Filter", the available signs (1) and Functions(2).
- The complete expression to calculate the “Difference YTD Amount in Global CrCy” is displayed on the screen.
Step 36:
- Jack now saves all his entries by clicking “Save Draft”.(1)
Step 37:
- Jack wants to insert a new column in his report to display the Procentual Percentage of the Difference between the YTD Amount.
- He clicks “Add” (1) to create another calculated measure.
- Then he selects and double clicks “Add Calculated Measure”.(2)
- The “New Calculated Measure” windows displayed with a field to maintain. (3)
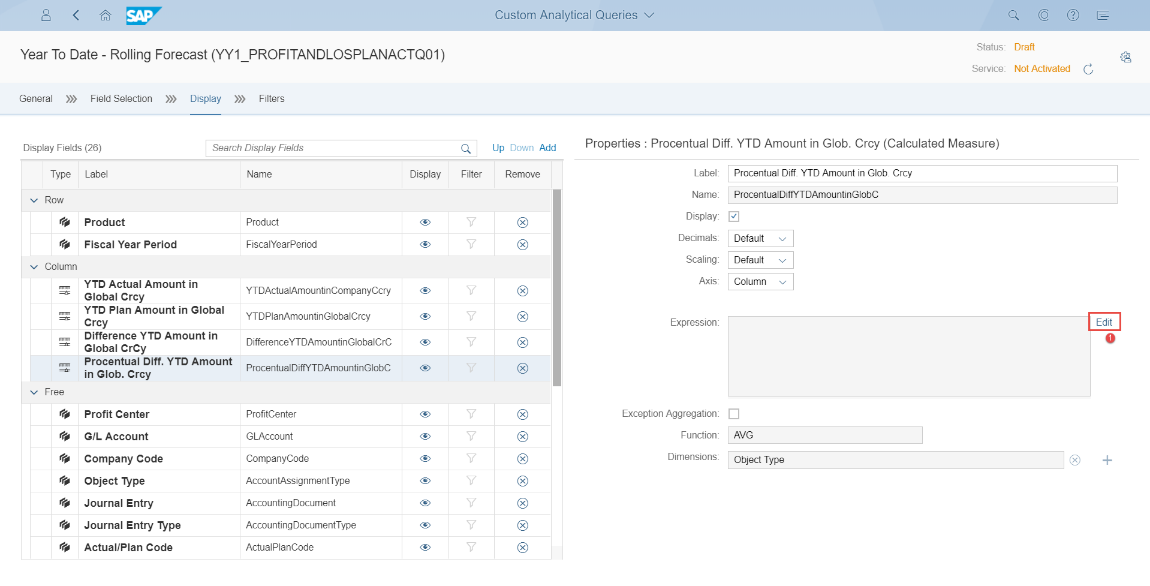
Step 38:
- Jacks maintains the label: “Procentual Diff. YTD Amount in Glob. Crcy” (1) and
- The name: “ProcentualDiffYTDAmountinGlobCrcy” (2)
- Afterwards, he clicks “OK” to save the entries.(3)
Step 39:
- To define an expression for the calculated measure “Procentual Diff. YTD Amount in Global Crcy”, Jack clicks “Edit” for the editor to open.(1)
- The “Expression Editor” window opens.
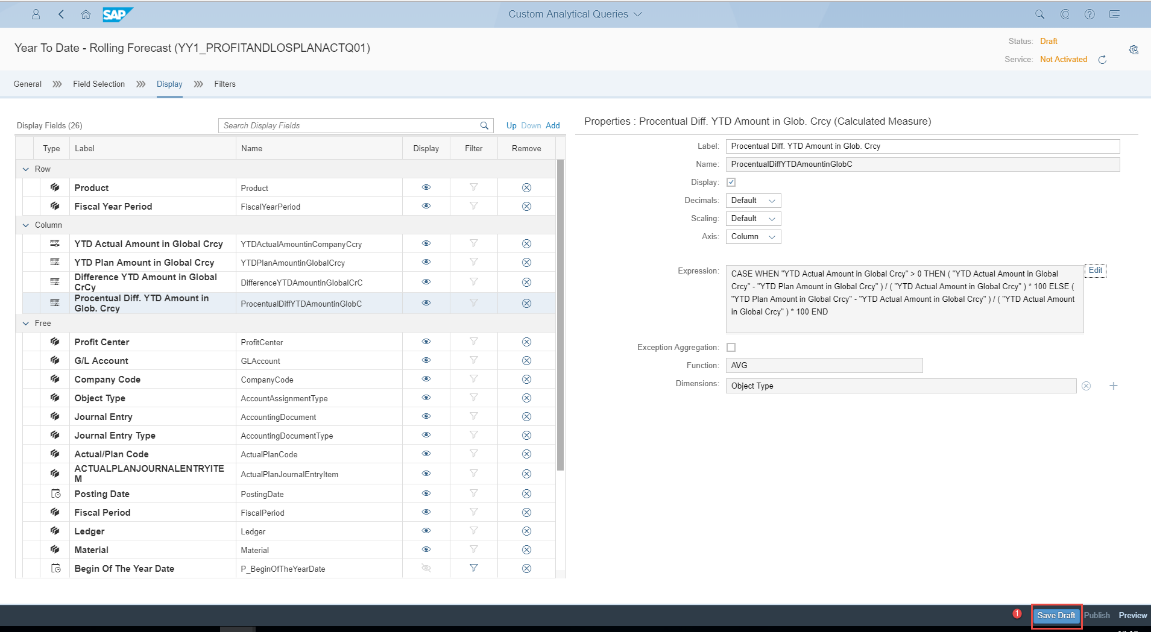
- Jack clicks “Functions”(1) which displays a drop – down list from where Jack selects “Case Expression” (2) and double clicks it to insert it in the editor.
- The full expression to calculate the “Procentual Diff. YTD Amount in Global CrCy” is as follows:
CASE WHEN "YTD Actual Amount in Global Crcy" > 0 THEN ( "YTD Actual Amount in Global Crcy" - "YTD Plan Amount in Global Crcy" ) / ( "YTD Actual Amount in Global Crcy" ) * 100 ELSE ( "YTD Plan Amount in Global Crcy" - "YTD Actual Amount in Global Crcy" ) / ( "YTD Actual Amount in Global Crcy" ) * 100 END.
(1)
Step 40:
- Jack now saves all his entries by clicking “Save Draft”.(1)
- Then he clicks “Publish” to have the actual image available on Design Studio for preview.(1)
Step 41:
- To preview the content of his newly created query, he clicks “Preview”. (1)
Step 42:
- To preview only content Jack wants to view, the “Prompts” window is displayed. Here he can maintain the selection parameter as follows:
- Plan Category with “PLANORD01” (1)
- Once he has selected the parameters, he clicks OK (2) to preview the content.
- Jack’s report looks as displayed on the screen:
- In Column from left to right he has selected from the available dimensions:
- Product and
- Fiscal Year Period.
- In Column from left to right he has selected from the available dimensions:
- For the measures he has the created, restricted and calculated measure representing the expected results of his report:
- YTD Actual Amount in Global Crcy
- YTD Plan Amount in Global Crcy
- Difference YTD Amount in Global CrCy
- Procentual YTD Amount in Global Crcy
- SAP Managed Tags:
- SAP Fiori for SAP S/4HANA,
- SAP S/4HANA Finance,
- SAP S/4HANA Public Cloud
2 Comments
You must be a registered user to add a comment. If you've already registered, sign in. Otherwise, register and sign in.
Labels in this area
-
Artificial Intelligence (AI)
1 -
Business Trends
363 -
Business Trends
23 -
Customer COE Basics and Fundamentals
1 -
Digital Transformation with Cloud ERP (DT)
1 -
Event Information
461 -
Event Information
24 -
Expert Insights
114 -
Expert Insights
158 -
General
1 -
Governance and Organization
1 -
Introduction
1 -
Life at SAP
415 -
Life at SAP
2 -
Product Updates
4,684 -
Product Updates
218 -
Roadmap and Strategy
1 -
Technology Updates
1,502 -
Technology Updates
89
Related Content
- Analytics on Universal Journal, the heart of SAP S/4HANA in Enterprise Resource Planning Blogs by SAP
- Comparative Analysis with S/4 HANA Embedded Analytics in Enterprise Resource Planning Blogs by Members
- Date Function for dynamic date filtering in Fiori apps in Enterprise Resource Planning Blogs by SAP
- Example: Custom CDS View using predefined Virtual Data Model and Extend View in S/4HANA in Enterprise Resource Planning Blogs by SAP
- Table TCURR, Exchange Rate Type EURY in Enterprise Resource Planning Q&A
Top kudoed authors
| User | Count |
|---|---|
| 13 | |
| 11 | |
| 10 | |
| 7 | |
| 7 | |
| 6 | |
| 5 | |
| 4 | |
| 4 | |
| 4 |