
- SAP Community
- Products and Technology
- CRM and Customer Experience
- CRM and CX Blogs by SAP
- Code List Mapping in Data Workbench
CRM and CX Blogs by SAP
Stay up-to-date on the latest developments and product news about intelligent customer experience and CRM technologies through blog posts from SAP experts.
Turn on suggestions
Auto-suggest helps you quickly narrow down your search results by suggesting possible matches as you type.
Showing results for
Employee
Options
- Subscribe to RSS Feed
- Mark as New
- Mark as Read
- Bookmark
- Subscribe
- Printer Friendly Page
- Report Inappropriate Content
07-23-2018
5:24 AM
Introduction
Data migration is an important step before using the system for productive usage. Migration involves importing business data (both master and transactional) from your legacy systems to SAP Cloud for Customer.
For mass data management activities in SAP Cloud for Customer, you can use Data Workbench. Code list mapping in Data Workbench ensures your legacy data maps to the right content in SAP Cloud for Customer.
In this blog, we will address the following questions:
- What is a code list in SAP Cloud for Customer and why should you use it?
- What authorization do you need to perform code list mapping?
- How to create a code list mapping template that business users can use to migrate data?
You can use these detailed instructions to perform code list mapping for the objects you want to migrate to Cloud for Customer. If you have any questions or corner case scenarios, post them at the end of the blog.
Note: For information about code list mapping in the context of CRM/ERP integration, see my other blog Understanding Code List Mapping in SAP Cloud for Customer.
Basics of Code Lists
Usually, you download or extract the data from legacy systems (data that you want to migrate) to import to SAP Cloud for Customer (C4C). This extracted data is referred to as your data file. Data Workbench accepts data file in the CSV (comma-separated values) format. For example, Employee data may have First Name, Last Name, Employee ID, Date of birth, Language, Gender, Country, etc.
Example: Sample view of Employee Data CSV file

Amongst these headers, there may be a few headers that may have any defined set of values. For example, language can only have values that are already defined, such as English, French, German, Hindi, or Spanish. Such headers are referred to as code lists. In other words, a code list is an element, which can have multiple values.
Example code lists and the corresponding values for each of the code lists in Employee Data: Academic title, Country, Gender, Marital status etc.

Code lists and their values for each business object in Data Workbench are predefined in C4C. For example, the predefined set of values for Country code list is AU for Australia, BE for Belgium, CA for Canada, etc.
Before migrating your data, you need to ensure that the code list values used in your data file are mapped to the code list values defined in C4C. This task is referred to as code list mapping.
Example: Code lists and their values

During mapping, you can just match the values between your data file and the C4C code list values. From the above example, you’d match values in Education to Academic Title; 1 to 0001, 2 to 0002, 3 to 0006, and 4 to 0005. As you can see, you always match the values and not the description. Mapping these values is an important step to ensure that there is no data mismatch during import. For example, if you map 3 to 0003, then all the employees whose Education is maintained as PhD in your legacy system, will be displayed as Prof. Dr. in C4C.
Authorization in Data Workbench
Data Workbench can be used by two types of users:
Key user: A C4C user who is usually responsible for setup tasks like identifying what data needs to be migrated, and directing others on how it should be done to ensure consistency across the company. These users are the ones who have authorization to create templates and perform data mapping and code list value mapping.
- Note: To become a key user, you need to have authorization to the Flexibility Change Log Assignment work center. A quick way to find out if you are a key user is to check if the Adapt link is available for you in the top-right corner of the Cloud for Customer application.
Business user. A business user is typically someone on the field who uses the templates created by the key user to migrate data into Data Workbench. They do not have access to the Templates view in Data Workbench.
- Note: Check with your administrator for the authorization. You should have access to Data Workbench work center, and any other views for which you need to import data. If you want to import a specific set of business object data into Data Workbench, ensure that you have access to the corresponding work center views in C4C. For example, if you want to import opportunities, then you need to have authorization to the Opportunities work center view.
Instructions for a key user to set up code list mapping templates
As a key user, you can define the mapping of all the code lists for all the objects for which data needs to be migrated into C4C. You can save these mappings as code list mapping templates, and it is a one-time activity. You can ask your business users to use these templates while migrating data, thus ensuring that all data migrated by any business user is consistently mapped.
You can create an object template in the following ways:
- While importing data in the Import view
- Directly in the Templates view - the instructions below focus on this approach.
Let us see what steps you will have to perform as a key user, to define code list mapping templates for all code lists in an object.
Step A: For the object you want to import, find out all the code lists defined in Data Workbench.
Let us assume that you want to import Employee basic data into Data Workbench.
- Go to Data Workbench work center -> click Templates work center view -> select Standard Object.
- Select the object for which you want to find out the code lists, and click Download to download the ZIP file that contains the required artifacts.
Example
To download Employee basic data, under Standard Object -> enter Employee and select Employee -> click Download.

The downloaded a ZIP file for an individual object will contain three artifacts. For example, Employee and user object will have Employee.CSV file, FieldDef_Employee.CSV file, and CodeList folder.
Note: For a complete business object, the ZIP file will have CodeList, FieldDefinition, and Templates folders.
Understanding the downloaded artifacts
Let us try to understand the downloaded files in a bit more detail:

In summary, you can find the:
- Code lists defined for an object in the field definition CSV file under the CodeList Entity header.
- List of code lists and their values in the CodeList folder.
Step B: For each of the C4C code lists, identify the corresponding fields in your data file.
To identify the mapping information for each of the code lists:
- Have the CodeList folder you downloaded in step 1 handy.
- For the same object, download sample data from your legacy system. This is your data file.
- Now open a code list file from the CodeList folder.
- Check for a corresponding field header in your data file.
This is exactly what you do for all fields in the Import -> Data Mapping step. For example, you could say C4C code list Title corresponds to Salutation in your data file.
Note: While extracting the data from legacy system you can either download it using the same header as mentioned in the template CSV file or in case they are different then we need to map them while uploading the template in to C4C.
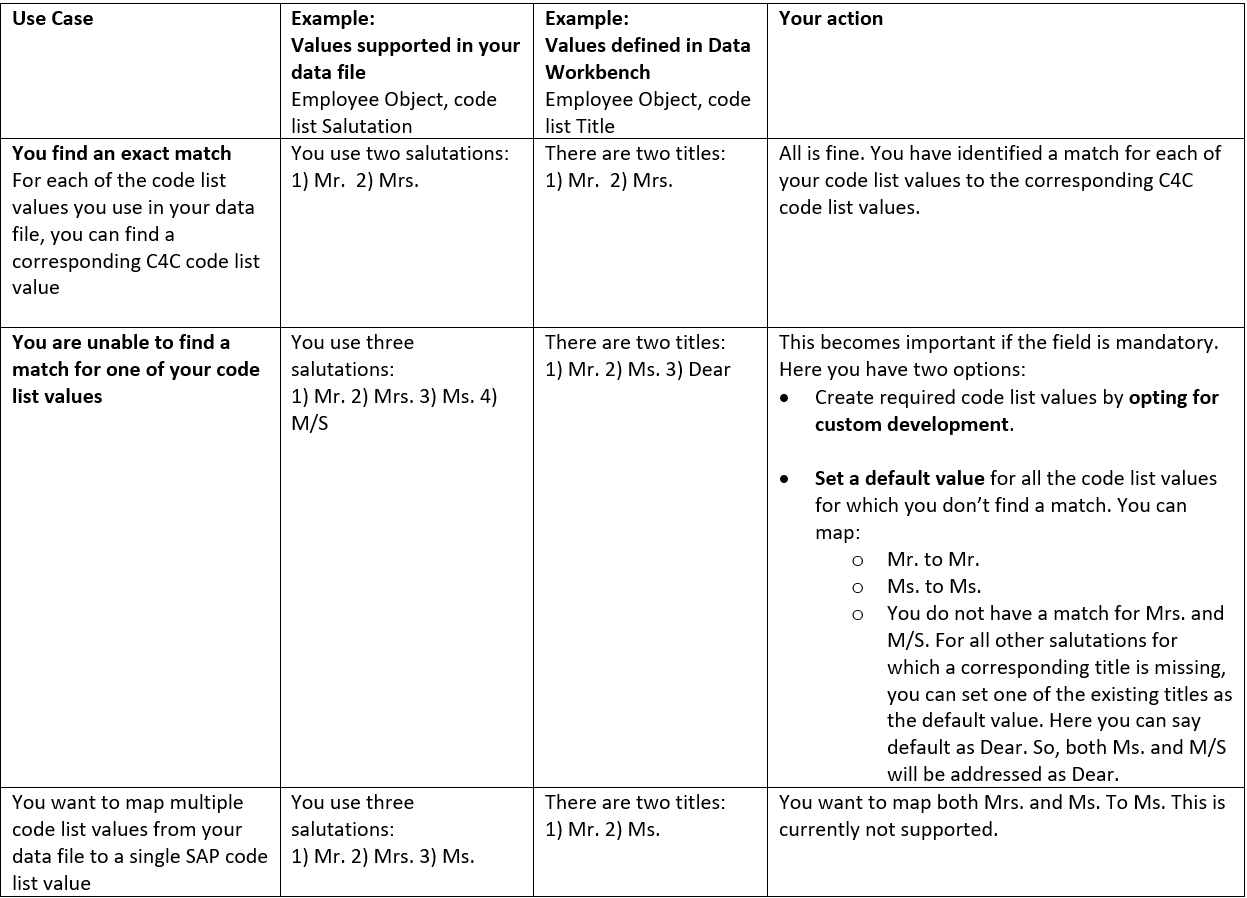
Step C: Check if all the possible values in your data file have a corresponding value in the C4C code list values.
Now, we need to check if all the possible values you maintain for a field in your legacy system, has a corresponding entry defined in Data Workbench. There are multiple possibilities:
Step 😧 Create a code list mapping template
Now that you have decided the content and what needs to be mapped to which field, you can perform code list mapping in Data Workbench.
- In the Data Workbench work center -> click Templates work center view -> select Standard Object.

- Select the object that has the code list, for which you want to create a template. For example, Employee.
- Click Next.
- Click Browse, and select the CSV file you downloaded from your legacy system ().
- Click Upload.
- Click Next.

- Check the mapping of the header fields of your data file and C4C object, based on what you identified and matched in step B. Click Next. System will map all the fields with similar names between legacy system and C4C system, in case field names are not identical it can be manually mapped as shown below for Title and Gender fields.

- For each of the code list under Select a code list property, enter the code list value used in your legacy system, based on step C. You can set a default value for all unlisted code list in the Select Internal Code for unmapped fields.

- Optionally you can save the values as a code list template (In case you want to reuse these code list mapping in another template).

- Repeat step 9 and 10 for each of the code lists.
- Once you are through with all your mappings, click Next.
- Click Create, to create a template for the selected object. The header level data mapping is also saved in the template.
These templates are now visible in the Templates view, and can be used by business users to import data.
Instructions for a business user to use the code list mapping templates
Extract data from your legacy system for the object that you want to import to C4C.
- In the Data Workbench work center -> click Import work center view -> select Individual Object.
- Under Select a template, choose the template suggested by your key user. Click Download. (This is needed only if the data needs to be downloaded from legacy system as per template defined). If data is already available in the required format, go to step 4

- Save your legacy data in the object template you downloaded.
- Click Next.
- Upload your data file using the Browse and Upload option.

- Click Next.
- Check if data validation is successful and Click Import.

- Note down the task name, to monitor the status of your import in the Monitor.
Conclusion
In this blog, we discussed basics of code lists, code list mapping, the steps to create and use code list templates to load data in Data Workbench. In case you have any questions, leave a comment and I will get back to you. In subsequent blogs, we will discuss the following and more:
- While performing an update, can I do code list mapping?
- Does C4C support code list validation?
- What do you do if you want to map two of your code list values to the same code list in C4C?
- SAP Managed Tags:
- SAP Cloud for Customer add-ins
4 Comments
You must be a registered user to add a comment. If you've already registered, sign in. Otherwise, register and sign in.
Labels in this area
-
Business Trends
270 -
Business Trends
11 -
chitchat
1 -
customerexperience
1 -
Event Information
256 -
Event Information
17 -
Expert Insights
30 -
Expert Insights
49 -
Life at SAP
133 -
Life at SAP
1 -
Product Updates
666 -
Product Updates
24 -
SAP HANA Service
1 -
SAPHANACloud
1 -
SAPHANAService
1 -
Technology Updates
453 -
Technology Updates
15
Related Content
- Utility Product Integration Layer (UPIL) in S/4HANA Utilities for Customer Engagement – Part 1 in CRM and CX Blogs by Members
- Delete & Rename Contract Account Name from SAP Cloud for Customer (C4C) in CRM and CX Blogs by Members
- Is it possible we put a Water Mark on the data we exported from the C4C Data Workbench? in CRM and CX Questions
- SAP Customer Data Cloud Integration with Commerce Cloud and Composable Storefront in CRM and CX Blogs by SAP
- CRM Basic Technical Info for ABAPers in CRM and CX Blogs by Members
Top kudoed authors
| User | Count |
|---|---|
| 4 | |
| 2 | |
| 2 | |
| 1 | |
| 1 | |
| 1 | |
| 1 | |
| 1 | |
| 1 | |
| 1 |