
- SAP Community
- Products and Technology
- Enterprise Resource Planning
- ERP Blogs by SAP
- Configure OAuth 2.0 for SAP ByDesign OData Service...
Enterprise Resource Planning Blogs by SAP
Get insights and updates about cloud ERP and RISE with SAP, SAP S/4HANA and SAP S/4HANA Cloud, and more enterprise management capabilities with SAP blog posts.
Turn on suggestions
Auto-suggest helps you quickly narrow down your search results by suggesting possible matches as you type.
Showing results for
Product and Topic Expert
Options
- Subscribe to RSS Feed
- Mark as New
- Mark as Read
- Bookmark
- Subscribe
- Printer Friendly Page
- Report Inappropriate Content
07-13-2018
10:25 AM
SAP Business ByDesign OData services support two authentication protocols: Basic Authentication (user/password) and OAuth 2.0 SAML Bearer authentication.
Combining frontend single sign-on and principal propagation using OAuth means you can extend SAP Business ByDesign (ByD) by SAP Cloud Platform HTML5 applications and automatically benefit from the role-based authorization management of ByD. As result you gain a great flexibility to extend ByD at low development costs to secure data stored in ByD.
This blog posts provides an example to configure single sign-on and principal propagation using OAuth 2.0 SAML Bearer authentication between an HTML5 Application running on the SAP Cloud Platform (SCP) and SAP Business ByDesign (ByD) using OData services.
Example scenario:
Let’s assume we have an HTML5 Application running on the SAP Cloud Platform (SCP) to display and browse your company address book and allow employees to change their workplace address information. The HTML5 application is connected to SAP Business ByDesign as cloud ERP backend with all relevant employee data stored.
Users shall be able to use the same logon credentials for the SCP HTML5 application as well as for SAP Business ByDesign using frontend single sign-on, and user propagation shall be used for any OData requests between the SCP application and ByD.
In my example I’m using the following system setup:

In my blog post Extend SAP ByDesign using SAP Cloud Platform HTML5 Applications I explained how to setup an HTML5 Application running on the SAP Cloud Platform to extend SAP Business ByDesign.
Now we will adapt this setup in 3 steps to apply frontend Single Sign-On and principal propagation using OAuth 2.0 SAML Bearer authentication:
As first step we setup frontend single sign-on to use SAP Cloud Platform Identity Authentication as Identity provider for the HTML5 demo application.
SCP: Capture all relevant information to configure the IDP and later on OAuth:
IDP: Add the SCP as application to the identity provider list of applications:
IDP: Capture the IDP metadata from the SAP Cloud Platform Identity Authentication tenant:
SCP: Add the SAP Cloud Platform Identity Authentication tenant as trusted identity provider:
Result:
You can test single sign-on for your SCP HTML5 Application: Capture the Application URL of your SCP HTML5 application and open the URL in an incognito browser window. The browser should redirect you to the IDP logon screen for authentication and you should be able to successfully login to the SCP HTML5 application.
In step 2 we setup frontend single sign-on to use SAP Cloud Platform Identity Authentication as Identity provider for SAP Business ByDesign.
ByD: Configure Single Sign-on:
IDP: Add the ByD tenant as application on the identity provider:
Result:
You can login to the ByD tenant using single sign-on: Open the SSO-URL of your ByD tenant in an incognito browser window (for example "https://myXXXXXX-sso.sapbydesign.com"). The browser should redirect you to the IDP logon screen for authentication and you should be able to successfully login to ByD.
Some remarks:
Per default ByD uses the name ID format “unspecified” for user mapping. ByD maps the name ID of SAML-assertions on the ByD user alias.
Additionally ByD support the name ID format “emailAddress“. In this case ByD maps the name ID of the SAM-assertion on the ByD user e-mail address that is specified in the ByD employee contact data.
In step 1 and 2 we configured frontend single sign-on for SAP ByDesign and the SAP Cloud Platform application. Now we configure principal propagation such that the same user is used for OData access between the SCP application and ByD as well.
ByD: Configure an OAuth 2.0 Identity Provider
ByD: Add an OAuth2.0 Client Registration
SCP: Create a Destination with OAuth 2.0 SAML Bearer authentication
Result:
The SCP HTML5 Application now uses user propagation for accessing ByD using the OData services. Open the Application URL of your HTML5 application in an incognito browser window: The browser should redirect you to the IDP logon screen for authentication (frontend single sign-on configured in step 1) and the role-based authorizations of your mapped ByD user should apply in the HTML5 application for read and write access to ByD (user propagation configured in step 3).
In my example above I used a single SCP sub-account to develop and use the HTML5 appication.
In a productively used scenario I would rather suggest to separate provisioning and consumption of the SCP application, which adds one more SCP sub-account to the system setup:
In this setup the SAP Cloud Platform consumer sub-account subscribes to the HTML5 application provided by the SAP Cloud Platform provider sub-account using SAP Cloud Platform Cockpit >> Application >> Subscription.
In the subscription you get the Application URL and you have the possibility to map required destinations as described in step 3.
Furthemore frontend single sign-on and OAuth 2.0 SAML Bearer Authentication has to be configured in the SAP Cloud Platform consumer sub-account.
Related information using OAuth 2.0 in SAP Business ByDesign and SAP Cloud for Customer:
Combining frontend single sign-on and principal propagation using OAuth means you can extend SAP Business ByDesign (ByD) by SAP Cloud Platform HTML5 applications and automatically benefit from the role-based authorization management of ByD. As result you gain a great flexibility to extend ByD at low development costs to secure data stored in ByD.
This blog posts provides an example to configure single sign-on and principal propagation using OAuth 2.0 SAML Bearer authentication between an HTML5 Application running on the SAP Cloud Platform (SCP) and SAP Business ByDesign (ByD) using OData services.
Example scenario:
Let’s assume we have an HTML5 Application running on the SAP Cloud Platform (SCP) to display and browse your company address book and allow employees to change their workplace address information. The HTML5 application is connected to SAP Business ByDesign as cloud ERP backend with all relevant employee data stored.
Users shall be able to use the same logon credentials for the SCP HTML5 application as well as for SAP Business ByDesign using frontend single sign-on, and user propagation shall be used for any OData requests between the SCP application and ByD.
In my example I’m using the following system setup:
- SAP Business ByDesign (referred to as “ByD”)
- SAP Cloud Platform Identity Authentication as Identity provider (referred to as “IDP”)
- SAP Cloud Platform sub-account to develop and run the HTML5 application "demoemployee" (referred to as “SCP”)
In my blog post Extend SAP ByDesign using SAP Cloud Platform HTML5 Applications I explained how to setup an HTML5 Application running on the SAP Cloud Platform to extend SAP Business ByDesign.
Now we will adapt this setup in 3 steps to apply frontend Single Sign-On and principal propagation using OAuth 2.0 SAML Bearer authentication:
- Setup frontend Single Sign-On for the SCP HTML5 Application
- Setup frontend Single Sign-On for SAP Business ByDesign
- Configure principal propagation between the SAP Cloud Platform HTML5 Application and SAP Business ByDesign using OAuth 2.0 SAML Bearer Authentication
Step 1: Setup Single Sign-On for the SCP HTML5 Application
As first step we setup frontend single sign-on to use SAP Cloud Platform Identity Authentication as Identity provider for the HTML5 demo application.
SCP: Capture all relevant information to configure the IDP and later on OAuth:
- Open the SAP Cloud Platform Cockpit and navigate to Security >> Trust and edit the
Local Service Provider settings
- Change the Configuration Type to “Custom”
- If no signing key is available click on “Generate Key Pair” and save
- Note the Local Provider Name
- Copy the Signing Certificate and create a .cer-file (e.g. with file name “SCP_subaccount_signing_certificate.cer”) with exactly the following content:
-----BEGIN CERTIFICATE-----
<cut&past Signing Certificate here>
-----END CERTIFICATE----- - Click on “Get Metadata” and save the Service Provider Metadata (e.g. file name “SCP_subaccount_SP_metadata.xml”)

IDP: Add the SCP as application to the identity provider list of applications:
- Open the SAP Cloud Platform Identity Authentication Administration Console and navigate to Applications & Resources >> Applications
- Add an application and name it according your SCP sub-account name
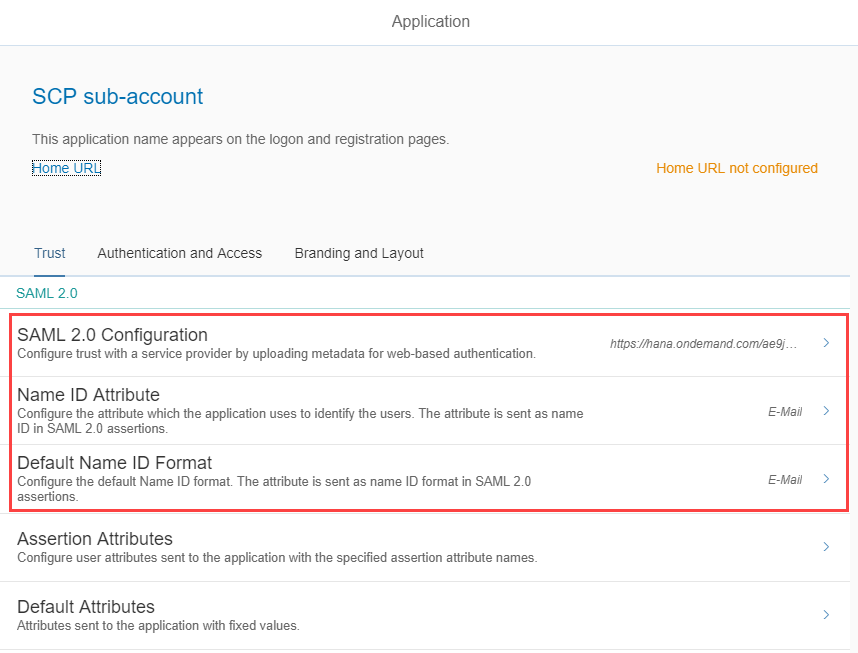
- Open the SAML 2.0 Configuration and upload the Service Provider Metadata of your SAP Cloud Platform sub-account; save
- Open Name ID Attribute and select "E-Mail"; save
- Open Default Name ID Format and select "E-Mail" as well; save
- Open Assertion Attributes and note the SAML Assertion Attribute Names (could be for example “first_name”, “last_name” and “mail”)
IDP: Capture the IDP metadata from the SAP Cloud Platform Identity Authentication tenant:
- Open the SAP Cloud Platform Identity Authentication Administration Console and navigate to Applications & Resources >> Tenant Settings
- Open SAML 2.0 Configuration, click on “Download Metadata File” and save the IDP Metadata File (e.g. file name “IDP_metadata.xml”)
SCP: Add the SAP Cloud Platform Identity Authentication tenant as trusted identity provider:
- Open the SAP Cloud Platform Cockpit and navigate to Security >> Trust and switch to sheet Application Identity Provider
- Click on “Add Trusted Identity Provider” and upload the IDP Metadata File; save
- Switch to tab “Attributes” and enter Assertion-Based Attributes using the SAML Assertion Attribute Names provided by the IDP and the principal attribute names “email”, “firstname” and “lastname”, for example:
- mail : email
- first_name : firstname
- last_name : lastname
Result:
You can test single sign-on for your SCP HTML5 Application: Capture the Application URL of your SCP HTML5 application and open the URL in an incognito browser window. The browser should redirect you to the IDP logon screen for authentication and you should be able to successfully login to the SCP HTML5 application.
Step 2: Setup Single Sign-On for SAP Business ByDesign
In step 2 we setup frontend single sign-on to use SAP Cloud Platform Identity Authentication as Identity provider for SAP Business ByDesign.
ByD: Configure Single Sign-on:
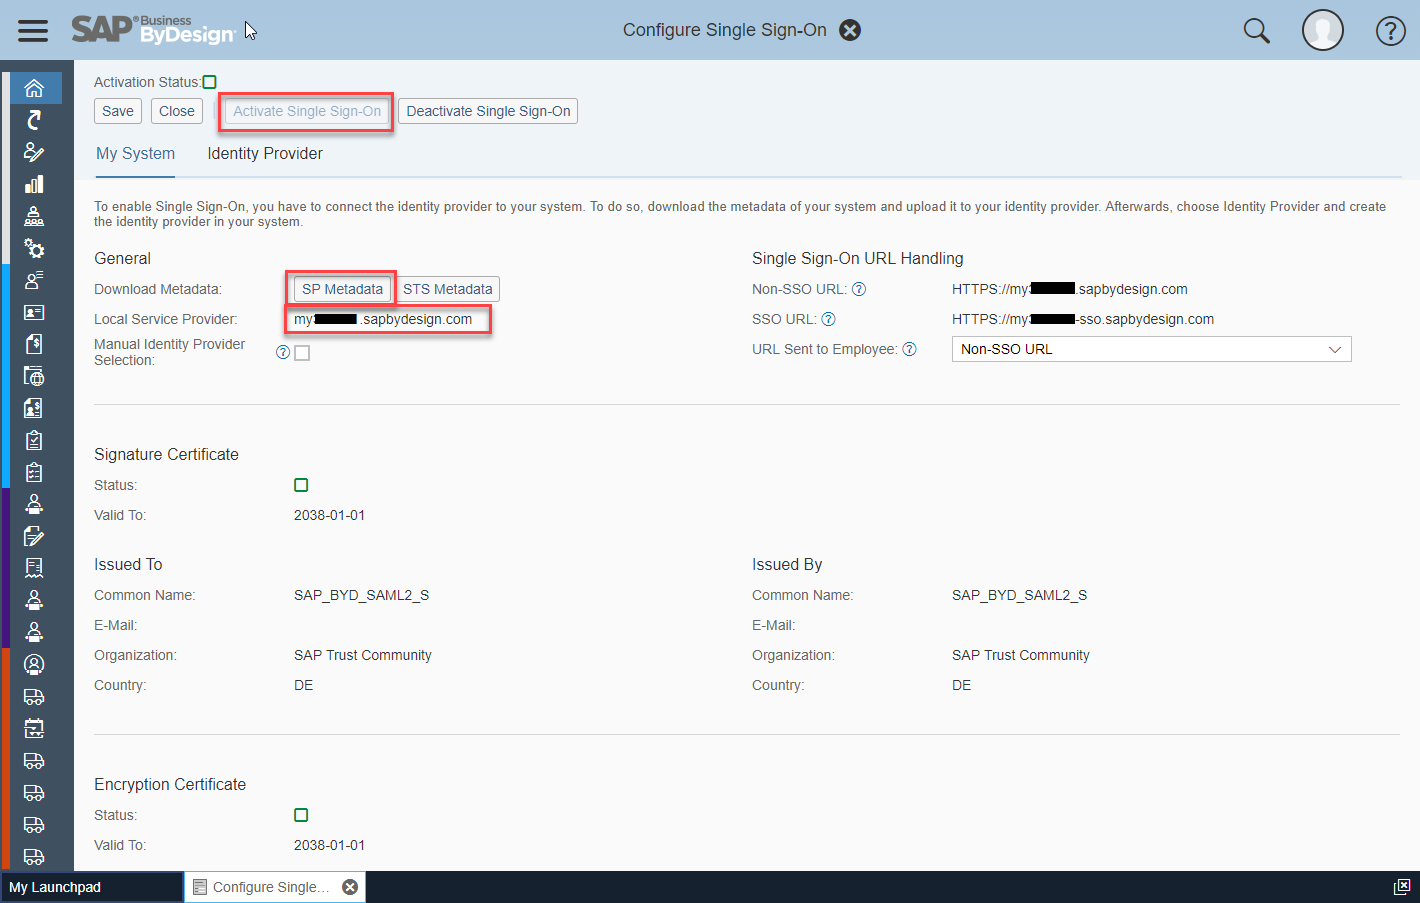
- Open the ByD work center Application and User Management >> common task Configure Single Sign-On
- On tab “My System” note the Local Provider Name and click on “SP Metadata” to download and save the Service Provider Metadata (e.g. file name “ByD_SP_metadata.xml”)
- Switch to tab “Identity Provider”, create a “New Identity Provider” and upload the IDP Metadata File downloaded step 1
- Edit the Supported Name ID Formats and add “E-Mail Address” as default name ID format and save (Note: ByD supports SSO name ID format e-mail with release 1808; make sure you maintained your e-mail address in your ByD employee contact data in field “E-Mail”)
- Click button “Activate Single Sign-On”
IDP: Add the ByD tenant as application on the identity provider:
- Open the SAP Cloud Platform Identity Authentication Administration Console and navigate to Applications & Resources >> Applications
- Add an application and name it according your ByD tenant name
- Open the SAML 2.0 Configuration and upload the Service Provider Metadata of your ByD tenant; save
- Open Name ID Attribute and select "E-Mail"; save
- Open Default Name ID Format and select "E-Mail"; save
Result:
You can login to the ByD tenant using single sign-on: Open the SSO-URL of your ByD tenant in an incognito browser window (for example "https://myXXXXXX-sso.sapbydesign.com"). The browser should redirect you to the IDP logon screen for authentication and you should be able to successfully login to ByD.
Some remarks:
Per default ByD uses the name ID format “unspecified” for user mapping. ByD maps the name ID of SAML-assertions on the ByD user alias.
Additionally ByD support the name ID format “emailAddress“. In this case ByD maps the name ID of the SAM-assertion on the ByD user e-mail address that is specified in the ByD employee contact data.
Step 3: Configure OAuth 2.0 SAML Bearer Authentication
In step 1 and 2 we configured frontend single sign-on for SAP ByDesign and the SAP Cloud Platform application. Now we configure principal propagation such that the same user is used for OData access between the SCP application and ByD as well.
ByD: Configure an OAuth 2.0 Identity Provider
- Open the ByD work center Application and User Management >> common task Configure OAuth 2.0 Identity Providers
- Create new OAuth 2.0 provider:
- Issuing Entity Name: Enter the SCP Local Provider Name noted in step 1
- Primary Signing Certificate: Browse and upload the SCP Signing Certificate .cer-file created in step 1
- Check indicator “Email Address”
ByD: Add an OAuth2.0 Client Registration
- Open the ByD work center view Application and User Management - OAuth2.0 Client Registration
- Create new OAuth2.0 Client Registration
- Client ID: Note the Client ID generated by the system
- Client Secret: Enter a password and note the Client Secret
- Description: Enter some description
- Issuer Name: Select the OAuth 2.0 Identity provider created above
- Scope: Selecting scope ID “UIWC:CC_HOME” should be sufficient for most use cases
SCP: Create a Destination with OAuth 2.0 SAML Bearer authentication
- Open the SAP Cloud Platform Cockpit, navigate to Connectivity >> Destinations and create a new destination:
- Name: Enter a destination name
- Type: "HTTP"
- Description: Enter a destination description
- URL: Enter the URL of your ByD OData service, for example “https://myXXXXXX.sapbydesign.com/sap/byd/odata/cust/v1/khemployee/”
- Proxy Type: "Internet"
- Authentication: "OAuth2SAMLBearerAssertion"
- Audience: Enter the ByD Local Provider Name noted in step 2
- Client Key: Enter the ByD Client ID noted in step 3
- Token Service URL: Enter the ByD token service URL, for example “https://myXXXXXX.sapbydesign.com/sap/bc/sec/oauth2/token” (replace the hostname with your ByD tenant hostname)
- Token Service User: Enter the ByD Client ID noted in step 3
- Token Service Password: Enter the ByD Client Secret noted in step 3
Enter the Additional Properties:
- authnContextClassRef : "urn:none"
- nameIdFormat : "urn:oasis:names:tc:SAML:1.1:nameid-format:emailAddress"
- scope : Enter the Scope of the ByD OAuth client registration, e.g. "UIWC:CC_HOME"
- userIdSource : "email"
- Open SAP Cloud Platform Cockpit and navigate to HTML5 Applications: Open the HTML5 application and edit the destination mapping: enter your new OAuth destination as “Mapped Subaccount Destination”.
Result:
The SCP HTML5 Application now uses user propagation for accessing ByD using the OData services. Open the Application URL of your HTML5 application in an incognito browser window: The browser should redirect you to the IDP logon screen for authentication (frontend single sign-on configured in step 1) and the role-based authorizations of your mapped ByD user should apply in the HTML5 application for read and write access to ByD (user propagation configured in step 3).
Remarks and additional information
In my example above I used a single SCP sub-account to develop and use the HTML5 appication.
In a productively used scenario I would rather suggest to separate provisioning and consumption of the SCP application, which adds one more SCP sub-account to the system setup:
- SAP Business ByDesign
- SAP Cloud Platform Identity Authentication as Identity provider
- SAP Cloud Platform provider sub-account to develop and deploy the HTML5 application
- SAP Cloud Platform consumer sub-account to use the HTML5 application
In this setup the SAP Cloud Platform consumer sub-account subscribes to the HTML5 application provided by the SAP Cloud Platform provider sub-account using SAP Cloud Platform Cockpit >> Application >> Subscription.
In the subscription you get the Application URL and you have the possibility to map required destinations as described in step 3.
Furthemore frontend single sign-on and OAuth 2.0 SAML Bearer Authentication has to be configured in the SAP Cloud Platform consumer sub-account.
Related information using OAuth 2.0 in SAP Business ByDesign and SAP Cloud for Customer:
- SAP Business ByDesign Help Center: search for "OAuth 2.0 Quick Guide" or “Front-End Single Sign-On“
- SAP Help / SAP Cloud Platform: search for “Authorization and Trust Management“
- SAP Community:
Single Log-Out (SLO) with SAP Business ByDesign
Single-Sign On (SSO) with SAP Business ByDesign
Configuring OAuth 2.0 between SAP Hybris Cloud for Customer and SAP Cloud Platform - GitHub: SAP Cloud for Customer OData API Developer's Guide (incl. a sample Java implementation of an OAuth SAML bearer client)
- SAP Managed Tags:
- SAP BTP Security,
- SAP Cloud Identity Services,
- SAP Business ByDesign,
- SAP Business Technology Platform
Labels:
19 Comments
You must be a registered user to add a comment. If you've already registered, sign in. Otherwise, register and sign in.
Labels in this area
-
Artificial Intelligence (AI)
1 -
Business Trends
363 -
Business Trends
21 -
Customer COE Basics and Fundamentals
1 -
Digital Transformation with Cloud ERP (DT)
1 -
Event Information
461 -
Event Information
24 -
Expert Insights
114 -
Expert Insights
152 -
General
1 -
Governance and Organization
1 -
Introduction
1 -
Life at SAP
415 -
Life at SAP
2 -
Product Updates
4,685 -
Product Updates
208 -
Roadmap and Strategy
1 -
Technology Updates
1,502 -
Technology Updates
88
Related Content
- nginx configuration in 2024 SAP B1 in Enterprise Resource Planning Q&A
- S/4 EHS: Hazardous substance inventory cannot be created, no location shown in Enterprise Resource Planning Q&A
- Deep Dive into SAP Build Process Automation with SAP S/4HANA Cloud Public Edition - Retail in Enterprise Resource Planning Blogs by SAP
- Asset Management in SAP S/4HANA Cloud Private Edition | 2023 FPS01 Release in Enterprise Resource Planning Blogs by SAP
- How Do I Process Cash Dividends in SAP Treasury and Risk Management? in Enterprise Resource Planning Blogs by SAP
Top kudoed authors
| User | Count |
|---|---|
| 8 | |
| 6 | |
| 5 | |
| 4 | |
| 4 | |
| 3 | |
| 3 | |
| 2 | |
| 2 | |
| 2 |