
- SAP Community
- Products and Technology
- Enterprise Resource Planning
- ERP Blogs by SAP
- A Do-It-Yourself Step-by-Step Guide: How to Set Up...
Enterprise Resource Planning Blogs by SAP
Get insights and updates about cloud ERP and RISE with SAP, SAP S/4HANA and SAP S/4HANA Cloud, and more enterprise management capabilities with SAP blog posts.
Turn on suggestions
Auto-suggest helps you quickly narrow down your search results by suggesting possible matches as you type.
Showing results for
Product and Topic Expert
Options
- Subscribe to RSS Feed
- Mark as New
- Mark as Read
- Bookmark
- Subscribe
- Printer Friendly Page
- Report Inappropriate Content
07-12-2018
3:00 PM
§ [Additional remark 9 April 2019]
I have posted a new article in my blog series. This time, you will extend your S/4HANA system (1809) by creating a Node.js app. You deploy the app on SAP Cloud Platform (Cloud Foundry environment). It calls an OData service from your S/4HANA on-premise system securely via Cloud Connector. All of this from your home PC with minimal budget, using SCP trial account. My original source code is available on GitLab.
‡ [Additional Remark 29 Jan 2019]
I have managed to deploy S/4HANA 1809 onto the same GCP infrastructure (the same project) I created for 1709. I am planning to include this in an upcoming tutorial blog if I can get things working (no problem with 1809; I'm learning new staff)... Thank you for all the views, likes, and interactions in the comments. Stay tuned.
-- Noboru
† [Additional remark 21 Jan 2019]
A couple of people reported in the comments that they did not have to pay Google US$ 35 equivalent like I needed to. Happy for those lucky ones 🙂 Or perhaps Google did something to increase their base computing capacity for their free trial. Either way, you might not need to pay.
Part II is also available 🙂
This tutorial blog series is aimed at anyone who wants to play with an SAP S/4HANA on-premise system from your Windows PC at home.
What I am advocating is a Do-It-Yourself (DIY) approach for SAP S/4HANA. It probably required a heroic amount of learning and efforts to set up an SAP R/3 system at home 15 years ago. The time is different now. We can do it easily with the help of cloud infrastructure services like Google Cloud Platform and Amazon Web Services, and SAP Cloud Appliance Library.
Hopefully true to the DIY spirit, I will be able to show you the path I blazed through. Along the way and beyond, I hope you will have a lot of fun. I will cover the following items with step-by-step screen shots, sharing my learnings from my own trouble-shooting experiences.
Part I. Let’s Get Your Own SAP S/4HANA On-Premise System in the Cloud using CAL
Part II. Let’s Play with Development Tools, SAP Demo Data, CDSs, oData Services, and Fiori Apps
I will focus on the operating system (OS) most of us in the corporate environment is familiar with: Windows.
Here are the computer environment that you need to have for this tutorial:
I used Windows 10, 64-bit version. I also happen to have SAP GUI for Windows already installed on my laptop PC (it's my work PC). If you do not have access to SAP GUI, unfortunately, I do not know how you might be able to legitimately obtain SAP GUI outside SAP support website (Comments, anyone?). The page leads you to SAP launchpad's Software Download area. Downloading software from this place requires you to have an authorisation.
You can still use SAP Fiori apps, as they require only a browser to use.
ADT, even if it is a plug-in for Eclipse, requires SAP GUI installed on your computer.
Yes. Java. It is optional. We need it for ABAP Development Tool (ADT), as it is a plug-in for Eclipse. Eclipse is an integrated development environment (IDE) written (mostly) in Java. Windows normally does not come with a Java environment, so you will need to get an installer execution file and install a runtime by yourself. We will see this step-by-step in the section for ADT later in Part II.
† [Additional remark 21 Jan 2019]
A couple of people reported in the comments that they did not have to pay US$ 35 equivalent. Happy for those lucky ones 🙂 Or perhaps Google did something to increase their base computing capacity for their free trial. Either way, you might not need to pay.
Yes, it is true that GCP has a free 12-month trial. Unfortunately, however the computer resource provided for a free trial is not enough as we will be running an enterprise software on it. You will be upgrading the account and then to increase the computer resource allocation (GCP calls it quota). In order to do so, GCP needs you to prove that you are “serious” about it; as a proof, you need to pay $US 35 or equivalent in your currency via credit card. You will see a step-by-step how-to later. I did this in Germany; you may have other conditions depending on your geography – perhaps you could share your experience in the comment below.
There are other small bits and pieces. We will cover them step-by-step when necessary.
In this part, you will deploy your own instance of SAP S/4HANA 1709, fully configured, ready for you to play with. It can be all done from your home PC with the internet. We will be covering the following steps:
For me as a consumer of CAL, it is a catalog of SAP systems you can deploy onto a cloud infrastructure. With CAL:
There is a good blog from joerg.wolfa colleague of mine at SAP that explains general information on CAL for S/4HANA 1709: https://blogs.sap.com/2017/12/14/sap-s4hana-1709-fully-activated-appliance-create-your-sap-s4hana-17....
In my blog tutorial, I have chosen GCP just because I never used it before to host a system. I have used it only for some small tutorials. It is exciting to try something new, isn’t it? You can choose AWS, of course. Perhaps you could share your experience in the comments below, or write your own blog about it.
So let’s get started!
From my own experience, it is smoother to start with GCP. You will see why later.
Go to GCP console: https://console.cloud.google.com/.
There is a landing page for GCP but you will be doing actual set up in the console.
I have a Google account. If you don’t, you will need to create one for yourself.

Here is the console. I already have a couple of projects from my past. Clicking on where the arrow is pointing gives you a pop-up menu like this below. Create a new project for your S/4HANA system.


It will take 30 seconds or so for your new project to be active.
Go to the dashboard for your project.


You will need to create a service account within your project. I will let Google explain what it is.

The service account requires the following roles to host your S/4HANA instance:

Make sure that you keep the default selection of JSON for Key type. You will need the JSON file in CAL later.

When you create a new service account, you will get a JSON file (a private key for the account). You will upload it to SAP CAL later to establish connection between CAL and GCP (next section).
This step tripped me when I was creating my own S/4HANA instance. If you do not do this step, you will get an error message when you try to upload the JSON file in CAL.


Enable Cloud Resource Manager API by pressing the “Enable” button.
You also need to enable the Compute Engine API.


For this API, it looks like you will need to be a little more serious about using GCP. Breathe, and commit to enabling billing.

If you do this for the first time like I did, Google gives you free credit of USD 300; or at least that’s what I got (in Germany, around April / May 2018).
Activation takes 30 seconds or so with the waiting animation, and then you will see this.
At the moment, you are using a free GDP account. In order to host your SAP S/4HANA 1709 instance, you will need to commit to GCP a bit more. Essentially, you need to do these things:
Can you stay with a free GCP account? Unfortunately, the answer is no. I could not activate my S/4HANA instance correctly. With the APIs enabled, you can establish connection between GCP and CAL. The problem is the free GCP account does not give you enough computing resources; in our case, CPUs and SSD storage.

With these measures, you will get the error message like above when you try activating your S/4HANA instance in CAL. The explanation of “Quota ‘CPUS’”and “Quota ‘SSD_TOTAL_GB’” is listed in this GCD documentation (the link is also provided in FAQ in CAL documentation for GCP).
I have already blazed through this path myself. You can follow me in my footsteps below.
Here is how you upgrade to a paid account.


After the upgrade, SSD message can be resolved.

You can see that the error message is now reduced to only ‘CPUS’, but you cannot still activate your S/4HANA instance yet.

In order to increase your quota for CPUS, you need to go through GCP’s process. You start with requesting this like this.

You will see a message saying that you may need to wait for 24—48 hours. Instead, in my case, I almost immediately got an email from Google Compute Engine Quota Support, requesting to make a payment of 35 USD or equivalent in my currency.
Here is how you do this…


I googled how much is 35 USD in Euro (currency in Germany where I did this). According to Google, 35 USD on the day was about 30 Euro.

As soon as I have confirmed that it is shown in the Console as "credit" (in my case, almost immediately, not 24 hours), I replied to the email. Yes, it was a manual process to write an email and send it back.

This reply from GCP Support came back within perhaps 12-20 hours or so, I think. I sent the email back to them in the evening before I went to bed. I worked next day, and checked my email after I came back home from work to find the reply.
Now it’s all set to get your S/4HANA up and running on GCP from CAL.
Go to CAL at https://cal.sap.com/. Clicking on Get Start will take you to a catalog of solutions (I would say “virtual machines”) available.

There are many different solutions. Filter by “1709” like in the screen shot to find “SAP S/4HANA 1709, Fully-Activated Appliance”. You then create your own instance by clicking on Create Instance button. If you have not logged on to SAP CAL, then it will prompt you to log on with the screen like in the next screen shot.

If you do not have an SAP ID, do not worry. You can register yourself here; it is a quick process of filling in a simple form. If you have an SAP ID, log on.

You will also get a terms & conditions around here. If you accept it, then you will be in a screen where you maintain account details.
If you are following this tutorial, I do not believe you need to read these details. In case you want to, here are some GCP specific information you can navigate to from this tip bubble: https://wiki.scn.sap.com/wiki/x/Exp7H and https://cloud.google.com/compute/quotas.
Remember the JSON file (the service account’s key) you downloaded when creating a GCP service account in the previous section? You upload it here.
For Region and Zone, I just kept the default ones automatically populated for me.


I stored the private key, provided password and downloaded a .pem file here.
For the first time, you do need to wait for about 90 minutes.
If you have done all the pre-work in GCP described in previous step, you should have no problem activating your S/4HANA instance.
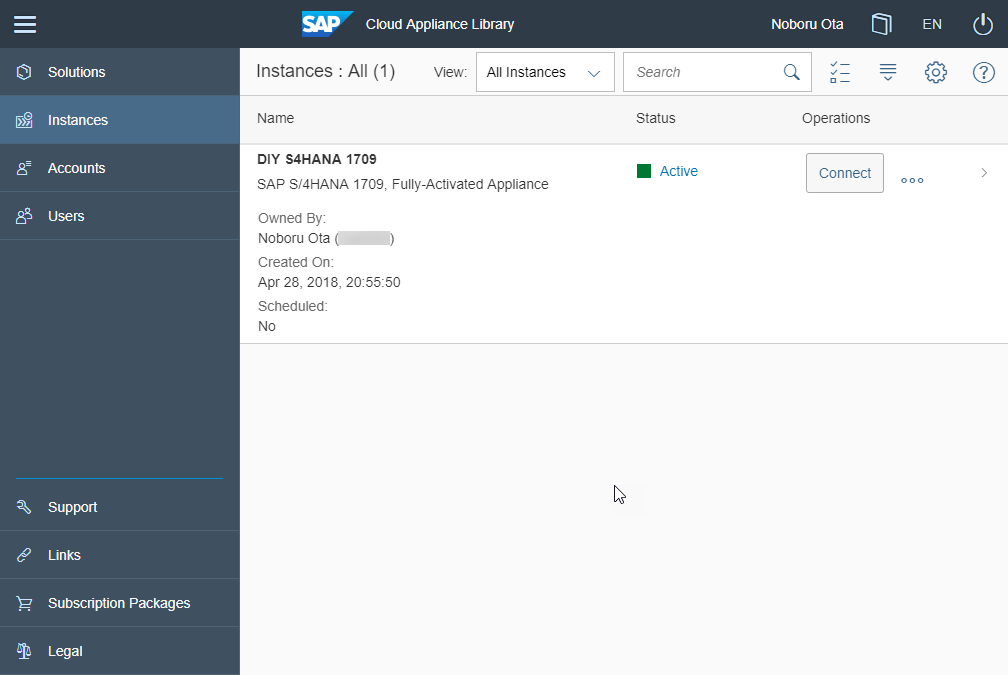
Congratulations! Now you have your own SAP S/4HANA 1709 in the Cloud.
Once you have successfully activated your instance of SAP S/4HANA 1709, you can easily connect to it. There is documentation with a good detail, including settings for Fiori, and pre-defined users with passwords, etc. (Getting Started Guide).
But Let’s just connect to it via good ol’ SAP GUI, shall we?


If you have SAP GUI installed in your PC, you should get this pop up. Allow the connection.

For pre-defined users and password, refer to the “Getting Started Guide” – you see the link on top of this pop-up window.

For example, you can use S4H_MM. All the pre-defied users have a common password, “Welcome1”.

Logged on as S4H_MM.

It is truly your system. You can even create a super user with SAP_ALL and SAP_NEW profiles (!).
To access the SAP Fiori Launchpad using your browser in your home PC, you need to do a little more. Getting Started Guide has a section dedicated to this as below. Let’s unpack it.

In your CAL Console, navigate to the detail of your instance. It lists all the IP addresses to add to your "hosts" file. You need the following three IP addresses for your hosts file.


Tick the Public Static IP Addresses check box and save. If you do not do this, every time you suspend and activate your instance, the IP addresses will be different – you would then need to edit your hosts file in your PC each time.
Make sure to run the text editor as administrator (in my case, I use Notepad, as instructed by the Guide). Otherwise, you will not be able to save the file. I will assume you know what you are doing if you are using some fancy text editor.


If you run as administrator, you will probably get this confirmation box. Say yes.
The location of the file should be:


If you see nothing in the folder, then make sure to change the selection to include all the files, not just *.txt files (this is the default).
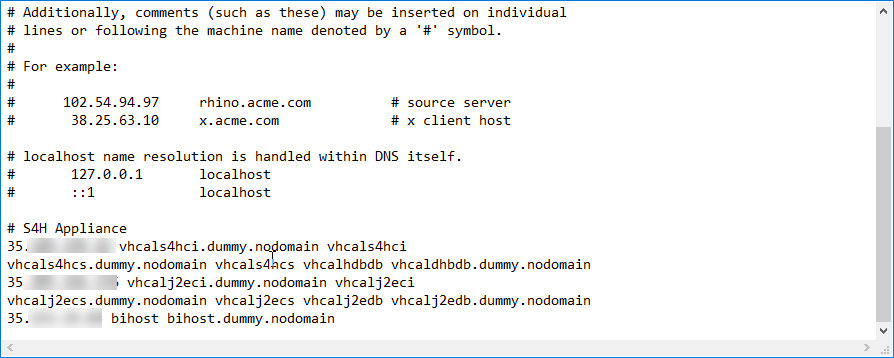
Note that your Console lists a pair of IP addresses for each machine, internal IP and external IP. Make sure to use the external ones. In my case, all the external ones start with 35, internal ones 10.
Make sure you save the file.
I assume that this is DIY with your PC at home, so probably you do not need to do anything with the proxy related settings for your browser. I did not have to do anything.
If you encounter some issues related to internet connection, it may be worth looking at the Guide; there is a section that mentions some changes you might need to do to your browser settings, especially when you are using a web proxy and for Internet Explorer.
If you have edited your hosts file correctly, this URL should get you to your SAP Fiori Launchpad. The entry in your hosts file map this domain name to the IP address of your SAP S/4HANA system.
https://vhcals4hci.dummy.nodomain:44301/sap/bc/ui5_ui5/ui2/ushell/shells/abap/FioriLaunchpad.html


Congratulations! Now you have set up your own SAP S/4HANA instance on GCP, and can access it via SAP GUI and the SAP Fiori Launchpad.
Part II of this tutorial blog will build on this, and walk you through a process of developing a simple Fiori app with using a ABAP Development Tool (ADT) and Web IDE (desktop version). We will also cover how to get these development tools and set them up.
I have posted a new article in my blog series. This time, you will extend your S/4HANA system (1809) by creating a Node.js app. You deploy the app on SAP Cloud Platform (Cloud Foundry environment). It calls an OData service from your S/4HANA on-premise system securely via Cloud Connector. All of this from your home PC with minimal budget, using SCP trial account. My original source code is available on GitLab.
‡ [Additional Remark 29 Jan 2019]
I have managed to deploy S/4HANA 1809 onto the same GCP infrastructure (the same project) I created for 1709. I am planning to include this in an upcoming tutorial blog if I can get things working (no problem with 1809; I'm learning new staff)... Thank you for all the views, likes, and interactions in the comments. Stay tuned.
-- Noboru
† [Additional remark 21 Jan 2019]
A couple of people reported in the comments that they did not have to pay Google US$ 35 equivalent like I needed to. Happy for those lucky ones 🙂 Or perhaps Google did something to increase their base computing capacity for their free trial. Either way, you might not need to pay.
Part II is also available 🙂
Introduction
This tutorial blog series is aimed at anyone who wants to play with an SAP S/4HANA on-premise system from your Windows PC at home.
What I am advocating is a Do-It-Yourself (DIY) approach for SAP S/4HANA. It probably required a heroic amount of learning and efforts to set up an SAP R/3 system at home 15 years ago. The time is different now. We can do it easily with the help of cloud infrastructure services like Google Cloud Platform and Amazon Web Services, and SAP Cloud Appliance Library.
Hopefully true to the DIY spirit, I will be able to show you the path I blazed through. Along the way and beyond, I hope you will have a lot of fun. I will cover the following items with step-by-step screen shots, sharing my learnings from my own trouble-shooting experiences.
What We Will Cover in This Blog Tutorial Series
Part I. Let’s Get Your Own SAP S/4HANA On-Premise System in the Cloud using CAL
- Dealing with Google Cloud Platform (GCP)
- Deploying S/4HANA 1709 Trial from CAL onto GCP
- Connecting to Your Own S/4HANA 1709 Instance
Part II. Let’s Play with Development Tools, SAP Demo Data, CDSs, oData Services, and Fiori Apps
- Playing with ABAP Development Tool (ADT)
- Setting up Java, Eclipse, and ADT Plug-in
- Connecting ADT to Your S/4HANA Instance via SMGW
- Generating SAP Demo Data
- Creating a Custom CDS View
- Publishing and Testing an oData Service
- Playing with Web IDE (desktop version)
- 7-zip, Unarchiving and Setting Up Web IDE
- Creating your own Fiori App Using a Template on Web IDE
Assumptions about You
- Yes, I assume you are familiar with basics of SAP ERP or SAP S/4HANA, like SAP GUI, some development transactions, etc.
- No, you do not need to have an army of consultants and friends with SAP Basis skills to help you; I assume you are doing this at home after work, or on a quiet weekend, by yourself
- No, you do not need to get a budget approved by senior management to have a server and SAP license; I assume you are doing it by yourself, for yourself, with a hobbyist budget – that is, not much money
- No, you do not need to spend long hours to muster all the necessary documentation scattered through the internet universe; I assume you want to benefit from experience of someone else – like me – to ease the burden of the journey
What you need to have
Windows
I will focus on the operating system (OS) most of us in the corporate environment is familiar with: Windows.
Here are the computer environment that you need to have for this tutorial:
- Windows 7, 8 or 10
- SAP GUI for Windows 7.40
I used Windows 10, 64-bit version. I also happen to have SAP GUI for Windows already installed on my laptop PC (it's my work PC). If you do not have access to SAP GUI, unfortunately, I do not know how you might be able to legitimately obtain SAP GUI outside SAP support website (Comments, anyone?). The page leads you to SAP launchpad's Software Download area. Downloading software from this place requires you to have an authorisation.
You can still use SAP Fiori apps, as they require only a browser to use.
ADT, even if it is a plug-in for Eclipse, requires SAP GUI installed on your computer.
Java? (Optional)
Yes. Java. It is optional. We need it for ABAP Development Tool (ADT), as it is a plug-in for Eclipse. Eclipse is an integrated development environment (IDE) written (mostly) in Java. Windows normally does not come with a Java environment, so you will need to get an installer execution file and install a runtime by yourself. We will see this step-by-step in the section for ADT later in Part II.
Credit Card and 35 USD equivalent for GCP
† [Additional remark 21 Jan 2019]
A couple of people reported in the comments that they did not have to pay US$ 35 equivalent. Happy for those lucky ones 🙂 Or perhaps Google did something to increase their base computing capacity for their free trial. Either way, you might not need to pay.
Yes, it is true that GCP has a free 12-month trial. Unfortunately, however the computer resource provided for a free trial is not enough as we will be running an enterprise software on it. You will be upgrading the account and then to increase the computer resource allocation (GCP calls it quota). In order to do so, GCP needs you to prove that you are “serious” about it; as a proof, you need to pay $US 35 or equivalent in your currency via credit card. You will see a step-by-step how-to later. I did this in Germany; you may have other conditions depending on your geography – perhaps you could share your experience in the comment below.
Anything else?
There are other small bits and pieces. We will cover them step-by-step when necessary.
Notes
- I used Google Chrome as my browser
- For screen shots, the browser screen size is set to 1024x768
- Screen shots are taken between 26 April and 10 May, 2018
- SAP CAL offers a 30-day free trial. After this, there is an option to extend the trial under some conditions. I am not sure what you could do to retain your system after this
- The official documentation for ADT mentions a DLL VS2010 as one of the prerequisites. I did not have to do anything extra. It is possible that my Windows PC already had it; I could not tell
Part I: Let’s Get Your Own S/4HANA 1709 Instance
In this part, you will deploy your own instance of SAP S/4HANA 1709, fully configured, ready for you to play with. It can be all done from your home PC with the internet. We will be covering the following steps:
- Do all the set up in Google Cloud Platform (GCP) to host your instance of S/4HANA 1709
- Activate your trial instance of S/4HANA 1709 in SAP Cloud Appliance Library (CAL)
- Connect to your S/4HANA Instance with SAP GUI and Fiori Launchpad
Time You Need Spend
- About 60 minutes of your time actively facing and typing in your computer
- About 90 minutes to wait for your S/4HANA instance to be ready (automatically)
- Up to 48 hours of waiting; this is specific to Google Cloud Platform. You will need to wait up to 48 hours for Google staff to increase quota (i.e. more CPUs -- details later). In my case, it was done overnight (so in the matter of… 12 hours or so)
Step 0. What’s SAP Cloud Appliance Library (CAL)?
For me as a consumer of CAL, it is a catalog of SAP systems you can deploy onto a cloud infrastructure. With CAL:
- You can put up an on-premise instance of S/4HANA in a matter of 60 minutes. You do not need to deal with command prompt or any other “SAP Basis” activities; it is all done in your browser.
- You do not need to have a server lying around in your garage to install your SAP S/4HANA system; your instance is hosted in an infrastructure on the Cloud like Google Cloud Platform (GCP) or Amazon Web Services (AWS).
- It is also friendly to your wallet; CAL offers 30-day free trial, which we will gracefully accept and use for this tutorial.
There is a good blog from joerg.wolfa colleague of mine at SAP that explains general information on CAL for S/4HANA 1709: https://blogs.sap.com/2017/12/14/sap-s4hana-1709-fully-activated-appliance-create-your-sap-s4hana-17....
In my blog tutorial, I have chosen GCP just because I never used it before to host a system. I have used it only for some small tutorials. It is exciting to try something new, isn’t it? You can choose AWS, of course. Perhaps you could share your experience in the comments below, or write your own blog about it.
So let’s get started!
From my own experience, it is smoother to start with GCP. You will see why later.
Step 1. Let’s Set Up Google Cloud Platform
1.1. Create a Project in GCP
Go to GCP console: https://console.cloud.google.com/.
There is a landing page for GCP but you will be doing actual set up in the console.
I have a Google account. If you don’t, you will need to create one for yourself.
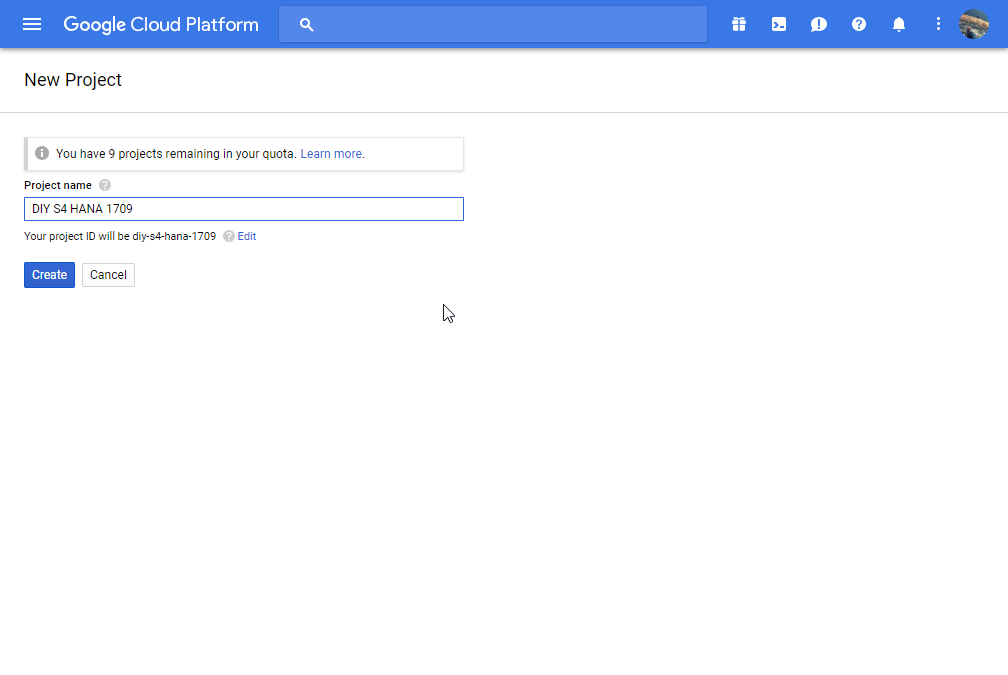
Here is the console. I already have a couple of projects from my past. Clicking on where the arrow is pointing gives you a pop-up menu like this below. Create a new project for your S/4HANA system.
It will take 30 seconds or so for your new project to be active.
1.2. Create a Service Account for Your Project
Go to the dashboard for your project.
You will need to create a service account within your project. I will let Google explain what it is.
The service account requires the following roles to host your S/4HANA instance:
- Compute Instance Admin (v1),
- Compute Network Admin
- Compute Security Admin
Note: I could not see these roles in the drop-down menu on the day I created this project. I tried next day, and I could see them. I am not sure what the difference is; perhaps the project needs a little bit of time to fully activate?
Make sure that you keep the default selection of JSON for Key type. You will need the JSON file in CAL later.
When you create a new service account, you will get a JSON file (a private key for the account). You will upload it to SAP CAL later to establish connection between CAL and GCP (next section).
1.3. Enable Google Cloud Resource Manager API
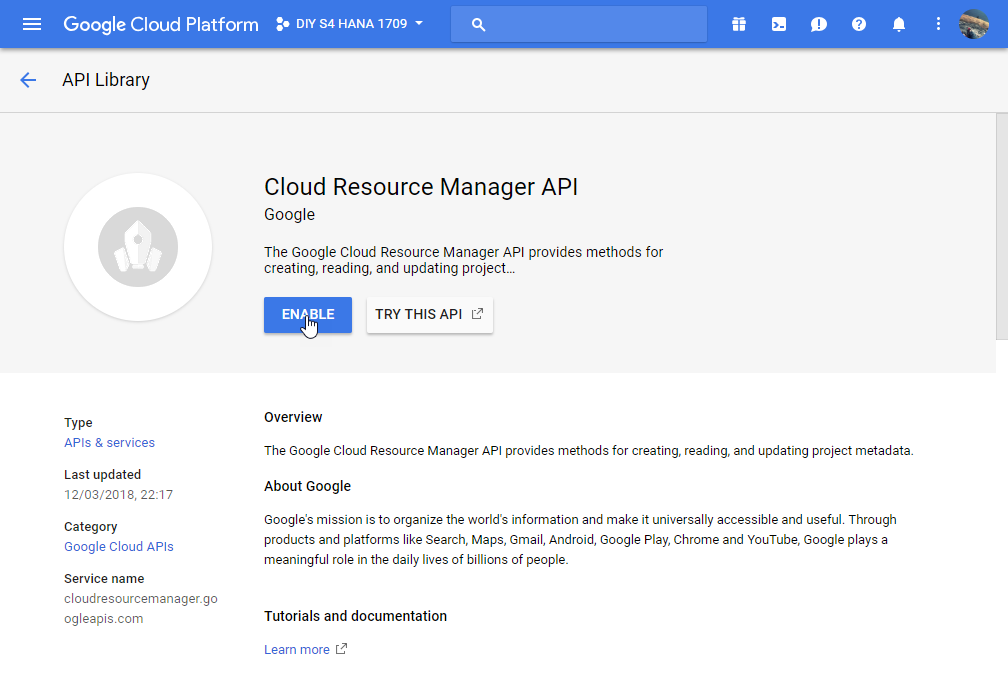
This step tripped me when I was creating my own S/4HANA instance. If you do not do this step, you will get an error message when you try to upload the JSON file in CAL.
Enable Cloud Resource Manager API by pressing the “Enable” button.
1.4. Enable Compute Engine API
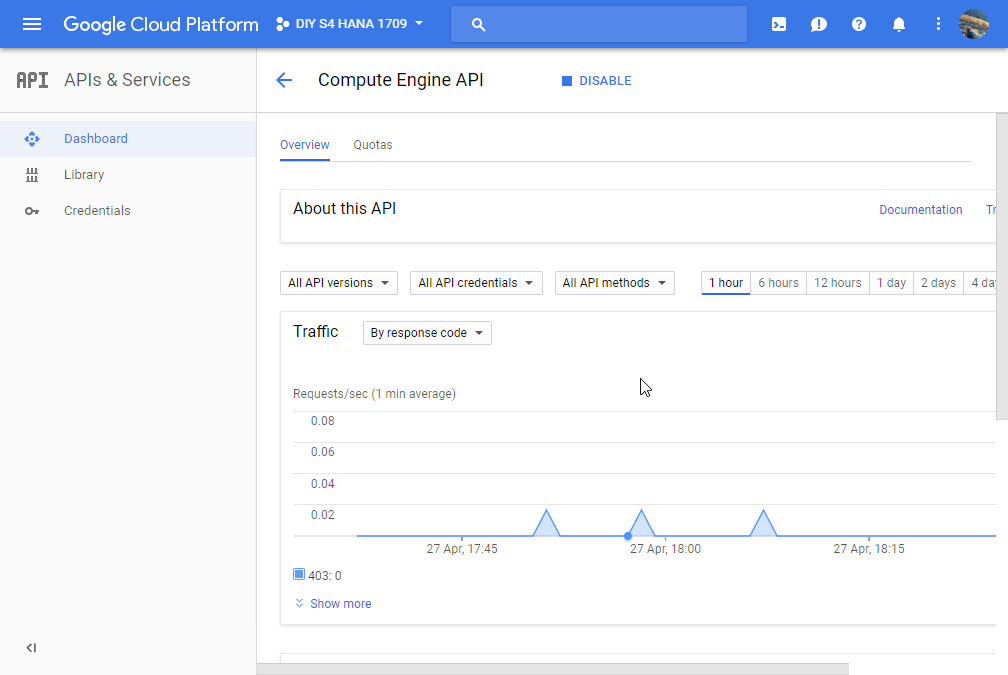
You also need to enable the Compute Engine API.
For this API, it looks like you will need to be a little more serious about using GCP. Breathe, and commit to enabling billing.
If you do this for the first time like I did, Google gives you free credit of USD 300; or at least that’s what I got (in Germany, around April / May 2018).
Activation takes 30 seconds or so with the waiting animation, and then you will see this.
1.5. Upgrade to Paid Account, Pay 35 USD or equivalent, and Increase Quota for “CPUS” and “SSD_TOTAL_GB”
At the moment, you are using a free GDP account. In order to host your SAP S/4HANA 1709 instance, you will need to commit to GCP a bit more. Essentially, you need to do these things:
- Upgrade to a paid account
- Increase the quota for SSD_TOTAL_GB
- Pay Google 35 USD or equivalent in your currency
- Request increase quota for CPUS
Can you stay with a free GCP account? Unfortunately, the answer is no. I could not activate my S/4HANA instance correctly. With the APIs enabled, you can establish connection between GCP and CAL. The problem is the free GCP account does not give you enough computing resources; in our case, CPUs and SSD storage.
With these measures, you will get the error message like above when you try activating your S/4HANA instance in CAL. The explanation of “Quota ‘CPUS’”and “Quota ‘SSD_TOTAL_GB’” is listed in this GCD documentation (the link is also provided in FAQ in CAL documentation for GCP).
I have already blazed through this path myself. You can follow me in my footsteps below.
Here is how you upgrade to a paid account.
After the upgrade, SSD message can be resolved.
You can see that the error message is now reduced to only ‘CPUS’, but you cannot still activate your S/4HANA instance yet.
In order to increase your quota for CPUS, you need to go through GCP’s process. You start with requesting this like this.
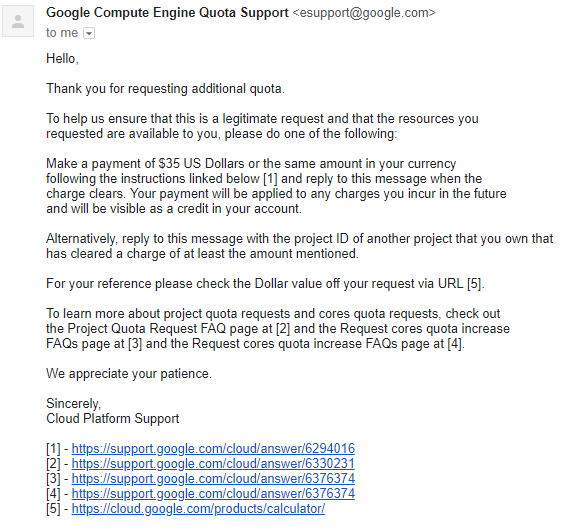
You will see a message saying that you may need to wait for 24—48 hours. Instead, in my case, I almost immediately got an email from Google Compute Engine Quota Support, requesting to make a payment of 35 USD or equivalent in my currency.
Here is how you do this…
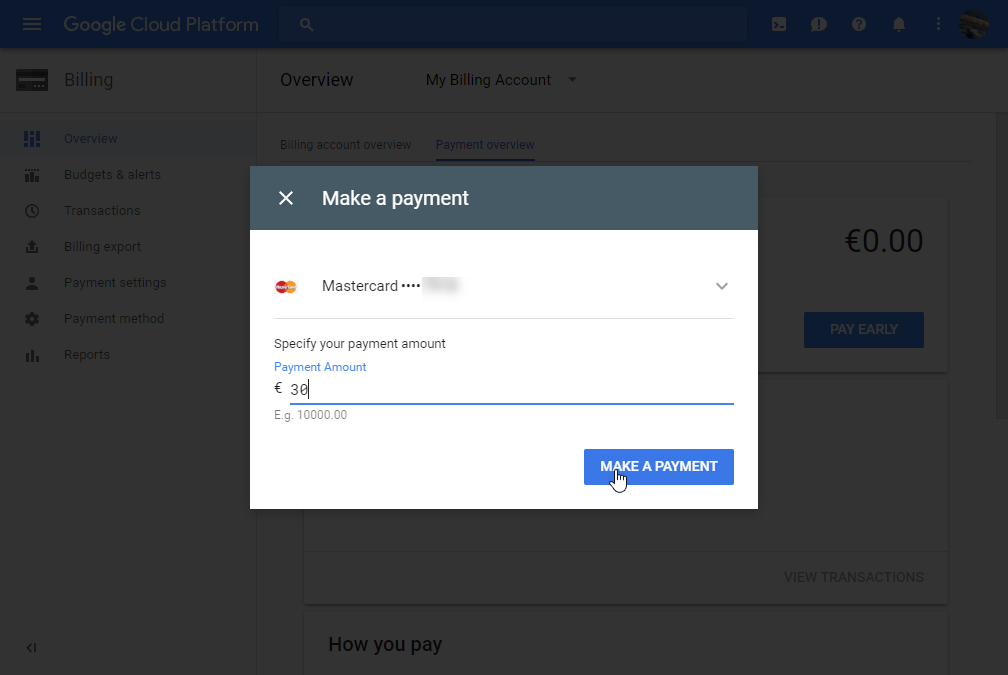
I googled how much is 35 USD in Euro (currency in Germany where I did this). According to Google, 35 USD on the day was about 30 Euro.
As soon as I have confirmed that it is shown in the Console as "credit" (in my case, almost immediately, not 24 hours), I replied to the email. Yes, it was a manual process to write an email and send it back.
This reply from GCP Support came back within perhaps 12-20 hours or so, I think. I sent the email back to them in the evening before I went to bed. I worked next day, and checked my email after I came back home from work to find the reply.
Now it’s all set to get your S/4HANA up and running on GCP from CAL.
Step 2. Let’s Set Up SAP Cloud Appliance Library (CAL)
Go to CAL at https://cal.sap.com/. Clicking on Get Start will take you to a catalog of solutions (I would say “virtual machines”) available.
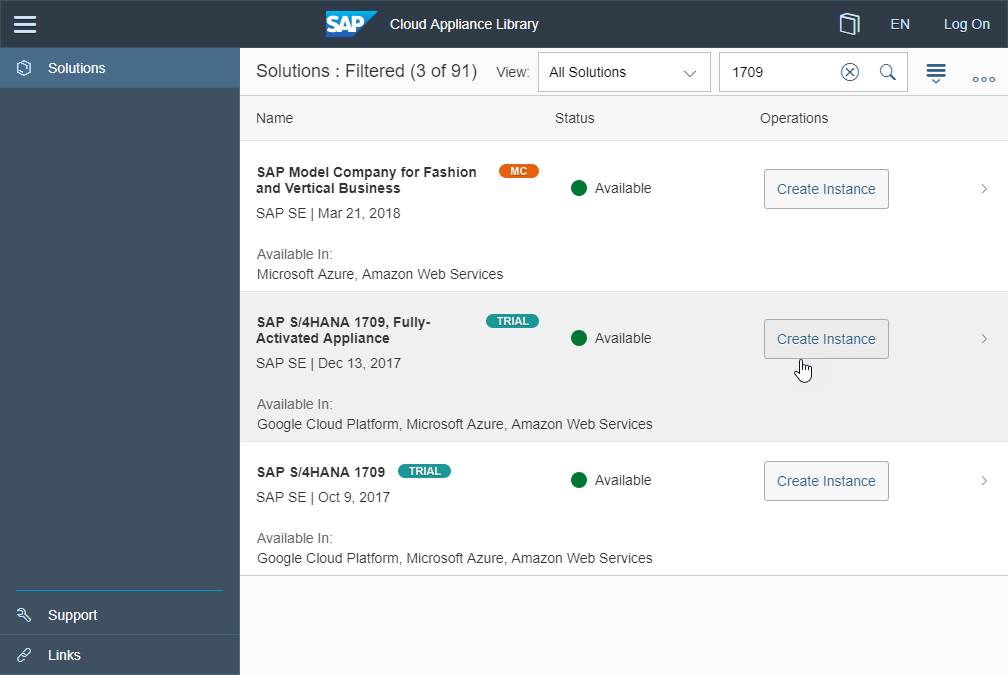
There are many different solutions. Filter by “1709” like in the screen shot to find “SAP S/4HANA 1709, Fully-Activated Appliance”. You then create your own instance by clicking on Create Instance button. If you have not logged on to SAP CAL, then it will prompt you to log on with the screen like in the next screen shot.
Note: at the time of writing this after the screen shot was taken, a fully-activated appliance for 1709 FSP01 is available from 13th of May, 2018. You might like to choose to use this newer solution; the rest of the tutorial should still be applicable. The rest of the tutorial is based on 1709 available from December 13th 2017 as in the screen shot.
If you do not have an SAP ID, do not worry. You can register yourself here; it is a quick process of filling in a simple form. If you have an SAP ID, log on.
You will also get a terms & conditions around here. If you accept it, then you will be in a screen where you maintain account details.
If you are following this tutorial, I do not believe you need to read these details. In case you want to, here are some GCP specific information you can navigate to from this tip bubble: https://wiki.scn.sap.com/wiki/x/Exp7H and https://cloud.google.com/compute/quotas.
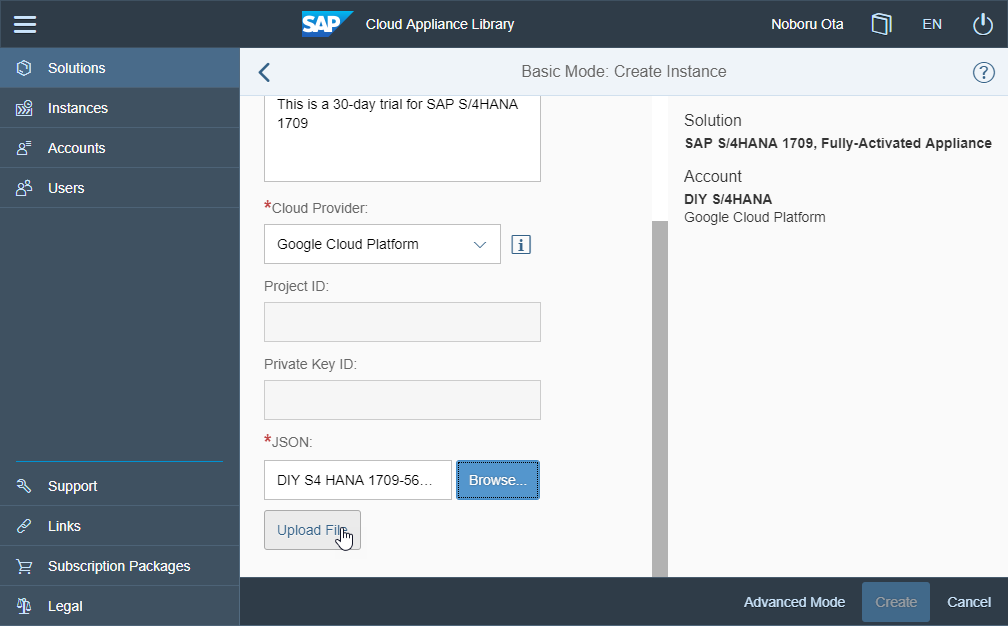
Remember the JSON file (the service account’s key) you downloaded when creating a GCP service account in the previous section? You upload it here.
For Region and Zone, I just kept the default ones automatically populated for me.
I stored the private key, provided password and downloaded a .pem file here.
For the first time, you do need to wait for about 90 minutes.
If you have done all the pre-work in GCP described in previous step, you should have no problem activating your S/4HANA instance.
Congratulations! Now you have your own SAP S/4HANA 1709 in the Cloud.
Step 3a. Let’s Connect to Your Instance of SAP S/4HANA 1709 via SAP GUI
Once you have successfully activated your instance of SAP S/4HANA 1709, you can easily connect to it. There is documentation with a good detail, including settings for Fiori, and pre-defined users with passwords, etc. (Getting Started Guide).
But Let’s just connect to it via good ol’ SAP GUI, shall we?
If you have SAP GUI installed in your PC, you should get this pop up. Allow the connection.
For pre-defined users and password, refer to the “Getting Started Guide” – you see the link on top of this pop-up window.
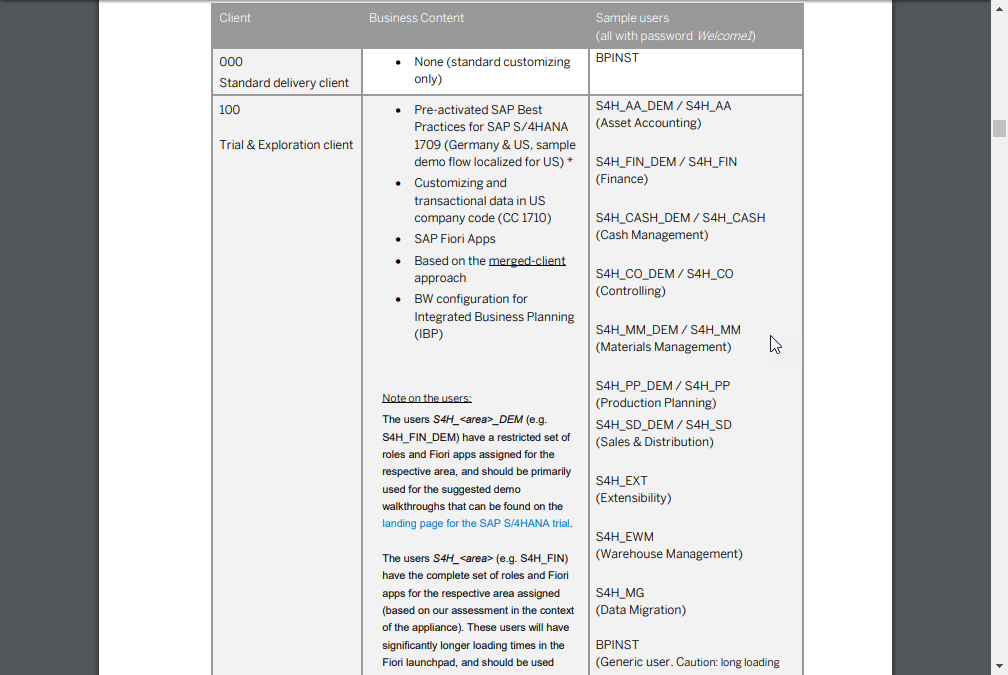
For example, you can use S4H_MM. All the pre-defied users have a common password, “Welcome1”.
Logged on as S4H_MM.
It is truly your system. You can even create a super user with SAP_ALL and SAP_NEW profiles (!).
Step 3b. Let’s Test Fiori Launchpad from Home
To access the SAP Fiori Launchpad using your browser in your home PC, you need to do a little more. Getting Started Guide has a section dedicated to this as below. Let’s unpack it.
IP Addresses
In your CAL Console, navigate to the detail of your instance. It lists all the IP addresses to add to your "hosts" file. You need the following three IP addresses for your hosts file.
Tick the Public Static IP Addresses check box and save. If you do not do this, every time you suspend and activate your instance, the IP addresses will be different – you would then need to edit your hosts file in your PC each time.
Edit hosts file in your PC
Make sure to run the text editor as administrator (in my case, I use Notepad, as instructed by the Guide). Otherwise, you will not be able to save the file. I will assume you know what you are doing if you are using some fancy text editor.
If you run as administrator, you will probably get this confirmation box. Say yes.
The location of the file should be:
C:\Windows\System32\drivers\etc
If you see nothing in the folder, then make sure to change the selection to include all the files, not just *.txt files (this is the default).
Note that your Console lists a pair of IP addresses for each machine, internal IP and external IP. Make sure to use the external ones. In my case, all the external ones start with 35, internal ones 10.
Make sure you save the file.
Finally, SAP Fiori Launchpad!
I assume that this is DIY with your PC at home, so probably you do not need to do anything with the proxy related settings for your browser. I did not have to do anything.
If you encounter some issues related to internet connection, it may be worth looking at the Guide; there is a section that mentions some changes you might need to do to your browser settings, especially when you are using a web proxy and for Internet Explorer.
If you have edited your hosts file correctly, this URL should get you to your SAP Fiori Launchpad. The entry in your hosts file map this domain name to the IP address of your SAP S/4HANA system.
https://vhcals4hci.dummy.nodomain:44301/sap/bc/ui5_ui5/ui2/ushell/shells/abap/FioriLaunchpad.html
Congratulations! Now you have set up your own SAP S/4HANA instance on GCP, and can access it via SAP GUI and the SAP Fiori Launchpad.
Next Part of the Blog Tutorial Series
Part II of this tutorial blog will build on this, and walk you through a process of developing a simple Fiori app with using a ABAP Development Tool (ADT) and Web IDE (desktop version). We will also cover how to get these development tools and set them up.
Related Blog
- SAP Managed Tags:
- ABAP Development,
- SAPUI5,
- SAP Cloud Appliance Library,
- SAP S/4HANA,
- SAP Web IDE
Labels:
107 Comments
- « Previous
-
- 1
- 2
- 3
- Next »
You must be a registered user to add a comment. If you've already registered, sign in. Otherwise, register and sign in.
Labels in this area
-
Artificial Intelligence (AI)
1 -
Business Trends
363 -
Business Trends
28 -
Customer COE Basics and Fundamentals
1 -
Digital Transformation with Cloud ERP (DT)
1 -
Event Information
461 -
Event Information
26 -
Expert Insights
114 -
Expert Insights
171 -
General
1 -
Governance and Organization
1 -
Introduction
1 -
Life at SAP
415 -
Life at SAP
2 -
Product Updates
4,683 -
Product Updates
247 -
Roadmap and Strategy
1 -
Technology Updates
1,501 -
Technology Updates
91
Related Content
- SAP S/4HANA Cloud Public Edition 财务-成本会计常见热点问题汇总FAQ in Enterprise Resource Planning Blogs by SAP
- SAP Public Cloud Migration Cockpit Query for Transactional Data migration in Enterprise Resource Planning Q&A
- 4 big waves for API led strategies and SAP BTP Integration Suite explosive growth in Enterprise Resource Planning Blogs by Members
- Deep Dive - SAP Payroll Lösungen für die Schweiz in Enterprise Resource Planning Blogs by SAP
- Custom Analytical Query - "Not able to delete the query." in Enterprise Resource Planning Q&A
Top kudoed authors
| User | Count |
|---|---|
| 31 | |
| 6 | |
| 5 | |
| 5 | |
| 5 | |
| 4 | |
| 4 | |
| 3 | |
| 3 | |
| 3 |