
- SAP Community
- Products and Technology
- Technology
- Technology Blogs by SAP
- SAP Web IDE Presents: The Storyboard
Technology Blogs by SAP
Learn how to extend and personalize SAP applications. Follow the SAP technology blog for insights into SAP BTP, ABAP, SAP Analytics Cloud, SAP HANA, and more.
Turn on suggestions
Auto-suggest helps you quickly narrow down your search results by suggesting possible matches as you type.
Showing results for
michal_keidar
Active Contributor
Options
- Subscribe to RSS Feed
- Mark as New
- Mark as Read
- Bookmark
- Subscribe
- Printer Friendly Page
- Report Inappropriate Content
07-10-2018
12:22 PM
One of SAP Web IDE Full-Stack's nicest and most powerful features is the Storyboard perspective.
The Storyboard provides a visual representation of the application's UI including its pages (views), navigations, and the services and entities that it uses. And it can be used to build some parts of your app with no code 🙂

Let's take a simple use-case to see the Storyboard in action.
We will create an application based on the SAP Fiori Worklist template, where in its first view we'll present a list of SalesOrders, and from each row in the list we will navigate to a view presenting the SalesOrderItems.
In SAP Web IDE Full-Stack:
Optional: You can run the app at this point to see what it looks like (when prompted to select the file to run, select the index.html).
Select your Sales Orders project and open the Storyboard perspective from the left sidebar.

You can immediately see the visual representation of your app. You can expand the Entity Sets and see the SalesOrdersSet.
Let's start by adding a new view to our app. On the top left corner, click New View.

Enter a name for the new view, e.g. SalesOrderItems, click Next and then Finish.
You can see the new view was added in the Storyboard.
Reminder: We would like to present a list of SalesOrders where each row in the list will navigate to a view presenting the SalesOrderItems.


The current Type of the StandardListItem is configured as Navigation, but we don't want to navigate using this list, so change it to Inactive in the Properties Pane (scroll down a bit).
Optional: Bind the page's title to a string from the i18n.properties file:


The new view should look like this:
Now that we finished modeling our new view, we need to "connect" it to the app, i.e. make it part of the flow.
We want to configure a navigation from the Worklist.view.xml to our new view.
For this we need to return to the Storyboard 🙂
On the upper-right corner, click on the Storyboard tab.

You can see that the new view now has a new Entity Set:

Let's configure the navigation in just a few clicks:
Hover over the Worklist.view.xml and click on the Arrow button.

In the Configure Navigation dialog:
Click on Configure Navigation to close the dialog.

Notice how the Storyboard now presents the new navigation.
You can configure navigations also from the Layout Editor:
Open the Worklist.view.xml view in the Layout Editor.
Select the Standard List Item control and click on the Events tab in the property editor panel.
Search for the relevant event (In our case it is the Press event), click on the icon next to it and select Navigate To from the menu.

In the Configure Navigation dialog:

Next,
Since the Object.view.xml isn't used anymore, we can delete it.
Hover over it and click the Delete button (and confirm when prompted).

The Storyboard adjusts itself and now the flow is clearer:

Choose to edit the new view again (remember the Pencil button?).
Make sure the Page control is selected.
Change the Show Nav Button property to True.
In the Storyboard, configure navigation from the new view to the Worklist.view.xml:
... and see the result!

In the storyboard, click the Run button (if prompted to select the file to run, select the index.html), and navigate through the app which we built in minutes, and with no code 🙂
The Storyboard provides a visual representation of the application's UI including its pages (views), navigations, and the services and entities that it uses. And it can be used to build some parts of your app with no code 🙂
Let's take a simple use-case to see the Storyboard in action.
We will create an application based on the SAP Fiori Worklist template, where in its first view we'll present a list of SalesOrders, and from each row in the list we will navigate to a view presenting the SalesOrderItems.
Prerequisites
- Create a destination pointing to SAP Gateway Demo System (ES5)
- The Storyboard feature should be enabled in the Preferences perspective, on the Features tab.
Create a Sales Orders app based on the Fiori Worklist template
In SAP Web IDE Full-Stack:
- From the menu, select: File -> New -> Project from Template.
- Select the SAP Fiori Worklist Application template.
- Give the project a name, title, and namespace.
- Select the ES5 Gateway Demo System and the GWSAMPLE_BASIC service.
- Select App Type to be Standalone App.
- Select:
- Object Collection: SalesOrderSet
- Object Title: CustomerName
- Object Numeric Attribute: NetAmount
- Object Unit of Measure: CurrencyCode
- Click Finish.
Optional: You can run the app at this point to see what it looks like (when prompted to select the file to run, select the index.html).
Launch the Storyboard
Select your Sales Orders project and open the Storyboard perspective from the left sidebar.
You can immediately see the visual representation of your app. You can expand the Entity Sets and see the SalesOrdersSet.
Use the Storyboard
Add a New View
Let's start by adding a new view to our app. On the top left corner, click New View.
Enter a name for the new view, e.g. SalesOrderItems, click Next and then Finish.
You can see the new view was added in the Storyboard.
Build the New View
Reminder: We would like to present a list of SalesOrders where each row in the list will navigate to a view presenting the SalesOrderItems.
- Let's build our new view to present the SalesOrderItems. While in the Storyboard, hover over the new view and click on the Pencil button. This opens the view in the Layout Editor.
- On the left, search for a List, then drag-and-drop it into the canvas.
- Click on the list in the canvas in order to select the StandardListItem.
- On the right, in the Properties pane, click to select the Entity Set to which we will bind the StandardListItem.
- In the dialog that opens, select the third radio button and the /SalesOrderLineItemSet Entity Set.
- Click OK to close the dialog.
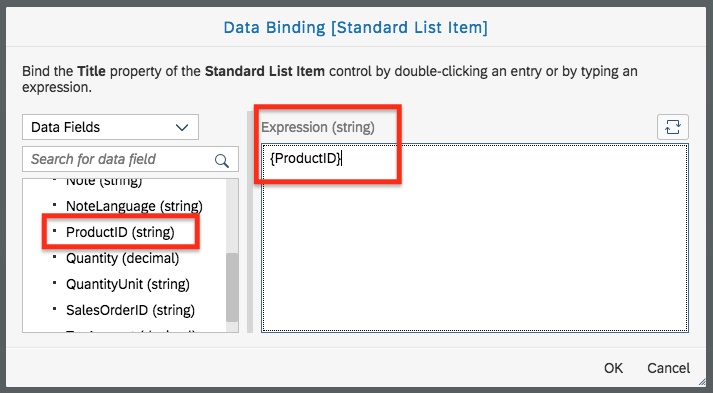
- Now let's bind the list's Title and Description to properties of the service:
- In the Properties Pane, click on the Binding button of the Title property.
- Delete the "List Item 1" string and double-click on the ProductID property.
Click OK.
- In the same manner, bind the Description property to 2 properties: Quantity and QuantityUnit. Click OK.
The current Type of the StandardListItem is configured as Navigation, but we don't want to navigate using this list, so change it to Inactive in the Properties Pane (scroll down a bit).
Optional: Bind the page's title to a string from the i18n.properties file:
- Select the Page control.
This can be done via the canvas or via the Outline tab on the left (select the sap.m.Page control). Verify that the Page is indeed selected by seeing "Page" in the Properties Pane. - Click on the Binding button of the Title property.
- In the dropdown on the left, select i18n.
- Click on the + button to add a new string to the i18n.properties file.
- Enter a String Key, Value and Type. Click OK.
- Delete the "Title" string from the Expression text area, and double-click on the new i18n string you just added. It is added to the Expression text area.
Click OK.
The new view should look like this:
Configure Navigation
Now that we finished modeling our new view, we need to "connect" it to the app, i.e. make it part of the flow.
We want to configure a navigation from the Worklist.view.xml to our new view.
For this we need to return to the Storyboard 🙂
On the upper-right corner, click on the Storyboard tab.
You can see that the new view now has a new Entity Set:
Let's configure the navigation in just a few clicks:
Hover over the Worklist.view.xml and click on the Arrow button.
In the Configure Navigation dialog:
- Select the ColumnListItem as the Control from which the navigation will happen.
- The Event is press
- Choose to Navigate To the new view.
- Check the Propagate context binding checkbox to propagate the SalesOrder entity.
Click on Configure Navigation to close the dialog.
Notice how the Storyboard now presents the new navigation.
You can configure navigations also from the Layout Editor:
Open the Worklist.view.xml view in the Layout Editor.
Select the Standard List Item control and click on the Events tab in the property editor panel.
Search for the relevant event (In our case it is the Press event), click on the icon next to it and select Navigate To from the menu.
In the Configure Navigation dialog:
- Select Propagate current context from the Data Binding options.
- Select the SalesOrderItems view from the View options.
Next,
Since the Object.view.xml isn't used anymore, we can delete it.
Hover over it and click the Delete button (and confirm when prompted).
The Storyboard adjusts itself and now the flow is clearer:
Optional: Configure Back Navigation
Choose to edit the new view again (remember the Pencil button?).
Make sure the Page control is selected.
Change the Show Nav Button property to True.
In the Storyboard, configure navigation from the new view to the Worklist.view.xml:
- Control: Page
- Event: navButtonPress
- Navigate To: Worklist
Run the App
... and see the result!
In the storyboard, click the Run button (if prompted to select the file to run, select the index.html), and navigate through the app which we built in minutes, and with no code 🙂
- SAP Managed Tags:
- SAP Business Application Studio,
- SAP Web IDE
Labels:
9 Comments
You must be a registered user to add a comment. If you've already registered, sign in. Otherwise, register and sign in.
Labels in this area
-
ABAP CDS Views - CDC (Change Data Capture)
2 -
AI
1 -
Analyze Workload Data
1 -
BTP
1 -
Business and IT Integration
2 -
Business application stu
1 -
Business Technology Platform
1 -
Business Trends
1,658 -
Business Trends
91 -
CAP
1 -
cf
1 -
Cloud Foundry
1 -
Confluent
1 -
Customer COE Basics and Fundamentals
1 -
Customer COE Latest and Greatest
3 -
Customer Data Browser app
1 -
Data Analysis Tool
1 -
data migration
1 -
data transfer
1 -
Datasphere
2 -
Event Information
1,400 -
Event Information
66 -
Expert
1 -
Expert Insights
177 -
Expert Insights
293 -
General
1 -
Google cloud
1 -
Google Next'24
1 -
Kafka
1 -
Life at SAP
780 -
Life at SAP
12 -
Migrate your Data App
1 -
MTA
1 -
Network Performance Analysis
1 -
NodeJS
1 -
PDF
1 -
POC
1 -
Product Updates
4,577 -
Product Updates
340 -
Replication Flow
1 -
RisewithSAP
1 -
SAP BTP
1 -
SAP BTP Cloud Foundry
1 -
SAP Cloud ALM
1 -
SAP Cloud Application Programming Model
1 -
SAP Datasphere
2 -
SAP S4HANA Cloud
1 -
SAP S4HANA Migration Cockpit
1 -
Technology Updates
6,873 -
Technology Updates
416 -
Workload Fluctuations
1
Related Content
- Streamlining Time Sheet Approvals in SuccessFactors: Time Sheet Approval Center in Technology Blogs by Members
- 10+ ways to reshape your SAP landscape with SAP BTP - Blog 4 Interview in Technology Blogs by SAP
- Consuming SAP with SAP Build Apps - Connectivity options for low-code development - part 2 in Technology Blogs by SAP
- Unlocking Full-Stack Potential using SAP build code - Part 1 in Technology Blogs by Members
- Single Sign On to SAP Cloud Integration (CPI runtime) from an external Identity Provider in Technology Blogs by SAP
Top kudoed authors
| User | Count |
|---|---|
| 31 | |
| 24 | |
| 8 | |
| 7 | |
| 7 | |
| 6 | |
| 6 | |
| 5 | |
| 5 | |
| 4 |