
- SAP Community
- Products and Technology
- Technology
- Technology Blogs by SAP
- Virtual Machine for Developers - Part 2
Technology Blogs by SAP
Learn how to extend and personalize SAP applications. Follow the SAP technology blog for insights into SAP BTP, ABAP, SAP Analytics Cloud, SAP HANA, and more.
Turn on suggestions
Auto-suggest helps you quickly narrow down your search results by suggesting possible matches as you type.
Showing results for
former_member23
Explorer
Options
- Subscribe to RSS Feed
- Mark as New
- Mark as Read
- Bookmark
- Subscribe
- Printer Friendly Page
- Report Inappropriate Content
07-05-2018
5:51 AM
This is the second part of my blog series to setup a virtual machine as a developer work space. The first part is about the setup of the virtual machine itself and the installation of the operation system.
In this part we are now adding the following tools to our "toolbox":
There are some more recommended configuration steps for git. These are use specific and as this virtual machine should be our template we will not configure git now. A good idea would be to provide some “getting started” documentation with those topics when you want to share your virtual machine.
For more information about how to install git you can check the following reference: https://wiki.ubuntuusers.de/Git/
Before you start to install Eclipse check if you want to install the SAP Development Tools for Eclipse. If so, you should check if these are provided for your Eclipse version and adjust the Eclipse version accordingly. During this blog writing Eclipse provides the new “Photon” build, but there is no related Version of the SAP Development Tools available. To ensure compatibility I decided to use Oxygen in this blog.
Again on https://tools.hana.ondemand.com/#cloud you can find the CLI (Command Line Interface) for Cloud Foundry and for example an SAP Cloud Platform Neo Environment SDK. In my environment I want to have both of them available. Depending on your usecases you have to decide which of these tools you want to install. You can also decide with of the SDK and versions you want to provide or you can let it open so that the developer will install in the required version later.
As there is already a lot of documentation and help available on how to install this tools and here are a lot of different option available I’ll not create a step by step documentation here and recommend to use the available documentation.
A very basic concept is the project specific markdown file in the root folder of the git projects, something like a readme file. If you don’t know what markdown is a good starting point is:
https://guides.github.com/features/mastering-markdown/
While you can modify the markdown files quite easy with any text editor I like the WYSIWYG tool Remarkable very much. Be careful if you try to install it directly with the Linux package manager. The only "remarkable" application I found so far was a tool for an ebook reader with the same name.
In the current version of Linux Mint the Mozilla Firefox Browser is installed per default. You can argument about which browser you want to use for development but regarding to the fact that in some cases it's required to test with the most common browsers you won't have only one browser.
But there are no Linux versions of Microsoft Edge or Apple's Safari availiable today. To close this gap you should have a closer look at tools like browserstack.
Lucky Google Chrome is availiabe for Linux and this is my prefered browser for development (especially SAP UI5):
Postman is good tool to test your REST APIs.
I have seen a lot of SAP UI5 developers that are using Visual Studio Code. There are also some plugins for Angular developers. Even if the SAP WebIDE is a great tool that should be used, I won't miss to mention Visual Studio Code and provide the installation steps.
That's it. I'm not sure if you followed the installation instruction but to wrap this short blog series up, I think it's a good way to provide a toolbox for developers among your project teams to really shorten the preparation and on-boarding phase in your software development projects. With the selection of operating system and tools I just want to provide some examples. I know that there a so many great and helpful tools out there and each developer has some different favorites.
I hope you like this blog and maybe you are now the one who starts with the creation of the developer toolbox for your development team.
In this part we are now adding the following tools to our "toolbox":
- Java SDK
- GIT (Source Code Management)
- Maven or Gradle (Software Project Management)
- SAP Cloud SDK, CLI
- Eclipse (Java Development)
- Eclipse Plugins:
- JAutodoc
- EGit
- SAP Tools
- Visual Studio Code (Javascript and Angular Development)
- Remarkable (Markdown file editor)
- Chrome (Browser with great debugging features)
- Postman (Debugging and Testing of Rest API)
Step 1: Install Java
- Open a terminal window
- Enter command
sudo apt-get install openjdk-11-jdk
and if asked, provide your password.
- Check if the installation was successful by entering
java -version
or to check if you have the java compiler
javac -version

Step 2: Install Git
- Open a terminal window
- Enter command
sudo apt-get install git
and if asked, provide your password
- Accept the usage of additional disk space by hitting enter

- Check if the installation was successful by entering
git --version

.
There are some more recommended configuration steps for git. These are use specific and as this virtual machine should be our template we will not configure git now. A good idea would be to provide some “getting started” documentation with those topics when you want to share your virtual machine.
For more information about how to install git you can check the following reference: https://wiki.ubuntuusers.de/Git/
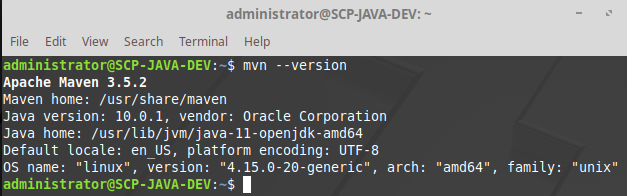
Step 3: Install Maven
- Open a terminal window
- Enter command
sudo apt-get install maven
and if asked, provide your password
- Accept the usage of additional disk space by hitting enter

- Check if the installation was successful by entering
mvn -version
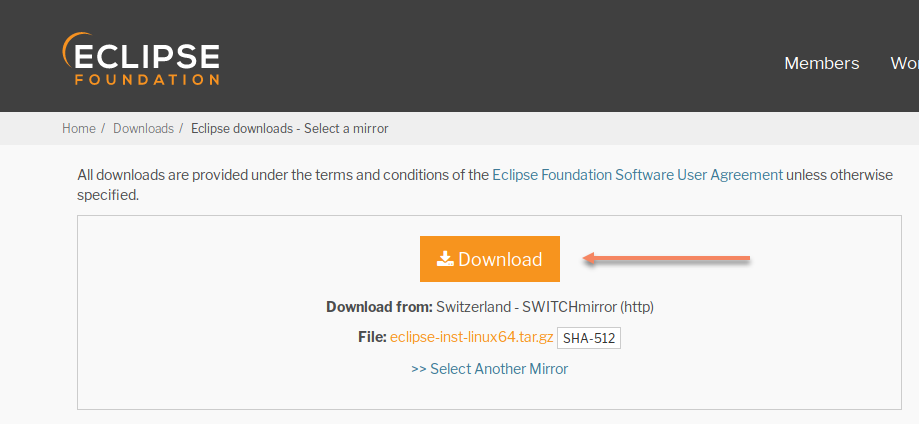
Step 4: Install Eclipse
Before you start to install Eclipse check if you want to install the SAP Development Tools for Eclipse. If so, you should check if these are provided for your Eclipse version and adjust the Eclipse version accordingly. During this blog writing Eclipse provides the new “Photon” build, but there is no related Version of the SAP Development Tools available. To ensure compatibility I decided to use Oxygen in this blog.
- Download the installer from http://www.eclipse.org/downloads/eclipse-packages/


- Extract the downloaded file (it’s just the installer, the this would not be the installation location)

- Go the the installer folder and double click on the file “eclipse-inst”

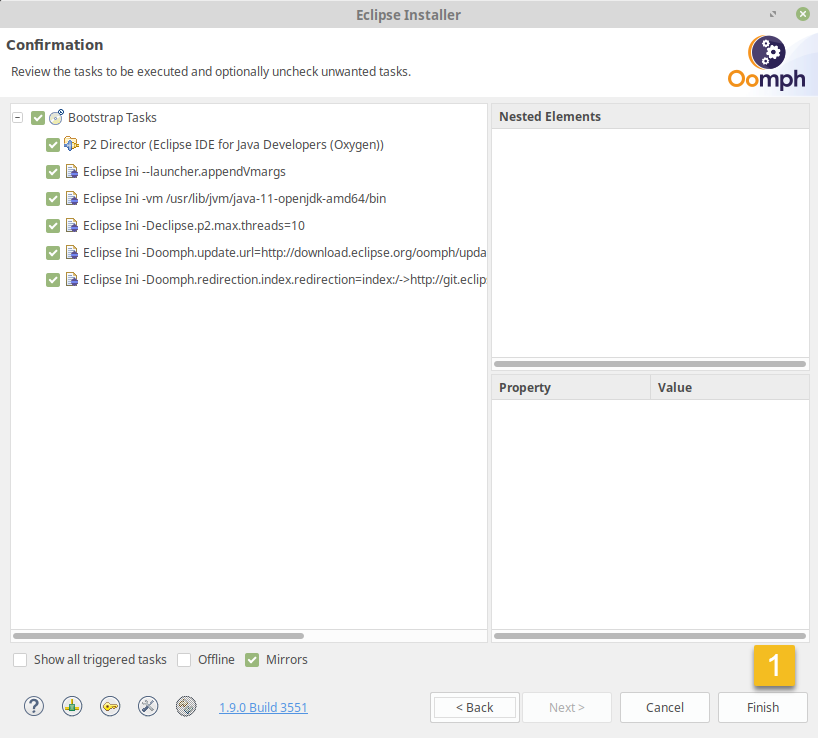
- If you are missing options related to your installation strategy you can switch to “advanced mode”. Double check if 32 bit or 64 bit and the right version is selected, adjust if necessary and click on “Next”.

- We will install the plugins later on, so just leave anything uncheck in the next screen and click on “Next”

- Adjust the installation location. At his point you may thing about a multi-user installation or things like that. As I want to keep this template as simple as possible I would not do any multi-user installation things and just go on with this “only one” user in the virtual machine. For later logins to e.g. GIT repositories and so on, the user can provide his personal credentials.

- Check the conclusion and if everything is fine, click on “Finish”
- Check the licence agreements and if you confirm, click on “Accept”

- Check the certificates and trust.

- Select your workspace directory

- After this step Eclipse should be started. You can close the installer and start with the plugin installation. E.g. for the installation of the SAP Development Tool follow the instructions of https://tools.hana.ondemand.com/
Step 5: Install SAP Cloud Tools
Again on https://tools.hana.ondemand.com/#cloud you can find the CLI (Command Line Interface) for Cloud Foundry and for example an SAP Cloud Platform Neo Environment SDK. In my environment I want to have both of them available. Depending on your usecases you have to decide which of these tools you want to install. You can also decide with of the SDK and versions you want to provide or you can let it open so that the developer will install in the required version later.
As there is already a lot of documentation and help available on how to install this tools and here are a lot of different option available I’ll not create a step by step documentation here and recommend to use the available documentation.
Step 6: Install Remarkable
A very basic concept is the project specific markdown file in the root folder of the git projects, something like a readme file. If you don’t know what markdown is a good starting point is:
https://guides.github.com/features/mastering-markdown/
While you can modify the markdown files quite easy with any text editor I like the WYSIWYG tool Remarkable very much. Be careful if you try to install it directly with the Linux package manager. The only "remarkable" application I found so far was a tool for an ebook reader with the same name.
- Download the deb package from the remarkable homepage. Be careful to click on the right download button and not the one from the ads.


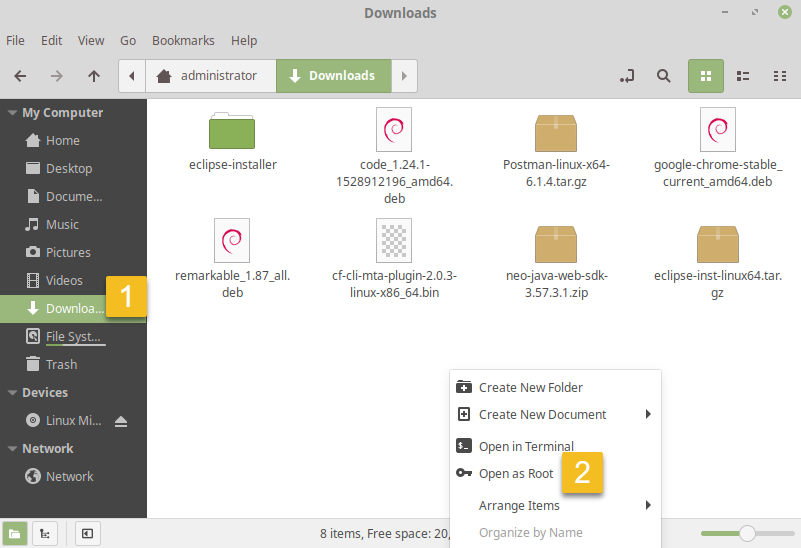
- Open the download folder as root (if the folder is open and you right click on the white area you can select it from context menu) and enter your password.

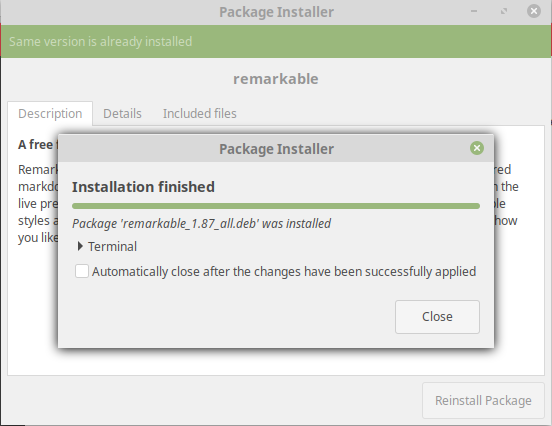
- In the context menu of the deb package file for remarkable click on "Open With GDebi Package Installer"

- In the package installer windows click on "Install Package"
 If the installer window is closing without any action you most probably missed to switch to root mode.
 - Close the installer window and the privileged explorer window

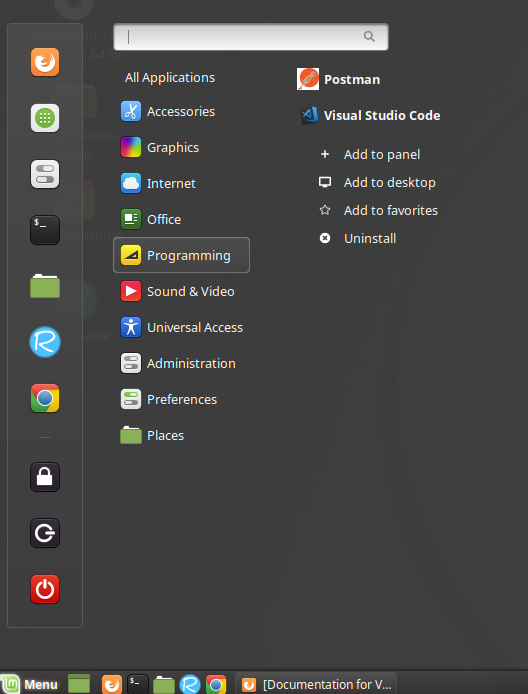
- You can open the Remarkable application from the Menu >> Accessories >> Remarkable. I recommend to right click on the application and e.g. add it to panel, desktop or favorites or all of them.

Step 10: Install Browsers (Chrome)
In the current version of Linux Mint the Mozilla Firefox Browser is installed per default. You can argument about which browser you want to use for development but regarding to the fact that in some cases it's required to test with the most common browsers you won't have only one browser.
But there are no Linux versions of Microsoft Edge or Apple's Safari availiable today. To close this gap you should have a closer look at tools like browserstack.
Lucky Google Chrome is availiabe for Linux and this is my prefered browser for development (especially SAP UI5):
- Download the deb package from https://www.google.com/chrome/

- Read the terms of usage and if you agree, click on "ACCEPT AND INSTALL"
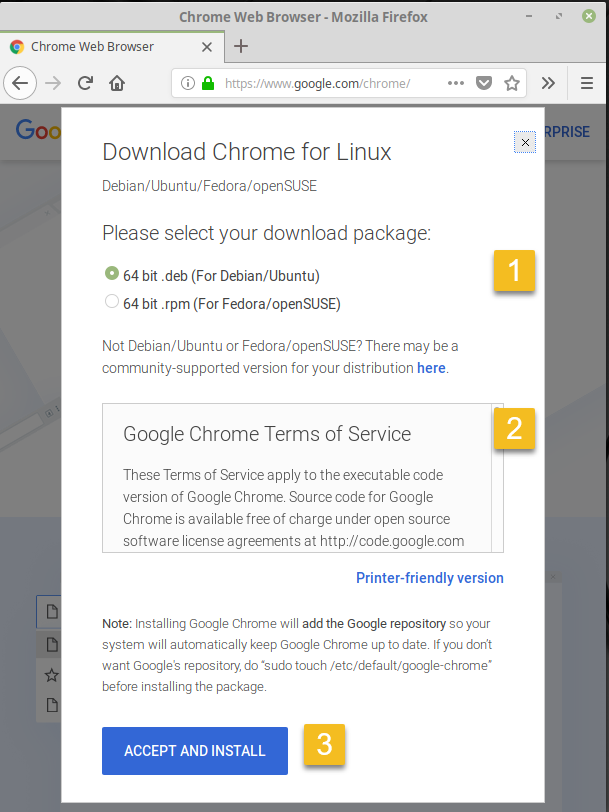
- In the upcoming download dialog ensure that you save the file as file and not open it directly. The installation will not work because it won't have root priviliges.

- Open your download folder and switch to root

- Select from context menu of the google chrome deb package
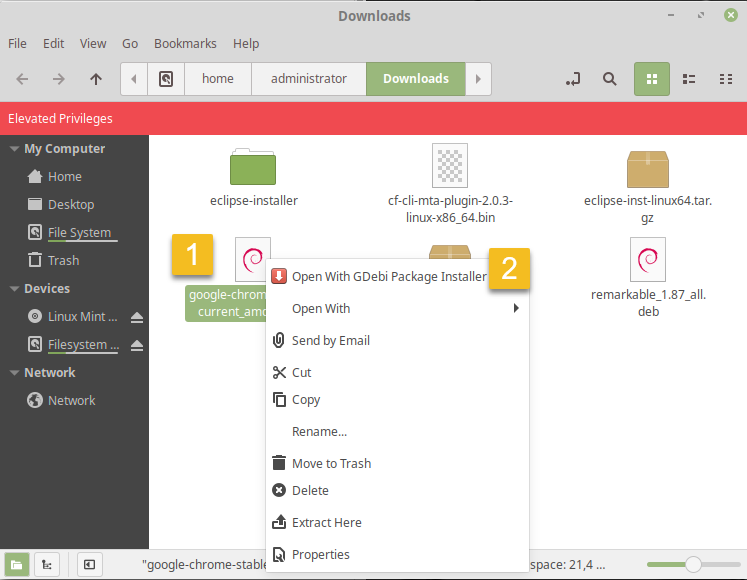
- Click on "Install Package" in the Package Installer
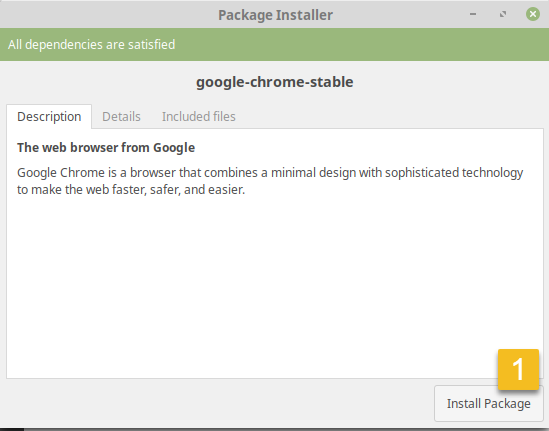
- Close the installer and the priviliged explorer window

- You can find Google Chrome in Menu >> Internet. I suggest to right click it and in the submenu select where you want the launch icon to appear.

Step 11: Install Postman
Postman is good tool to test your REST APIs.
- Download the tar package (tar.gz file) from https://www.getpostman.com/


- Go to the download folder and in the context menu of the file select "Extract To..."

- In the extract application switch to the Home folder and create a new subfolder, e.g Postman and extract the archive.

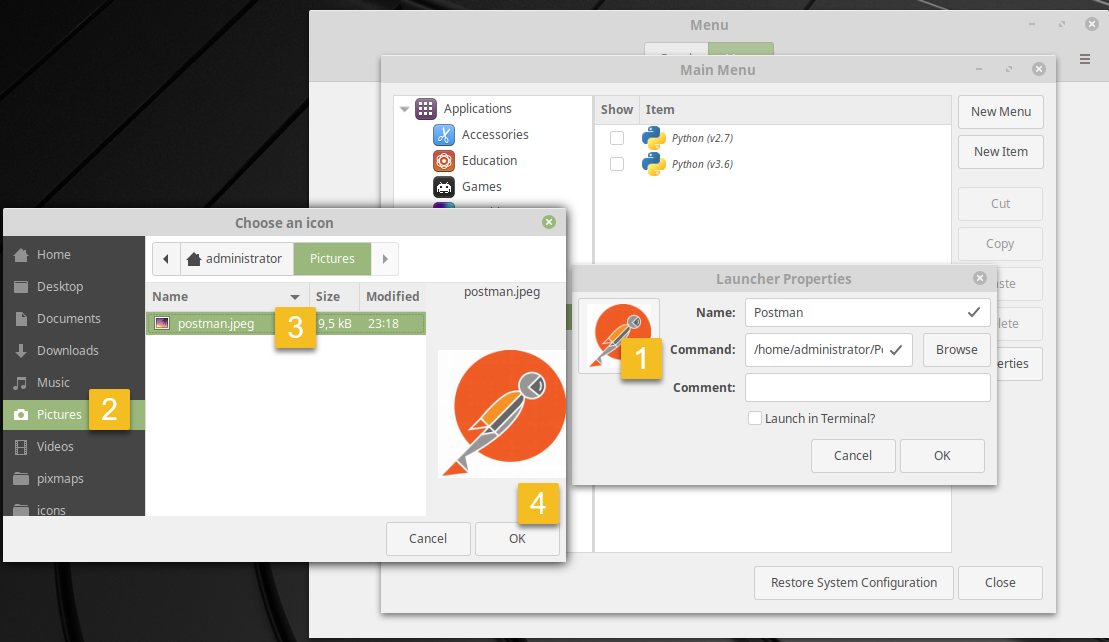
- In general you can use postman now, but we want to add it to our menu. Therefore right click on the Menu and select "Configure..."

- Select Menu and open the menu editor

- Select the category where you want to place the launcher item and click on New Item. In the dialog enter the name for the application and the command /home/administrator/Postman/Postman (adjust this if you have extracted the archive to a different folder).
 Instead of typing the location of the command you can select it with Browse.
- Download an Icon that you want to use and select the corresponding file.
- Similar to the previous installation steps right click on the menu item for Postman and select where you want it to appear.

Step 12: Install Visual Studio Code
I have seen a lot of SAP UI5 developers that are using Visual Studio Code. There are also some plugins for Angular developers. Even if the SAP WebIDE is a great tool that should be used, I won't miss to mention Visual Studio Code and provide the installation steps.
- Download the installation package (deb file) from https://code.visualstudio.com/


- Open the download folder and switch to root
- Open the downloaded file with the GDebi Package Installer

- Click on Install Package

- Close the installation windows

- Go to the menu and select where you want the application launcher to appear
That's it. I'm not sure if you followed the installation instruction but to wrap this short blog series up, I think it's a good way to provide a toolbox for developers among your project teams to really shorten the preparation and on-boarding phase in your software development projects. With the selection of operating system and tools I just want to provide some examples. I know that there a so many great and helpful tools out there and each developer has some different favorites.
I hope you like this blog and maybe you are now the one who starts with the creation of the developer toolbox for your development team.
- SAP Managed Tags:
- Java,
- Virtualization
You must be a registered user to add a comment. If you've already registered, sign in. Otherwise, register and sign in.
Labels in this area
-
ABAP CDS Views - CDC (Change Data Capture)
2 -
AI
1 -
Analyze Workload Data
1 -
BTP
1 -
Business and IT Integration
2 -
Business application stu
1 -
Business Technology Platform
1 -
Business Trends
1,658 -
Business Trends
93 -
CAP
1 -
cf
1 -
Cloud Foundry
1 -
Confluent
1 -
Customer COE Basics and Fundamentals
1 -
Customer COE Latest and Greatest
3 -
Customer Data Browser app
1 -
Data Analysis Tool
1 -
data migration
1 -
data transfer
1 -
Datasphere
2 -
Event Information
1,400 -
Event Information
66 -
Expert
1 -
Expert Insights
177 -
Expert Insights
299 -
General
1 -
Google cloud
1 -
Google Next'24
1 -
Kafka
1 -
Life at SAP
780 -
Life at SAP
13 -
Migrate your Data App
1 -
MTA
1 -
Network Performance Analysis
1 -
NodeJS
1 -
PDF
1 -
POC
1 -
Product Updates
4,577 -
Product Updates
345 -
Replication Flow
1 -
RisewithSAP
1 -
SAP BTP
1 -
SAP BTP Cloud Foundry
1 -
SAP Cloud ALM
1 -
SAP Cloud Application Programming Model
1 -
SAP Datasphere
2 -
SAP S4HANA Cloud
1 -
SAP S4HANA Migration Cockpit
1 -
Technology Updates
6,873 -
Technology Updates
427 -
Workload Fluctuations
1
Related Content
- Crystal Report for Visual Studio 2022 on Windows 11 ARM in Technology Q&A
- App to automatically configure a new ABAP Developer System in Technology Blogs by Members
- SAP HANA Cloud Vector Engine: Quick FAQ Reference in Technology Blogs by SAP
- 10+ ways to reshape your SAP landscape with SAP Business Technology Platform – Blog 4 in Technology Blogs by SAP
- Top Picks: Innovations Highlights from SAP Business Technology Platform (Q1/2024) in Technology Blogs by SAP
Top kudoed authors
| User | Count |
|---|---|
| 41 | |
| 25 | |
| 17 | |
| 14 | |
| 9 | |
| 7 | |
| 6 | |
| 6 | |
| 6 | |
| 6 |