
- SAP Community
- Products and Technology
- Technology
- Technology Blogs by SAP
- Implementing a Chatbot Custom Control
Technology Blogs by SAP
Learn how to extend and personalize SAP applications. Follow the SAP technology blog for insights into SAP BTP, ABAP, SAP Analytics Cloud, SAP HANA, and more.
Turn on suggestions
Auto-suggest helps you quickly narrow down your search results by suggesting possible matches as you type.
Showing results for
brian_keenan
Contributor
Options
- Subscribe to RSS Feed
- Mark as New
- Mark as Read
- Bookmark
- Subscribe
- Printer Friendly Page
- Report Inappropriate Content
07-05-2018
10:09 AM
So you have decided to create a chat bot because everybody is doing it, but you dont want to loose the SAPUI5 look and feel. Time to create a custom control.
I initially did a mock up and started looking for controls that I could use within my control, I also then decided that I would extend the Control object itself and write my own renderer rather than extending another control.
So this is my design, its really composed of a button and a responsive popover containing some other controls.
The first step is extending the control and importing the files that you need,
of course during the course of design this section was updated an dismantlement many times as i tried different controls.
Then we need to define the metadata of the control, what properties i would like to be able to let the application developer set and what events the control will trigger in the application.
I defined some custom properties, internal aggregations marked (with the underscore _) and also an event that the application developer can bind a function to.
When you create a custom control you will need to specify a renderer so the render manager knows what to paint in the DOM for this control. As you can see above I have two controls stored in aggregations and I am just rendering then within my <div> which I have also assigned the class bkChatButton so I can add some css styles later.
so far so good...
This is where we are doing the majority of our heavy lifting. We need to design the chat bot and all the sub controls that are in this responsive popover.
To start with import some css and also create the button, I bind an internal function to the button press event which will open the chat dialog.
The _onOpenChat function looks something like this... Im using the openBy function of the responsivepopver and then setting the content height and width.
You will notice that I gave my button an id, and the id was based on the id of the control,
this.getId() + "-bkChatButton"
This is a good idea as if the control is used many times each will have a different id, and we wont see any errors relating to duplicate ids. I need to give this control an id to access it as one of its properties is based on my custom control property.
I want this button icon to be configurable, but in the init function the properties are not available. Therefore, i overwrite the setter for the property buttonIcon and I call the setProperty method which actually exists in the managedObject.js somewhere.
Finally I set the icon of the button I have given the id to.
The most important thing to take note of here is that,
When a control is created and the init function is called the properties that are assigned are not available in the init.
First the init is called and then as the XML parser encounters properties it calls the setProperty() method to update them one by one. Therefore accessing the properties within the init method will lead to empty values. To get a good understanding of this I put some breakpoints in the init and the setters and i could see them getting called and in what order.
the chat dialog is simply a sap.m.List (without separators between the FedListItems used) and also a sap.m.FeedInput where the end user will write.
Lets first talk about the FeedInput, The feedinput is a UI5 control that the user types text and to enter it they need to press the button. I want the Enter key to also send the message. But the default behavior of the Enter key is to move to the next line.
To get around this, I add an event delagate to the feed item, so now when the enter key is pressed, the below function is called. First I use preventDefault() to stop the carrage return happening. Then I check if there is Text in the feed item. If there is I fire the event that normally only happens when the button is pressed. Once this is done I clear the text.
You can see above that the event fired is post and in the creation of the feed input, i have bound this event to the _oPost function. Lets take a look at that now.
When this is fired we need to do 2 things, update the list with out new chat text, and also send this text to the chatbot to get a response. As we are the control developer and not the application developer we will fire our custom controls event "send" with the text. Now the application developer can bind to this event to get the server response. We will look at that after.
You can see above we have added the chat with the function addChatItem time to look at that...
This function is designed to add the text in chat bubbles into the chat dialog, it takes 2 parameters, the text and also a boolean, to decide if it is the user or the robot adding the text. Above we can see it is being called by the user. However later we will see the robot calling this.
depending on the boolean value a class is added and this styles the chat bubble with the appropriate bubble direction and the correct image. We w
I also scroll to the bottom of my list when a new chat is added.
Now the control is developer, the below code is external to the custom control and its the application developer who is writing this.
To use the control, they just define the namespace in the view, then they can add the component and bind all the properties we have defined in the metadata of the control.
We also bind to the event send. We bind the function onSendPressed which we will define in the controller of this view. Lets take a look at that now.
Once this is called the application developer can include the ajax call to whatever chatbot they are using. Once the response comes back then they use the addChatItem function de spoke of earlier. This time however it is called with false, to the response text and bubble will be styled as a robot.
There is some more going on it the code that we have not discussed, resizing the dialog etc. Also the design of the speech bubbles, this is done in the CSS and there is plenty of resources on the web to explain.
I will upload all the code the gibhub when I get a chance.
Happy Chatting 🙂
I initially did a mock up and started looking for controls that I could use within my control, I also then decided that I would extend the Control object itself and write my own renderer rather than extending another control.
So this is my design, its really composed of a button and a responsive popover containing some other controls.
getting started...
The first step is extending the control and importing the files that you need,
sap.ui.define(

  [	"sap/ui/core/Control",

	"sap/m/Button",

	"sap/ui/core/IconPool",

	"sap/m/Dialog",

	"sap/m/List",

	"sap/m/FeedListItem",

	"sap/m/FeedInput",

	"sap/m/ResponsivePopover",

	"sap/m/VBox",

	"sap/m/ScrollContainer",

	"sap/m/Bar",

	"sap/m/Title",

	"sap/ui/core/ResizeHandler"

  ],

  function(Control, Button, IconPool, Dialog, List, FeedListItem, FeedInput, ResponsivePopover, VBox, ScrollContainer, Bar, Title, ResizeHandler) {

	var ChatDialog = Control.extend("CSID.i027737.custlib.controls.ChatDialog",{
of course during the course of design this section was updated an dismantlement many times as i tried different controls.
Then we need to define the metadata of the control, what properties i would like to be able to let the application developer set and what events the control will trigger in the application.
metadata : {

			properties : {

				title: {type: "string", group: "Appearance", defaultValue: null},


			    width: {type: "sap.ui.core.CSSSize", group: "Dimension", defaultValue: null},

				height: {type: "sap.ui.core.CSSSize", group: "Dimension", defaultValue: null},


			    buttonIcon: {type: "sap.ui.core.URI", group: "Appearance", defaultValue: null},

				robotIcon: {type: "sap.ui.core.URI", group: "Appearance", defaultValue: null},

				userIcon: {type: "sap.ui.core.URI", group: "Appearance", defaultValue: null},


				initialMessage: {type: "string", group: "Appearance", defaultValue: "Hello, How can I help?"},

				placeHolder: {type: "string", group: "Appearance", defaultValue: "Post something here"}


			},

			aggregations : {

				_chatButton:  {type: "sap.m.Button", multiple: false},

				_popover: {type: "sap.m.ResponsivePopover", multiple: false}


			},

			events : {

				send: {

            		parameters : {

						text : {type : "string"}

					}

            	}

			}

		},
I defined some custom properties, internal aggregations marked (with the underscore _) and also an event that the application developer can bind a function to.
The Renderer...
renderer  : function(oRm, oControl) {


	var oChatBtn = oControl.getAggregation("_chatButton");

	var oPop = oControl.getAggregation("_popover");


	oRm.write("<div ");

	oRm.addClass("bkChatButton");

	oRm.writeClasses();

	oRm.write(">");


	oRm.renderControl(oChatBtn);

        oRm.renderControl(oPop);

	oRm.write("</div>");

}
When you create a custom control you will need to specify a renderer so the render manager knows what to paint in the DOM for this control. As you can see above I have two controls stored in aggregations and I am just rendering then within my <div> which I have also assigned the class bkChatButton so I can add some css styles later.
so far so good...
init...
This is where we are doing the majority of our heavy lifting. We need to design the chat bot and all the sub controls that are in this responsive popover.
To start with import some css and also create the button, I bind an internal function to the button press event which will open the chat dialog.
init : function () {


        //initialisation code, in this case, ensure css is imported

        var libraryPath = jQuery.sap.getModulePath("CSID.i027737.custlib");

        jQuery.sap.includeStyleSheet(libraryPath + "/css/bkChat.css");


	var oBtn = new Button(this.getId() + "-bkChatButton", {

		press: this._onOpenChat.bind(this)

	});

	this.setAggregation("_chatButton", oBtn);
The _onOpenChat function looks something like this... Im using the openBy function of the responsivepopver and then setting the content height and width.
 _onOpenChat: function(oEvent){

        this.getAggregation("_popover").openBy(this.getAggregation("_chatButton"));

        this.getAggregation("_popover").setContentHeight(this.getProperty("height"));

	this.getAggregation("_popover").setContentWidth(this.getProperty("width"));

},
You will notice that I gave my button an id, and the id was based on the id of the control,
this.getId() + "-bkChatButton"
This is a good idea as if the control is used many times each will have a different id, and we wont see any errors relating to duplicate ids. I need to give this control an id to access it as one of its properties is based on my custom control property.
I want this button icon to be configurable, but in the init function the properties are not available. Therefore, i overwrite the setter for the property buttonIcon and I call the setProperty method which actually exists in the managedObject.js somewhere.
Finally I set the icon of the button I have given the id to.
setButtonIcon: function(sButtonIcon){

        this.setProperty("buttonIcon", sButtonIcon, true);

        sap.ui.getCore().byId(this.getId() + "-bkChatButton").setIcon(sButtonIcon);

},
The most important thing to take note of here is that,
When a control is created and the init function is called the properties that are assigned are not available in the init.
First the init is called and then as the XML parser encounters properties it calls the setProperty() method to update them one by one. Therefore accessing the properties within the init method will lead to empty values. To get a good understanding of this I put some breakpoints in the init and the setters and i could see them getting called and in what order.
User Input...
the chat dialog is simply a sap.m.List (without separators between the FedListItems used) and also a sap.m.FeedInput where the end user will write.
Lets first talk about the FeedInput, The feedinput is a UI5 control that the user types text and to enter it they need to press the button. I want the Enter key to also send the message. But the default behavior of the Enter key is to move to the next line.
To get around this, I add an event delagate to the feed item, so now when the enter key is pressed, the below function is called. First I use preventDefault() to stop the carrage return happening. Then I check if there is Text in the feed item. If there is I fire the event that normally only happens when the button is pressed. Once this is done I clear the text.
var oFeedIn = new FeedInput(this.getId() + "-bkChatInput", {

	post: this._onPost.bind(this),

	showicon: true

}).addStyleClass("sapUiTinyMargin");


oFeedIn.addEventDelegate({

    	onsapenter: function(oEvent) {


    		oEvent.preventDefault();


    		var sTxt = oFeedIn.getValue();

    		if(sTxt.length > 0){

	    		oFeedIn.fireEvent("post", {

				value: sTxt

			}, true, false);

			oFeedIn.setValue(null);

    		}


	}

});
You can see above that the event fired is post and in the creation of the feed input, i have bound this event to the _oPost function. Lets take a look at that now.
When this is fired we need to do 2 things, update the list with out new chat text, and also send this text to the chatbot to get a response. As we are the control developer and not the application developer we will fire our custom controls event "send" with the text. Now the application developer can bind to this event to get the server response. We will look at that after.
 _onPost: function(oEvent){


	var sText = oEvent.getSource().getValue();

	this.addChatItem(sText, true);

	this.fireEvent("send", {

		text: sText

	}, false, true);


},
You can see above we have added the chat with the function addChatItem time to look at that...
addChatItem...
This function is designed to add the text in chat bubbles into the chat dialog, it takes 2 parameters, the text and also a boolean, to decide if it is the user or the robot adding the text. Above we can see it is being called by the user. However later we will see the robot calling this.
depending on the boolean value a class is added and this styles the chat bubble with the appropriate bubble direction and the correct image. We w
I also scroll to the bottom of my list when a new chat is added.
addChatItem: function(sText, bUser){


        var oFeedListItem = new FeedListItem({

		showicon: true,

		text: sText

	});


	if(bUser){

		oFeedListItem.setIcon(this.getUserIcon());

		oFeedListItem.addStyleClass("bkUserInput");

		sap.ui.getCore().byId(this.getId() + "-bkChatList").addItem(oFeedListItem, 0);

	}else{

	oFeedListItem.setIcon(this.getRobotIcon());

		oFeedListItem.addStyleClass("bkRobotInput");

		sap.ui.getCore().byId(this.getId() + "-bkChatList").addItem(oFeedListItem, 0);

	}


	var oScroll = sap.ui.getCore().byId(this.getId() + "-bkChatScroll");

	setTimeout(function(){

		oScroll.scrollTo(0, 1000, 0);

	}, 0);

}
Using the Control...
Now the control is developer, the below code is external to the custom control and its the application developer who is writing this.
To use the control, they just define the namespace in the view, then they can add the component and bind all the properties we have defined in the metadata of the control.
<mvc:View controllerName="sap.i027737.Node.controller.App"
xmlns:mvc="sap.ui.core.mvc"
xmlns:controls="sap.i027737.Node.controls"
displayBlock="true" xmlns="sap.m" async="true">
<App id="idAppControl">
<pages>
<Page title="{i18n>title}">
<content>
<controls:ChatDialog id="brianchat"
title="Chat"
height="600px"
width="350px"
showCloseButton="true"
send="onSendPressed"
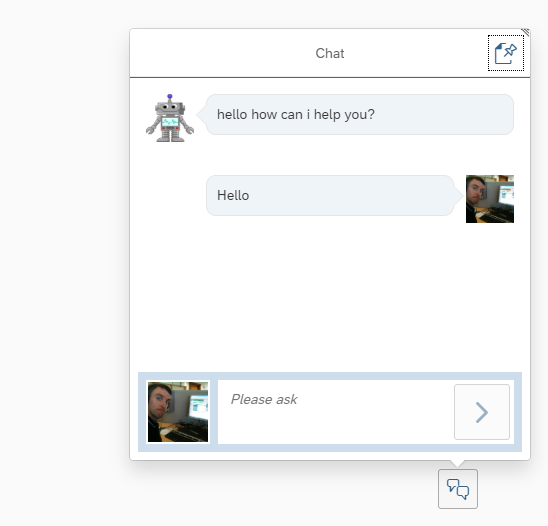
initialMessage="hello how can i help you?"
placeHolder="Please ask"
userIcon="https://avatars1.githubusercontent.com/u/5350169"
robotIcon="https://edspace.american.edu/perf683/wp-content/uploads/sites/392/2015/10/robot.png"
buttonIcon="sap-icon://discussion">
</controls:ChatDialog>
</content>
</Page>
</pages>
</App>
</mvc:View>We also bind to the event send. We bind the function onSendPressed which we will define in the controller of this view. Lets take a look at that now.
onSendPressed: function(oEvent){


	var chatbot = this.getView().byId("brianchat");

	var question = oEvent.getParameter("text");

        var payload = {content: question};


	jQuery.ajax({

		url: "/chat",

		cache: false,

		type: "POST",

		data: JSON.stringify(payload),

		async: true,

		success: function(sData) {

			chatbot.addChatItem(sData.content, false);

		},

		error: function(sError) {

			chatbot.addChatItem("Sorry im malfunctioning", false);

		}

	});

}
Once this is called the application developer can include the ajax call to whatever chatbot they are using. Once the response comes back then they use the addChatItem function de spoke of earlier. This time however it is called with false, to the response text and bubble will be styled as a robot.
Summary...
There is some more going on it the code that we have not discussed, resizing the dialog etc. Also the design of the speech bubbles, this is done in the CSS and there is plenty of resources on the web to explain.
I will upload all the code the gibhub when I get a chance.
Happy Chatting 🙂
- SAP Managed Tags:
- JavaScript,
- SAPUI5
7 Comments
You must be a registered user to add a comment. If you've already registered, sign in. Otherwise, register and sign in.
Labels in this area
-
ABAP CDS Views - CDC (Change Data Capture)
2 -
AI
1 -
Analyze Workload Data
1 -
BTP
1 -
Business and IT Integration
2 -
Business application stu
1 -
Business Technology Platform
1 -
Business Trends
1,658 -
Business Trends
91 -
CAP
1 -
cf
1 -
Cloud Foundry
1 -
Confluent
1 -
Customer COE Basics and Fundamentals
1 -
Customer COE Latest and Greatest
3 -
Customer Data Browser app
1 -
Data Analysis Tool
1 -
data migration
1 -
data transfer
1 -
Datasphere
2 -
Event Information
1,400 -
Event Information
66 -
Expert
1 -
Expert Insights
177 -
Expert Insights
293 -
General
1 -
Google cloud
1 -
Google Next'24
1 -
Kafka
1 -
Life at SAP
780 -
Life at SAP
13 -
Migrate your Data App
1 -
MTA
1 -
Network Performance Analysis
1 -
NodeJS
1 -
PDF
1 -
POC
1 -
Product Updates
4,577 -
Product Updates
340 -
Replication Flow
1 -
RisewithSAP
1 -
SAP BTP
1 -
SAP BTP Cloud Foundry
1 -
SAP Cloud ALM
1 -
SAP Cloud Application Programming Model
1 -
SAP Datasphere
2 -
SAP S4HANA Cloud
1 -
SAP S4HANA Migration Cockpit
1 -
Technology Updates
6,873 -
Technology Updates
417 -
Workload Fluctuations
1
Related Content
- Behind the compatibility - What are the compatibility means between GRC and the plugins in Technology Blogs by SAP
- Consume Ariba APIs using Postman in Technology Blogs by SAP
- Empowering Vendors: The Transformative Impact of SAP Chatbot in Technology Blogs by Members
- ABAP RAP error " Handler not implemented; Method: INSTANCE_FEATURE " in Technology Q&A
- Common Master data and Master data for access control, access analysis in IAG in Technology Q&A
Top kudoed authors
| User | Count |
|---|---|
| 34 | |
| 25 | |
| 13 | |
| 7 | |
| 7 | |
| 6 | |
| 6 | |
| 6 | |
| 5 | |
| 4 |