
- SAP Community
- Products and Technology
- Financial Management
- Financial Management Blogs by SAP
- BPC Planning for S/4HANA - FOX formulas - Part 1
Financial Management Blogs by SAP
Get financial management insights from blog posts by SAP experts. Find and share tips on how to increase efficiency, reduce risk, and optimize working capital.
Turn on suggestions
Auto-suggest helps you quickly narrow down your search results by suggesting possible matches as you type.
Showing results for
Product and Topic Expert
Options
- Subscribe to RSS Feed
- Mark as New
- Mark as Read
- Bookmark
- Subscribe
- Printer Friendly Page
- Report Inappropriate Content
07-05-2018
10:05 AM
Use Case
You would like to use the BW formula planning functions for the BPC Embedded Model for Consolidations or for Planning and learn to write FOX (formula extension) code.
Content
I started writing a blog on coding FOX formulas and happened to be working on a BPC Optimized for S/4HANA system. My intention was just to write a single blog but found it developing into a few parts due to the length and the fact that I wanted to build the system from scratch, including the entire data model.
So this is PART 1 of a 4-part blog with the following structure:
PART 1 - Setting up the data model, creating an Analysis for Office workbook, capturing and saving some seeding data to the data model. (No fox code yet)
PART 2 - Write a "Hello World" equivalent fox formula and execute it from a button placed in the Analysis for Office workbook.
PART 3 - Tools for debugging functions, variables, constants, loops, If-statements, messages.
PART 4 - Capturing data directly into the cube without using Analysis for Office, "DO" loops, "TMVL()" expression - time value offset calculations, "ATRV()" expression - using attribute values of a dimension member, a complete look at what it takes to calculate production quantities from sales demand and working across 2 cubes, periodic escalations of prices and quantities, overhead costs and cost of sales price calculations, sales price calculation based on a markup percentage, sales income calculation and cost of sales calculations.
*** NOTE ***: Also refer to Gerd Schoeffl's blog posts related to BPC for further great content on coding and designs for BPC solutions.
Context
The system I'm using is BPC Optimized for S/4HANA but you can use any version of BPC that can create an embedded model.
The powerful benefits of using S/4HANA for planning are NOT demonstrated in this blog as we're focusing on FOX coding. We will not cover the S4 master data and transaction data integration or the S4 delivered planning content. However, if you look at my blog on setting up RTC you will get a good idea of how you can use S4 master data and S4 transaction data from the foundation views of S4.
What may be of interest to you from a BPC-S4 perspective is to visualise how embedded BW and embedded BPC is accessed and used within an S4 system. You might be wondering how different it is to developing BPC on a typical stand-alone instance of BW and this is evident from this blog. The short answer is that you can develop BPC as normal within S4. You can still access RSA1, create your own real-time planning cubes, manage the environments from the BPC Web Admin client and create Analysis for Office user interfaces. In a sense nothing changes other than logging onto the S4 system, seeing the accounting menu and executing BW transaction codes such as RSA1. However, it would be a total understatement to say "nothing changes" because when you choose to take advantage of the S4 integration, you have at your fingertips all the S4 master- and transaction data exposed to BW in virtual views without the need for extractors as well as all the pre-delivered BPC planning content.
So in this first part of coding FOX formula planning functions we are going to setup the planning model by doing the following:
- Create all the InfoObjects from scratch, two with an attribute
- Create two real-time planning cubes for revenue planning and cost planning
- Capture the master data
- Create a composite provider to join the two cubes
- Create an aggregation level
- Create a planning query as datasource for Analysis for Office
- Create an Analysis for Office workbook for capturing data and viewing our coding results
- Capture and save some initial seeding data so we can start our coding
Introduction
I love FOX coding. It's easy to use, it's a powerful language, it can run directly in HANA using the HANA Planning Engine so the functions execute extremely quickly, it doesn't require a developers key, it can be used on consolidation as well as planning models and most functional consultants and any technical BPC consultant who doesn't know the language can be resourced onto a project and within a couple of weeks, under the lead of a senior consultant, will be productive on your project.
I have delivered very complex calculation models only using fox code. I have coded production planning, recursive functions, nominal and compound interest calculations for portions of a financial period, weighted average cost of capital, complex treasury calculations with forward cover and tax rate changes, shared services, disaggregations, cost allocations, minority interests, capital calcs etc. all in fox. To put it another way, the rare occasions that we have decided to move fox code to ABAP or another language has never been based on the complexity of the business rules but rather due to other considerations.
As a general rule you can use BPC planning functions to deliver almost all of your solutions logic but you will need ABAP for areas such as coding BW variables or start and end routines of data flows.
Aim
The aim of this blog is to give you an introduction to BPC Planning Functions and in particular, fox code. We will do the following:
- Write a formula function which requires fox coding. We will use all the basic features of the language for loops, variables, calculations, internal-tables etc.
- Link the planning functions to the user front end input template as a button they can press to execute the fox code.
Assume: When I refer to "BW Planning functions", "BPC Planning Functions" or simply "Planning functions" it also applies to consolidation models and it is the functions available in BW under transaction code RSPLAN.
The FOX help reference guide
At the heart of FOX coding is the coding editor and it's the one place in SAP where, ever since I started coding FOX around 2000/1 in SEM-BPS, the in-app online help documentation always works and with each new version of BPC I always open a blank coding screen, find the INFO button and call up the familiar reference material just like I've done below with the "all new" embedded BW on S/4HANA:
- DATA DECLARATIONS
- EXPRESSIONS
- CONDITIONAL STATEMENTS
- LOOP CONTRUCTS
- MESSAGES
- ....and so on.

Everything you need to know about FOX coding is here in these help pages but it's not the starting point. To get here we need to create a data model and aggregation level and then we can create the formula function.
You can also find this help in the SAP Help documentation here.
Overview of system components
We'll setup a simple data model from scratch which has the following design:

- At the base of the design we'll create some very simple characteristics and key figures, capture some master data and add an attribute to some characteristics so we can demonstrate how fox accesses attribute values in the code
- We will create two planning cubes, one for revenue planning and one for cost planning
- We will combine the two planning cubes into a composite multi-provider
- In order to create a planning function you must build it on an aggregation level which is a subset of the characteristics and key figures of the underlying InfoProvider. (In our case we have selected all InfoObjects for the aggregation level)
- The next level of construction is to prepare a query based on the aggregation level to serve as a data source for the Analysis for Office Workbook so we can capture and save input data as well as view output results
- Also built on the aggregation level will be our planning functions and filters used to compile the planning sequence(s) which is linked to the button(s) in our Analysis for Office workbook so the user can execute them
Setup the data model
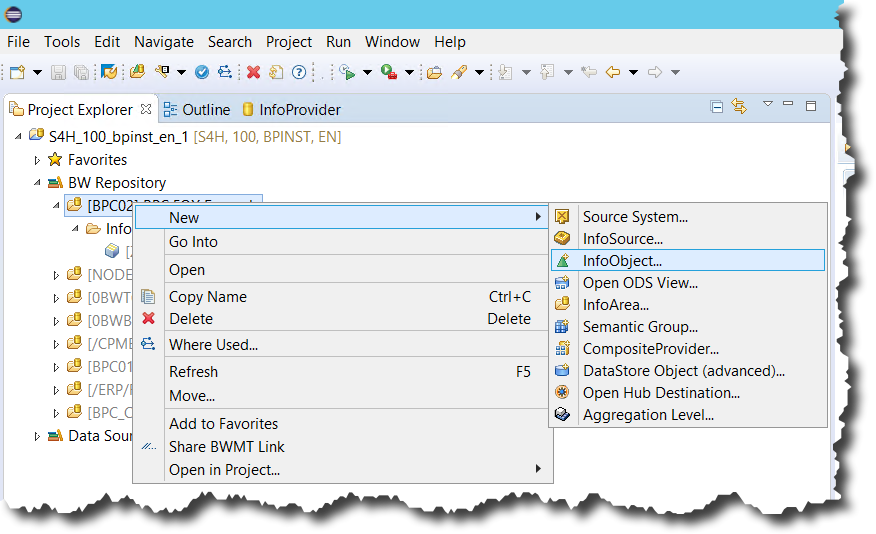 | Using Eclipse with the BW Modeling perspective I recommend that you create a separate InfoArea to contain the build objects - but this is not mandatory. Next right-click the InfoArea and select NEW, INFO-OBJECT. |
 | Create CHARACTERISTICS for COST CENTER, GL ACCOUNT, ITEM, PROFIT CENTER and VERSION with length 10, master data and texts. |
 | Use the technical names shown in the screen-shot. Now create KEY FIGURES for AMOUNT, NUMBER and QUANTITY using 0CURRENCY and 0UNIT as the supporting characteristics for the unit-based key figures. These 3 key figures will demonstrate how currency, units and simple data types are handled in FOX code. |
 |  |
 | 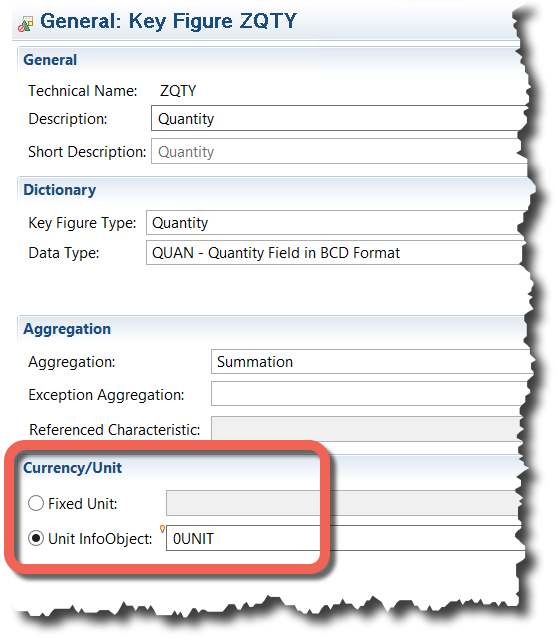 |
 | Creating ZNUM gives us a general purpose number key figure which does not require a currency/unit selection. |
 | Now create a characteristic named ZTYPE which has NO master data or texts and is an ATTRIBUTE ONLY characteristic. We will use this as an attribute on ZITEM and ZGLACC to classify the line items and demonstrate how FOX accesses and uses them in coding. |
 | Add ZTYPE to ZGLACC and ZITEM as an attribute. |
 | Logon to BW to create the planning cubes in RSA1. For those of us who have worked on stand-alone instances of BW for a long time and now switching to S/4HANA this is going to take some getting used to...executing BW transaction codes directly from the ERP system where you can see the accounting SAP menu. You can of course work on any version of BW i.e. BW on AnyDB, BW on HANA, BPC 11 etc. The only code element you may have a problem with in very old versions is the use of internal tables which is a fairly new addition to FOX coding and if your version of BW does not support composite providers then use a multi-provider instead. |
 | Create two InfoCubes in transaction code RSA1, MODELING. The first will be called ZREV01 for REVENUE PLANNING and the second ZCST01 for COST PLANNING. Make sure you select the check-box for REAL-TIME. Without this selection you will not be able to save data back to the cube. |
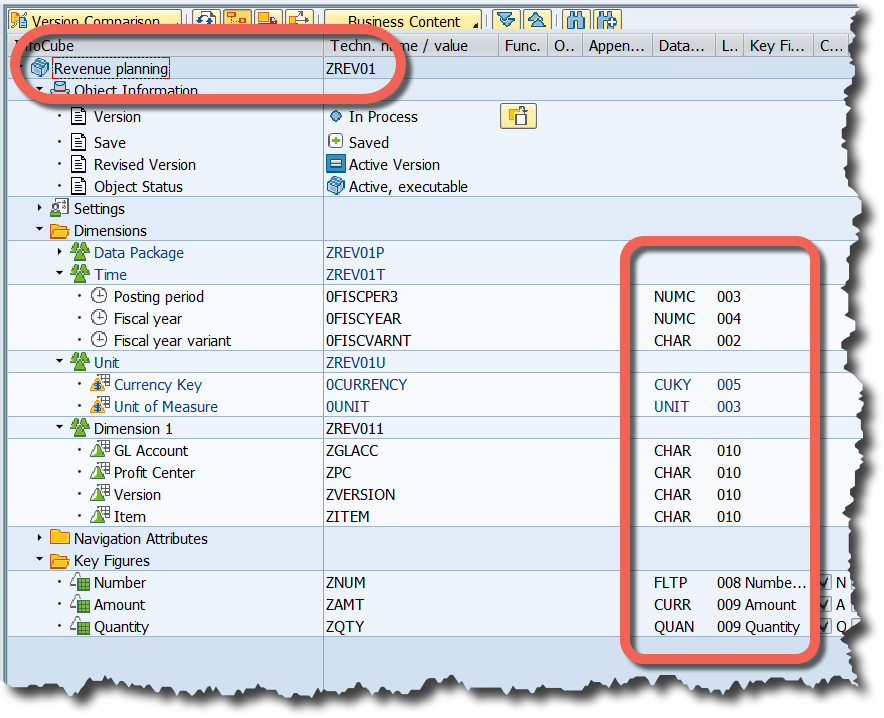 | Add all the characteristics we created to the ZREV01 cube EXCEPT for the Cost Center. Also add the standard time dimension characteristics which we did not need to create. |
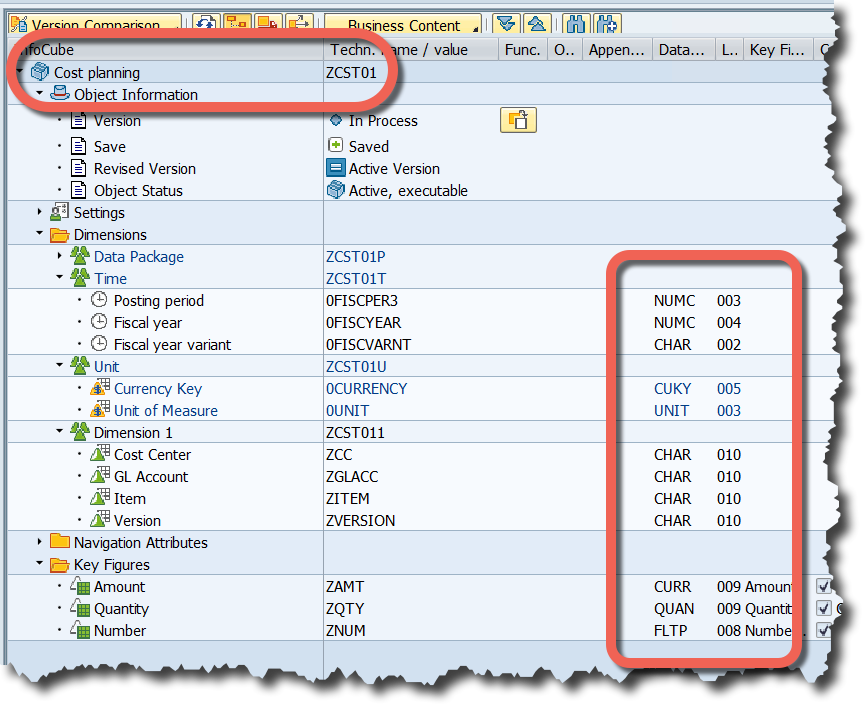 | Add all the characteristics we created to the ZCST01 cube EXCEPT for the Profit Center. Also add the standard time dimension characteristics which we did not need to create. |
 | Now go back to Eclipse to create the Composite provider which I named ZPLAN01. You should see your two InfoCubes in the InfoArea when you refresh the project browser. |
 | Add your two InfoCubes as a UNION to the COMPOSITE PROVIDER and drag and drop all the characteristics and key figures to the target. You'll notice that all InfoObjects are shared between the two source cubes except the COST CENTER and PROFIT CENTER as we made these unique to each cube. So you will see single mapping lines from the source cubes to these two target objects. |
 | The final step in the data model construction is to create an aggregation level. |
 | Create an aggregation level based on the InfoProvider ZPLAN01 (the composite provider) with the technical name ZPAL01 and on the OUTPUT tab add all the InfoObjects from the composite provider. You'll notice that the system automatically adds a characteristic 0INFOPROV to the aggregation level so that we can distinguish which cube the data is being read- and written back to for shared characteristics. |
 | So...by the end of the data model setup you should see the InfoArea content as follows: Characteristics and Key Figures, the two real-time InfoCubes, the Composite Provider and an aggregation level. |
| ................................................................................................. |
Add master data
| Manually capture some basic master data for each of the characteristics created | |
 | Once again in transaction RSA1, INFOPROVIDER, right-click, context menu item MAINTAIN MASTER DATA. |
 | For each characteristic select NEW for TEXTS and capture the ID and DESCRIPTION. When adding attributes for ITEM and GL ACCOUNT select TIME INDEPENDENT master data. |
 | Cost Centers |
 | Profit Centers |
 | GL Accounts |
 | GL Account attributes |
 | Items |
 | Item attributes |
 | Versions |
Create a BPC Planning Model
Logon to the BPC Web Admin Client and create a new ENVIRONMENT for EMBEDDED models and then create an EMBEDDED PLANNING MODEL based on the COMPOSITE provider.

Setup the user interface & capture some transaction data
The resulting Analysis for Office (AO) excel workbook for capturing data will look as follows:

The datasource is a query set to open in INPUT-READY mode with the Columns set to:
- Key figures - ZNUM, ZQTY and ZAMT. All set to INPUT-READY.
- Periods - fixed values 1 to 12
The rows are set to:
- InfoProvider
- Profit Center
- Cost Center
- GL Account
- Item
- Currency
- Unit of Measure
The header fixed values are set to:
- Fiscal year variant
- Fiscal year
- Version
Here are a few pointers to get the workbook INPUT-READY if it's a bit new to you: ................................................................................................................ | |
 | The datasource for the input template in Analysis Office is a query built on the aggregation level. |
 | Flag the query to open in INPUT-READY mode under the PLANNING tab so you don't have to manually switch it when you add it to the workbook. |
 | Add the 3 Key Figures to the columns and make them INPUT READY by selecting each key figure in turn and on the PLANNING tab changing the INPUT-READY field to INPUT-READY. |
  | ALL CHARACTERISTICS must be added to either the columns, rows or header (free) sections of the query. Omitting a single characteristic will prevent it from opening in INPUT-READY mode as the query must be at the lowest level of granularity in order to know where to save data. The characteristics in the HEADER area under FREE characteristics must have a FIXED FILTER set for the same reason. These will not be visible in the worksheet and the user will not be able to capture them so they must have fixed values so that when we save the record it has values to save against for those characteristics. |
  | After adding the query to the workbook display the design panel and on the COMPONENTS tab at the bottom of the screen select the PLANNING tab in the middle and link the query to the BPC Planning Model. On the same tab selecting the datasource's CROSSTAB will allow you to select the number of new blank lines to capture. The default is 5 and hence the 5 new rows displayed for capture in the worksheet. Selecting the datasource [DS_1] also allows you on this tab to set the datasource to INPUT READY on opening. |
Capture and save data
So now for the moment of truth...can you capture and save data? Any errors in the setup and this will not work.
Capture a value of 100, 80 and 150 in the Quantity column for period 1 for the 3 finished products PRD01, PRD02 and PRD03. Save.

If the SAVE is successful the workbook will display all the updated sub-totals, the SAVE button will return to an inactive state and if you select the MESSAGES button you can view the last system return message which reads "DATA WAS SAVED". Also notice that the captured lines are open for editing and 5 new rows have been added to the bottom of the screen for new characteristic combinations to be captured.

- SAP Managed Tags:
- SAP Business Planning and Consolidation, version for SAP NetWeaver
8 Comments
You must be a registered user to add a comment. If you've already registered, sign in. Otherwise, register and sign in.
Labels in this area
Related Content
- Manage dates-driven planning processes with SAP Analytics Cloud in Financial Management Blogs by SAP
- Payment Batch Configurations SAP BCM - S4HANA in Financial Management Blogs by Members
- SAP ECC Conversion to S/4HANA - Focus in CO-PA Costing-Based to Margin Analysis in Financial Management Blogs by SAP
- TRM - Error Document type TRO is not defined in Financial Management Q&A
- What’s New in S/4HANA 2023 for IS-Oil and Gas in Financial Management Blogs by Members
Top kudoed authors
| User | Count |
|---|---|
| 6 | |
| 3 | |
| 2 | |
| 2 | |
| 1 | |
| 1 | |
| 1 | |
| 1 | |
| 1 | |
| 1 |