
- SAP Community
- Products and Technology
- CRM and Customer Experience
- CRM and CX Blogs by SAP
- SAP Marketing Cloud - Connect any email service pr...
CRM and CX Blogs by SAP
Stay up-to-date on the latest developments and product news about intelligent customer experience and CRM technologies through blog posts from SAP experts.
Turn on suggestions
Auto-suggest helps you quickly narrow down your search results by suggesting possible matches as you type.
Showing results for
mathias_knura
Explorer
Options
- Subscribe to RSS Feed
- Mark as New
- Mark as Read
- Bookmark
- Subscribe
- Printer Friendly Page
- Report Inappropriate Content
06-25-2018
2:44 PM
This blog post of how to connect any email service provider to SAP Marketing Cloud, consists of 3 chapter:
This document describes step-by step how to connect an email service provider of choice to SAP Marketing Cloud.
To connect a custom ESP to SAP Marketing Cloud via the newly implemented generic ESP adapter, it is necessary to use a middleware that transforms the standardised HTTP output of SAP Marketing Cloud to the custom ESP's individual API specification. Since SCP is the standard integration tool for SAP Marketing Cloud, is has been used to create an example that illustrates how to setup an integration project to connect the ESP SAP Digital Interconnect.
Within this example, the SCP has been configured to rework HTTP requests from the generic ESP adapter of SAP Marketing Cloud to match the specification of SAP Digital Interconnect's API. At the same time, the SCP processes the response from SAP Digital Interconnect and transforms it to the specific shape required by the generic ESP adapter to perform subsequent logic.

This document describes in detail the SCP Integration Flows for sending emails and retrieving bounces from SAP Digital Interconnect via the generic ESP adapter of SAP Marketing Cloud.
Prerequisite:
Communication System and Communication Arrangement Scenario ID SAP_COM_0234 Setting up a Generic Email Service Provider is maintained.
Details are available in application help Setting up a Generic Email Service Provider
Open APP Communication Systems and maintain system id, name, Host Name and User to connect to SAP Cloud Platform system:

Open App Communication Arrangements and maintain Scenario ID SAP_COM_0234 Setting up a Generic Email Service Provider.

The path for outbound service could be /http/sapmc_esp/ as it is described in section
Configuration of Inbound- and Outbound connections.
Please consider your onwn path.
The following steps must be done to transforms the standardised HTTP output of SAP Marketing Cloud to the custom ESP's individual API specification:
In the diagram below, the general structure of a send Mail SCP iFlow is displayed. The iFlow acts as translator between the SAP Marketing Cloud System and the connected Email Service Provider (ESP). The SAP Marketing Cloud System sends a HTTPS POST request to the endpoint /send of the SCP with the parameters as described in Interface Definition - Custom ESP in the Cloud. The iFlow transforms the request in a HTTP POST request with the parameters according to the interface definition of the connected ESP. The chapter Example ESP: SAP Digital Interconnect shows an example transformation for the ESP SAP Digital Interconnect. The response of the ESP is also converted back into the expected format of the SAP Marketing Cloud System (Interface Definition - Custom ESP in the Cloud). For arising errors, the iFlow contains an exception sub process, that parses the error message and sends it to the SAP Marketing Cloud System in the right format, which is also described in the interface definition.

The following sections explain the different transformation steps of the send Mail iFlow in more detail.
The send Mail iFlow is connected to the SAP Marketing Cloud System and to the ESP via the following two connectors.
The iFlow can be connected to the SAP Marketing Cloud System using a control with type Sender. The endpoint URL of a generic iFlow on SCP is defined by:
<SCP Tenant iFlow URL>/<used protocol>/<defined endpoint>
While the <SCP Tenant iFlow URL> is always fixed for a SCP Tenant, the <used protocol> and <defined endpoint> can be configured directly within the iFlow. To perform this configuration, the connector starting from Sender must be double clicked:

In the next window, the Adapter Type can be defined on the right side of the General Tab, while the endpoint settings are made in the Adapter Specific Tab under Request Processing. The configuration for our send mail scenario is shown below:


With this configuration, the complete endpoint URL depending on the used SCP Tenant reads as:
<SCP Tenant iFlow URL>/http/SA_esp/send. After saving and deploying the configuration, a GET request to the specified URL should return with status 200.
The ESP can be connected to the iFlow using a control with type Receiver. Similarly, as above, the connection settings for outgoing calls from SCP to any endpoint can be defined by double clicking the Receiver node:

Here the connection settings can be maintained in the same way as for inbound connections within the tabs General and Adapter Specific. The general configuration used in our send mail scenario is shown below:

In the following, the different controls are discussed that are needed for the transformation of the SAP Marketing Cloud to the ESP request structure.
Control Type: Start Message

This control represents the starting point of the iFlow
Control Type: Router

Router verifies that only post messages will be processed in this iFlow.
Control Type: Content Modifier

Select the control "Add Root Source" and take a look at the properties view. There, the body of the incoming request is encapsualted by a "root"-tag. This is needed because the JSON to XML Converter, which is used later on, requires to have only one root attribute (see Developper's Guide: Managing Integration Content, Chapter 2.5.3.7.1.1).
Control Type: Script

Because the JSON to XML converter can also not handle the html tags "<" and ">" as well as the "&", they are encoded in this transformation step. Select the control "Add Root Source" and look at the properties view. There, the script file and script function are defined.
Control Type: Converter


Note:
We need to convert the json body to xml for the further processing. In the next transformation step, we use a content modifier control, which easily can extract the properties of xml bodies.
Control Type: Content Modifier


This creates the properties that are needed for building the request to the ESP. The properties are defined as XPath variables that link to the properties of the original input request.
Finally it creates the request body for the ESP send mail request. This body highly depends on the send mail interface of the ESP. Chapter Example ESP: SAP Digital Interconnect presents a body for the request to SAP Digital Interconnect. The previously defined properties can be accessed in the body via the syntax ${property.<propertyName>}.
Control Type: Script

Control Type: Router

The router decides, whether the email message shall be send to the recipient later with a specific delay. The determining factor is the property sendAt in the request body of the SAP Marketing Cloud System. The conditions can be defined by selecting the conditional arrows starting at the router.
In the properties panel, the condition can be maintained. With the checkbox “Default Router”, the route can be defined as default meaning that it will be passed if the routed cannot be taken.
Control Type: Script
Default branch, without additional body Information for delivery date/time.
Note:
It is necessary always to use converters and not to create the body as json object directly. This is, because the values of the properties are still in an xml format and need to be converted back to a json format before they can be used in a json file.
Control Type: Script

Use case for specific delivery date like best sending time. Split property 'sendAt' into dedicated properties for date and time.
Control Type: Content Modifier
Control Type: Script
Pass additional message body information for delivery date/time
Note:
It is neccesary always to use converters and not to create the body as json object directly. This is, because the values of the properties are still in an xml format and need to be converted back to a json format before they can be used in a json file.
Control Type: Converter

Control Type: Script
Control Type: Service Call

This control is responsible for:
1.sending the send mail POST request to the ESP via the defined endpoint as described in section Establishing connection to Email Service Provider and
2.retrieving the answer of the request from the ESP.
Control Type: Converter


Control Type: Content Modifier


Like step Create Body, the content type is set to json and the needed information (the Notification Id), of the received ESP answer is stored in a property and used in the new message body, which will be sent to the SAP Marketing Cloud System later.
Note:
SAP Marketing expects, that the messagId is unique, which is send with the answer of ESP.
Control Type: Content Modifier

Control Type: Converter


Control Type: End Message

This control represents the success end point of the iFlow. The answer of the request will be sent now to the SAP Marketing Cloud System.
Control Type: Error Start
Whenever an error occurs (which means errors in the SCP coding, syntactically incorrect requests, etc.), the exception sub process is entered.
Control Type: Script

The error body is created in the script directly, because many operations need to be done. First the source of the error message needs to be determined. If the send mail request of the ESP returned with the given error message, then, depending on the ESP interface, the error reason and code can be extracted. The mapping, which is defined in line 9, also depends on the connected ESP and defines, which error codes of the ESP should be mapped to which error codes of the SAP Marketing Cloud System.
In the other cases, the error was thrown in the SCP coding and the error message is transformed to a permanent error.
Control Type: Message End

Note:
The answer is sent as usual request answer and not as exception. This is needed, because the generic adapter interface expects a specific error body and not just an exception as answer.
In this section I will give you a short overview about how to add loggers to the iFlow.
Control Type: Script


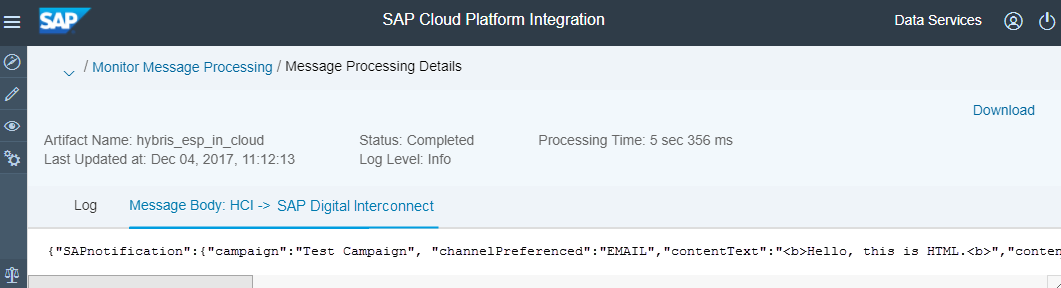
A logger can be easily added using a script control. Inside, the current message is given as input and the body can be accessed with its method "getBody". A logger message is already provided by the messageLogFactory. The new logger message can than be added with the method "addAttachmentAsString".
After the execution of the iFlow, the logged message can be looked up in the SAP Cloud Platform Integration Web-UI.


Headers: Content-Type: application/json
Next Chapter:
2. Example ESP: SAP Digital Interconnect
3. Get Bounces
This document describes step-by step how to connect an email service provider of choice to SAP Marketing Cloud.
To connect a custom ESP to SAP Marketing Cloud via the newly implemented generic ESP adapter, it is necessary to use a middleware that transforms the standardised HTTP output of SAP Marketing Cloud to the custom ESP's individual API specification. Since SCP is the standard integration tool for SAP Marketing Cloud, is has been used to create an example that illustrates how to setup an integration project to connect the ESP SAP Digital Interconnect.
Within this example, the SCP has been configured to rework HTTP requests from the generic ESP adapter of SAP Marketing Cloud to match the specification of SAP Digital Interconnect's API. At the same time, the SCP processes the response from SAP Digital Interconnect and transforms it to the specific shape required by the generic ESP adapter to perform subsequent logic.
This document describes in detail the SCP Integration Flows for sending emails and retrieving bounces from SAP Digital Interconnect via the generic ESP adapter of SAP Marketing Cloud.
Prerequisite:
Communication System and Communication Arrangement Scenario ID SAP_COM_0234 Setting up a Generic Email Service Provider is maintained.
Details are available in application help Setting up a Generic Email Service Provider
Open APP Communication Systems and maintain system id, name, Host Name and User to connect to SAP Cloud Platform system:
Open App Communication Arrangements and maintain Scenario ID SAP_COM_0234 Setting up a Generic Email Service Provider.
The path for outbound service could be /http/sapmc_esp/ as it is described in section
Configuration of Inbound- and Outbound connections.
Please consider your onwn path.
Maintain Integration Flow on SCP for Email Send Scenario
The following steps must be done to transforms the standardised HTTP output of SAP Marketing Cloud to the custom ESP's individual API specification:
General Structure of iFlow
In the diagram below, the general structure of a send Mail SCP iFlow is displayed. The iFlow acts as translator between the SAP Marketing Cloud System and the connected Email Service Provider (ESP). The SAP Marketing Cloud System sends a HTTPS POST request to the endpoint /send of the SCP with the parameters as described in Interface Definition - Custom ESP in the Cloud. The iFlow transforms the request in a HTTP POST request with the parameters according to the interface definition of the connected ESP. The chapter Example ESP: SAP Digital Interconnect shows an example transformation for the ESP SAP Digital Interconnect. The response of the ESP is also converted back into the expected format of the SAP Marketing Cloud System (Interface Definition - Custom ESP in the Cloud). For arising errors, the iFlow contains an exception sub process, that parses the error message and sends it to the SAP Marketing Cloud System in the right format, which is also described in the interface definition.
The following sections explain the different transformation steps of the send Mail iFlow in more detail.
Configuration of Inbound- and Outbound connections
The send Mail iFlow is connected to the SAP Marketing Cloud System and to the ESP via the following two connectors.
Defining the SCP endpoint
The iFlow can be connected to the SAP Marketing Cloud System using a control with type Sender. The endpoint URL of a generic iFlow on SCP is defined by:
<SCP Tenant iFlow URL>/<used protocol>/<defined endpoint>
While the <SCP Tenant iFlow URL> is always fixed for a SCP Tenant, the <used protocol> and <defined endpoint> can be configured directly within the iFlow. To perform this configuration, the connector starting from Sender must be double clicked:
In the next window, the Adapter Type can be defined on the right side of the General Tab, while the endpoint settings are made in the Adapter Specific Tab under Request Processing. The configuration for our send mail scenario is shown below:
With this configuration, the complete endpoint URL depending on the used SCP Tenant reads as:
<SCP Tenant iFlow URL>/http/SA_esp/send. After saving and deploying the configuration, a GET request to the specified URL should return with status 200.
Establishing connection to Email Service Provider
The ESP can be connected to the iFlow using a control with type Receiver. Similarly, as above, the connection settings for outgoing calls from SCP to any endpoint can be defined by double clicking the Receiver node:
Here the connection settings can be maintained in the same way as for inbound connections within the tabs General and Adapter Specific. The general configuration used in our send mail scenario is shown below:
Redefinition of the input parameters
In the following, the different controls are discussed that are needed for the transformation of the SAP Marketing Cloud to the ESP request structure.
Send Mail Start
Control Type: Start Message
This control represents the starting point of the iFlow
Rooter 1
Control Type: Router
Router verifies that only post messages will be processed in this iFlow.
Add root source
Control Type: Content Modifier
Select the control "Add Root Source" and take a look at the properties view. There, the body of the incoming request is encapsualted by a "root"-tag. This is needed because the JSON to XML Converter, which is used later on, requires to have only one root attribute (see Developper's Guide: Managing Integration Content, Chapter 2.5.3.7.1.1).
Encode Body
Control Type: Script
Because the JSON to XML converter can also not handle the html tags "<" and ">" as well as the "&", they are encoded in this transformation step. Select the control "Add Root Source" and look at the properties view. There, the script file and script function are defined.
import com.sap.gateway.ip.core.customdev.util.Message;
def Message encodeBody(Message message) {
message.setBody(message.getBody().replace("&", "&").replace("<", "<").replace(">", ">"));
return message;
}
JSON to XML Converter
Control Type: Converter
Note:
We need to convert the json body to xml for the further processing. In the next transformation step, we use a content modifier control, which easily can extract the properties of xml bodies.
Create Properties
Control Type: Content Modifier
This creates the properties that are needed for building the request to the ESP. The properties are defined as XPath variables that link to the properties of the original input request.
Finally it creates the request body for the ESP send mail request. This body highly depends on the send mail interface of the ESP. Chapter Example ESP: SAP Digital Interconnect presents a body for the request to SAP Digital Interconnect. The previously defined properties can be accessed in the body via the syntax ${property.<propertyName>}.
Adjust Send Data
Control Type: Script
def Message adjustSendData(Message message) {

    def sendAt = message.getProperty('sendAt');

    if(sendAt != ""){

    def sendAtDateTime = new Date().parse("yyyyMMddHHmmss", sendAt);

    def currentDateTime = new Date();

    if(sendAtDateTime <= currentDateTime){

        sendAt = '';

        message.setProperty('sendAt', sendAt);

        }

        else{

        def duration = groovy.time.TimeCategory.minus(sendAtDateTime, currentDateTime);

            if(duration.days <= 0 && duration.hours < 2){

            sendAt = '';

            message.setProperty('sendAt', sendAt);

             }

    }

    }

return message;

}
Router
Control Type: Router
The router decides, whether the email message shall be send to the recipient later with a specific delay. The determining factor is the property sendAt in the request body of the SAP Marketing Cloud System. The conditions can be defined by selecting the conditional arrows starting at the router.
In the properties panel, the condition can be maintained. With the checkbox “Default Router”, the route can be defined as default meaning that it will be passed if the routed cannot be taken.
Create Without Delivery Data
Control Type: Script
<SAPnotification>

<campaign>${property.sourceSystem}</campaign>

<channelPreferences>${property.type}</channelPreferences>

<contentText>${property.bodyContentHTML}</contentText>

<contentTextEncoding>NONE</contentTextEncoding>

<contentTextType>text/html</contentTextType>

<sender>${property.sender}</sender>

<recipients></recipients>

<configuration>

<email>

<alternateContentText>${property.bodyContentPlainText}</alternateContentText>

<alternateContentTextEncoding>NONE</alternateContentTextEncoding>

<alternateContentTextType>text/plain</alternateContentTextType>

<clickEvent>false</clickEvent> <openEvent>false</openEvent>

<replyTo>${property.replyTo}</replyTo>

<replyToName>${property.replyToName}</replyToName>

<senderName>${property.senderName}</senderName>

<subject>${property.subjectContentPlainText}</subject>

</email>

</configuration>

</SAPnotification>
Default branch, without additional body Information for delivery date/time.
Note:
It is necessary always to use converters and not to create the body as json object directly. This is, because the values of the properties are still in an xml format and need to be converted back to a json format before they can be used in a json file.
Process Send Data
Control Type: Script
def Message processSendData(Message message) {

   def sendAt = message.getProperty('sendAt');

    if(sendAt != ""){

        message.setProperty('deliveryUTCDate', sendAt.substring(0,8));

        message.setProperty('deliveryUTCHour', sendAt.substring(8,10));

    }

    return message;

}
Use case for specific delivery date like best sending time. Split property 'sendAt' into dedicated properties for date and time.
Set Delivery Data
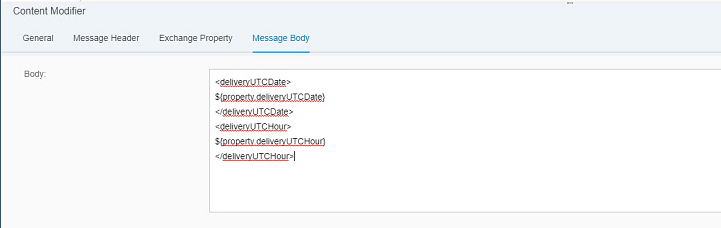
Control Type: Content Modifier
Create Body with Delivery Date
Control Type: Script
<SAPnotification>

<campaign>${property.sourceSystem}</campaign>

<channelPreferences>${property.type}</channelPreferences>

<contentText>${property.bodyContentHTML}</contentText>

<contentTextEncoding>NONE</contentTextEncoding>

<contentTextType>text/html</contentTextType>

<sender>${property.sender}</sender>

<recipients></recipients>

<configuration>

<email>

${body}

<alternateContentText>${property.bodyContentPlainText}</alternateContentText>

<alternateContentTextEncoding>NONE</alternateContentTextEncoding>

<alternateContentTextType>text/plain</alternateContentTextType>

<clickEvent>false</clickEvent>

<openEvent>false</openEvent>

<replyTo>${property.replyTo}</replyTo>

<replyToName>${property.replyToName}</replyToName>

<senderName>${property.senderName}</senderName>

<subject>${property.subjectContentPlainText}</subject>

</email>

</configuration>

</SAPnotification>
Pass additional message body information for delivery date/time
Note:
It is neccesary always to use converters and not to create the body as json object directly. This is, because the values of the properties are still in an xml format and need to be converted back to a json format before they can be used in a json file.
XML to JSON Converter
Control Type: Converter
Set Recipient
Control Type: Script
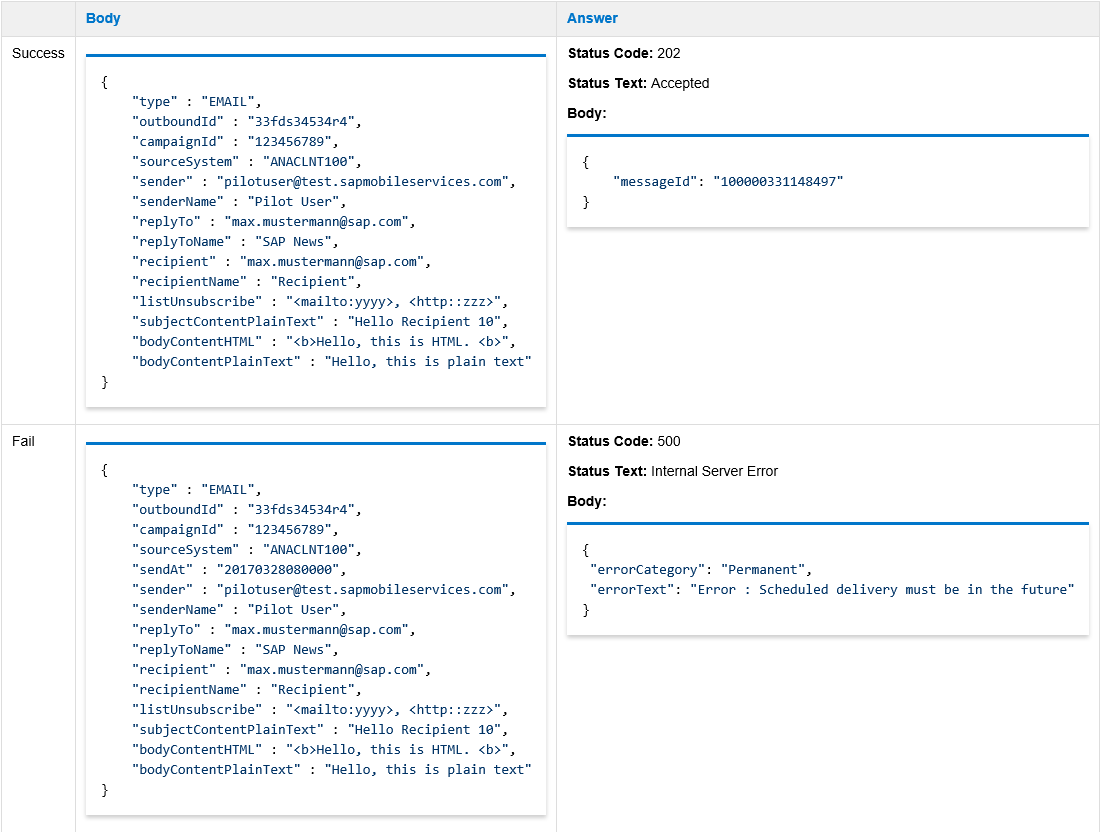
def processResponseMessage(Message message) {

    def statusCode = message.getHeaders().get("CamelHttpResponseCode").toInteger();

    if( statusCode == 200){

        message.setHeader("CamelHttpResponseCode", 202);

        message.setHeader("CamelHttpResponseText", 'Accepted');

    }

    return message;

}
Request-Reply
Control Type: Service Call
This control is responsible for:
1.sending the send mail POST request to the ESP via the defined endpoint as described in section Establishing connection to Email Service Provider and
2.retrieving the answer of the request from the ESP.
JSON to XML Converter
Control Type: Converter
Return Body
Control Type: Content Modifier
Like step Create Body, the content type is set to json and the needed information (the Notification Id), of the received ESP answer is stored in a property and used in the new message body, which will be sent to the SAP Marketing Cloud System later.
Note:
SAP Marketing expects, that the messagId is unique, which is send with the answer of ESP.
Set Status
Control Type: Content Modifier
XML to JSON Converter
Control Type: Converter
Send Mail End
Control Type: End Message
This control represents the success end point of the iFlow. The answer of the request will be sent now to the SAP Marketing Cloud System.
The Exception Sub process
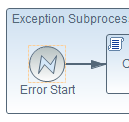
Error Start
Control Type: Error Start
Whenever an error occurs (which means errors in the SCP coding, syntactically incorrect requests, etc.), the exception sub process is entered.
Process Error
Control Type: Script
def Message processErrorData(Message message) {

    try{

        Map statusCodeCategoryMap = [

            500: 'Permanent'

        ];

        def exception = message.getProperties().get("CamelExceptionCaught");

        def exceptionStatusCode;

        def statusText;


        if(exception != null & exception in org.apache.camel.component.ahc.AhcOperationFailedException & exception.class.metaClass.methods*.name.any{it=='getStatusText'}){

            def exceptionStatusText = exception.getStatusText();

            def responseBody = exception.getResponseBody();

            exceptionStatusCode = exception.getStatusCode();

            statusText = responseBody.split('"statusText":')[1].split(',')[0];

        }else{

            exceptionStatusCode = 500;

            statusText = '"An internal error occured in the SAP Cloud Platform Integration Flow."'   }

            message.setHeader("Content-Type", "json");

            message.setHeader("CamelHttpResponseCode", exceptionStatusCode);

            message.setBody('{ "errorCategory": "' + statusCodeCategoryMap[exceptionStatusCode] + '", "errorText": ' + statusText + ' }');


            return message;

    }catch (Exception e){

            message.setHeader("Content-Type", "json");

            message.setHeader("CamelHttpResponseCode", 500);

            message.setBody('{ "errorCategory": "Permanent", "errorText": "An internal error occured in the SAP Cloud Platform Integration Flow." }');


            return message;

    }

}
The error body is created in the script directly, because many operations need to be done. First the source of the error message needs to be determined. If the send mail request of the ESP returned with the given error message, then, depending on the ESP interface, the error reason and code can be extracted. The mapping, which is defined in line 9, also depends on the connected ESP and defines, which error codes of the ESP should be mapped to which error codes of the SAP Marketing Cloud System.
In the other cases, the error was thrown in the SCP coding and the error message is transformed to a permanent error.
Error End
Control Type: Message End
Note:
The answer is sent as usual request answer and not as exception. This is needed, because the generic adapter interface expects a specific error body and not just an exception as answer.
The Logger Controls
In this section I will give you a short overview about how to add loggers to the iFlow.
Logging in iFlow
Control Type: Script
A logger can be easily added using a script control. Inside, the current message is given as input and the body can be accessed with its method "getBody". A logger message is already provided by the messageLogFactory. The new logger message can than be added with the method "addAttachmentAsString".
Observing Logged Messages in SCP
After the execution of the iFlow, the logged message can be looked up in the SAP Cloud Platform Integration Web-UI.
Postman Collection
Headers: Content-Type: application/json
Next Chapter:
2. Example ESP: SAP Digital Interconnect
3. Get Bounces
- SAP Managed Tags:
- SAP Marketing
Labels:
2 Comments
You must be a registered user to add a comment. If you've already registered, sign in. Otherwise, register and sign in.
Labels in this area
-
Business Trends
270 -
Business Trends
10 -
chitchat
1 -
customerexperience
1 -
Event Information
256 -
Event Information
17 -
Expert Insights
30 -
Expert Insights
48 -
Life at SAP
133 -
Life at SAP
1 -
Product Updates
666 -
Product Updates
24 -
SAP HANA Service
1 -
SAPHANACloud
1 -
SAPHANAService
1 -
Technology Updates
453 -
Technology Updates
15
Related Content
- SAP Hybris Marketing: Customer Data Upload in CRM and CX Questions
- SAP Commerce Cloud Q1 ‘24 Release Highlights in CRM and CX Blogs by SAP
- Maximize Results and Drive Sustainability in Fashion Retail with SAP and GK AIR Dynamic Pricing in CRM and CX Questions
- Is your organization ready for a marketing transformation? in CRM and CX Blogs by SAP
- SAP Marketing Cloud - Usage of BAdI: Create and Update Permissions for Additional Marketing Areas in CRM and CX Questions
Top kudoed authors
| User | Count |
|---|---|
| 4 | |
| 2 | |
| 2 | |
| 2 | |
| 1 | |
| 1 | |
| 1 | |
| 1 | |
| 1 | |
| 1 |