Overview
As a prerequisite to this blog i would recommend to read the blog on
user identity and management
When a business application consists of several different apps (microservices), the application router is used to provide a single entry point to that business application.
Responsibility of app router is:
- Dispatch request to backend microservices.
- Authenticate users.
- Serve static content.

We shall split this blog into 2 parts.
- Creating a Multi target application which consists of a SAP ui5 application enabled with xsuaa.
- Creating a nodejs application which exposes a API which are exposed through destinations.
Creating a Multi target application.
Login into your cloud platform account. Navigate from your global NEO account - > choose your subaccount -> choose services on the navigation view -> select “Web IDE Full-Stack”.

In the webide lets do the initial cloud foundry setting. On the navigation pain, select the last option with settings logo. Expand “workspace preferences” and select Cloud Foundry.
Enter the required details like API endpoint, organization and space. Install the builder which is necessary to deploy a multi target application from web ide.

Once the cloud foundry space is configured lets go ahead and create a multi target application.
- From the File menu select New-> Project from template
- Select Multi-target application and click Next.
- Enter the following details and click finish.
- A project template is created with a mta.yaml file.
The MTA descriptor (the mta.yaml file located in the root project folder) is automatically generated when an application project is created from scratch, and it is updated when the project properties change or when a module is added or removed. However, not all the necessary information can be generated automatically. You need to maintain the descriptor manually to define resources, properties, and dependencies, as well as fill in missing information.
- now let’s add a html5 module to mtar application, right click on the name of the mtar project and select New-> HTML5 Module.

- Enter the required details and click finish.
- Expand the UI module and notice there are 2 files which are of our interest. XS-app.json and package.json
- XS-app.json file – is mandatory and contains the main configurations of the application router.
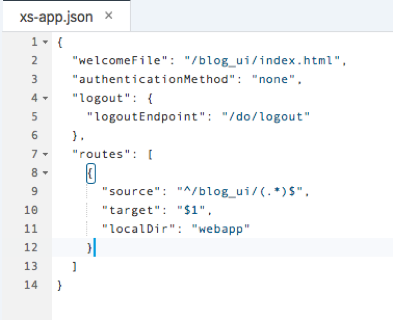
A index.html file is served by default if the HTTP request does not include a specific path.
We change the default authentication method to “route” from “none”
- A brief understanding of package.json is from here. The package descriptor is used by the npm to start the application router.
XSUAA instance
Now that we have changed the authentication method from “none” to “route”, lets go ahead and create an instance of xsuaa.
- In the navigation view of cloud cockpit, expand services and select Service Marketplace.
- Select Authorization & Trust Management. In the “Authorization & Trust Management” view choose “Instances” in the navigation view and click on New Instance.
- Choose the service plan as application and click next.
- In the specify parameters text box, mention 2 paramters as mentioned below.

- You can choose Assign application to none and choose next, give a instance name for example (blog) and click finish.
Add the XSUAA service to application.
- Once the xsuaa instance is created lets add the same to the mtar application. Open the mta.yaml file, add the requires element to UI5 module.

- Now right click on the mtar application and build. An .mtar file is generate with the project name suffixed to it in mta_archives folder. Right click on the .mtar file and choose deploy -> deploy to Cloud Foundry.

- Once the application is deployed go to the space where he app is deployed. Open the application and click on the url. User will be redirected to IDP for login credentials. Once authenticated, application launches.

Blog on Creating a nodejs application which exposes a API which are exposed through destinations will be live soon.
