
- SAP Community
- Products and Technology
- Technology
- Technology Blogs by SAP
- Cloud Integration – Configuring Scenario Using the...
Technology Blogs by SAP
Learn how to extend and personalize SAP applications. Follow the SAP technology blog for insights into SAP BTP, ABAP, SAP Analytics Cloud, SAP HANA, and more.
Turn on suggestions
Auto-suggest helps you quickly narrow down your search results by suggesting possible matches as you type.
Showing results for
Advisor
Options
- Subscribe to RSS Feed
- Mark as New
- Mark as Read
- Bookmark
- Subscribe
- Printer Friendly Page
- Report Inappropriate Content
06-04-2018
9:09 AM
This blog describes how to use the new XI receiver adapter, which will be available for customers with the 10-June-2018 release. It describes the configuration options, size limits and monitoring of your scenario.
Many customers run existing on-premise backend systems that can connect to an integration broker using the XI 3.0 protocol. In most cases, the broker is an SAP Netweaver PI (Process Integration) or PO (Process Orchestration) system. Now, with the new XI adapter, customers can also connect their on-premise backends to SAP Cloud Integration using the XI 3.0 protocol. Whereas the XI sender adapter can be used to receive messages via the XI 3.0 protocol, the XI receiver adapter can be used to send out messages using the XI 3.0 protocol.
In this blog, I focus on the XI receiver adapter and will create a sample scenario for the XI receiver adapter. In this scenario an asynchronous request is sent to a backend using the XI 3.0 protocol. In blog Configure Scenario Using the XI Sender Adapter I will continue with the end-to-end scenario configuring the XI sender adapter to receive an asynchronous response.
To send a message via the XI 3.0 protocol in Cloud Integration you need to configure an integration flow with an XI receiver adapter and you need to configure the receiver backend to receive the message.
The first step is to configure the receiver backend to receive a message via the XI 3.0 protocol. You need to check that the local integration engine is configured.
Configure the Lokal Integration Engine in the backend using transaction SXMB_ADM -> Integration Engine Configuration. Here the Role of the Business System defined should be Application System.
Then you need to construct the URL under which the local integration engine of the application system can be called. This URL needs to contain the HTTPS port the system exposes. Check in transaction SMICM -> Goto -> Services. Using the host name and port of the HTTPS service construct the URL using the following pattern:
https://<host name>:<port>/sap/xi/engine?type=receiver&sap-client=<client>
To be able to configure the XI receiver channel you need to know the name of the business system of the applications system. The easiest way to find out this information is to use transaction SLDCHECK in the application backend. In section LCR_GET_OWN_BUSINESS_SYSTEM you find the id of the business system. Usually it has the pattern: <SID>_<client>.

Use transaction SPROXY to find out which XI services are available in the system. For our sample we use the services of the PI flight booking demo examples. Check for the Service Interface FlightBookingOrderRequest_In in namespace http://sap.com/xi/XI/Demo/Airline.

Check that the interface is active. This interface will process the request and send back an asynchronous response (interface FlightBookingOrderConfirmation_Out) to Cloud Integration. The configuration for the response processing is described in the blog Configure Scenario Using the XI Sender Adapter and can be done as soon as the request configuration is successfully finished.
If this interface is not available in your backend, you can also use another Inbound interface for the scenario.
Now we have all the details to configure the integration flow in the Cloud Integration tenant.
First, we configure the integration flow in the Design section of the Web UI. Create an integration flow, connect the end message event with the receiver participant and select the XI adapter.
First, you configure the Connection Details in the Connection tab in the XI receiver channel.
In addition to the connection details, you need to define the XI-specific configuration:

In the Delivery Assurance tab, you specify the Quality of Service and, in case of Exactly Once, the Retry configuration settings. Let’s check the options in more detail.
To define the Quality of Service, you have the following options: either Exactly Once or Best Effort:
We configure Exactly Once for our sample scenario as we want to send an asynchronous message. In this case the Temporary Storage needs to be defined. You can select to store the message temporarily either in the Data Store or in JMS Queues:
If Data Store is configured as Temporary Storage, the following additional settings need to be defined:

If JMS Queue is configured as Temporary Storage the following additional settings need to be defined:

With the 25-November-2018 update an additional dropdown is available to configure the mapping of the message IDs, which is important to reach real Exactly-Once (EO) handling.
If the XI Message ID Determination dropdown is already available in your channel, you may keep it with the default setting Generate for this scenario. But you could also configure it to map the order ID from the inbound message to the XI message ID. Configure this as described in the blog Configuring ID Mapping in XI receiver Adapter.
Most fields in the XI Receiver adapter are supported for dynamic configuration. This means you can configure them from a header or property:
The following fields can be configured via header or property:
Note that you need at least version 1.6 of the XI Receiver channel. This is the version that is available with the 5th-August-2018 update.
You need to configure the correct transaction manager in the integration process for transactional end-to-end processing. Our process does only contain one direct XI Receiver without splitter or sequential multicast; so, we don’t need a specific transaction handler. Select the integration process and switch to the Processing tab. In Transaction Handling drop down select Not Required.

More details about the different transaction handling options and existing limitations are described in the blog ‘How to Configure Transaction Handling in Integration Flow’.
Configure the integration flow with the inbound channel required by your scenario. For the sample scenario we use the SOAP adapter and trigger the message from SOAP UI. But you can use any other adapter supporting asynchronous requests as well.

Now you can deploy the integration flow. Afterwards check that the integration flow was started successfully in the Manage Integration Content monitor.

To be able to call the integration flow from the SOAP UI you need to know the endpoint URL to be used. For this purpose, check the Endpoints tab in the Manage Integration Content monitor. There the URL is shown and can be copied to the clipboard using the Copy option.

Now you can run the scenario. Use the SOAP UI to send the call. You can use the following request payload:
<soapenv:Envelope xmlns:soapenv="http://schemas.xmlsoap.org/soap/envelope/" xmlns:dis="http://camel.apache.org/cxf/jaxws/dispatch">
<soapenv:Header/>
<soapenv:Body>
<ns1:FlightBookingOrderRequest xmlns:ns1='http://sap.com/xi/XI/Demo/Airline'>
<AgencyData>
<AgencyID>00000110</AgencyID>
<OrderNumber>00000001</OrderNumber>
<ItemNumber>01</ItemNumber>
<OrderType>Single</OrderType>
</AgencyData>
<FlightID>
<AirlineID>LH</AirlineID>
<ConnectionID>401</ConnectionID>
<FlightDate>2018-04-01</FlightDate>
</FlightID>
<ClassCode>Y</ClassCode>
<PassengerName>Max Muster</PassengerName>
<PassengerBirthdate>2000-12-31</PassengerBirthdate>
</ns1:FlightBookingOrderRequest>
</soapenv:Body>
</soapenv:Envelope>
After triggering the request from SoapUI, you can check the execution in Cloud Integration's monitoring and in transaction SXMB_MONI in the backend. In Cloud Integration's monitoring you will see that two messages were processed; one message for storing the message in the temporary storage and one for consuming it from there and further processing it. More details about the monitoring in Cloud Integration can be found below in the Monitoring section.

In transaction SXMB_MONI you should see two messages: the inbound request from Cloud Integration which should be processed successfully and an outbound request trying to send the response. But as we have not yet configured the response processing this message will probably have the status failed. The response processing will be configured in the blog Configure Scenario Using the XI Sender Adapter.

To check the processing in Cloud Integration detail, you can use the monitoring tools provided by Cloud Integration.
The message processing can be checked in detail in the section Monitor Message Processing. Select the message you sent and check the processing status. You should find two message processing logs, one for the inbound messaging that saves the message to the data store/JMS queue, and one for processing the message from the data store/JMS queue and sending it to the receiver system. Those two messages are correlated via the CorrelationID available in the textual representation of the message processing log.
With the 8th-July-2018 update of Cloud Integration, this Correlation ID is in addition shown in the Properties of a message processing log and you can also search for all messages having the same Correlation ID using the ID search field at the top of the monitor:

In the event of a failure when sending to the receiver system, the outbound message will go into status Retry. The message will then be retried as configured in the XI receiver channel. The detailed error information is available under the link Message Processing Log.
The messages that are stored temporarily during processing can be seen in the Data Stores tile in the Manage Stores section in the monitoring dashboard. During successful processing, the messages are removed immediately after the processing was completed. In case of an error the messages are kept in the data store to trigger the retry from there.

The used data store name is auto-generated according to the following pattern: <participant name>_< XI channel name>. Below the data store name <integration flow name>/XI is shown. In the monitor all messages are listed with a Status. Two statuses exist:
In the monitor the Message ID is shown as a link. If you select the link the respective message processing log is opened in the message monitor.
Note that data stores that do not have messages persisted at the time the monitor is opened are not shown in the monitor. This is because data stores are created "on the fly" during message processing if required and removed after the last message was removed from the data store.
In case the message was involved in several node outages, for example caused by an out-of-memory, the message gets locked in the Lock Monitor. Those messages are not retried any longer. Notice that you will probably not see any entry in this monitor during testing your sample scenario, as this entry will only be permanently available in case of a runtime node outage. So, see this section more as additional information.
The entry will be generated with the following parameters:

You need to check if the message was the root cause of the error, maybe it is just too large to be processed. Then you need to ask the sender to send the data in smaller messages. Afterwards you can delete the message in the Data Store monitor and then also delete the lock in the Manage Locks monitor. If you are confident that the message did not cause the outage you can release the lock in the Manage Locks monitor by using the Release button.
The messages that are stored temporarily during processing can be seen in the Message Queues tile in the Manage Stores section in the monitoring dashboard. During successful processing the messages are removed immediately after the processing was completed. In case of an error the messages are kept in the JMS queue to trigger the retry from there.

The used JMS queue name is auto-generated according to the following pattern: XI.<Integration Flow Name>.<Channel Name>.<Guid>. In the monitor all messages are listed with a status. Four statuses exist:
In the monitor the Message ID is shown as a link. If you select the link the respective message processing log is opened in the message monitor.
You can see the number of retries that have already been executed and the time of the next retry. You can also trigger an immediate retry of the message or delete specific messages if you no longer want them to be processed.
If you do no longer need a specific queue (for example if you un-deploy the integration flow), you have to delete the queue manually in the Queue Monitor if the queue contains messages. The queue cannot be deleted automatically because this could cause data loss. Only the scenario owner knows if the messages can be deleted or are still required.
To find unused queues in the monitor you may use the checks described in the blog ‘Checks in JMS Message Queue Monitor’.
If you are using JMS for temporary storage you need to keep in mind that the connected JMS messaging instance, that is used has limited resources. The Enterprise or Messaging License sets a limit on the queues, storage and connections that you can use in the messaging instance. The limits are described in more detail in the blog ‘JMS Resource and Size Limits‘.
When using the XI sender or receiver adapter, there are some very important facts you need to be aware of:
Use JMS option if JMS is available in the tenant
To avoid additional load on the database and to have better performance you are strongly recommended to use the JMS option for temporary storage.
Changing Storage Between Data Store and JMS May Cause Data Loss:
As the adapter stores messages for retry in case of an error either in a JMS queue or in the Data Store, you need to keep in mind that changing this setting for an already running scenario may cause loss of data. This is because there can still be messages in the old storage, which will not be retried anymore after the storage changed. Those messages would stay in the data store or JMS queue until they are deleted (see field Retain Until in Data Store or Queue monitor).
Because of this be very careful with such changed in productive scenarios. Make sure there are no messages left in the ‘old’ storage before changing this setting.
Changing Participant or Channel Name May Cause Data Loss:
As the data store or JMS queue name for retry is generated based on the participant and channel name, a new data store or JMS queue would be generated if you change one of those names. As there can still be messages in the old storage, these messages will not be retried anymore after the storage changed. Those messages would stay in the data store or JMS queue until they are deleted (see field Retain Until in Data Store or Queue monitor).
Because of this be very careful with such changes in productive scenarios. Make sure there are no message left in the ‘old’ storage before changing participant or channel name. With the 30-September-2018 update you have the option to move all messages from one JMS queue to another, if required. This option would help you in case you urgently need to change the channel or participant name or if you have done it without knowing the constraint that a new queue would be generated.
To move messages from one JMS queue to another use the Message Queues monitor. In the single line actions for the 'old' queue select the Move action:

In the Move Messages dialog select the newly generated queue and choose Move. All messages of the old queue are now moved to the new one.

Note that there is currently no such move option for the data store. The blog will be updated as soon as this is available.
Wrong transaction handling configuration may cause inconsistent data and/or data loss:
The two storage options, JMS Queue and Data Store, require different transaction handlers. Because of this it is crucial that you define the correct transaction handler:
More details about the transaction handling configuration and the constraints in configuration can be found in blog ‘How to configure Transaction Handling in Integration Flow‘.
The XI adapter currently has some limitations:
The blog will be updated regularly with the new features.
Configuring a Scenario Using the XI Receiver Adapter
Many customers run existing on-premise backend systems that can connect to an integration broker using the XI 3.0 protocol. In most cases, the broker is an SAP Netweaver PI (Process Integration) or PO (Process Orchestration) system. Now, with the new XI adapter, customers can also connect their on-premise backends to SAP Cloud Integration using the XI 3.0 protocol. Whereas the XI sender adapter can be used to receive messages via the XI 3.0 protocol, the XI receiver adapter can be used to send out messages using the XI 3.0 protocol.
In this blog, I focus on the XI receiver adapter and will create a sample scenario for the XI receiver adapter. In this scenario an asynchronous request is sent to a backend using the XI 3.0 protocol. In blog Configure Scenario Using the XI Sender Adapter I will continue with the end-to-end scenario configuring the XI sender adapter to receive an asynchronous response.
To send a message via the XI 3.0 protocol in Cloud Integration you need to configure an integration flow with an XI receiver adapter and you need to configure the receiver backend to receive the message.
Configure the Receiver System to Receive the XI Message from Cloud Integration
The first step is to configure the receiver backend to receive a message via the XI 3.0 protocol. You need to check that the local integration engine is configured.
Configure Local Integration Engine
Configure the Lokal Integration Engine in the backend using transaction SXMB_ADM -> Integration Engine Configuration. Here the Role of the Business System defined should be Application System.
Construct XI Engine URL
Then you need to construct the URL under which the local integration engine of the application system can be called. This URL needs to contain the HTTPS port the system exposes. Check in transaction SMICM -> Goto -> Services. Using the host name and port of the HTTPS service construct the URL using the following pattern:
https://<host name>:<port>/sap/xi/engine?type=receiver&sap-client=<client>
Get Name of the Business System
To be able to configure the XI receiver channel you need to know the name of the business system of the applications system. The easiest way to find out this information is to use transaction SLDCHECK in the application backend. In section LCR_GET_OWN_BUSINESS_SYSTEM you find the id of the business system. Usually it has the pattern: <SID>_<client>.
Check Available Interfaces
Use transaction SPROXY to find out which XI services are available in the system. For our sample we use the services of the PI flight booking demo examples. Check for the Service Interface FlightBookingOrderRequest_In in namespace http://sap.com/xi/XI/Demo/Airline.
Check that the interface is active. This interface will process the request and send back an asynchronous response (interface FlightBookingOrderConfirmation_Out) to Cloud Integration. The configuration for the response processing is described in the blog Configure Scenario Using the XI Sender Adapter and can be done as soon as the request configuration is successfully finished.
If this interface is not available in your backend, you can also use another Inbound interface for the scenario.
Now we have all the details to configure the integration flow in the Cloud Integration tenant.
Configure the Integration Flow Sending the XI Message
First, we configure the integration flow in the Design section of the Web UI. Create an integration flow, connect the end message event with the receiver participant and select the XI adapter.
Configure the XI Receiver Channel
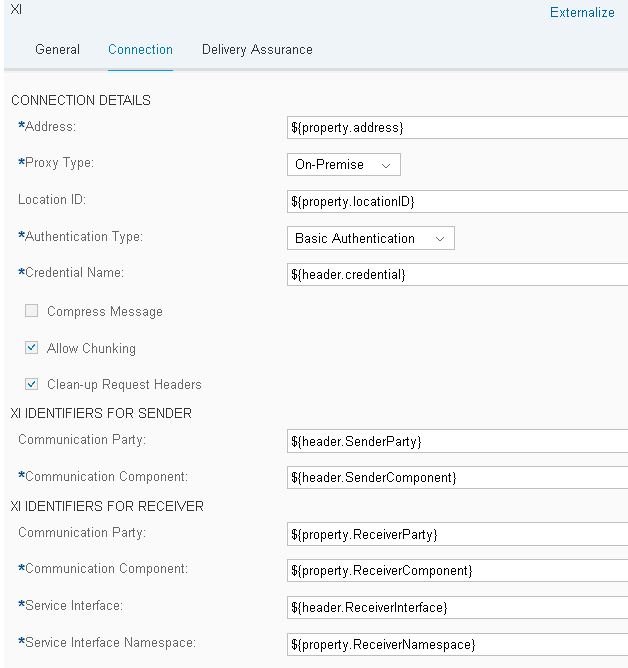
First, you configure the Connection Details in the Connection tab in the XI receiver channel.
- Configure the Address field with the XI Engine URL constructed in one of the last steps.
- Select the Proxy Type you want to use to connect to the backend. On-Premise indicates that in our sample scenario we use the cloud connector configured with the Location ID CC2 to connect to the on-premise backend. The configuration of the cloud connector will not be described here. If the cloud connector is required to connect to the backend refer to the SAP documentation for the cloud connector.
- Select the Authentication Type required, in this sample scenario we use Basic Authentication and so have to enter the Credential Name as well. Make sure that you deploy the credentials on the tenant before you deploy the integration flow.
In addition to the connection details, you need to define the XI-specific configuration:
- Define the XI Identifiers For Sender system. We define a name for the Sender Communication Component. This name is used in the backend to identify the sender of the message.
- Define the XI Identifiers For Receiver. We define the name for the Receiver Communication Component. Set the business system of the receiver backend here, use the name you retrieved in one of the last steps using the SLDCHECK.
- As Service Interface define the interface you want to call in the backend, for our scenario we use FlightBookingOrderRequest_In.
- As Service Interface Namespace define the namespace of the interface you want to call in the backend, for our scenario we use http://sap.com/xi/XI/Demo/Airline.
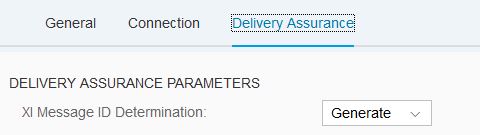
In the Delivery Assurance tab, you specify the Quality of Service and, in case of Exactly Once, the Retry configuration settings. Let’s check the options in more detail.
To define the Quality of Service, you have the following options: either Exactly Once or Best Effort:
- Best Effort is used for synchronous request-reply scenarios, that means, in case your sender system has a synchronous interface through which you like to send a message to Cloud Integration you use this option. If you select this option, you don't need to configure any additional settings because the message request and the response are processed immediately in Cloud Integration. Therefore, no temporary storage of the message for later retry is involved.
- Exactly Once is used for asynchronous one-way scenarios, that means if your sender system has an asynchronous interface through which you like to send a message to Cloud Integration you need to use this option. If you configure this option the message is temporarily stored in the Cloud Integration tenant and, if an error occurs, the message is retried from there. The sender gets the successfully received status as soon as the message is persisted in the temporary storage.
We configure Exactly Once for our sample scenario as we want to send an asynchronous message. In this case the Temporary Storage needs to be defined. You can select to store the message temporarily either in the Data Store or in JMS Queues:
- When Data Store is selected, the message is persisted temporarily in the tenant’s database. The stored message can be monitored in the data store monitor.
- If JMS Queue is selected the message is stored in a JMS queue on the connected JMS broker. Note, that the JMS Queue option is the recommended option because it is more performant but is only available if you have an Enterprise edition or Integration Suite for the tenant. (You can find more details in the in blog ‘How to activate Message Broker’.)
If Data Store is configured as Temporary Storage, the following additional settings need to be defined:
- Retry Interval: Here you define after which time a retry shall be triggered if there was an error during message processing.
- Exponential Backoff: If the flag is selected (which I would recommend), the retry interval is doubled after each unsuccessful retry.
- Maximum Retry Interval: Here you enter the limit to avoid endless increase of the retry interval caused by the exponential backoff setting. This field is only available is Exponential Backoff is selected. The recommendation is to either keep the 60 minutes or even increase it if this is acceptable for the scenario.
- Encrypt Message During Persistence: If this option is selected the message is encrypted in the data store during temporary storage. Note that this is recommended if the message contains sensitive data. However, the drawback is that this setting reduces the performance slightly.
- Note that no configuration option is available for dead-letter queue handling. If the data store is used as temporary storage, the out-of-memory handling is always active. This means that after the 3rd retry caused by an out-of-memory, a message is blocked and taken out of further processing.
If JMS Queue is configured as Temporary Storage the following additional settings need to be defined:
- Retry Interval: Here you define after which time a retry shall be triggered if there was an error during message processing.
- Exponential Backoff: If the flag is selected, which I would recommend, the retry interval is doubled after each unsuccessful retry.
- Maximum Retry Interval: Here you enter the limit to avoid endless increase of the retry interval caused by the exponential backoff setting. This field is only available is Exponential Backoff is selected. The recommendation is to either keep the 60 minutes or even increase it if this is acceptable for the scenario.
- Dead-Letter Queue: You should select this option to handle potential out-of-memory situations caused by large messages. If selected, a message is blocked and taken out of further processing after the 3rd retry caused by an out-of-memory. More details about the dead letter queue handling can be found in blog How to configure Dead Letter Handling in JMS Adapter.
- Encrypt Message During Persistence: If this option is selected, the message is encrypted in the JMS queue during temporary storage. Note that this is recommended if the message contains sensitive data. However, the drawback is that this setting reduces the performance slightly
ID Mapping in XI Receiver
With the 25-November-2018 update an additional dropdown is available to configure the mapping of the message IDs, which is important to reach real Exactly-Once (EO) handling.
If the XI Message ID Determination dropdown is already available in your channel, you may keep it with the default setting Generate for this scenario. But you could also configure it to map the order ID from the inbound message to the XI message ID. Configure this as described in the blog Configuring ID Mapping in XI receiver Adapter.
Dynamic Configuration in XI Receiver
Most fields in the XI Receiver adapter are supported for dynamic configuration. This means you can configure them from a header or property:
The following fields can be configured via header or property:
- Address
- Location ID
- Credential Name
- Private Key Alias
- Sender Communication Party
- Sender Communication Component
- Receiver Communication Party
- Receiver Communication Component
- Receiver Service Interface
- Receiver Service Interface Namespace
Note that you need at least version 1.6 of the XI Receiver channel. This is the version that is available with the 5th-August-2018 update.
Configure Transaction Handling
You need to configure the correct transaction manager in the integration process for transactional end-to-end processing. Our process does only contain one direct XI Receiver without splitter or sequential multicast; so, we don’t need a specific transaction handler. Select the integration process and switch to the Processing tab. In Transaction Handling drop down select Not Required.
More details about the different transaction handling options and existing limitations are described in the blog ‘How to Configure Transaction Handling in Integration Flow’.
Configure the Inbound Channel
Configure the integration flow with the inbound channel required by your scenario. For the sample scenario we use the SOAP adapter and trigger the message from SOAP UI. But you can use any other adapter supporting asynchronous requests as well.
- Define the Address the SOAP endpoint will expose.
- Select One-Way as Message Exchange Pattern because the scenario is an asynchronous one-way scenario.
- Select Robust as Processing Setting to receive errors back that may occur during message processing.
- Define the Authorization you want to use. As we want to connect using user and password, we use User Role with the default User Role ESBMessaging.send.
Deploy the Integration Flow
Now you can deploy the integration flow. Afterwards check that the integration flow was started successfully in the Manage Integration Content monitor.
Get the Endpoint URL to be called
To be able to call the integration flow from the SOAP UI you need to know the endpoint URL to be used. For this purpose, check the Endpoints tab in the Manage Integration Content monitor. There the URL is shown and can be copied to the clipboard using the Copy option.
Sending a Message to the Cloud Integration Endpoint
Now you can run the scenario. Use the SOAP UI to send the call. You can use the following request payload:
<soapenv:Envelope xmlns:soapenv="http://schemas.xmlsoap.org/soap/envelope/" xmlns:dis="http://camel.apache.org/cxf/jaxws/dispatch">
<soapenv:Header/>
<soapenv:Body>
<ns1:FlightBookingOrderRequest xmlns:ns1='http://sap.com/xi/XI/Demo/Airline'>
<AgencyData>
<AgencyID>00000110</AgencyID>
<OrderNumber>00000001</OrderNumber>
<ItemNumber>01</ItemNumber>
<OrderType>Single</OrderType>
</AgencyData>
<FlightID>
<AirlineID>LH</AirlineID>
<ConnectionID>401</ConnectionID>
<FlightDate>2018-04-01</FlightDate>
</FlightID>
<ClassCode>Y</ClassCode>
<PassengerName>Max Muster</PassengerName>
<PassengerBirthdate>2000-12-31</PassengerBirthdate>
</ns1:FlightBookingOrderRequest>
</soapenv:Body>
</soapenv:Envelope>
After triggering the request from SoapUI, you can check the execution in Cloud Integration's monitoring and in transaction SXMB_MONI in the backend. In Cloud Integration's monitoring you will see that two messages were processed; one message for storing the message in the temporary storage and one for consuming it from there and further processing it. More details about the monitoring in Cloud Integration can be found below in the Monitoring section.
In transaction SXMB_MONI you should see two messages: the inbound request from Cloud Integration which should be processed successfully and an outbound request trying to send the response. But as we have not yet configured the response processing this message will probably have the status failed. The response processing will be configured in the blog Configure Scenario Using the XI Sender Adapter.
Monitoring
To check the processing in Cloud Integration detail, you can use the monitoring tools provided by Cloud Integration.
Message Monitoring
The message processing can be checked in detail in the section Monitor Message Processing. Select the message you sent and check the processing status. You should find two message processing logs, one for the inbound messaging that saves the message to the data store/JMS queue, and one for processing the message from the data store/JMS queue and sending it to the receiver system. Those two messages are correlated via the CorrelationID available in the textual representation of the message processing log.
With the 8th-July-2018 update of Cloud Integration, this Correlation ID is in addition shown in the Properties of a message processing log and you can also search for all messages having the same Correlation ID using the ID search field at the top of the monitor:
In the event of a failure when sending to the receiver system, the outbound message will go into status Retry. The message will then be retried as configured in the XI receiver channel. The detailed error information is available under the link Message Processing Log.
Data Store Monitor (For Messages Stored in Data Store)
The messages that are stored temporarily during processing can be seen in the Data Stores tile in the Manage Stores section in the monitoring dashboard. During successful processing, the messages are removed immediately after the processing was completed. In case of an error the messages are kept in the data store to trigger the retry from there.
The used data store name is auto-generated according to the following pattern: <participant name>_< XI channel name>. Below the data store name <integration flow name>/XI is shown. In the monitor all messages are listed with a Status. Two statuses exist:
- Status Waiting means that the message waits for consumption.
- Status Overdue indicates that the message was not consumed and processed in the due time, which is 2 days in case of the XI adapter.
In the monitor the Message ID is shown as a link. If you select the link the respective message processing log is opened in the message monitor.
Note that data stores that do not have messages persisted at the time the monitor is opened are not shown in the monitor. This is because data stores are created "on the fly" during message processing if required and removed after the last message was removed from the data store.
Lock Monitor (For Messages Stored in Data Store)
In case the message was involved in several node outages, for example caused by an out-of-memory, the message gets locked in the Lock Monitor. Those messages are not retried any longer. Notice that you will probably not see any entry in this monitor during testing your sample scenario, as this entry will only be permanently available in case of a runtime node outage. So, see this section more as additional information.
The entry will be generated with the following parameters:
- Component: XI
- Source: XI_<integration flow name>.<participant name>_<channel name>
- Entry ID: corresponds to the ID shown in data store monitor
You need to check if the message was the root cause of the error, maybe it is just too large to be processed. Then you need to ask the sender to send the data in smaller messages. Afterwards you can delete the message in the Data Store monitor and then also delete the lock in the Manage Locks monitor. If you are confident that the message did not cause the outage you can release the lock in the Manage Locks monitor by using the Release button.
Queue Monitor (For Messages Stored in JMS Queue)
The messages that are stored temporarily during processing can be seen in the Message Queues tile in the Manage Stores section in the monitoring dashboard. During successful processing the messages are removed immediately after the processing was completed. In case of an error the messages are kept in the JMS queue to trigger the retry from there.
The used JMS queue name is auto-generated according to the following pattern: XI.<Integration Flow Name>.<Channel Name>.<Guid>. In the monitor all messages are listed with a status. Four statuses exist:
- Status Waiting means that the message waits for consumption.
- Status Failed indicates that the last processing or retry of the message ended with an error.
- Status Blocked comes into play if dead-letter queue is configured in XI channel and if the message was involved in several node outages and so is taken out of processing. See dead-letter queue handling above.
- Status Overdue indicates that the message was not consumed and processed in the due time, which is 2 days in case of the XI adapter.
In the monitor the Message ID is shown as a link. If you select the link the respective message processing log is opened in the message monitor.
You can see the number of retries that have already been executed and the time of the next retry. You can also trigger an immediate retry of the message or delete specific messages if you no longer want them to be processed.
Queue Deletion
If you do no longer need a specific queue (for example if you un-deploy the integration flow), you have to delete the queue manually in the Queue Monitor if the queue contains messages. The queue cannot be deleted automatically because this could cause data loss. Only the scenario owner knows if the messages can be deleted or are still required.
To find unused queues in the monitor you may use the checks described in the blog ‘Checks in JMS Message Queue Monitor’.
JMS Resource and Size Limits
If you are using JMS for temporary storage you need to keep in mind that the connected JMS messaging instance, that is used has limited resources. The Enterprise or Messaging License sets a limit on the queues, storage and connections that you can use in the messaging instance. The limits are described in more detail in the blog ‘JMS Resource and Size Limits‘.
Important Considerations and Limitations
When using the XI sender or receiver adapter, there are some very important facts you need to be aware of:
Use JMS option if JMS is available in the tenant
To avoid additional load on the database and to have better performance you are strongly recommended to use the JMS option for temporary storage.
Changing Storage Between Data Store and JMS May Cause Data Loss:
As the adapter stores messages for retry in case of an error either in a JMS queue or in the Data Store, you need to keep in mind that changing this setting for an already running scenario may cause loss of data. This is because there can still be messages in the old storage, which will not be retried anymore after the storage changed. Those messages would stay in the data store or JMS queue until they are deleted (see field Retain Until in Data Store or Queue monitor).
Because of this be very careful with such changed in productive scenarios. Make sure there are no messages left in the ‘old’ storage before changing this setting.
Changing Participant or Channel Name May Cause Data Loss:
As the data store or JMS queue name for retry is generated based on the participant and channel name, a new data store or JMS queue would be generated if you change one of those names. As there can still be messages in the old storage, these messages will not be retried anymore after the storage changed. Those messages would stay in the data store or JMS queue until they are deleted (see field Retain Until in Data Store or Queue monitor).
Because of this be very careful with such changes in productive scenarios. Make sure there are no message left in the ‘old’ storage before changing participant or channel name. With the 30-September-2018 update you have the option to move all messages from one JMS queue to another, if required. This option would help you in case you urgently need to change the channel or participant name or if you have done it without knowing the constraint that a new queue would be generated.
To move messages from one JMS queue to another use the Message Queues monitor. In the single line actions for the 'old' queue select the Move action:
In the Move Messages dialog select the newly generated queue and choose Move. All messages of the old queue are now moved to the new one.
Note that there is currently no such move option for the data store. The blog will be updated as soon as this is available.
Wrong transaction handling configuration may cause inconsistent data and/or data loss:
The two storage options, JMS Queue and Data Store, require different transaction handlers. Because of this it is crucial that you define the correct transaction handler:
- JMS Queue: If a JMS Queue is used for temporary storage in the XI receiver adapter and the XI adapter is used in a sequential multicast or splitter pattern, you need to configure the Transaction Handling as Required for JMS.
- Data Store: If the Data Store is used for temporary storage in the XI receiver adapter and the XI adapter is used in a sequential multicast or splitter pattern, you need to configure the Transaction Handling as Required for JDBC.
- For the XI sender adapter no transaction handler is required.
- For the XI receiver adapter no transaction handler is required if the XI adapter is not used in a sequential multicast or in a split scenario.
- As there is no distributed transaction support in Cloud Integration you cannot combine JMS and JDBC transactions. This means that you cannot ensure transactional behavior in scenarios using the XI receiver adapter with JMS storage in multicast scenarios together with flow steps that need a JDBC transaction handler, like for example Data Store or Write Variables.
More details about the transaction handling configuration and the constraints in configuration can be found in blog ‘How to configure Transaction Handling in Integration Flow‘.
The XI adapter currently has some limitations:
- No explicit retry handling via Retry Header in Exception Sub-Process possible possible yet. -> Solved, see blog Configuring Explicit Retry in Exception Sub-Process for XI Adapter Scenarios.
- MPL status stays in Retry even if the message is deleted from JMS queue or data store. Nevertheless in runtime no retry is executed anymore. -> solved, messages are now getting status Cancelled when the corresponding message is manually deleted in JMS or Data Store monitor. Note that the deletion of a message after the expiry date does not lead to Cancelled messages because the delete is directly done on the database/JMS broker.
- XI receiver adapter is currently neither allowed in Request-Reply nor in Send step. -> Solved, see blog Usage of XI Adapter in Send and Request-reply Step.
- Attachments are not supported -> solved with the latest versions of the XI sender and receiver adapter (February 2021)
- Packaging is not supported -> solved with the latest version of the XI sender adapter (April 2021)
- Acknowledgements are not supported
- Fault Messages are not supported
- ExactlyOnceInOrder (EOIO) is not supported.
The blog will be updated regularly with the new features.
- SAP Managed Tags:
- SAP Integration Suite,
- Cloud Integration
Labels:
64 Comments
- « Previous
-
- 1
- 2
- Next »
You must be a registered user to add a comment. If you've already registered, sign in. Otherwise, register and sign in.
Labels in this area
-
ABAP CDS Views - CDC (Change Data Capture)
2 -
AI
1 -
Analyze Workload Data
1 -
BTP
1 -
Business and IT Integration
2 -
Business application stu
1 -
Business Technology Platform
1 -
Business Trends
1,661 -
Business Trends
88 -
CAP
1 -
cf
1 -
Cloud Foundry
1 -
Confluent
1 -
Customer COE Basics and Fundamentals
1 -
Customer COE Latest and Greatest
3 -
Customer Data Browser app
1 -
Data Analysis Tool
1 -
data migration
1 -
data transfer
1 -
Datasphere
2 -
Event Information
1,400 -
Event Information
65 -
Expert
1 -
Expert Insights
178 -
Expert Insights
280 -
General
1 -
Google cloud
1 -
Google Next'24
1 -
Kafka
1 -
Life at SAP
784 -
Life at SAP
11 -
Migrate your Data App
1 -
MTA
1 -
Network Performance Analysis
1 -
NodeJS
1 -
PDF
1 -
POC
1 -
Product Updates
4,577 -
Product Updates
330 -
Replication Flow
1 -
RisewithSAP
1 -
SAP BTP
1 -
SAP BTP Cloud Foundry
1 -
SAP Cloud ALM
1 -
SAP Cloud Application Programming Model
1 -
SAP Datasphere
2 -
SAP S4HANA Cloud
1 -
SAP S4HANA Migration Cockpit
1 -
Technology Updates
6,886 -
Technology Updates
408 -
Workload Fluctuations
1
Related Content
- Top Picks: Innovations Highlights from SAP Business Technology Platform (Q1/2024) in Technology Blogs by SAP
- Consuming SAP with SAP Build Apps - Connectivity options for low-code development - part 2 in Technology Blogs by SAP
- Cloud Integration: Manually Sign / Verify XML payload based on XML Signature Standard in Technology Blogs by SAP
- HTTP receiver adapter - inbuilt retry option in Technology Q&A
- SAP Cloud Integration: Understanding the XML Digital Signature Standard in Technology Blogs by SAP
Top kudoed authors
| User | Count |
|---|---|
| 13 | |
| 10 | |
| 10 | |
| 7 | |
| 6 | |
| 5 | |
| 5 | |
| 5 | |
| 5 | |
| 4 |