
- SAP Community
- Products and Technology
- Technology
- Technology Blogs by SAP
- Deep Dive 10 with SAP Cloud SDK: Generating Java V...
Technology Blogs by SAP
Learn how to extend and personalize SAP applications. Follow the SAP technology blog for insights into SAP BTP, ABAP, SAP Analytics Cloud, SAP HANA, and more.
Turn on suggestions
Auto-suggest helps you quickly narrow down your search results by suggesting possible matches as you type.
Showing results for
former_member27
Participant
Options
- Subscribe to RSS Feed
- Mark as New
- Mark as Read
- Bookmark
- Subscribe
- Printer Friendly Page
- Report Inappropriate Content
04-30-2018
5:02 PM
Disclaimer: This blog post is only applicable for the SAP Cloud SDK version of at most 2.19.2. We plan to continuously migrate these blog posts into our List of Tutorials. Feel free to check out our updated Tutorials on the SAP Cloud SDK.
Note: This post is part of a series. For a complete overview visit the SAP Cloud SDK Overview.
SAP Cloud SDK provides a fluent and type-safe java API to build queries and to access S/4HANA OData endpoints. It is achieved by means of the Java Virtual Data Model (VDM), SAP's type-safe OData querying Java APIs. In this blog post, we describe how to use VDM for white-listed APIs of SAP S/4HANA.
With the SDK version 1.9.4 for beta-testing and later with the version 1.10.0 for productive use, we have released the VDM generator that allows to generate VDM classes for custom OData services.
In this blog post, we describe one of the possible use cases for the released generator: generating the VDM for a custom OData service of SAP S/4HANA.
Also, see the following GitHub example that demonstrates the project setup required to use the generator as a maven plugin.
In case you have questions or suggestions, reach out to us on Stackoverflow with the sap-cloud-sdk tag. Our development team is actively monitoring this tag and is making sure that the questions and requests are addressed properly. You can use this opportunity to share your experiences and to get advice from a broader Stackoverflow community. Of course, we are happy to receive your questions and suggestions in the comments to our blog posts, as well.

Goal of This Blog Post
In this blog post, we show the end-to-end process of integrating the VDM for a custom OData service in your Java project. We cover aspects, such as creation of an in-app extension (custom business object) using the key user tools, exposing a custom OData service in S/4HANA Cloud, generating the VDM for the created custom OData service, and using the generated VDM in a Java project.
At the end of this article, we also provide some troubleshooting notes based on the feedback that we have got.
Out of Scope
In addition to the generator itself, we also cover some SAP S/4HANA in-app extensibility steps in order to create a custom OData service. However, as the focus of this blog post is the VDM generator, we will not explain the SAP S/HANA in-app extensibility options in many details. For more information related to this topic, please, see the blog The Key User Extensibility Tools of S/4 HANA.
The detailed explanation of the usage of the OData VDM itself is also out of scope in this blog post. For more details, please, refer to the blog Step 4 with SAP Cloud SDK: Calling an OData Service with the Virtual Data Model.
There are several alternatives that you can use to run the generator, see the section Usage Options. In this blog post, we are focusing on the maven plugin. In the SDK release blog for the version 1.10.0, we also explain how to use the VDM generator using the command line.
Prerequisites
To be able to execute the steps explained in this blog post, you need to prepare your local development environment. This takes just a few minutes - the required steps and tools are explained in the blog Step 1 with SAP Cloud SDK: Set up.
To execute all the steps described in this tutorial, you need have access to SAP S/4HANA and the necessary roles assignments to perform in-app extensibility with key-user tools. Also, we assume that you are already familiar with the main concepts and principles of the in-app extensibility. For more information, refer to the blog posts:
The Key User Extensibility Tools of S/4 HANA
SAP S/4HANA Cloud – Key User In-App Extensibility
We also recommend the book Extending SAP S/4HANA that covers the various extensibility aspects in details.
In case you do not have access to SAP S/4HANA system but you are still interested to evaluate the OData generator, you can skip the steps introduced in the section Create Custom OData API in SAP S/4HANA and just copy the provided metadata file into your project structure, as described in section Prepare Your Project. You will be able to run the VDM generation step and create your servlet leaving out the integration tests.
Recap on OData VDM
Since the first versions of the SAP Cloud SDK, it has been providing the VDM for white-listed SAP S/4HANA OData services that can be found in SAP API hub. In VDM, each service is represented as a Java interface and a corresponding implementation that calls OData service in S/4HANA. Take a look at the following source code demonstrating the execution of the query against the white-listed business partner API:
final List<BusinessPartner> businessPartners =

        new DefaultBusinessPartnerService()

                .getAllBusinessPartner()

                .select(BusinessPartner.BUSINESS_PARTNER,

                        BusinessPartner.LAST_NAME,

                        BusinessPartner.FIRST_NAME,

                        BusinessPartner.IS_MALE,

                        BusinessPartner.IS_FEMALE,

                        BusinessPartner.CREATION_DATE)

                .execute();
Why do we recommend to use the VDM when connecting to OData services from your Java code?
The good explanation is provided in the blog post Step 4 with SAP Cloud SDK: Calling an OData Service with the Virtual Data Model.
In short, with VDM, you work with classes and methods instead of strings while building the OData queries, so you cannot make a typo, which is not possible to "catch" during the compilation of your source code. The VDM provides the Java data types for entities and ensures type safety for OData methods, such as filter, select, and orderBy.
Comparing the OData and SQL worlds, the OData VDM does the same job for OData as Query DSL, such as JOOQ for SQL, providing a domain-specific language to construct queries from classes generated from metadata.
VDM Generator
In many cases, SAP S/4HANA extension is a combination of in-app and side-by-side approaches. In this case, custom objects, such as business objects or CDS view and custom OData services can be created in S/4HANA and consumed by applications running in SAP Cloud Platform. New custom OData services are not represented in SAP API Hub and therefore they do not have corresponding VDM objects in the SAP Cloud SDK.
To allow the developers to enjoy the same type-safe fluent Java API for accessing custom OData services, we have released the VDM generator. In the SDK version 1.10.0, we have announced the productive release of this component.
As announced in the release blog, you can use one of the following options to run the generator:
Option 1, Standalone Jar file via command line: Just download the latest version from Maven Central (search for odata-generator-cli) and follow the instructions provided in the corresponding section of the release blog
Option 2, Java dependency: Include the odata-generator artifact as a dependency in your pom and use DataModelGenerator class directly in your code to trigger the generation (you can also update the version of the generator based on the latest SDK release, which you can find in our release notes😞
<dependency>

    <groupId>com.sap.cloud.s4hana.datamodel</groupId>

    <artifactId>odata-generator</artifactId>

    <version>2.9.1</version>

</dependency>
Option 3, Maven plugin: Add the odata-generator-maven-plugin to your maven configuration and generate sources from the metadata during the project build.
Whatever option you choose, you can use execution parameters that allow you to fine tune the behavior of the generator. Please, see the section Under the Hood for a more detailed explanation of these parameters.
In this blog post, we have chosen to run the generator using the maven plugin option (Option 3) in the project. With this approach, we reduce the manual effort of separate generating of sources on every metadata change and ensure consistency of the generated VDM and the metadata file on each build of the project.
The picture below describes the main components involved in the setup described in this blog.

In the sections below, we explain these components one by one:
I. Extend SAP S/4HANA Cloud with a custom OData service: Create a custom business object (Social Network Account) and a corresponding OData service in SAP S/4HANA Cloud
II. Generate the VDM: Set up a project and generate the VDM for a custom service using the generator as maven plugin
III. Consume the service via VDM: Write a simple Java application and a corresponding integration test
I. Extend SAP S/4HANA Cloud with a Custom OData Service
Before moving to the OData VDM generator functionality, we prepare a custom OData service that will be used for the generation.
For this purpose, we use the key user extensibility tools in SAP S/4HANA Cloud system. Note that you can also create a custom OData service in SAP S/4HANA On-Premise in case you do not have access to the Cloud edition.
Step 1: Create a custom business object and generate the corresponding OData service and UI
For the purpose of the demo in this blog post, we create a simple business object: social network accounts. It allows to store the data regarding social network accounts for business partners and employees. To create this business object, we use the application "Custom Business Objects" that can be found in the Extensibility catalog.
In the screenshot below, you see that we have activated UI and service generation for our custom business object. UI generation will automatically create the Fiori UI application that we will later use to create the data. The service generation option means that the OData service will be generated.

The following fields are maintained for this business object: ID, provider, account, all the added fields are of type "text":

As we have chosen to generate the UI and the OData service, publishing the business object will create these related artifacts.
To access the generated UI, we need to assign the business object to a catalog. After we have done this, the application will be immediately available for all users with the roles containing this catalog. In the next step, we will do this assignment to be able to access and to write the data via UI.
Step 2. Add the business object to the catalog
Assignment to a catalog can be done via the "Maintain Catalogs" option in the initial screen of the custom business object. We assign this object to the catalog "Employee - Master Data".
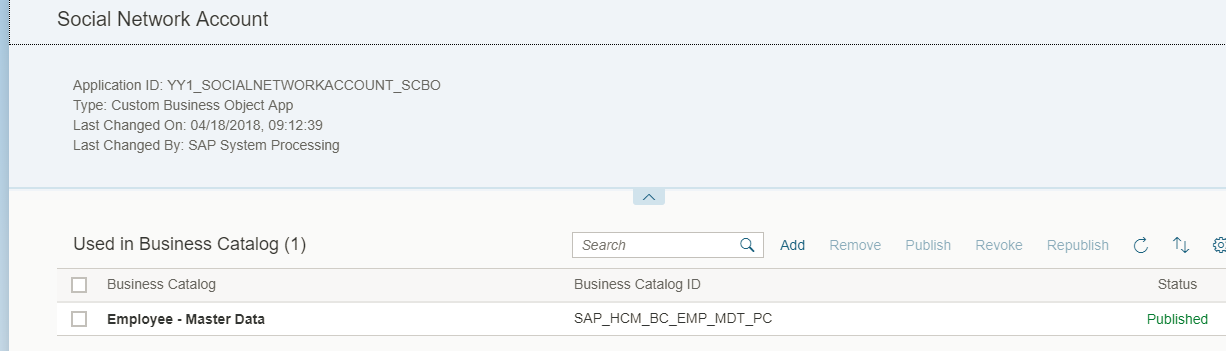
After publishing the object in the catalog, the newly created application is available in the Fiori Launchpad. In the next step, we will evaluate this application and create the data using the generated UI.
Step 3. Add data via UI in SAP S/4HANA Cloud
In the Fiori Launchpad, we can now see the newly created application:

We add the following few records. This data will be later accessed in our Java application:

We can now easily access the created data via the UI in Fiori Launchpad. We now need to enable access to the corresponding API from our Java application that we will build. For that purpose, we need a custom communication scenario and a corresponding communication arrangement.
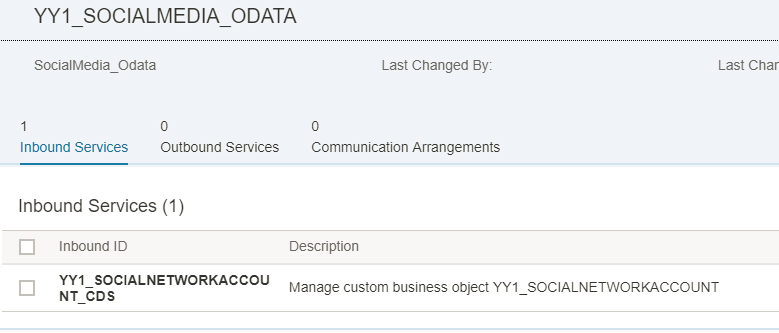
Step 4. Create custom communication scenario, user, system, and arrangement
We create the communication scenario, assigning the generated social network service as an inbound service, as it will be called from external systems, such as the local machine (for integration testing) and SAP Cloud Platform applications.
With the custom communication scenario in place, you can now create a communication arrangement based on the scenario. The creation of communication arrangement for custom OData API does not differ from the one for standard OData services.
The blog Deep Dive 1 with SAP Cloud SDK: An End-to-End Story on the Virtual Data Model using the Business Par...provides a good practical introduction on how to create the communication system, user, and arrangement in order to enable access to APIs from the local machine, which is sufficient for the example given in this blog post.
Also, please refer to this blog post to get overview on the concept of SAP S/4HANA Cloud communication and integration artifacts.
Step 7. Evaluate the generated OData service
Now, when we have enabled the generated custom OData service, let us take a look at its metadata. The metadata of the OData service is represented by an edmx file that can be accessed by adding /$metadata to the OData service base path. We use the following URL:
<S4_URL>/sap/opu/odata/sap/YY1_SOCIALNETWORKACCOUNT_CDS/$metadata
<edmx:Edmx xmlns:edmx="http://schemas.microsoft.com/ado/2007/06/edmx" xmlns:m="http://schemas.microsoft.com/ado/2007/08/dataservices/metadata" xmlns:sap="http://www.sap.com/Protocols/SAPData" Version="1.0">

<edmx:Reference xmlns:edmx="http://docs.oasis-open.org/odata/ns/edmx" Uri="https://my300098.s4hana.ondemand.com:443/sap/opu/odata/IWFND/CATALOGSERVICE;v=2/Vocabularies(TechnicalName='%2FIWBEP%2FVOC_COMMON',Version='0001',SAP__Origin='')/$value">

<edmx:Include Namespace="com.sap.vocabularies.Common.v1" Alias="Common"/>

</edmx:Reference>

<edmx:Reference xmlns:edmx="http://docs.oasis-open.org/odata/ns/edmx" Uri="https://my300098.s4hana.ondemand.com:443/sap/opu/odata/IWFND/CATALOGSERVICE;v=2/Vocabularies(TechnicalName='%2FIWBEP%2FVOC_CAPABILITIES',Version='0001',SAP__Origin='')/$value">

<edmx:Include Namespace="Org.OData.Capabilities.V1" Alias="Capabilities"/>

</edmx:Reference>

<edmx:DataServices m:DataServiceVersion="2.0">

<Schema xmlns="http://schemas.microsoft.com/ado/2008/09/edm" Namespace="YY1_SOCIALNETWORKACCOUNT_CDS" xml:lang="en" sap:schema-version="1">

<EntityType Name="YY1_SOCIALNETWORKACCOUNTType" sap:label="Social Network Account" sap:content-version="1">

<Key>

<PropertyRef Name="SAP_UUID"/>

</Key>

<Property Name="SAP_UUID" Type="Edm.Guid" Nullable="false" sap:label="UUID" sap:quickinfo="16 Byte UUID in 16 Bytes (Raw Format)"/>

<Property Name="ID" Type="Edm.String" MaxLength="20" sap:label="ID"/>

<Property Name="Provider" Type="Edm.String" MaxLength="20" sap:label="Provider"/>

<Property Name="Account" Type="Edm.String" MaxLength="20" sap:label="Account"/>

</EntityType>

<EntityContainer Name="YY1_SOCIALNETWORKACCOUNT_CDS_Entities" m:IsDefaultEntityContainer="true" sap:supported-formats="atom json xlsx">

<EntitySet Name="YY1_SOCIALNETWORKACCOUNT" EntityType="YY1_SOCIALNETWORKACCOUNT_CDS.YY1_SOCIALNETWORKACCOUNTType" sap:searchable="true" sap:content-version="1"/>

</EntityContainer>

<Annotations xmlns="http://docs.oasis-open.org/odata/ns/edm" Target="YY1_SOCIALNETWORKACCOUNT_CDS.YY1_SOCIALNETWORKACCOUNTType/ID">

<Annotation Term="Common.FieldControl" EnumMember="Common.FieldControlType/Mandatory"/>

</Annotations>

<Annotations xmlns="http://docs.oasis-open.org/odata/ns/edm" Target="YY1_SOCIALNETWORKACCOUNT_CDS.YY1_SOCIALNETWORKACCOUNTType">

<Annotation Term="Common.SemanticKey">

<Collection>

<PropertyPath>ID</PropertyPath>

</Collection>

</Annotation>

</Annotations>

<atom:link xmlns:atom="http://www.w3.org/2005/Atom" rel="self" href="https://my300098.s4hana.ondemand.com:443/sap/opu/odata/sap/YY1_SOCIALNETWORKACCOUNT_CDS/$metadata"/>

<atom:link xmlns:atom="http://www.w3.org/2005/Atom" rel="latest-version" href="https://my300098.s4hana.ondemand.com:443/sap/opu/odata/sap/YY1_SOCIALNETWORKACCOUNT_CDS/$metadata"/>

</Schema>

</edmx:DataServices>

</edmx:Edmx>
The wiki page will helps to understand some important aspects of the metadata file. Let us note some of them and explain them in more details in the Under the Hood section:
- This edmx file contains a description of a single entity with the name YY1_SOCIALNETWORKACCOUNTType and label Social Network Account.
- The entity contains four properties, three of them were created by a user and are of type Edm.String (ID, Provider, Account) and one added by the system: SAP_UUID of type Edm.Guid. All of them contain Name and sap:label attributes.
- Within the EntityContainer tag in the EntitySet tag level, the attributes such as sap:addressable, sap:creatable, sap:deletable, sap:updatable can be specified to change the default behavior of an OData service. Please, see the Under the Hood section to review how the SDK considers these parameters for the VDM generation.
- The tag <atom:link> is used to specify the base path to the OData service that is also considered during the VDM generation.
II. Generate VDM
After we have prepared the consumable service on the SAP S/4HANA Cloud side, we can now move forward with the generation of the VDM for this service. In this blog post we focus on the maven archetype option and connect the generation of sources with the maven lifecycle.
We generate the project from the SDK archtype scp-cf-tomee, as it is described in the blog Step 3 with SAP Cloud SDK: HelloWorld on SCP CloudFoundry. Note, however, that you can use any other project structure and you just need to add few dependencies to be able to integrate the generator.
After creating the project structure, we add the edmx folder and the corresponding Social Network Account service metadata file into the application folder, as shown in the screenshot below. We just copied the metadata file that we saw in the previous section into the project structure.

Now, we can adapt the pom file of our project application pom.xml to integrate and customize the VDM generator component. We recommend to use the latest version of the SDK VDM generator in the code snippet below - we give an example with the version 2.9.1. You can look up the latest available version in the SDK release notes.
So, go to the file <root project folder>/application/pom.xml and make the required changes described below.
We add the generator plugin into the pom under <build> <plugins> section, as follows. Please note that if you use the generator for services other then SAP S/4HANA services, you might need to add the parameter defaultBasePath to the configuration section, which should provide the base path to the exposed API (e.g odata/v2/). For example, see the tutorial on SAP Success Factors integration with the example of the base path for Success Factors services.
<plugin>

    <groupId>com.sap.cloud.s4hana.datamodel</groupId>

    <artifactId>odata-generator-maven-plugin</artifactId>

    <version>2.9.1</version>

    <executions>

        <execution>

            <id>generate-consumption</id>

            <phase>generate-sources</phase>

            <goals>

                <goal>generate</goal>

            </goals>

            <configuration>

                <inputDirectory>${project.basedir}/edmx</inputDirectory>

                <outputDirectory>${project.build.directory}/vdm</outputDirectory>

                <deleteOutputDirectory>true</deleteOutputDirectory>

                <packageName>com.mycompany.vdm</packageName>

            </configuration>

        </execution>

    </executions>

</plugin>
Note that the execution of the generator is bound the generate-sources phase, which is part of maven's build lifecycle. Therefore, the generation will be executed on each project build.
Here, we use the following parameters to configure the generator.
| Parameter Value | Explanation |
| <inputDirectory>${project.basedir}/edmx</inputDirectory> | Location of the metadata .edmx file that is used as a source for the generation. |
| <outputDirectory>${project.build.directory}/vdm</outputDirectory> | Location of the output directory for generated sources. |
| <deleteOutputDirectory>true</deleteOutputDirectory> | Target directory is deleted before every execution of the generator |
| <packageName>com.mycompany.vdm</packageName> | Package name for the generated sources |
See the Under the Hood section for more information regarding the parameters that you can use to fine tune the generator behavior.
In addition, we need to add the following plugin to specify that the VDM target folder should be considered as a source folder by maven:
<plugin>

    <groupId>org.codehaus.mojo</groupId>

    <artifactId>build-helper-maven-plugin</artifactId>

    <version>3.0.0</version>

    <executions>

        <execution>

            <phase>generate-sources</phase>

            <goals>

                <goal>add-source</goal>

            </goals>

            <configuration>

                <sources>

                    <source>${project.build.directory}/vdm</source>

                </sources>

            </configuration>

        </execution>

    </executions>

</plugin>
As lombok and dependency injections are used by the generated VDM classes, we also add the following dependencies if they are not included into the project yet:
<dependency>

    <groupId>org.projectlombok</groupId>

    <artifactId>lombok</artifactId>

    <scope>provided</scope>

</dependency>

<dependency>

    <groupId>javax.inject</groupId>

    <artifactId>javax.inject</artifactId>

    <scope>provided</scope>

</dependency>
You can find the final pom file for our example project on GitHub.
Now, our pom file is ready and we can run the maven command to build the project, which will also trigger the VDM sources generation.
mvn clean installAfter the generation and the build is through, you can find the target and the vdm folder in your project structure, as you have specified in the configuration of the generator maven plugin in <outputDirectory>..</outputDirectory>.

In the vdm folder, you can now find two packages, containing the generated sources:
namespaces.socialnetworkaccount that includes classes corresponding to OData Entities (in our case, it is a single class SocialNetworkAccount) and corresponding fluent helpers that are used to build OData with the fluent Java APIs (refer to the Blog for more details).
services that contains the Java interface and implementation that calls custom OData service in S/4HANA.
III. Consume the Service via VDM
Now, we can integrate the generated VDM classes to build OData queries using fluent and type safe Java APIs. We create a simple servlet in order to test this. The servlet implements doGet() and retrieves the social network accounts from SAP S/4HANA Cloud and returns this data as a json list. See the final source code of the servlet in GitHub.
The code snippet below demonstrates the usage of the generated VDM for the custom OData service:
final List<SocialNetworkAccount> socialNetworkAccounts = new DefaultSocialNetworkAccountService()

                    .getAllSocialNetworkAccount()

                    .select(SocialNetworkAccount.PROVIDER, SocialNetworkAccount.ACCOUNT)

                    .execute();
To make sure that the servlet is working as expected and the connection and data retrieval using the VDM succeeds, we add an integration test for the /accounts. Note that this step will not work in case you do not have access to SAP S/4HANA and just used the provided template edmx file to generate sources.
As we have already added some social network accounts via business objects UI (see in I. Extend SAP S/4HANA Cloud with a Custom OData Service), we expect that the endpoint returns some data. To check that, we build a simple integration test:
@Test

public void testService()

{

    when().

            get("/accounts").

            then().

            statusCode(200).

            contentType(ContentType.JSON).

            body("$", hasSize(greaterThan(0))).

            body("[0].Provider", not(isEmptyOrNullString()));

}
Please, note that you will need systems.json and credentials.yml files in the resources folder in your integration tests to mock ErpDestination in tests. Please, refer to the blog Step 13 with SAP Cloud SDK: Automated Testing section Mock ERP Destination for more details on this topic.

By running this test, we ensure that building and executing the OData query using the generated VDM succeeds:

Under the Hood
In the example above, we used some parameters of the maven odata generator plugin to fine tune the behavior of the generator. The table below lists all the available parameters and their description. Note that all the parameters are available independently of whether you use the tool in Java code, as a command line tool (jar), or as a maven-plugin:
| Java | Jar | Maven-Plugin | Description |
| withInputDirectory(…) | -i | <inputDirectory>…</inputDirectory> | The directory with the metadata and swagger files |
| --input-dir | |||
| withOutputDirectory(…) | -o | <outputDirectory>…</outputDirectory> | The directory to which the java files are generated |
| --output-dir | |||
| deleteOutputDirectory() | -d | <deleteOutputDirectory>true </deleteOutputDirectory> | Should the output directory be cleared before generating? Default: false |
| --delete-output-dir | |||
| overwriteFiles() | -f | <overwriteFiles>true </overwriteFiles> | Should already existing files be overwritten? Default: false |
| --overwrite-files | |||
| withPackageName(…) | -p | <packageName>…</packageName> | The package into which the java files are generated |
| --package-name-prefix | |||
| withDefaultBasePath(…) | -b | <defaultBasePath>…</defaultBasePath> | If no swagger file is provided this can be used to determine the service path |
| --default-base-path | |||
| withServiceNameMapping(…) | -m | <serviceNameMappingFile>…</serviceNameMappingFile> | The file containing name mappings of the services |
| --name-mapping-file | |||
| withNamingStrategy(…) | -n | <namingStrategy>…</namingStrategy> | Fully-qualified Java class to be used as the naming strategy |
| --name-strategy-class | |||
| withNameSource(…) | --use-odata-names | <nameSource>NAME</nameSource> <nameSource>LABEL</nameSource> | If no custom naming strategy is used, this switches naming from label to name |
withIncludedEntitySet(...) withIncludedFunctionImports(...) | --include-entity-sets --include-function-imports with comma-separated list of entity set or function import names | <includeEntitySets> <param>EntitySet1</param> <param>EntitySet2</param> </includeEntitySets> <includeFunctionImports> <param>FunctionImport1</param> <param>FunctionImport2</param> </includeFunctionImports> | Note, these parameters are available since the SDK version 2.9.1. Using this parameter, you can you can selectively generate Java virtual data model classes for specific entity sets and/or function imports. The generated VDM will then only include Java representations such as operations, fluent helpers and entities for the filtered entity sets or function imports. This reduces the footprint by focusing on the classes needed for your use case. |
Additional comments
Naming strategy: You can choose from two available methods for naming your classes and fields that correspond to OData entities and their properties. The generator can use labels (see sap:label attribute on EntityType or Property in edmx) or names (see Name attribute on EntityType or Property in edmx). By default, the labels are used, as it leads to more "human readable" names in Java code. Of course, the labels can contain white spaces (it was the case also in our example) or special characters. The generator default naming strategy takes care of removing those symbols to generate acceptable Java names. However, you may want to evaluate the tool developed by our partner that checks the edmx file before using it for the VDM generation and helps to improve the naming. The description of the tool can be found in the blog posts:
EDMX Label Builder for SAP Cloud SDK VDM Generator
How-to use EDMX Label Builder for VDM Generator
Service path determination: To be able to map the VDM entity classes to the service URL, the VDM generator uses the following service path determination strategy:
- You can provide a Swagger file in the input folder with the same name, as the name of the metadata edmx file and define the base path there. Please, see the templates for the Swagger files in GitHub.
- If the swagger file is not provided, the generator uses the value of the parameter default base path (see the table above).
- If a Swagger file and the parameter is not provided, the base path is looked up in the metadata file in the tag <atom:link rel="self" href="<base-path>"/>
- If none of these sources can be used, an exception is thrown
What operations are allowed on each generated entity: Probably, you have noticed that fluent helpers for all CRUD operations are generated for our example service (if not, just take a look at the generated com.mycompany.vdm.namespaces.socialnetworkaccount package). Why and how can you influence this?
First option is to provide a Swagger file with corresponding definitions. However, starting from the SDK version 1.10.0, the Swagger file is optional. In case the Swagger file is not provided, the allowed operations are derived from the metadata file from the attributes of the EntitySet element. This wiki page defines those elements. The table below represents the mapping to java methods done by the generator:
| sap property | VDM method |
| sap:addressable | READ |
| sap:creatable | CREATE |
| sap:deletable | DELETE |
| sap:updatable | UPDATE |
Conclusion
In this blog post, we demonstrated how you can generate Java VDM for a custom OData service in S/4HANA Cloud. We guided you through the following steps: creating a custom business object and generating an OData service in SAP S/4HANA Cloud, generating Java VDM from the metadata of this service, and using the generated VDM to build and to execute the queries against SAP S/4HANA. We also highlighted some important aspects of the inner-working and fine-tuning of the VDM generator behavior.
Further Information and Related Readings
There are several related readings that may be of interest for you in case you would like to investigate the topic touched in this blog post. Many of these resources are already referenced above, here is the short summary:
The Key User Extensibility Tools of S/4 HANA
SAP S/4HANA Cloud – Key User In-App Extensibility
Deep Dive 1 with SAP Cloud SDK: An End-to-End Story on the Virtual Data Model using the Business Par...
Deep Dive 2 with SAP Cloud SDK: What is what? Your quick reference to Communication Management, and ...
OData VDM in SAP Cloud SDK
SDK release blog describing the first productive release of the VDM generator
We also highly recommend you to check and to order Extending SAP S/4HANA book that will be released soon and where you can find more detailed hands-on examples on various S/4HANA extensibility topics.
Stay tuned for upcoming blog posts describing further capabilities of the tool!
Troubleshooting
In case you want to use the VDM generator in your Java project that was not created out of the SAP Cloud SDK archetype and if you are getting a compilation error with the message "package com.sap.cloud.sdk.s4hana.datamodel.odata.helper does not exist", you should manually add the following dependency to your application.pom file:
<dependency>

    <groupId>com.sap.cloud.s4hana.datamodel</groupId>

    <artifactId>odata-api</artifactId>

    <version>2.9.1</version>

</dependency>- SAP Managed Tags:
- SAP Cloud SDK,
- SAP S/4HANA,
- SAP S/4HANA Public Cloud
Labels:
21 Comments
You must be a registered user to add a comment. If you've already registered, sign in. Otherwise, register and sign in.
Labels in this area
-
ABAP CDS Views - CDC (Change Data Capture)
2 -
AI
1 -
Analyze Workload Data
1 -
BTP
1 -
Business and IT Integration
2 -
Business application stu
1 -
Business Technology Platform
1 -
Business Trends
1,661 -
Business Trends
86 -
CAP
1 -
cf
1 -
Cloud Foundry
1 -
Confluent
1 -
Customer COE Basics and Fundamentals
1 -
Customer COE Latest and Greatest
3 -
Customer Data Browser app
1 -
Data Analysis Tool
1 -
data migration
1 -
data transfer
1 -
Datasphere
2 -
Event Information
1,400 -
Event Information
64 -
Expert
1 -
Expert Insights
178 -
Expert Insights
270 -
General
1 -
Google cloud
1 -
Google Next'24
1 -
Kafka
1 -
Life at SAP
784 -
Life at SAP
11 -
Migrate your Data App
1 -
MTA
1 -
Network Performance Analysis
1 -
NodeJS
1 -
PDF
1 -
POC
1 -
Product Updates
4,578 -
Product Updates
323 -
Replication Flow
1 -
RisewithSAP
1 -
SAP BTP
1 -
SAP BTP Cloud Foundry
1 -
SAP Cloud ALM
1 -
SAP Cloud Application Programming Model
1 -
SAP Datasphere
2 -
SAP S4HANA Cloud
1 -
SAP S4HANA Migration Cockpit
1 -
Technology Updates
6,886 -
Technology Updates
395 -
Workload Fluctuations
1
Related Content
- Top Picks: Innovations Highlights from SAP Business Technology Platform (Q1/2024) in Technology Blogs by SAP
- SAP Document and Reporting Compliance - 'Colombia' - Contingency Process in Technology Blogs by SAP
- Consuming SAP with SAP Build Apps - Connectivity options for low-code development - part 2 in Technology Blogs by SAP
- explore the business continuity recovery sap solutions on AWS DRS in Technology Blogs by Members
- Unlocking Full-Stack Potential using SAP build code - Part 1 in Technology Blogs by Members
Top kudoed authors
| User | Count |
|---|---|
| 11 | |
| 10 | |
| 10 | |
| 10 | |
| 8 | |
| 7 | |
| 7 | |
| 7 | |
| 7 | |
| 6 |