
- SAP Community
- Products and Technology
- Technology
- Technology Blogs by SAP
- SAP Analytics Cloud APIs: Getting Started Guide
Technology Blogs by SAP
Learn how to extend and personalize SAP applications. Follow the SAP technology blog for insights into SAP BTP, ABAP, SAP Analytics Cloud, SAP HANA, and more.
Turn on suggestions
Auto-suggest helps you quickly narrow down your search results by suggesting possible matches as you type.
Showing results for
Advisor
Options
- Subscribe to RSS Feed
- Mark as New
- Mark as Read
- Bookmark
- Subscribe
- Printer Friendly Page
- Report Inappropriate Content
04-20-2018
2:20 PM
Application Programming Interfaces (APIs) allow developers to access predefined services and at the same time hide these services' implementation complexity. In recent years, APIs have gained popularity as more and more companies have decided to expose their data and functionalities. On the one hand, making data/ functionality accessible to partners and customers is a key driver for the development of innovative solutions. On the other hand, it allows one application to access another applications' services which is indispensable for connecting enterprise applications.
Last year, SAP Analytics Cloud (SAC) has started opening up access to its data by publishing the REST API. Last month, the URL API followed. Both, URL and REST API, have been published on API Hub. The REST API conforms to the OpenAPI specification.
This blog post is intended as a user guide for the URL API and the REST API of SAC. Before diving into the APIs themselves, we deal with how OAuth 2.0 can be implemented to let third-party applications access our protected resources on SAC. Once, a third-party application is authorized, it can make an API call to SAC.

This blog post is structured as follows:
SAC allows third-party applications to access its web services by using the authorization protocol OAuth 2.0. With OAuth 2.0, we are able to make web service calls without exchanging user credentials between applications (cf. the standard RFC 6746).
The four entities which are involved in the OAuth protocol are:
Translated to our context, the resource owner is the end-user, the resource server (Service Provider) is SAC, the client is any third-party application (client- or server-side application) and the authorization server is our Identity Provider (IdP) (per default the SAP Cloud Platform Identity Authentication Service).
The authorization server issues two types of tokens: access tokens and refresh tokens. While access tokens grant a user access to a protected resource, refresh tokens are mainly used to acquire a new access token when the current access token becomes invalid (e.g., because it has expired).
Below, we will at first register a third-party application as OAuth-client. Thereafter, we will see how to retrieve data from SAC implementing either the original three-legged or the two-legged OAuth flow.
The URL API enables you to embed SAC stories in third-party applications. These stories are embedded in our website with inline frames (iframes).
Using SAC REST API endpoints, any requesting authorized application can access data stored on the tenant. (official documentation)
Below you can find an overview over the endpoints that are currently accessible to third-party applications.
To access an endpoint, we simply append it to the tenant's base URL (cf. screenshot below).

A sample GET request could look like this:
Making a GET request, it is possible to specify which meta-information shall be included in the response e.g., models. We simply set the include-parameter by appending the following query string to our endpoint: ?include=models.
To show you what a response looks like, we consider the following GET request
which returns a JSON Array of story objects including all models that are used in a story. For illustration purposes, you see a JSON Array containing one story object (including model objects) in the following:
Last year, SAP Analytics Cloud (SAC) has started opening up access to its data by publishing the REST API. Last month, the URL API followed. Both, URL and REST API, have been published on API Hub. The REST API conforms to the OpenAPI specification.
This blog post is intended as a user guide for the URL API and the REST API of SAC. Before diving into the APIs themselves, we deal with how OAuth 2.0 can be implemented to let third-party applications access our protected resources on SAC. Once, a third-party application is authorized, it can make an API call to SAC.
This blog post is structured as follows:
1. User Authorization through OAuth 2.0 in SAC
1.2. Authorization Code Grant (three-legged)
1.2.2. Obtaining the Access Token
1.3. Client Credentials Grant (two-legged)
1. User Authorization through OAuth 2.0 in SAC
SAC allows third-party applications to access its web services by using the authorization protocol OAuth 2.0. With OAuth 2.0, we are able to make web service calls without exchanging user credentials between applications (cf. the standard RFC 6746).
The four entities which are involved in the OAuth protocol are:
- Resource Owner: Grants access to a protected resource (can be the end-user).
- Resource Server: Provides the protected resource to the client.
- Client: Requests the protected resource. (Please note that this entity is independent from its implementation i.e., the 'client' can also be a server.)
- Authorization Server: Authorizes the client and grants access tokens.
Translated to our context, the resource owner is the end-user, the resource server (Service Provider) is SAC, the client is any third-party application (client- or server-side application) and the authorization server is our Identity Provider (IdP) (per default the SAP Cloud Platform Identity Authentication Service).
The authorization server issues two types of tokens: access tokens and refresh tokens. While access tokens grant a user access to a protected resource, refresh tokens are mainly used to acquire a new access token when the current access token becomes invalid (e.g., because it has expired).
Below, we will at first register a third-party application as OAuth-client. Thereafter, we will see how to retrieve data from SAC implementing either the original three-legged or the two-legged OAuth flow.
1.1. Client Registration
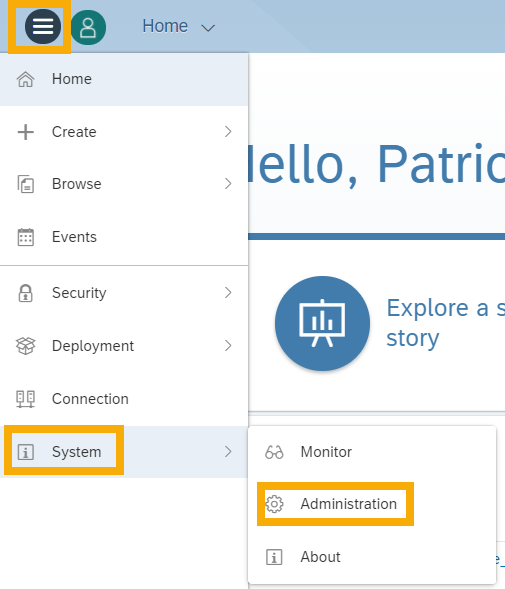
Having administrator privileges on our SAC tenant, we can register an OAuth-client in the App Integration tab of the administration page. We navigate to the administration page by clicking on ≡ (Main Menu) -> System -> Administration.
Within the App Integration tab (1), we are now able to register a new OAuth client by clicking on +Add New OAuth Client (2).

This is opening the dialogue box for registering a new OAuth Client. Having chosen a name (1) and ID (2) for our client, we specify the authorization method which we want to use for obtaining tokens from the authorization server (3).
Currently, two authorization methods are available: Authorization Code Grant and Client Credentials Grant. In short, Authorization Code Grant is used for client-side applications consuming an API and Client Credentials Grant is used for authorizing server-side applications.

1.2. Authorization Code Grant (three-legged)
Authorization Code Grant is used when applications make API requests on behalf of the end-user. Hence, this authorization type requires interaction with the resource owner, or rather end-user interaction. The end-user gives her e.g., mobile or web application access to a protected resource on the Service Provider without the Service Provider getting to know her user credentials (cf. RFC 6749).
To implement the Authorization Code Grant flow, the client needs to be registered as OAuth client (1.2.1. Registration Details) and get an access token from the authorization server (1.2.2. Obtaining the Access Token).
1.2.1. Registration Details
At first, we finish registering the application as OAuth Client. We select Authorization Code under Authorization Grant and optionally define a lifetime for the authorization code (1).
Specifying a secret is an additional security measure and optional (2). If set, our client can only obtain an authorization code from the authorization server when knowing the secret.
Under Redirect URI we indicate the callback URL the authorization server returns the client to after successful authorization (3).
The client is able to parse the authorization code from the callback URL's query string (e.g. http://localhost:8080/callback?code=1234abcd-5678-e9fg-h123i-4567jkl8mnop).
Defining a lifetime for access and refresh tokens is again optional (4).
For further information on the configuration, please kindly refer to Configuring OAuth 2.0 Authorization Code Grant Workflow and Managing OAuth Clients.

1.2.2. Obtaining the Access Token
The diagram below depicts the Authorization Code Grant flow tailored to our context and guides you towards its implementation. As previously mentioned, the end-user authorizes an application to access a protected resource on the the Service Provider (SP). Therefore, the end-user has to interact with the IdP (authorization server).

Please note that the SCP Authentication Service is the default IdP which can be changed.
Our custom application should first send the user to the URL of the authorization server's authorization endpoint (Authorization URL). After obtaining the authorization code, the application has to exchange it for an access token. This is done by making a POST request with the authorization code to the authorization server's token endpoint (Token URL).
Authorization URL (4) and Token URL (5) can be found within the App Integration tab (2) under OAuth Clients (3) on SAC's administration page (1).

1.3. Client Credentials Grant (two-legged)
As opposed to the authorization type Authorization Code Grant, Client Credentials Grant is used for "machine-to-machine" authorization. Typically this flow is used when the protected resource does not belong to a specific user. Instead, the program is the resource owner. Hence, Client Credentials Grant does not require any interaction with the end-user. In fact, the client makes API requests on behalf of itself and handles the authorization process (cf. RFC 6749).
To implement the Client Credentials Grant flow, the client needs to be registered as OAuth client (1.3.1. Registration Details) and provide a Security Assertion Markup Language Bearer Assertion (1.3.2. SAML Bearer Assertion).
1.3.1. Registration Details
Just like in the case of client-side applications, we have to register our server-side application as OAuth Client. We select Client Credentials under Authorization Grant (1) and specify a secret (2). Optionally, we can define the lifetime for access tokens (3).
For further information on the configuration, please kindly refer to Configuring OAuth 2.0 SAML Bearer Assertion Workflow and Managing OAuth Clients.

1.3.2. SAML Bearer Assertion
Contrary to Authorization Code Grant, Client Credentials Grant requires a SAML assertion for authorization. This assertion has to be signed by the IdP we would like to use and must furthermore be known to SAC. Therefore, we have to save the assertion's certificate as a Trusted IdP on SAC's administration page (1) within the App Integration (2) tab under Trusted Identity Providers (3) (cf. Managing OAuth Clients and Trusted Identity Providers).

In case the server-side application is deployed on SAP Cloud Platform (SAPCP), the burden of implementing the OAuth protocol is not entirely placed on the shoulders of the developer. Instead, we can make use of the support which is provided by SAPCP i.e., SAML Bearer Assertion Authentication.
2. SAC URL API
The URL API enables you to embed SAC stories in third-party applications. These stories are embedded in our website with inline frames (iframes).
2.1. Enable iFrame Embedding
By default embedding SAC stories in iframes is not allowed. Thus, we have to change our tenant's settings to enable iframe embedding. This can be done on the tenant's administration page (≡ -> System -> Administration).
Within the administration page, we choose the App Integration (1) tab. In the section Trusted Origins (2) we can specify the origins (3) for which we want to allow iframe embedding:
Furthermore, we have to allow cookies from sapbusinessobjects.cloud in Google Chrome. This can be done in Chrome's settings (1) under Advanced (2) -> Privacy and security (3) -> Content settings (4) -> Cookies.
2.2. Compose the URL
Now that we have enabled iframe embedding on our tenant, we compose the URL of the story to be embedded in the iframe. A story is referenced like this:
<TENANT> is a placeholder for our tenant's public URL. The <TENANT_ID> refers to the ID that has been assigned to our tenant. The <STORY_ID> indicates which story we want to open. The values to replace these placeholders can be found in the URL that opens when selecting a story in SAC (≡ -> Browse -> Stories -> e.g., MyFavouriteStory😞
The URL for opening our story may look like this:
Now we can append a query component (also known as query string) to the URL of our story. The query component can contain different parameters, each of which is specified as key-value pair. We can add parameters to define how a story is displayed in the iframe, parameters to filter a dimension with a certain value and parameters to initialize story variables.
As usual, the query component is preceded by a '?'. It can contain multiple key-value pairs. Key and value are separated by '='. Different key-value pairs are separated by '&'.
In the following, we briefly introduce the parameters that can be added to an URL. A detailed description can be found in the official documentation.
2.2.1. Display Parameters
Display parameters indicate how a story is displayed. They can be combined with Filter and Variable Parameters. We are able to indicate the mode we want to open the story in (key: mode), en-/ disable the page bar (key: pageBar) and specify the page we want to open (key: page). A URL could look like this:
2.2.2. Filter Parameters
With filter parameters we can apply story filters. We can specify the model we want to use the filter on (key: f<XX>Model), the dimension we want to apply the filter to (key: f<XX>Dim), the values we want to filter for (key: f<XX>Val) and the filtering operator (key: f<XX>Op).
<XX> within a key is a freely selected two-digit number and is used to specify which parameters belong together. This is particularly important when more than one filter is passed (cf. URL below). Please keep in mind that the parameters that are passed within an URL have to be encoded (cf. URL-/ Percent-Encoding). A URL could look like this:
The values for the keys f<XX>Model, f<XX>Dim and f<XX>Val are internal IDs. The ID of a model can be found by opening a model in SAC's modeler (≡ -> Browse -> Models) (in the screenshot below: t.X.ApiDemoModel:ApiDemoModel).
We find the ID of a dimension by opening the filter bar within our story. The filter bar opens by clicking on the Story Filter icon in the Tools section (1) . To see the ID of a dimension, we click on the filter icon (2) and on Dimensions. Hovering over a dimension (in the screenshot below: Employee) brings up a tooltip which contains the dimension ID. The dimension ID is the string preceding the name in brackets (in the screenshot below: Sapphire_SF_TEST).

The ID of a filter value can be found by opening the filter dialogue. The filter dialogue shows all available dimensions of a model (cf. (3) in the previous screenshot). In the filter dialogue, we click on the dimension that we want to apply the filter to (in our example: Employee). This will bring up the Set filters dialogue. Within the Set filters dialogue, we see the ID of each possible filter value by hovering over the value (in the screenshot below: E223640).
2.2.3. Variable Parameters
As you know, we can use variables in SAC to create calculated values. These variables can be initialized by setting variable parameters in the query component of our URL. Having specified the model (key: v<XX>Model) and variable (key: v<XX>Par), we set the value we want to initialize our variable with (key: v<XX>Val).
<XX> within a key is a freely selected two-digit number and is used to specify which parameters belong together. This is particularly important when more than one filter is passed (cf. URL below). Please keep in mind that the parameters that are passed within an URL have to be encoded (cf. URL-/ Percent-Encoding). A URL could look like this:
The values for the keys v<XX>Model and v<XX>Par are internal IDs. The ID of a model can be found by opening a model in SAC's modeler (≡ -> Browse -> Models) (in the screenshot below: t.X.ApiDemoModel:ApiDemoModel).
We can list the IDs of all variables within a story by opening a story in SAC and selecting { } (Edit Prompts) in the toolbar. From there, we can choose the variable we want to initialize (in the screenshot below: Variable00 or Variable01).

3. SAC REST API
Using SAC REST API endpoints, any requesting authorized application can access data stored on the tenant. (official documentation)
Below you can find an overview over the endpoints that are currently accessible to third-party applications.
| HTTP Request | Endpoint | Description | HTTP Response |
| GET | api/v1/stories | Returns all stories on the tenant with meta-information. | 200 (OK), 403 (Not authorized), 500 (Internal server error) |
| POST | api/v1/stories?copyFrom=<srcStoryId> | Copies the story that is referenced by <srcStoryId>. Optionally, you can define the destination folder by appending ©To=<folderName>. | 201 (Created), 400 (Bad request), 403 (Not authorized), 404 (Not found), 500 (Internal server error) |
| PATCH | api/v1/stories/<storyId> | Renames the story that is referenced by <storyId>. | 200 (OK), 400 (Bad request), 403 (Not authorized), 404 (Not found), 500 (Internal server error) |
| DELETE | api/v1/stories/<storyId> | Deletes the story that is referenced by <storyId>. | 200 (OK), 403 (Not authorized), 404 (Not found), 500 (Internal server error) |
To access an endpoint, we simply append it to the tenant's base URL (cf. screenshot below).
A sample GET request could look like this:
https://my-favourite-tenant.eu1.projectorca.cloud/api/v1/storiesMaking a GET request, it is possible to specify which meta-information shall be included in the response e.g., models. We simply set the include-parameter by appending the following query string to our endpoint: ?include=models.
To show you what a response looks like, we consider the following GET request
https://my-favourite-tenant.eu1.projectorca.cloud/api/v1/stories?include=modelswhich returns a JSON Array of story objects including all models that are used in a story. For illustration purposes, you see a JSON Array containing one story object (including model objects) in the following:
[{

	"id": "8114AB5AE4CA9906E10000000A4E7468",

	"name": "JF Tech 3.0 -  API Demo",

	"description": "",

	"created": "2018-03-16T14:43:18.081Z",

	"createdBy": "MyFavouriteUser",

	"changed": "2018-04-13T06:54:28.412Z",

	"changedBy": "MyFavouriteUser",

	"models": [{

		"id": "t.16.SAP_SuccessFactors:SAP_SuccessFactors",

		"description": "Sapphire"

	},

	{

		"id": "t.16.SAP_Concur:SAP_Concur",

		"description": "Sapphire Concur"

	},

	{

		"id": "t.16.SAP_Cloud4Customer:SAP_Cloud4Customer",

		"description": "Sapphire C4C"

	},

	{

		"id": "t.16.SAP_Fieldglass:SAP_Fieldglass",

		"description": "Sapphire_Fieldglass"

	},

	{

		"id": "t.16.Sapphire_S4_V2:Sapphire_S4_V2",

		"description": "Sapphire_S4_V2"

	},

	{

		"id": "t.X.ApiDemoModel:ApiDemoModel",

		"description": "ApiDemoModel"

	}],

	"openURL": "/sap/fpa/ui/tenants/000/bo/story/8114AB5AE4CA9906E10000000A4E7468",

	"isTemplate": false,

	"isSample": false

}]- SAP Managed Tags:
- SAP Analytics Cloud,
- API,
- SAP Cloud Identity Services
13 Comments
You must be a registered user to add a comment. If you've already registered, sign in. Otherwise, register and sign in.
Labels in this area
-
ABAP CDS Views - CDC (Change Data Capture)
2 -
AI
1 -
Analyze Workload Data
1 -
BTP
1 -
Business and IT Integration
2 -
Business application stu
1 -
Business Technology Platform
1 -
Business Trends
1,658 -
Business Trends
93 -
CAP
1 -
cf
1 -
Cloud Foundry
1 -
Confluent
1 -
Customer COE Basics and Fundamentals
1 -
Customer COE Latest and Greatest
3 -
Customer Data Browser app
1 -
Data Analysis Tool
1 -
data migration
1 -
data transfer
1 -
Datasphere
2 -
Event Information
1,400 -
Event Information
66 -
Expert
1 -
Expert Insights
177 -
Expert Insights
299 -
General
1 -
Google cloud
1 -
Google Next'24
1 -
Kafka
1 -
Life at SAP
780 -
Life at SAP
13 -
Migrate your Data App
1 -
MTA
1 -
Network Performance Analysis
1 -
NodeJS
1 -
PDF
1 -
POC
1 -
Product Updates
4,577 -
Product Updates
345 -
Replication Flow
1 -
RisewithSAP
1 -
SAP BTP
1 -
SAP BTP Cloud Foundry
1 -
SAP Cloud ALM
1 -
SAP Cloud Application Programming Model
1 -
SAP Datasphere
2 -
SAP S4HANA Cloud
1 -
SAP S4HANA Migration Cockpit
1 -
Technology Updates
6,873 -
Technology Updates
427 -
Workload Fluctuations
1
Related Content
- Expanding Our Horizons: SAP's Build-Out and Datacenter Strategy for SAP Business Technology Platform in Technology Blogs by SAP
- SAP Queries/Infoset Queries data import to SAC (SAP ECC not on HANA) in Technology Q&A
- SAP Analytics Cloud for planning - Set Advanced Filters on Date and Version in Technology Q&A
- SAC: Find drill level in hierarchy based on string in Technology Q&A
- SAP Datasphere - add user error in Technology Q&A
Top kudoed authors
| User | Count |
|---|---|
| 40 | |
| 25 | |
| 17 | |
| 14 | |
| 8 | |
| 7 | |
| 7 | |
| 7 | |
| 6 | |
| 6 |