

- SAP Community
- Products and Technology
- CRM and Customer Experience
- CRM and CX Blogs by SAP
- C4C Server side Integration with Microsoft Outlook
CRM and CX Blogs by SAP
Stay up-to-date on the latest developments and product news about intelligent customer experience and CRM technologies through blog posts from SAP experts.
Turn on suggestions
Auto-suggest helps you quickly narrow down your search results by suggesting possible matches as you type.
Showing results for
Advisor
Options
- Subscribe to RSS Feed
- Mark as New
- Mark as Read
- Bookmark
- Subscribe
- Printer Friendly Page
- Report Inappropriate Content
04-19-2018
12:19 PM
Goal of this blog:
The goal of this blog is to explain the administration and usage of the SERVER side outlook integration. It should not replace the official documentation which can be found here:
Please check the following link for the latest specifications- choose the latest release.
End-user:
https://help.sap.com/viewer/e3d4d4173c6f4231a6a35885511484ee/1802/en-US/b629f2105f464cb182c9398b1b95...
Admin:
https://help.sap.com/viewer/cea15f900ca04c4faa35d3044577fe27/1802/en-US/76e20fe2ccac4ccf8646a0f9fa61...
In addition to the official documentation the blog explains some features and functions more in detail and brings them into a context. Also it should help to understand some functions better from a business point of view and also the current limitations. In some cases which are important to know the blog refers to the right chapter of the official documentation instead of copy and paste the data to the blog
Please consider that all screenshots below showing the add in are taken in the outlook browser version. If you use webmail or webapps the user experience is a different one.
Also please be aware that comments/questions for this blog are NOT monitored!
if you need help setting up the feature - please contact Customer Experience Expertservices:
sapcx-expertservices@sap.com
.
All administration work is done from the admin view of the client side server integration within C4C.
Prerequisites for the usage of the SERVER side server integration can be found here:
Please check the following link for the latest specifications - choose the latest release.
https://help.sap.com/viewer/e3d4d4173c6f4231a6a35885511484ee/1802/enUS/a4db11343aaa4e9ca0e5950cb2038341.html
As an administrator you have to do the following steps before you can start to provisioning the new feature to the business users.
Step 1
Assign the workcenter Email integration to your user role within the standard user administration along with its two views.

The view ‘Groupware settings’ will give you access to the admin features.
The view ‘User settings’ will give you the features which you need as a business user.
As a result you will see a new workcenter ‘Email integration’ with the two views.
Since you are an admin your user will automatically provisioned for the server side outlook integration. Therefore an admin user will never show up in the provisioning tab but always in the user tab from the beginning.

Step 2
Check the pre-delivered settings and adopt them if required.
In order to do this, a general understanding on how to provision users is required and will be explained now…
The user provisioning is done as follows:
Grant users access to the email workcenter
Provision users within the admin view ‘Groupware settings’
As a result each user is assigned to an Organization and has an assigned profile.
Having these two simple steps in mind it is now important to understand more in detail:
The Organization has nothing to do with the Organizational model in C4C. It is just a grouping which allows you to provision multiple users easily. By assigning users to the Organization, the users inherit the configuration for this Organization.
The Organization specifies the Profile which will be inherited by the assigned users and the Mailbox access type.

If you want to integrate C4C with an Microsoft Exchange server choose ‘Microsoft exchange direct logon’
If you want to integrate with Google mail choose ‘Google direct logon’
Microsoft Exchange Impersonation is also supported. Here - if an C4C admin has the rights to fully access the users mailboxes (acting on their behalf) on the exchange server- the admin could specify his user and password for each provisioned user in C4C. As a result, the users do not have to give their credentials. All required settings to use 'impersonation ' are to be done on exchange side as it is a pure exchange feature (therefore it will not be explained in this blog- an exchange admin must be responsible for the set up). The server side integration can only use this access type if correctly configured on exchange side.
You need at least 1 Organization for each Mailbox access Type you want to integrate with.
The Profile determines the set of features and functions which is available for a single user / Group of users
It is divided in 2 parts – synch settings and add in settings.

In the synch settings you specify:
The settings are in the most cases self-explaining and will not be discussed in detail in this document but there are some points which are good to know:
In the ‘add in settings’ you specify:


The detailed view supports editing of fields and mandatory fields.
Fields which are defined as mandatory in your corresponding C4C object should be defined as mandatory also in the add in.
Extension fields are also supported.
make sure to activate the new field for right odataservice C4CODATA under 'further usage' when creating the extension field or if the field is created via PDI- the field needs to be included via PDI

important to know:
codelist restrictions and field rules are not supported by the add in.
please consider this when configuring fields in the add in.
The default profile which is assigned to an organization is just a proposal in order to streamline the user provisioning. You can change the assigned profile during the user provisioning for multiple users or also later for a single user.
Having understood the overall concept- you can now decide how many organizations and different profiles you need for your implementation.
You need at least one organization and profile- these are predelivered.

Decide to which party role your visits should be synched.
Fill in your administrator email address if you want to receive emails sent by the system as a copy.
For the Gmail integration options check the separate block for Gmail integration and server side add in.
Freeze description fields:
If you set this flag the information from the “Appointment” or “Visit Description” fields in SAP Cloud for Customer is not updated to the appointment or meeting in Microsoft Exchange or Google Calendar if it is changed in C4C (Initial information in both fields is synchronized.)
Single Sign on
If you use single sign on to access C4C you can flag the single singn on option. This configuration will open C4C screens without asking for user & Password if you click a hyperlink in the add in or if you choose the option 'open object in C4C' within the add in.
This flag does NOT activate a single sign on for the server side integration. Users ALWAYS have to provide their outlook credentials when activating the integration - or Microsoft impersonation is used. (see explanations in previous chapters)
Once you have checked the default settings or created new profiles you can start to provision users from the list of users in the provisioning tab.
As soon as a user is provisioned (and has the corresponding workcenter view assigned) he can start with his initial logon. The users are informed via email about the provisioning if chosen by the administrator during provisioning.
As an administrator you can administrate every single user via the different features you can access in the tab ‘users’.
You will find a description of the possible actions here:
https://help.sap.com/viewer/cea15f900ca04c4faa35d3044577fe27/1802/en-US/ce9507a88d5d45a4ac3c4e75c617...
(make sure you select the latest release for the doku)
Once a user is provisioned by the administrator, he will receive a welcome email (optional) in order to start the initial setup and synch.
The user will have a new workcenter view ‘User settings’ In release 1802 this view is visible in the workcenter pane.
If a user was not provisioned- he will get the following error once he opens the view ‚ user settings‘:

if provisioned:

As first step the user has to specify his credentials- therefore he has to open the ‘ change settings’ dialog.

Here he would specify the mail client he wants to use for the integration.

Then- depending on his choice the exchange password needs to be provided. C4C then automatically connects to the exchange server via the standard EWS interface of the Microsoft exchange.
For outlook 365 you get a different initial log on dialog

For using google mail- please check the article about google mail.
A user could change the assigned profile according to his preferences himself.

He can either choose an existing other profile or customize an individual one.
A user can change the appearance of the add in and what fields are shown or not- Here the user is restricted by the admin settings for the assigned profile. if an admin has set fields/objects to read only- this can not be changed and a user can not switch from read only to edit .
Currently it is NOT possible to deactivate the personalization.
To learn more about the localization option, please check the official doku:
https://help.sap.com/viewer/e3d4d4173c6f4231a6a35885511484ee/1802/en-US/b80d820511fc4615aa7d5cd9e3df...
-> Make sure you choose the latest release.
When using the C4C server side integration it is important to understand and differentiate the following 2 cases:
Currently the following Objects are supported:
Masterdata: Contacts, Accounts, Individual customers
Transactional data: Appointments, Tasks
The supported objects are limited by the available objects in outlook.
You can create these objects as entities in outlook and also change them.
Masterdata is (depending on your configuration in C4C) always synched with C4C.
Transactional data is synched only if marked as relevant for C4C via outlook categories or for the cases where autosynch applies.
If you create an appointment or task, you can categorize it as relevant for C4C and as a result it is replicated to C4C via an asynchronous web service call.
The synch is triggered automatically every 30 minutes by a background job. The synch interval cannot be configured.
However, in many cases you want to assign your appointment or task to a related object in C4C like an account or opportunity etc.
This can easily be done using the add in -> see next section 3.3.2.
The add in is basically a ‘minimized UI for C4C’ whenever you do something in the add in it is just like if you would work in C4C itself. There is no synching of data from outlook to C4C in this case since the data is directly read from/stored in C4C.
However- data created/changed via the add in will be replicated back to outlook in case the changed/created object has already a representation in outlook or is eligible to be synched to outlook.
Example 1
You have synched your C4C contacts to your outlook. A contact you change via the add in in C4C will update the contact in outlook during the next synchronization.
Example 2
If you create an appointment via the add in in C4C, the appointment is replicated to your outlook calendar with the next synchronization.
Most of the features are self-explaining and will not be discussed here – however few things are good to know.

If you click the add in icon, the add in retrieves all contextual data with regards to the selected email. If you enter something in the search field of the add in, the search is not done against the data shown in the add in, but it searches for related objects to your search in C4C. The filter can be applied on the search result. The filter does not apply on the contextual data derived in the add in based on the selected email.
Only 5 items are retrieved for each object found. In Realease 1802 the search takes the first 5 objects based on the alphabetical order of the name. So it makes sense to specify the search term as close as possible. From 1805 on it is planned that the search will return the last 5 objects based on the creation date.
The 2 typical scenarios when working with appointments and integrated with C4C are:
In both cases users most likely do not just want to replicate the plain appointment to C4C but link it to a related object like an account or opportunity etc.
Case a can be achieved easily by leveraging the following feature of the add in:
Option 1: Trigger synch via categorization (no direct assignment to an object possible)
Here you create the appointment in outlook, invite attendees, categorize as C4C relevant.
As a result, the appointment is synched to C4C. If the contact is assigned to an account, the account is derived automatically and assigned to the appointment.
If contacts within an appointment are belonging to different accounts, the account is derived from the first contact in the meeting request.
If a contact is assigned to multiple accounts in C4C, The account which is flagged as 'main account' for the contact is determined.
If a contact does not belong to any account or is not in C4C- no account is determined- choose option 2 then to have an account assigned.
If an account is determined and the appointment has no description in outlook- C4C adds ‘Appointment <account name>’ as description in C4C
Important: the determination of an account is always based on the FIRST attendee entered in outlook.

Also this person will be set as Primary contact in the visit/appointment by default.
If the fiirst attendee in outlook is not a contact in C4C- the next existing contact is used to determine the customer and primary contact. The non existing contact will become an attendee with no data record in C4C

Option 2: Trigger synch via add in (direct assignment to an object possible)
create the appointment in outlook, open add in within the appointment, choose the object you want the appointment to be assigned to within the add in and save it to that object.

The add in will change the 'save' button

Now you can save your appointment in outlook.
As a result, you have an appointment in outlook and an appointment saved to C4C.
With the next synch cycle the appointment is synched from C4C to outlook and the color code is updated so you can see that the appointment is C4C relevant.

Whenever you change the appointment in outlook , C4C it is updated and vice versa.
Case b is currently not supported. The server side integration does only allow the synchronization of appointments if you are the organizer.
Here you must expect the following behaviour based on the 3 cases:
case 1 :
if you categorize an appointment/meeting in outlook as C4C relevant and you are not the organizer (this is the case for all invitations you receive)- you will get an error message in the synch log in C4C which say that this is not supported. In outlook itself you get no error - but the calender entry never gets the 'C4C' colour which indicates that there was no synch.
case 2:
if you create an appointment within the add in you can change the organizer -which is you by default. Once you save- the appointment is saved to C4C but you will be reset as organizer. No warning 🙂 ! So it makes no sense to change the organizer in the add in.
case 3 :
if you create an appointment or visit in C4C you CAN change the organizer and save it in C4C. Here nothing will be synched as only events where you are the organizer are synched.
Please consider, that in the case you create an appointment/visit in C4C with another organizer then yourself- this visit/appointment will be replicated to the organizers outlook if he is provisioned for the integration. Also invites are sent then to the attendees from the organizers outlook.
Good to know:
Appointments which are flagged as 'Private' are not synched to C4C if you have not enabled the feature in the profile. If private appointments are replicated- they are replicated with no data in subject and description or any attendees. They only serve as placeholders in the C4C calender so that they can be considered when working in C4C.

The client side outlook integration will create a new subfolder ‘SAP Hybris Tasks’ in your outlook task folder.
Tasks created in C4C
All tasks created in C4C where you are the processor will be synched to this folder.
Tasks where you are the owner, but not the processor will not be synched- they will appear in the outlook of the processor if he is using the client side integration.
Tasks created in outlook
All tasks you create in outlook, regardless of the folder you create them in will be synched to C4C if categorized as C4C relevant.
After the synch to C4C these tasks are moved to the SAP Hybris Tasks ‘ folder.
The fact that you can assign the task in outlook to another outlook user via the button ‘assign task ’will not be considered for the replication to C4C- In C4C the creator of the task in outlook ( visible as ‘from’ in the outlook task) will become the processor AND owner in C4C.

Assigning other processors to tasks which are created in outlook is not supported for the synching to C4C.
The server side outlook integration allows you to manage/work with your contacts which are assigned to you in C4C.
Therefore, you can replicate your C4C contacts to your outlook and they will appear in a separate folder in ‘my contacts’
The folder is created automatically once your user is set up for the integration.
Depending on the configuration for your user
will be synched to your outlook.
Whenever a contact is changed in C4C, the changed data is replicated to outlook and vice versa.
Restrictions to be considered:
Recommended Best practise for contact management using the outlook contact folder is :
--> use the contact replication unidirectional from C4C to outlook. this ensures the best data quality!
--> The next more complex use case is to set up a bidirectional integration which allows ONLY changing contact data in outlook but not creating contacts.
--> Most complex use case is to allow creation of contacts in outlook. Please consider that no duplicate check is performed and you might create duplicates. Also there is no check on mandatory fields in outlook - this might lead to inbound errors in C4C (user/admin can see it in the C4C log)
--> if you WANT to create contacts initially within outlook it is recommended to do it via the add in as described in the next chapter. However this will not work if you are offline!
All new contacts created in C4C which appear in your ‘my contacts’ / ‘my teams contacts’ query are automatically replicated to outlook.
All new contacts created in the ‘SAP Hybris contacts’ folder in outlook are replicated to C4C. However, outlook might not give the option to maintain all relevant data with a good usability. For example – in most cases a contact must be assigned to an account- outlook does only provide a text field with no reference/value help to C4C. If you specify the account in this text field, C4C will try to derive a corresponding account if possible- but this might lead to errors.
Best practice to create C4C relevant contacts from outlook is using the add in. - But please consider, there is NO duplicate check!!!
The server side integration assumes that a user always works in a certain context to an outlook object. In this case the context can be an email which you have received and you want to create the sender of the email as a new contact in C4C.
The add in will show you that the sender was not found in C4C (based on the sender email address). If you decide to add the contact to C4C, push the contact button and maintain the additional data which is required for the contact- like the account….address, phone etc…
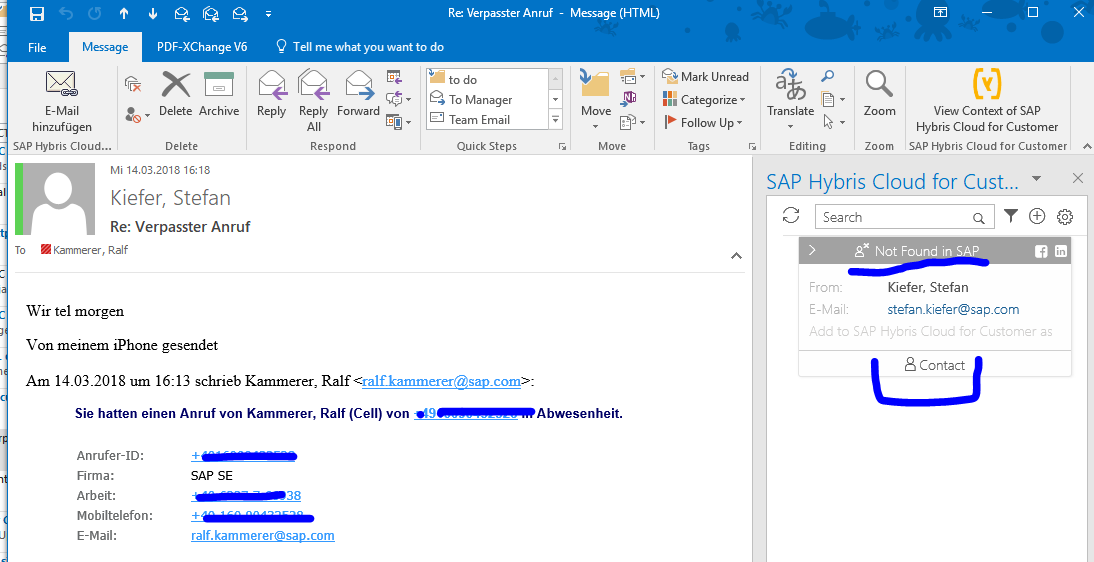

...and save it to C4C.
As a result you will find the contact in C4C.


When selecting an account in the add in- the add in shows all accounts which you are allowed to see according to your authorizations in C4C. Therefore if you choose an account which is not shown in ‘my accounts’ / ‘my teams accounts’ – the contact will be created in C4C, but not replicated to outlook.
The server side outlook integration allows you to manage/work with your accounts which are assigned to you in C4C.
Therefore, you can replicate your C4C accounts to your outlook and they will appear in a separate folder in ‘my accounts'’

The folder is created automatically once your user is set up for the integration.
Depending on the configuration for your user
will be synched to your outlook.
Whenever an account is changed in C4C, the changed data is replicated to outlook and vice versa.
Restrictions to be considered:
Even though it is possible to create entries in the outlook 'accounts' folder it ia not recommended to do/allow it. Recommendation is to switch off the 'create' option in the admin settings on profile level.
Reason here i that creating an account in C4C normally requires much more data than you can enter in outlook. Also there is no duplicate check.
Best practise within the outlook contact folder 'accounts' is to use it as 'read only feature'
Best practice to create C4C relevant accounts from outlook is using the add in. - But please consider, there is NO duplicate check!!!
If you decide to allow creation/update- please test it very thouroughly.
The server side outlook integration allows you to manage/work with your individual customers which are assigned to you in C4C.
Therefore, you can replicate your C4C individual customers to your outlook and they will appear in a separate folder in ‘my individual customers
AS there is NO standard 'my individual customer' query in C4C- the synch considers those ondividual customers where you are assigned as owner. NO other role of the account team triggers the synch. This means it is currently a limitation that the individual customer can only be synched to one users outlook - the one who is the owner.

Same as for 3.3.5.1. Manage existing accounts.
individual customers & add in:
as individual customers have a 'direct ' email address- the add in treats them like contacts when you open the add in in the context of an email you have received. If the sender was an individual customer in C4C it will be displayed in the add in...
whenever you click the add in button in outlook- the add in side pane is loaded and tries to fetch the contextual data in C4C for the marked email.

when opening the add in also meta data is loaded along with the contextual data. Loading the meta data takes some seconds and leads to a bad user experience.
therefore you can pin the add in

If you pin the add in it works much faster since the meta data is not loaded all the time.
If you close outlook, the pinning is also gone and you have to pin the add on again when you reopen outlook.
Pinning is only possible in the email overview and email detailed view. It is NOT available in the appointment/task overview/detailed view.
Searching in the add in is possible in 2 areas.
a. Global search

b. Searching for C4C masterdata within an object in a specific field ...example account field when creating an appointment within the add in.

The parameters you can use for searching are configurable per object.
for example searching for 'accounts'....

Here you can define which fields(parameters ) can be used when searching for an account.
The fields you can choose here are limited to the once which you did define before in the detailed view.
These settings will apply to both search types mentioned before under a. & b.
The standard configuration for the add in only provides the C4C internal account ID as search parameter.
In case your C4C is integrated with an ERP system users might use in C4C the external account ID in their daily business and on the UI as they know these external numbers by heart.
The external account ID is technically not 1 field in C4C but a table structure (since you could have multiple external ID's per account in the multi backend scenario)
if you want to search in the add in with the external ID you can do the following custom implementation:
now you can search via external customer ID.
The synchronization will synchronize all appointments/visits from C4C to outlook and from outlook to C4C wich are not older than 4 weeks.
It will synch all appointments/visits which are in the future.
this means there is a synch window from 4 weeks in the past and infinity.
once an appointment/visit moves out of this synch window, the categorization in outlook is deleted and it remains as 'normal' event in outlook with no link to C4C anymore.
In outlook you can create a calender event with attendees and just 'save' it without sending. Then you can open it later and send it.
For calender events created in outlook which have attendees assigned and which are categorized as C4C visit/appointment just saving is not possible anymore. Technically the event is synched to C4C- then C4C sends anupdate to outlook and at that point in time outlook behaves as if a 'new' event is coming from C4C and it sends the invitations to the attendees.
Please consider this behaviour!!
To prevent the sending - do not specify any attendde in the event as long it is only a draft.
The add in appears inactive in outlook if no reading pane is active. This is a Outlook functionality.
Therefore- in order to use the add in, the reading pane option should be switched on in outlook.
You can switch it on via the 'view' tab.


The goal of this blog is to explain the administration and usage of the SERVER side outlook integration. It should not replace the official documentation which can be found here:
Please check the following link for the latest specifications- choose the latest release.
End-user:
https://help.sap.com/viewer/e3d4d4173c6f4231a6a35885511484ee/1802/en-US/b629f2105f464cb182c9398b1b95...
Admin:
https://help.sap.com/viewer/cea15f900ca04c4faa35d3044577fe27/1802/en-US/76e20fe2ccac4ccf8646a0f9fa61...
In addition to the official documentation the blog explains some features and functions more in detail and brings them into a context. Also it should help to understand some functions better from a business point of view and also the current limitations. In some cases which are important to know the blog refers to the right chapter of the official documentation instead of copy and paste the data to the blog
Please consider that all screenshots below showing the add in are taken in the outlook browser version. If you use webmail or webapps the user experience is a different one.
Also please be aware that comments/questions for this blog are NOT monitored!
if you need help setting up the feature - please contact Customer Experience Expertservices:
sapcx-expertservices@sap.com
.
1. General set up – Administrator
All administration work is done from the admin view of the client side server integration within C4C.
Prerequisites for the usage of the SERVER side server integration can be found here:
Please check the following link for the latest specifications - choose the latest release.
https://help.sap.com/viewer/e3d4d4173c6f4231a6a35885511484ee/1802/enUS/a4db11343aaa4e9ca0e5950cb2038341.html
1.1. First steps as an administrator
As an administrator you have to do the following steps before you can start to provisioning the new feature to the business users.
Step 1
Assign the workcenter Email integration to your user role within the standard user administration along with its two views.
The view ‘Groupware settings’ will give you access to the admin features.
The view ‘User settings’ will give you the features which you need as a business user.
As a result you will see a new workcenter ‘Email integration’ with the two views.
Since you are an admin your user will automatically provisioned for the server side outlook integration. Therefore an admin user will never show up in the provisioning tab but always in the user tab from the beginning.
Step 2
Check the pre-delivered settings and adopt them if required.
In order to do this, a general understanding on how to provision users is required and will be explained now…
The user provisioning is done as follows:
Grant users access to the email workcenter
- Assign the Workcenter ‘Email Integration’ and ONLY the view ‘user settings’ via the standard user administration.
Provision users within the admin view ‘Groupware settings’
- choose the users you want to provision from the list of all C4C users. Then you assign them to an Organization (will be explained later in detail). The Organization determines the Mailbox access type which is used by this group of users (for example Microsoft exchange or Google mail). Based on the settings of the selected Organization a Profile is defaulted (the Profile determines the allowed features and functions within the outlook integration – details will be explained later). The Profile can be changed if required.
As a result each user is assigned to an Organization and has an assigned profile.
Having these two simple steps in mind it is now important to understand more in detail:
- What is an organization
- What is a profile
- How are these entities are connected
1.1.1. Organization
The Organization has nothing to do with the Organizational model in C4C. It is just a grouping which allows you to provision multiple users easily. By assigning users to the Organization, the users inherit the configuration for this Organization.
The Organization specifies the Profile which will be inherited by the assigned users and the Mailbox access type.
If you want to integrate C4C with an Microsoft Exchange server choose ‘Microsoft exchange direct logon’
If you want to integrate with Google mail choose ‘Google direct logon’
Microsoft Exchange Impersonation is also supported. Here - if an C4C admin has the rights to fully access the users mailboxes (acting on their behalf) on the exchange server- the admin could specify his user and password for each provisioned user in C4C. As a result, the users do not have to give their credentials. All required settings to use 'impersonation ' are to be done on exchange side as it is a pure exchange feature (therefore it will not be explained in this blog- an exchange admin must be responsible for the set up). The server side integration can only use this access type if correctly configured on exchange side.
You need at least 1 Organization for each Mailbox access Type you want to integrate with.
1.1.2. Profile
The Profile determines the set of features and functions which is available for a single user / Group of users
It is divided in 2 parts – synch settings and add in settings.
In the synch settings you specify:
- Which C4C Objects are subject to the integration and to what extend
- The look and feel of the Outlook add in for the user with regards to these objects
- General Synch settings
- The configuration options are using the terms appointments and meetings. This is a Microsoft outlook terminology. Meetings are calender entries in outlook where at least one attendee (other than the organizer -user who creates the entry) is maintained. Appointments are calender entries in outlook with NO attendee other than the organizer himself.
The settings are in the most cases self-explaining and will not be discussed in detail in this document but there are some points which are good to know:
- Currently no custom filters can be applied.
- Limit for objects which are synched is 10.000. the creation date is considered.
- In the ‘Remind about…’ setting you specify the default which is applied to the corresponding object in Outlook. This is done here since the C4C object does not have this function – but it is an important feature in outlook.
- The allowed file extensions you specify for attachments must also be allowed in C4C (finetuning activity)
- The attachment size can not be configured – if you need an adjustment you can raise a ticket to SAP and it will be adjusted by SAP for your tenant.
- Enable auto sharing for email – be careful with this setting. Once flagged every email which has a corresponding contact in C4C is synched with C4C automatically. This might not make sense for many customers and lead to unnecessary email data in C4C. Emails coming from blacklisted domains are not synched automatically.
- Synch appointments which are flagged as private to C4C - In C4C these appointments/Visits are only created as placeholders and will not show any data maintained in subject or description.
- Auto synch meetings – If you choose this option, all appointments created in outlook will be synched to C4C as appointments even though they are not categorized as C4C relevant. This option allows you to synch also appointments created in the native IPAD calender app which does not allow categorization at all. If you create appointments in the native outlook calender app you can ONLY synch appointments to outlook. Still- if you create appointments directly in outlook they can be categorized as visit and will be created as visit in C4C
- Autosynch has basically 4 options:
- ‘Auto synch meetings’ à all meetings are synched where at least 1 attendee is maintained AND which exists as a contact or individual customer in C4C
- ‘Sync even if there are no linked contacts or individual customers’ à if you choose this option, meetings with at least 1 attendee are synched to C4C – even though the attendee does not exist as contact or individual customer in C4C
- ‘Auto synch appointments’ à also calender entries with no attendees are synched
- ‘Include private meetings or appointments’ à Autosynch also considers events which have the private flag and creates ‘placeholders’ in C4C.
In the ‘add in settings’ you specify:
- The basic view of the add in which always show 4 fields of your choice:
- The detailed view of the add in:
The detailed view supports editing of fields and mandatory fields.
Fields which are defined as mandatory in your corresponding C4C object should be defined as mandatory also in the add in.
Extension fields are also supported.
make sure to activate the new field for right odataservice C4CODATA under 'further usage' when creating the extension field or if the field is created via PDI- the field needs to be included via PDI
important to know:
codelist restrictions and field rules are not supported by the add in.
please consider this when configuring fields in the add in.
1.1.3. Relationship: Organization- Profile
The default profile which is assigned to an organization is just a proposal in order to streamline the user provisioning. You can change the assigned profile during the user provisioning for multiple users or also later for a single user.
1.1.4. Number of Organization & Profiles
Having understood the overall concept- you can now decide how many organizations and different profiles you need for your implementation.
You need at least one organization and profile- these are predelivered.
1.1.5. Check overall settings
Decide to which party role your visits should be synched.
Fill in your administrator email address if you want to receive emails sent by the system as a copy.
For the Gmail integration options check the separate block for Gmail integration and server side add in.
Freeze description fields:
If you set this flag the information from the “Appointment” or “Visit Description” fields in SAP Cloud for Customer is not updated to the appointment or meeting in Microsoft Exchange or Google Calendar if it is changed in C4C (Initial information in both fields is synchronized.)
Single Sign on
If you use single sign on to access C4C you can flag the single singn on option. This configuration will open C4C screens without asking for user & Password if you click a hyperlink in the add in or if you choose the option 'open object in C4C' within the add in.
This flag does NOT activate a single sign on for the server side integration. Users ALWAYS have to provide their outlook credentials when activating the integration - or Microsoft impersonation is used. (see explanations in previous chapters)
1.2. Managing users
Once you have checked the default settings or created new profiles you can start to provision users from the list of users in the provisioning tab.
As soon as a user is provisioned (and has the corresponding workcenter view assigned) he can start with his initial logon. The users are informed via email about the provisioning if chosen by the administrator during provisioning.
As an administrator you can administrate every single user via the different features you can access in the tab ‘users’.
You will find a description of the possible actions here:
https://help.sap.com/viewer/cea15f900ca04c4faa35d3044577fe27/1802/en-US/ce9507a88d5d45a4ac3c4e75c617...
(make sure you select the latest release for the doku)
2. General setup – User
2.1. First steps for a user (mandatory)
Once a user is provisioned by the administrator, he will receive a welcome email (optional) in order to start the initial setup and synch.
The user will have a new workcenter view ‘User settings’ In release 1802 this view is visible in the workcenter pane.
If a user was not provisioned- he will get the following error once he opens the view ‚ user settings‘:
if provisioned:
As first step the user has to specify his credentials- therefore he has to open the ‘ change settings’ dialog.
Here he would specify the mail client he wants to use for the integration.
Then- depending on his choice the exchange password needs to be provided. C4C then automatically connects to the exchange server via the standard EWS interface of the Microsoft exchange.
For outlook 365 you get a different initial log on dialog
For using google mail- please check the article about google mail.
2.2. Optional Steps
A user could change the assigned profile according to his preferences himself.
He can either choose an existing other profile or customize an individual one.
A user can change the appearance of the add in and what fields are shown or not- Here the user is restricted by the admin settings for the assigned profile. if an admin has set fields/objects to read only- this can not be changed and a user can not switch from read only to edit .
Currently it is NOT possible to deactivate the personalization.
To learn more about the localization option, please check the official doku:
https://help.sap.com/viewer/e3d4d4173c6f4231a6a35885511484ee/1802/en-US/b80d820511fc4615aa7d5cd9e3df...
-> Make sure you choose the latest release.
3. End user features and function
When using the C4C server side integration it is important to understand and differentiate the following 2 cases:
- Work in outlook itself and synch data with C4C
- Working directly with the add in and synch data with C4C
3.1. Working in outlook
Currently the following Objects are supported:
Masterdata: Contacts, Accounts, Individual customers
Transactional data: Appointments, Tasks
The supported objects are limited by the available objects in outlook.
You can create these objects as entities in outlook and also change them.
Masterdata is (depending on your configuration in C4C) always synched with C4C.
Transactional data is synched only if marked as relevant for C4C via outlook categories or for the cases where autosynch applies.
If you create an appointment or task, you can categorize it as relevant for C4C and as a result it is replicated to C4C via an asynchronous web service call.
The synch is triggered automatically every 30 minutes by a background job. The synch interval cannot be configured.
However, in many cases you want to assign your appointment or task to a related object in C4C like an account or opportunity etc.
This can easily be done using the add in -> see next section 3.3.2.
3.2. Working with the add in
The add in is basically a ‘minimized UI for C4C’ whenever you do something in the add in it is just like if you would work in C4C itself. There is no synching of data from outlook to C4C in this case since the data is directly read from/stored in C4C.
However- data created/changed via the add in will be replicated back to outlook in case the changed/created object has already a representation in outlook or is eligible to be synched to outlook.
Example 1
You have synched your C4C contacts to your outlook. A contact you change via the add in in C4C will update the contact in outlook during the next synchronization.
Example 2
If you create an appointment via the add in in C4C, the appointment is replicated to your outlook calendar with the next synchronization.
3.3. Features and functions
Most of the features are self-explaining and will not be discussed here – however few things are good to know.
3.3.1.Search Feature
If you click the add in icon, the add in retrieves all contextual data with regards to the selected email. If you enter something in the search field of the add in, the search is not done against the data shown in the add in, but it searches for related objects to your search in C4C. The filter can be applied on the search result. The filter does not apply on the contextual data derived in the add in based on the selected email.
Only 5 items are retrieved for each object found. In Realease 1802 the search takes the first 5 objects based on the alphabetical order of the name. So it makes sense to specify the search term as close as possible. From 1805 on it is planned that the search will return the last 5 objects based on the creation date.
3.3.2. Creating appointments
The 2 typical scenarios when working with appointments and integrated with C4C are:
- User creates an appointment himself
- User receives an appointment
In both cases users most likely do not just want to replicate the plain appointment to C4C but link it to a related object like an account or opportunity etc.
Case a can be achieved easily by leveraging the following feature of the add in:
Option 1: Trigger synch via categorization (no direct assignment to an object possible)
Here you create the appointment in outlook, invite attendees, categorize as C4C relevant.
As a result, the appointment is synched to C4C. If the contact is assigned to an account, the account is derived automatically and assigned to the appointment.
If contacts within an appointment are belonging to different accounts, the account is derived from the first contact in the meeting request.
If a contact is assigned to multiple accounts in C4C, The account which is flagged as 'main account' for the contact is determined.
If a contact does not belong to any account or is not in C4C- no account is determined- choose option 2 then to have an account assigned.
If an account is determined and the appointment has no description in outlook- C4C adds ‘Appointment <account name>’ as description in C4C
Important: the determination of an account is always based on the FIRST attendee entered in outlook.
Also this person will be set as Primary contact in the visit/appointment by default.
If the fiirst attendee in outlook is not a contact in C4C- the next existing contact is used to determine the customer and primary contact. The non existing contact will become an attendee with no data record in C4C
Option 2: Trigger synch via add in (direct assignment to an object possible)
create the appointment in outlook, open add in within the appointment, choose the object you want the appointment to be assigned to within the add in and save it to that object.
The add in will change the 'save' button
Now you can save your appointment in outlook.
As a result, you have an appointment in outlook and an appointment saved to C4C.
With the next synch cycle the appointment is synched from C4C to outlook and the color code is updated so you can see that the appointment is C4C relevant.
Whenever you change the appointment in outlook , C4C it is updated and vice versa.
Case b is currently not supported. The server side integration does only allow the synchronization of appointments if you are the organizer.
Here you must expect the following behaviour based on the 3 cases:
case 1 :
if you categorize an appointment/meeting in outlook as C4C relevant and you are not the organizer (this is the case for all invitations you receive)- you will get an error message in the synch log in C4C which say that this is not supported. In outlook itself you get no error - but the calender entry never gets the 'C4C' colour which indicates that there was no synch.
case 2:
if you create an appointment within the add in you can change the organizer -which is you by default. Once you save- the appointment is saved to C4C but you will be reset as organizer. No warning 🙂 ! So it makes no sense to change the organizer in the add in.
case 3 :
if you create an appointment or visit in C4C you CAN change the organizer and save it in C4C. Here nothing will be synched as only events where you are the organizer are synched.
Please consider, that in the case you create an appointment/visit in C4C with another organizer then yourself- this visit/appointment will be replicated to the organizers outlook if he is provisioned for the integration. Also invites are sent then to the attendees from the organizers outlook.
Good to know:
Appointments which are flagged as 'Private' are not synched to C4C if you have not enabled the feature in the profile. If private appointments are replicated- they are replicated with no data in subject and description or any attendees. They only serve as placeholders in the C4C calender so that they can be considered when working in C4C.
3.3.3. Creating tasks
The client side outlook integration will create a new subfolder ‘SAP Hybris Tasks’ in your outlook task folder.
Tasks created in C4C
All tasks created in C4C where you are the processor will be synched to this folder.
Tasks where you are the owner, but not the processor will not be synched- they will appear in the outlook of the processor if he is using the client side integration.
Tasks created in outlook
All tasks you create in outlook, regardless of the folder you create them in will be synched to C4C if categorized as C4C relevant.
After the synch to C4C these tasks are moved to the SAP Hybris Tasks ‘ folder.
The fact that you can assign the task in outlook to another outlook user via the button ‘assign task ’will not be considered for the replication to C4C- In C4C the creator of the task in outlook ( visible as ‘from’ in the outlook task) will become the processor AND owner in C4C.
Assigning other processors to tasks which are created in outlook is not supported for the synching to C4C.
3.3.4. Contact Management
3.3.4.1. Manage existing contacts.
The server side outlook integration allows you to manage/work with your contacts which are assigned to you in C4C.
Therefore, you can replicate your C4C contacts to your outlook and they will appear in a separate folder in ‘my contacts’
The folder is created automatically once your user is set up for the integration.
Depending on the configuration for your user
- either all contacts which appear in the ‘my contacts’ query in C4C
- or all contacts which appear under the ‘my teams contacts’ query in C4C
will be synched to your outlook.
Whenever a contact is changed in C4C, the changed data is replicated to outlook and vice versa.
Restrictions to be considered:
- Changing data in outlook could lead to synch errors if the data entered in outlook is not compatible with you C4C configuration.
- The outlook contact object is not aligned with the C4C contact Object. Therefore, the outlook contact cannot consume/display all C4C data and vice versa.
Recommended Best practise for contact management using the outlook contact folder is :
--> use the contact replication unidirectional from C4C to outlook. this ensures the best data quality!
--> The next more complex use case is to set up a bidirectional integration which allows ONLY changing contact data in outlook but not creating contacts.
--> Most complex use case is to allow creation of contacts in outlook. Please consider that no duplicate check is performed and you might create duplicates. Also there is no check on mandatory fields in outlook - this might lead to inbound errors in C4C (user/admin can see it in the C4C log)
--> if you WANT to create contacts initially within outlook it is recommended to do it via the add in as described in the next chapter. However this will not work if you are offline!
3.3.4.2. Create new C4C relevant contacts in outlook.
All new contacts created in C4C which appear in your ‘my contacts’ / ‘my teams contacts’ query are automatically replicated to outlook.
All new contacts created in the ‘SAP Hybris contacts’ folder in outlook are replicated to C4C. However, outlook might not give the option to maintain all relevant data with a good usability. For example – in most cases a contact must be assigned to an account- outlook does only provide a text field with no reference/value help to C4C. If you specify the account in this text field, C4C will try to derive a corresponding account if possible- but this might lead to errors.
Best practice to create C4C relevant contacts from outlook is using the add in. - But please consider, there is NO duplicate check!!!
The server side integration assumes that a user always works in a certain context to an outlook object. In this case the context can be an email which you have received and you want to create the sender of the email as a new contact in C4C.
The add in will show you that the sender was not found in C4C (based on the sender email address). If you decide to add the contact to C4C, push the contact button and maintain the additional data which is required for the contact- like the account….address, phone etc…
...and save it to C4C.
As a result you will find the contact in C4C.
When selecting an account in the add in- the add in shows all accounts which you are allowed to see according to your authorizations in C4C. Therefore if you choose an account which is not shown in ‘my accounts’ / ‘my teams accounts’ – the contact will be created in C4C, but not replicated to outlook.
3.3.5. Account Management
The server side outlook integration allows you to manage/work with your accounts which are assigned to you in C4C.
Therefore, you can replicate your C4C accounts to your outlook and they will appear in a separate folder in ‘my accounts'’
The folder is created automatically once your user is set up for the integration.
Depending on the configuration for your user
- either all accounts which appear in the ‘my accounts’ query in C4C
- or all accounts which appear under the ‘my teams accounts’ query in C4C
will be synched to your outlook.
Whenever an account is changed in C4C, the changed data is replicated to outlook and vice versa.
Restrictions to be considered:
- Entering data in outlook could lead to synch errors if the data entered in outlook is not compatible with you C4C configuration.
- The outlook account object is not aligned with the C4C account Object. Therefore, the outlook account cannot consume/display all C4C data and vice versa.
3.3.5.1. Manage existing accounts.
Even though it is possible to create entries in the outlook 'accounts' folder it ia not recommended to do/allow it. Recommendation is to switch off the 'create' option in the admin settings on profile level.
Reason here i that creating an account in C4C normally requires much more data than you can enter in outlook. Also there is no duplicate check.
Best practise within the outlook contact folder 'accounts' is to use it as 'read only feature'
Best practice to create C4C relevant accounts from outlook is using the add in. - But please consider, there is NO duplicate check!!!
If you decide to allow creation/update- please test it very thouroughly.
3.3.6. Individual customer Management
The server side outlook integration allows you to manage/work with your individual customers which are assigned to you in C4C.
Therefore, you can replicate your C4C individual customers to your outlook and they will appear in a separate folder in ‘my individual customers
AS there is NO standard 'my individual customer' query in C4C- the synch considers those ondividual customers where you are assigned as owner. NO other role of the account team triggers the synch. This means it is currently a limitation that the individual customer can only be synched to one users outlook - the one who is the owner.
3.3.6.1. Manage existing individual customers
Same as for 3.3.5.1. Manage existing accounts.
individual customers & add in:
as individual customers have a 'direct ' email address- the add in treats them like contacts when you open the add in in the context of an email you have received. If the sender was an individual customer in C4C it will be displayed in the add in...
4. Special features & functions & good to know
4.1 pinning the add in
whenever you click the add in button in outlook- the add in side pane is loaded and tries to fetch the contextual data in C4C for the marked email.
when opening the add in also meta data is loaded along with the contextual data. Loading the meta data takes some seconds and leads to a bad user experience.
therefore you can pin the add in
If you pin the add in it works much faster since the meta data is not loaded all the time.
If you close outlook, the pinning is also gone and you have to pin the add on again when you reopen outlook.
Pinning is only possible in the email overview and email detailed view. It is NOT available in the appointment/task overview/detailed view.
4.2. Searching for values within the Add in
Searching in the add in is possible in 2 areas.
a. Global search
b. Searching for C4C masterdata within an object in a specific field ...example account field when creating an appointment within the add in.
The parameters you can use for searching are configurable per object.
for example searching for 'accounts'....
Here you can define which fields(parameters ) can be used when searching for an account.
The fields you can choose here are limited to the once which you did define before in the detailed view.
These settings will apply to both search types mentioned before under a. & b.
4.2.1 special case 'external account ID'
The standard configuration for the add in only provides the C4C internal account ID as search parameter.
In case your C4C is integrated with an ERP system users might use in C4C the external account ID in their daily business and on the UI as they know these external numbers by heart.
The external account ID is technically not 1 field in C4C but a table structure (since you could have multiple external ID's per account in the multi backend scenario)
if you want to search in the add in with the external ID you can do the following custom implementation:
- create an extension field in the account on header level
- do not forget to activate the odata servcie C4Codata via the further usage menue if field was created via key user adaption or via PDI when field was created via PDI.
- since the field is only needed for the add in search you can either hide it or set it to read only once filled.
- read the external ID via PDI implementation and fill the custom field with the ID
- include the new field in the detailed settings of the account via the groupwareadmin view
- include the field in the search via the admin view

now you can search via external customer ID.
4.3. Synch window for appointments/Visits
The synchronization will synchronize all appointments/visits from C4C to outlook and from outlook to C4C wich are not older than 4 weeks.
It will synch all appointments/visits which are in the future.
this means there is a synch window from 4 weeks in the past and infinity.
once an appointment/visit moves out of this synch window, the categorization in outlook is deleted and it remains as 'normal' event in outlook with no link to C4C anymore.
4.4. SAVE appointment in outlook not possible when categorized C4C relevant
In outlook you can create a calender event with attendees and just 'save' it without sending. Then you can open it later and send it.
For calender events created in outlook which have attendees assigned and which are categorized as C4C visit/appointment just saving is not possible anymore. Technically the event is synched to C4C- then C4C sends anupdate to outlook and at that point in time outlook behaves as if a 'new' event is coming from C4C and it sends the invitations to the attendees.
Please consider this behaviour!!
To prevent the sending - do not specify any attendde in the event as long it is only a draft.
4.5. prerequisites for add in to appear active/inactive
The add in appears inactive in outlook if no reading pane is active. This is a Outlook functionality.
Therefore- in order to use the add in, the reading pane option should be switched on in outlook.
You can switch it on via the 'view' tab.
- SAP Managed Tags:
- SAP Cloud for Customer add-ins,
- C4C Sales
16 Comments
You must be a registered user to add a comment. If you've already registered, sign in. Otherwise, register and sign in.
Labels in this area
-
Business Trends
270 -
Business Trends
11 -
chitchat
1 -
customerexperience
1 -
Event Information
256 -
Event Information
18 -
Expert Insights
30 -
Expert Insights
51 -
Life at SAP
133 -
Life at SAP
1 -
Product Updates
666 -
Product Updates
24 -
SAP HANA Service
1 -
SAPHANACloud
1 -
SAPHANAService
1 -
Technology Updates
453 -
Technology Updates
15
Related Content
- C4C-Outlook Server side integration in CRM and CX Questions
- SAP Inside Track 2024 – Bangalore – February 17 !!My experience as a Speaker in CRM and CX Blogs by Members
- Troubleshooting Outlook Add-In Issues in SAP C4C in CRM and CX Blogs by Members
- Visit date auto reverted in CRM and CX Questions
- Server side integration MS Outlook in CRM and CX Questions
Top kudoed authors
| User | Count |
|---|---|
| 4 | |
| 2 | |
| 2 | |
| 2 | |
| 2 | |
| 1 | |
| 1 | |
| 1 | |
| 1 | |
| 1 |