
- SAP Community
- Products and Technology
- Supply Chain Management
- SCM Blogs by SAP
- Extending Standard Apps on Consumer Accounts of SA...
Supply Chain Management Blogs by SAP
Expand your SAP SCM knowledge and stay informed about supply chain management technology and solutions with blog posts by SAP. Follow and stay connected.
Turn on suggestions
Auto-suggest helps you quickly narrow down your search results by suggesting possible matches as you type.
Showing results for
Employee
Options
- Subscribe to RSS Feed
- Mark as New
- Mark as Read
- Bookmark
- Subscribe
- Printer Friendly Page
- Report Inappropriate Content
04-11-2018
10:48 AM
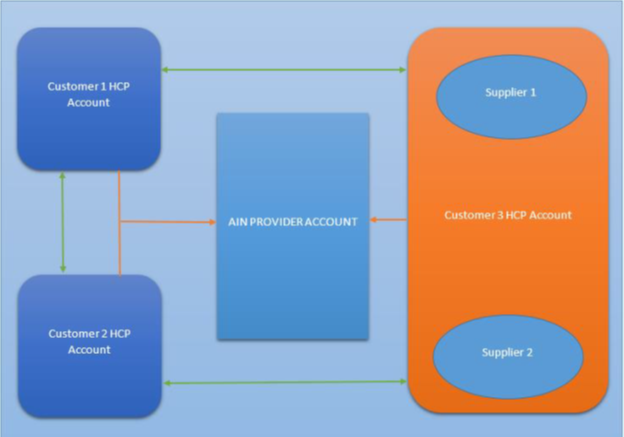
The SAP Asset Intelligence Network (SAP AIN) brings together the following types of customers:
SAP AIN also supports the development and deployment of additional services on top of asset information, including predictive maintenance planning, analytics, bench-marking, and remote monitoring.
SAP announced the launch of a new cloud business network for assets at the Hannover Messe conference. The SAP Asset Intelligence Network solution will help manufacturers, service providers, operators and other business partners to collaborate using a shared platform which has the single source of truth about shared assets.
Although the network is constantly enhanced by SAP with functionality to address problems with enterprise asset performance and management, there will always be the need for unique usages of the asset data contained in the network.
This blog explains how customers, partners and preferred solution providers can extend the standard apps provided by SAP AIN to create and cater to customer specific scenarios.
Extending standard apps helps the user to customize the app based on needs. It gives the flexibility to add more information that is not freely available or with the standard implementation. Extending and deploying the extended app is fairly straight forward with the new tools and IDE. Today, the app deployment process with HCP enablement tools such as mobile services (HCPMS) and WebIDE makes the app development faster. In our recent experience, it took us just a couple of hours to build Fiori apps with HCP.
This is useful when the customer wants to share more information with their invitees on SAP AIN. For example, a large Manufacturing Corporation is on boarded on AIN as a premium account holder and has multiple suppliers from which parts are procured. The corporation wants to share the current inventory situation to his suppliers for planning purposes to keep the inventory to a bare minimum and ease Just In Time (JIT) processing. In order to do this, you can extend the standard app, add necessary information and share it with these invited partners.
Besides this, the customers may also want to extend the standard apps in the following situations:
Customers can extend applications or specific sections and can have their own content, but these sections will not be visible to other customers.
For example, if Customer A extends the equipment page on the Equipment app and adds content like operational efficiency etc., all users of Customer A and its invitees will be able to see the section.
This section is independent of the owner of the object. This means if Customer A is looking at the equipment created by some other manufacturer, such as Customer B, then this section will also be visible.
This new information is not available to other customers seeing the same equipment, if shared.


The following steps show the process of extending the Models, Equipment and Locations app to add a new section to their details page.
1. Open your consumer account cockpit.
2. Choose the Services.
Note: You can jump to Step 4 if you already have the link to your Web IDE.
1. Select SAP Web IDE from the list of services.
2. Enable it if not already enabled.
Note: Instead of using SAP Web IDE, you can also use Eclipse or any other IDE to build your applications.

1. Click on the Open SAP Web IDE link.
2. This takes you to the new SAP Web IDE screen for your account.


1.Under the Create a Project section, choose New Extension Project.

1. Click Select Application -> SAP HANA Cloud Platform to choose the application to extend.
2. Enter your credentials.
Note: Currently, to extend the details page, you can choose:

3. Provide a name to the Extension Project and choose Next.
4. Unselect the checkbox to open the extensibility pane and choose Finish.
A new project is created in your workspace with the following structure.

Creating a UI5 View-Controller for Adding a Section
1. Right-click the webapp folder and choose New -> SAPUI5 View.

2. Enter a view name and confirm by clicking Next -> Finish
A view and controller is created in the project.
3. You can add multiple sections to an extension

Rendering a Block File in the Section
1. Right-click the webapp folder and click New -> File.
2. Create a file in the format <file_name>.js and choose OK.
The system creates a new block file containing the view you created in Step 6.
3. Add the below mentioned code to the file.
jQuery.sap.declare("sap.iot.ain.manageequipments.manageequipmentsExtension.<BlockFileName>");
jQuery.sap.require("sap.uxap.BlockBase");
sap.uxap.BlockBase.extend("sap.iot.ain.manageequipments.manageequipmentsExtension.<BlockFileName>",{
metadata:{
views:{
Expanded:{
viewName:"sap.iot.ain.manageequipments.manageequipmentsExtension.view.<ViewName>",
type: "XML"
},
Collapsed:{
viewName:"sap.iot.ain.manageequipments.manageequipmentsExtension.view.<ViewName>",
type: "XML"
}
}
}
});
4. Replace <BlockFileName> with your filename and <ViewName> with your view name.

This block is added to a fragment which becomes part of the executable code.
To create a fragment, follow the same procedure.
1. Right-click the webapp folder and select New -> File.
2. Enter a name for the fragment in the format: <FragmentName>.fragment.xml
3. A new fragment is created in the workspace. Add the following code to it.
<core:FragmentDefinition xmlns:core="sap.ui.core" xmlns="sap.uxap" xmlns:m="sap.m" xmlns:b="<path to the block file>">
<ObjectPageSection title="{i18n>SectionTitle}">
<subSections>
<ObjectPageSubSection>
<blocks>
<b:BlockFileName></b:BlockFileName>
</blocks>
</ObjectPageSubSection>
</subSections>
</ObjectPageSection>
</core:FragmentDefinition>
The fragment creates the ObjectPageSection and subsection control to be embedded into the details page.
1. Add a title to the section using the title property.
2. Replace <BlockFileName> with your block file’s name and the xml namespace for the block as the path to the block file.
(Here, sap.iot.ain.manageequipments.manageequipmentsExtension).

1. Using a code editor, open the manifest.json file.
2. Add the following code to the extensions object that was empty initially.
"sap.ui.viewExtensions": {
"sap.iot.ain.manageequipments.view.EquipmentObjectPage": {
"ObjectPageSections": {
"className": "sap.ui.core.Fragment",
"fragmentName": "sap.iot.ain.manageequipments.manageequipmentsExtension.ExtraSections",
"type": "XML"
}
}
}
Note:
- For Equipment, use: sap.iot.ain.manageequipments.view.EquipmentObjectPage.
- For Models, use: sap.iot.ain.managemodels.view.ModelObjectPage
- For Locations, use: sap.iot.ain.functional_locations.view.detail.FlocObjectPage
- Fragment name should be the path to the fragment created in the previous step.
Optional:

The steps previously executed are sufficient to run the application with the new section. To insert content in your section, add content to the view and controller as necessary. To implement the controller, follow these steps:
1. Enable your controller to access controller instance variables by using the following:
sap.ui.define([
"sap/iot/ain/lib/reusable/view/SectionBaseController"
], function(Controller) {
"use strict";
return Controller.extend("sap.iot.ain.manageequipments.manageequipmentsExtension.controller.View1", {});
});
Note:
The controller needs to inherit a “SectionBaseController” that enables your controller to have access to the following using controller instance variables:
The Object Page Controller (this._oParentController)
The Object Page (this._oObjectPage)
The Application Component (this._oComponent)
The Router of the application (this._oRouter)
The Event Bus (this._oEventBus)
The Resource Bundle (this._oResourceBundle)
2. Use the initialize method when controller is initialized
3. A method is also required to refresh the section every time by fetching the data and refreshing the section. This can be done in the function named renderSection
Note: Both methods have an object parameter which provides the ID, status and version of the current object – model/equipment/location.
{
id:32-char Id,
status: 1 for Unpublished, 2 for published, 3 for in revision
version: versionNumber
}
Note:
The status and version are optional. This will only be available on request of a specific version.
You can add all event handlers and standards/conventions of UI5/openUI5, as necessary.
1. Right-click the webapp folder and choose New -> File.
2. Name it as <FileName>.properties and add all the text to be used in the application.
Note: You can create multiple files for multiple languages as in a UI5 app.

To use in the new section, reference these texts in the controller using the following code:
var sPath = jQuery.sap.getModulePath(<extensionAppName>)
this._oComponent.getModel("i18n").enhance({bundleUrl:sPath + “/<filename>.properties”});
e.g. var sPath = jQuery.sap.getModulePath(“sap.iot.ain.manageequipments.manageequipmentsExtension”);
this._oComponent.getModel(“i18n”).enhance({bundleUrl:sPath + “/i18nProperties”});
1. In the consumer account cockpit, click the Destinations
2. Click the New Destination
3. Assign a name and description, select the required type, proxy type and authentication and enter the host URL relative to which service calls should be made
4. Choose Save.
5. Select the Check Connection button to verify if the connection succeeds.
Once a destination is created, it needs to be referred to the app created earlier.
1. Open the neo-app.json in your application folder in the workspace and add the destination you just created as an object under the “routes” array.
Example of a destination:
{
"path": "/ain/",
"target": {
"type": "destination",
"name": "name of the destination",
"entryPath": "/ain/"
},
"description": "Service end points for all the apps which will be used by the end user"
}
You can call services relative to the following path:
e.g. $.ajax({
url: "/ain/services/api/v1/announcements",
success: function(data) {}
});
Or By Using a UI5 json / odata model
renderSection: function(curObj) {
// create a Model with this data
var model = new sap.ui.model.json.JSONModel();
model.loadData("/ain/services/api/v1/equipment("+curObj.id+")/header?status="+curObj.status);
this.getView().setModel(model);
}
This can be then used to bind the data on the view.
e.g.
<mvc:View xmlns:core="sap.ui.core" xmlns:mvc="sap.ui.core.mvc" xmlns="sap.m" xmlns:l="sap.ui.layout"
controllerName="sap.iot.ain.manageequipments.manageequipmentsExtension.controller.view1" xmlns:html="http://www.w3.org/1999/xhtml">
<Page title="Title">
<content>
<l:VerticalLayout>
<Label text="Equipment Name" />
<Text text="{/name}"/>
<Label text="Equipment Description" />
<Text text="{/description/short}"/>
<Label text="Last Change" />
<Text text="{/adminData/changedOn}"/>
</l:VerticalLayout>
</content>
</Page>
</mvc:View>
1. Select your application (or the component file within it).
2. Run it as a "Fiori Launchpad Sandbox" from the Run -> Run as option in the menu bar or the Run icon on the icon bar.

Deploying the Application on HCP
1. Select the application you want to deploy and click Deploy to Hana Cloud Platform from the Deploy menu item.
Alternatively, you may right-click and choose Deploy -> Deploy to Hana Cloud Platform
2. Enter your credentials for authentication.
Once authenticated, a dialog pops up.
3. Select the account where you want to deploy the application
4. Enter the application name and choose Deploy.
The application gets deployed.
1. Select the application for tile you want to create
2. Choose Register on SAP Fiori Launchpad from the deploy menu.
Alternatively, you can right-click and choose Deploy -> Register on SAP Fiori Launchpad.
3. Enter the relevant information for the tile configuration depending on how you want your tile to display
4. Select Finish.
5. While configuring the tile, add the semantic Object, Action and parameters required for the application (if any).

From the UI, retrieve parameters from the following code:
this._oComponent =
sap.ui.component(sap.ui.core.Component.getOwnerIdFor(this.getView()));
this._oComponent.getComponentData().startupParameters.Param1
Your tile is created on the Launchpad for use.
- Operators: Large scale companies from various industries that buy, own and operate industrial assets
- Manufacturers: Industrial asset manufacturers that design, produce, sell, commission and operate/service industrial assets
- Distributors & Service Providers: Units that operate close to the operators and provide them with sales and services for the manufacturer’s assets
SAP AIN also supports the development and deployment of additional services on top of asset information, including predictive maintenance planning, analytics, bench-marking, and remote monitoring.
SAP announced the launch of a new cloud business network for assets at the Hannover Messe conference. The SAP Asset Intelligence Network solution will help manufacturers, service providers, operators and other business partners to collaborate using a shared platform which has the single source of truth about shared assets.
Although the network is constantly enhanced by SAP with functionality to address problems with enterprise asset performance and management, there will always be the need for unique usages of the asset data contained in the network.
This blog explains how customers, partners and preferred solution providers can extend the standard apps provided by SAP AIN to create and cater to customer specific scenarios.
Situations for Extending Standard Apps
Extending standard apps helps the user to customize the app based on needs. It gives the flexibility to add more information that is not freely available or with the standard implementation. Extending and deploying the extended app is fairly straight forward with the new tools and IDE. Today, the app deployment process with HCP enablement tools such as mobile services (HCPMS) and WebIDE makes the app development faster. In our recent experience, it took us just a couple of hours to build Fiori apps with HCP.
This is useful when the customer wants to share more information with their invitees on SAP AIN. For example, a large Manufacturing Corporation is on boarded on AIN as a premium account holder and has multiple suppliers from which parts are procured. The corporation wants to share the current inventory situation to his suppliers for planning purposes to keep the inventory to a bare minimum and ease Just In Time (JIT) processing. In order to do this, you can extend the standard app, add necessary information and share it with these invited partners.
Besides this, the customers may also want to extend the standard apps in the following situations:
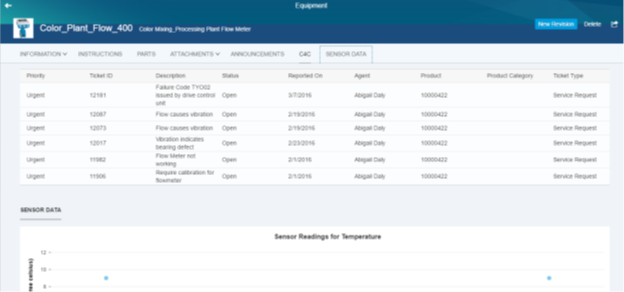
- To get the data from their connected systems (Cloud systems like Cloud for C4C and on premise systems like SAP EAM) and show it on the same details page as other information.
- To provide information to the customers/end users for tracking their equipment or for comparing it with performance of other similar equipment. For example, a farmer using a tractor (equipment) can get information about the tractor performance based on connected sensors and the health of its parts.
- To connect to external sources and get updated or live feed information about the object. For example, advertisements related to your equipment or parts.
Visibility
Customers can extend applications or specific sections and can have their own content, but these sections will not be visible to other customers.
For example, if Customer A extends the equipment page on the Equipment app and adds content like operational efficiency etc., all users of Customer A and its invitees will be able to see the section.
This section is independent of the owner of the object. This means if Customer A is looking at the equipment created by some other manufacturer, such as Customer B, then this section will also be visible.
This new information is not available to other customers seeing the same equipment, if shared.
Steps to Build and Extend a Standard SAP AIN Application on HCP
The following steps show the process of extending the Models, Equipment and Locations app to add a new section to their details page.
Step 1
Development Using Web IDE
1. Open your consumer account cockpit.
2. Choose the Services.
Note: You can jump to Step 4 if you already have the link to your Web IDE.
Step 2
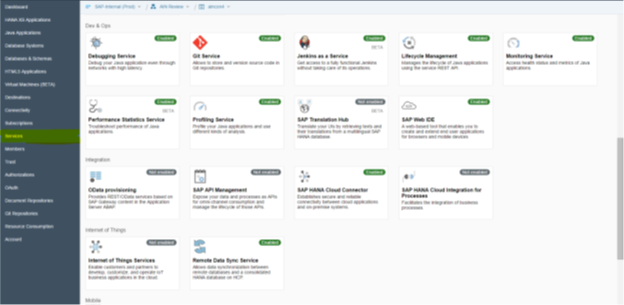
1. Select SAP Web IDE from the list of services.
2. Enable it if not already enabled.
Note: Instead of using SAP Web IDE, you can also use Eclipse or any other IDE to build your applications.
Step 3
1. Click on the Open SAP Web IDE link.
2. This takes you to the new SAP Web IDE screen for your account.
Step 4
1.Under the Create a Project section, choose New Extension Project.
Step 5
1. Click Select Application -> SAP HANA Cloud Platform to choose the application to extend.
2. Enter your credentials.
Note: Currently, to extend the details page, you can choose:
- “managemodels” for Models app
- “manageequipments” for Equipment app
- “functionallocations” for Locations app
3. Provide a name to the Extension Project and choose Next.
4. Unselect the checkbox to open the extensibility pane and choose Finish.
A new project is created in your workspace with the following structure.
Step 6
Creating a UI5 View-Controller for Adding a Section
1. Right-click the webapp folder and choose New -> SAPUI5 View.
2. Enter a view name and confirm by clicking Next -> Finish
A view and controller is created in the project.
3. You can add multiple sections to an extension
Step 7
Rendering a Block File in the Section
1. Right-click the webapp folder and click New -> File.
2. Create a file in the format <file_name>.js and choose OK.
The system creates a new block file containing the view you created in Step 6.
3. Add the below mentioned code to the file.
jQuery.sap.declare("sap.iot.ain.manageequipments.manageequipmentsExtension.<BlockFileName>");
jQuery.sap.require("sap.uxap.BlockBase");
sap.uxap.BlockBase.extend("sap.iot.ain.manageequipments.manageequipmentsExtension.<BlockFileName>",{
metadata:{
views:{
Expanded:{
viewName:"sap.iot.ain.manageequipments.manageequipmentsExtension.view.<ViewName>",
type: "XML"
},
Collapsed:{
viewName:"sap.iot.ain.manageequipments.manageequipmentsExtension.view.<ViewName>",
type: "XML"
}
}
}
});
4. Replace <BlockFileName> with your filename and <ViewName> with your view name.
Step 8
This block is added to a fragment which becomes part of the executable code.
To create a fragment, follow the same procedure.
1. Right-click the webapp folder and select New -> File.
2. Enter a name for the fragment in the format: <FragmentName>.fragment.xml
3. A new fragment is created in the workspace. Add the following code to it.
<core:FragmentDefinition xmlns:core="sap.ui.core" xmlns="sap.uxap" xmlns:m="sap.m" xmlns:b="<path to the block file>">
<ObjectPageSection title="{i18n>SectionTitle}">
<subSections>
<ObjectPageSubSection>
<blocks>
<b:BlockFileName></b:BlockFileName>
</blocks>
</ObjectPageSubSection>
</subSections>
</ObjectPageSection>
</core:FragmentDefinition>
The fragment creates the ObjectPageSection and subsection control to be embedded into the details page.
1. Add a title to the section using the title property.
2. Replace <BlockFileName> with your block file’s name and the xml namespace for the block as the path to the block file.
(Here, sap.iot.ain.manageequipments.manageequipmentsExtension).
Step 9
Plugging the Fragment in the Details Page of the Manifest File
1. Using a code editor, open the manifest.json file.
2. Add the following code to the extensions object that was empty initially.
"sap.ui.viewExtensions": {
"sap.iot.ain.manageequipments.view.EquipmentObjectPage": {
"ObjectPageSections": {
"className": "sap.ui.core.Fragment",
"fragmentName": "sap.iot.ain.manageequipments.manageequipmentsExtension.ExtraSections",
"type": "XML"
}
}
}
Note:
- For Equipment, use: sap.iot.ain.manageequipments.view.EquipmentObjectPage.
- For Models, use: sap.iot.ain.managemodels.view.ModelObjectPage
- For Locations, use: sap.iot.ain.functional_locations.view.detail.FlocObjectPage
- Fragment name should be the path to the fragment created in the previous step.
Optional:
- The application can be made to run in the fullwidth mode by using the property – fullwidth:true under “sap.ui” in the manifest file.
- The title of the application can be updated using the title property under “sap.app” in the manifest file.
Step 10
Recommendation
The steps previously executed are sufficient to run the application with the new section. To insert content in your section, add content to the view and controller as necessary. To implement the controller, follow these steps:
1. Enable your controller to access controller instance variables by using the following:
sap.ui.define([
"sap/iot/ain/lib/reusable/view/SectionBaseController"
], function(Controller) {
"use strict";
return Controller.extend("sap.iot.ain.manageequipments.manageequipmentsExtension.controller.View1", {});
});
Note:
The controller needs to inherit a “SectionBaseController” that enables your controller to have access to the following using controller instance variables:
The Object Page Controller (this._oParentController)
The Object Page (this._oObjectPage)
The Application Component (this._oComponent)
The Router of the application (this._oRouter)
The Event Bus (this._oEventBus)
The Resource Bundle (this._oResourceBundle)
2. Use the initialize method when controller is initialized
3. A method is also required to refresh the section every time by fetching the data and refreshing the section. This can be done in the function named renderSection
Note: Both methods have an object parameter which provides the ID, status and version of the current object – model/equipment/location.
{
id:32-char Id,
status: 1 for Unpublished, 2 for published, 3 for in revision
version: versionNumber
}
Note:
The status and version are optional. This will only be available on request of a specific version.
You can add all event handlers and standards/conventions of UI5/openUI5, as necessary.
Step 11
Maintaining a Properties File for Storing Localized Texts
1. Right-click the webapp folder and choose New -> File.
2. Name it as <FileName>.properties and add all the text to be used in the application.
Note: You can create multiple files for multiple languages as in a UI5 app.
To use in the new section, reference these texts in the controller using the following code:
var sPath = jQuery.sap.getModulePath(<extensionAppName>)
this._oComponent.getModel("i18n").enhance({bundleUrl:sPath + “/<filename>.properties”});
e.g. var sPath = jQuery.sap.getModulePath(“sap.iot.ain.manageequipments.manageequipmentsExtension”);
this._oComponent.getModel(“i18n”).enhance({bundleUrl:sPath + “/i18nProperties”});
Step 12
Making Service Calls Through a Destination
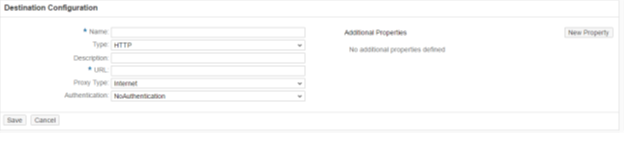
1. In the consumer account cockpit, click the Destinations
2. Click the New Destination
3. Assign a name and description, select the required type, proxy type and authentication and enter the host URL relative to which service calls should be made
4. Choose Save.
5. Select the Check Connection button to verify if the connection succeeds.
Step 13
Once a destination is created, it needs to be referred to the app created earlier.
1. Open the neo-app.json in your application folder in the workspace and add the destination you just created as an object under the “routes” array.
Example of a destination:
{
"path": "/ain/",
"target": {
"type": "destination",
"name": "name of the destination",
"entryPath": "/ain/"
},
"description": "Service end points for all the apps which will be used by the end user"
}
Step 14
You can call services relative to the following path:
e.g. $.ajax({
url: "/ain/services/api/v1/announcements",
success: function(data) {}
});
Or By Using a UI5 json / odata model
renderSection: function(curObj) {
// create a Model with this data
var model = new sap.ui.model.json.JSONModel();
model.loadData("/ain/services/api/v1/equipment("+curObj.id+")/header?status="+curObj.status);
this.getView().setModel(model);
}
This can be then used to bind the data on the view.
e.g.
<mvc:View xmlns:core="sap.ui.core" xmlns:mvc="sap.ui.core.mvc" xmlns="sap.m" xmlns:l="sap.ui.layout"
controllerName="sap.iot.ain.manageequipments.manageequipmentsExtension.controller.view1" xmlns:html="http://www.w3.org/1999/xhtml">
<Page title="Title">
<content>
<l:VerticalLayout>
<Label text="Equipment Name" />
<Text text="{/name}"/>
<Label text="Equipment Description" />
<Text text="{/description/short}"/>
<Label text="Last Change" />
<Text text="{/adminData/changedOn}"/>
</l:VerticalLayout>
</content>
</Page>
</mvc:View>
Step 15
Test and Run Your Application
1. Select your application (or the component file within it).
2. Run it as a "Fiori Launchpad Sandbox" from the Run -> Run as option in the menu bar or the Run icon on the icon bar.
Step 16
Deploying the Application on HCP
1. Select the application you want to deploy and click Deploy to Hana Cloud Platform from the Deploy menu item.
Alternatively, you may right-click and choose Deploy -> Deploy to Hana Cloud Platform
2. Enter your credentials for authentication.
Once authenticated, a dialog pops up.
3. Select the account where you want to deploy the application
4. Enter the application name and choose Deploy.
The application gets deployed.
Step 17
Creating a Tile on the Launchpad
1. Select the application for tile you want to create
2. Choose Register on SAP Fiori Launchpad from the deploy menu.
Alternatively, you can right-click and choose Deploy -> Register on SAP Fiori Launchpad.
3. Enter the relevant information for the tile configuration depending on how you want your tile to display
4. Select Finish.
5. While configuring the tile, add the semantic Object, Action and parameters required for the application (if any).
From the UI, retrieve parameters from the following code:
this._oComponent =
sap.ui.component(sap.ui.core.Component.getOwnerIdFor(this.getView()));
this._oComponent.getComponentData().startupParameters.Param1
Your tile is created on the Launchpad for use.
1 Comment
You must be a registered user to add a comment. If you've already registered, sign in. Otherwise, register and sign in.
Labels in this area
-
Business Trends
169 -
Business Trends
23 -
Catalog Enablement
1 -
Event Information
47 -
Event Information
3 -
Expert Insights
12 -
Expert Insights
35 -
intelligent asset management
1 -
Life at SAP
63 -
Product Updates
500 -
Product Updates
60 -
Release Announcement
1 -
SAP Digital Manufacturing for execution
1 -
Super Bowl
1 -
Supply Chain
1 -
Sustainability
1 -
Swifties
1 -
Technology Updates
187 -
Technology Updates
14
Related Content
- How AI-based Anomaly Detection empowers reliability engineers in SAP Asset Performance Management in Supply Chain Management Blogs by SAP
- SAP Business Network Asset Collaboration and Classification Content by ECLASS: FAQs in Supply Chain Management Blogs by SAP
- Condition Based Maintenance with SAP Asset Performance Management (SAP APM) and SAP Data Intelligence - Concept and Use Case in Supply Chain Management Blogs by SAP
- Unlock your supply chain potential with SAP Integrated Business Planning AI in Supply Chain Management Blogs by SAP
- Additional Customer Tolerance Components in Supply Chain Management Blogs by SAP
Top kudoed authors
| User | Count |
|---|---|
| 9 | |
| 7 | |
| 4 | |
| 4 | |
| 3 | |
| 3 | |
| 2 | |
| 2 | |
| 2 | |
| 2 |