
- SAP Community
- Products and Technology
- Technology
- Technology Blogs by SAP
- Content Transport using CTS - Cloud Integration – ...
Technology Blogs by SAP
Learn how to extend and personalize SAP applications. Follow the SAP technology blog for insights into SAP BTP, ABAP, SAP Analytics Cloud, SAP HANA, and more.
Turn on suggestions
Auto-suggest helps you quickly narrow down your search results by suggesting possible matches as you type.
Showing results for
Employee
Options
- Subscribe to RSS Feed
- Mark as New
- Mark as Read
- Bookmark
- Subscribe
- Printer Friendly Page
- Report Inappropriate Content
04-10-2018
5:32 PM
Introduction:
This blog discusses the steps and configurations to transport Integration Packages using CTS+ based system between multiple tenants by exporting it from one tenant and importing it in another.
Customers using the SAP’s Change and Transport (CTS+) On-Premise system and having two test and Production Cloud Integration tenants have the option to use the feature to transport an Integration Package from the Test to the production landscape using the CTS+ system.
This is a two-part blog series,
- Part 1 focuses on setting up the Cloud Integration for CTS.
- Part 2 focuses on transport Integration packages across test and Production Cloud Integration tenants.
In this part, we will do the necessary configurations to set up the SAP Cloud Integration for CTS.
1. Pre-requisites:
1.1. Roles and Transport Setting:
- As the Tenant Admin, you will need to enable the Transport Settings to CTS+ in the Test tenant. You can do this by accessing the Settings tab and choosing the Transport Mode to CTS+ Direct.

Note: Ensure that all Integration developers who would be transporting content and used for authentication have the Role IntegrationContent.Transport and is a Member of the tenant Account.
2. Enable the service, Solutions Lifecycle Management in your account.
3. Ensure that you perform this step in all the accounts (Test and Production) where you want to use content transport using CTS+. This is a one-time activity. You can do that by performing the following steps:
- In the account cockpit in the SAP Cloud Platform, Choose Services -> Solutions Lifecycle Management -> Enable.

4. Create a new HTTP destination by selecting Configure Destinations.
- Ensure that the Name of the destination is CloudIntegration (case-sensitive).
- Enter the URL of the tenant management node from which you want to transport content.
- The user credentials that you have used in the destination should be a member of the tenant management node account from which you want to transport content.

Note: The destination 'CloudIntegration' created for the Production/target account must have the corresponding tenant Management URL of the Production/target account.
Note: The Tenant Management URL can be obtained from the accounts cockpit which lists the applications that are subscribed.
5. You have activated and configured the CTS+ Export Web Service as described in Activating and Configuring CTS Export Web Service.
6. You have installed and configured the Cloud Connector, which is used to connect on-premise systems with the SAP Cloud Platform. For more information, see Cloud Connector
For more information on Content Transport, please refer Content Transport
2. Configuration:
2.1. Configuring Cloud Integration for CTS+ Direct
- To configure the target system, go to SOAMANAGER transaction in CTS system.
- Navigate to Web service configuration and search for EXPORT_CTS_WS. Click on the service.

- Click on service WSDL generation.

- Copy this URL and launch in browser, you will receive wsdl-definition in response. At the bottom of response, it contains wsdl-service as shown below:

- location of <soap-address> needs to be exposed as service.
For more information on WSDL Document Display, see Displaying a WSDL Document.
- This URL needs to be configured in Cloud connector, Enter the hostname and port per your requirement.

- Create a Destination in your account by selecting Configure Destinations, navigate to Login to your account in the SAP Cloud Integration.
- Ensure that the Name of the destination is TransportSystemCTS (case-sensitive).
- URL that was exposed as web service (for eg
 ) from which you want to transport content needs to be configured.

For more information, please refer Setting Up Direct Upload
2.2. Basic Configuration in CTS
- Import SSL Certificate
The root certificate of the certificate authority that was used to sign the SAP Cloud Integration server certificate needs to be imported in the CTS system.
This is the certification path for your domain:
- Logon to the Tenant WebUI URL and in the browser, click on the lock symbol.

- Navigate to the Certification path tab.

- Import this is CTS system. Start Internet Explorer and navigate to Tools -> Internet options.
- Go to Content -> Certificates -> Trusted Root Certification Authorities. Select “Baltimore Cyber Trust” and export it as Base-64 encoded .509 (.CER).

- In the CTS system open transaction “STRUST”.
- Select the certificate list on the left that you have specified above.

- Click the “Import Certificate” button on the bottom
- In the dialog enter the file name of the certificate file which has been exported in step 6.
- Click “Add to Certificate List”.

2.3. Configuring the HTTP destination:
You must create an HTTP destination on the CTS system for every target account (every system where you would like to execute imports).
- Go to transaction SM59 and create a Destination as shown.

- Enter a name in the field RFC Destination. Later, you must enter the name of the destination when you define the target system in STMS transaction.
- On the Technical Settings tab, enter the details of the target system:
- target Host: Enter the data center specific host name of the SL Service.
- Service No: <empty>
- Path Prefix: /slservice/slp/basic/<tenant-account-name>/slp
- Configure the proxy settings per your network configuration.
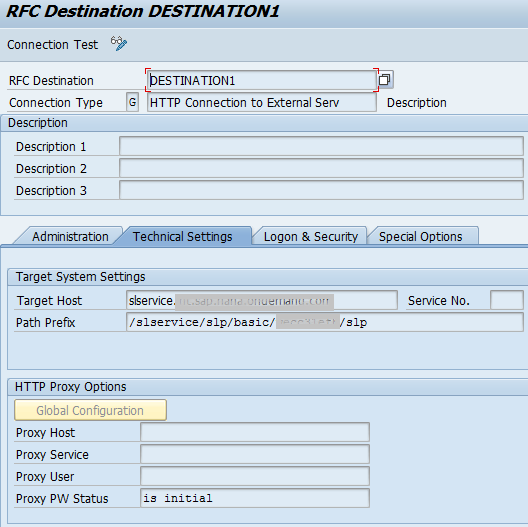
- Go to the Logon & Security tab, enter the logon details for the target system and Make sure to check the “Active” checkbox for SSL.

- The connection test for the connection should be successful.
For more information on configuring an HTTP Destination in ABAP system, see Establishing a connection using Destination
2.4. Configure Cloud Platform as Application type:
To use CTS with Cloud Integration, you need to define an application type for Cloud Integration in CTS. The application type will then be used as a unique identifier for Cloud Integration content in CTS.
The application type is created in CTS as below:
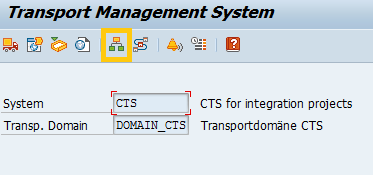
- Logon to the CTS system and open transaction STMS.
- Go to the System Overview.
- To create a new Application Type, go to Extras -> Application Types -> Configure.

- You can see the list of application types already created in your system. Choose New Entries.

- On the next screen, you can enter your application type as “HCP” and a Description.

- Save your entry and click Yes to distribute the new application type through your landscape. Click Back to return to the list of application types.
2.5. Configuring the Transport Landscape in CTS:
In this section, we will set up a landscape of two systems, Test (CI1) and Production (CI2), and Transport Routes.
- Configuring the Test system:
- Go to transaction STMS in the CTS system and Choose System Overview.
- Choose SAP System -> Create -> Non-ABAP System

- Enter the SID of the Test system as “CI1” in the field System and enter a Description.
- Choose Activate Transport Organizer and click Save.

Note: All users that should be allowed to attach SAP Cloud Integration content to transport requests must have a corresponding user in the client of the CTS system that you are using for transports.
2. Configuring the Production System:
- Similarly add another system, Enter the SID of the Production system as “CI2” and configure as shown:

- Click yes to distribute the configuration.

- When saving the non-ABAP system, you are asked to define the deployment method for your system. Choose New Entries.
- On the next screen, configure as shown:

- Save your entries and choose Yes to distribute the new application type through your landscape.
- Click back to return to the list. Click Back to return to the system overview.

Note: Create any other target system that you might need.
3. Configuring the Transport Landscape: Defining Transport Routes
With the Transport routes, we connect the representations of different systems we created above.
- Go to transaction STMS and open Transport routes.

- The systems created CI1 and CI2 are shown in upper row of systems. The systems in here are not yet connected by transport routes.

- Switch to Edit Mode. Go to Edit -> Transport Layer -> Create.
- Enter a name for the Transport Layer, e.g. ZCPI.

- Click on system CI1 in the upper row and drag and drop it in the area where the transport routes are shown.
- Repeat the previous step for CI2.

- Choose Add Transport Route.

- Your mouse pointer is now a pencil. Draw a line from CI1 to CI2.
- A dialog box opens. Make sure that Consolidation is selected. A consolidation route is needed to connect a test system to e.g. a Production system (from a system where you do an export to a system where you would like to import the transport request). Enter the Production system as CI2.
- Choose ZCPI as the transport layer and choose Transfer.
- A transport route has been added connecting CI1 with CI2.
- Confirm that you would like to Distribute and Activate the configuration.

For more details on the setting in the CTS+ system, refer: Change Management with CTS+
Take Away:
We have learnt how to configure the Cloud Integration for CTS. We have also done the necessary settings to perform the Transport of Integration packages using the CTS system.
In the next part of this blog series, I would extend this set up to perform the Transport of Integration packages across the Test and Production Tenant Accounts.
Part 2
- SAP Managed Tags:
- Cloud Integration
Labels:
16 Comments
You must be a registered user to add a comment. If you've already registered, sign in. Otherwise, register and sign in.
Labels in this area
-
ABAP CDS Views - CDC (Change Data Capture)
2 -
AI
1 -
Analyze Workload Data
1 -
BTP
1 -
Business and IT Integration
2 -
Business application stu
1 -
Business Technology Platform
1 -
Business Trends
1,661 -
Business Trends
88 -
CAP
1 -
cf
1 -
Cloud Foundry
1 -
Confluent
1 -
Customer COE Basics and Fundamentals
1 -
Customer COE Latest and Greatest
3 -
Customer Data Browser app
1 -
Data Analysis Tool
1 -
data migration
1 -
data transfer
1 -
Datasphere
2 -
Event Information
1,400 -
Event Information
65 -
Expert
1 -
Expert Insights
178 -
Expert Insights
280 -
General
1 -
Google cloud
1 -
Google Next'24
1 -
Kafka
1 -
Life at SAP
784 -
Life at SAP
11 -
Migrate your Data App
1 -
MTA
1 -
Network Performance Analysis
1 -
NodeJS
1 -
PDF
1 -
POC
1 -
Product Updates
4,577 -
Product Updates
330 -
Replication Flow
1 -
RisewithSAP
1 -
SAP BTP
1 -
SAP BTP Cloud Foundry
1 -
SAP Cloud ALM
1 -
SAP Cloud Application Programming Model
1 -
SAP Datasphere
2 -
SAP S4HANA Cloud
1 -
SAP S4HANA Migration Cockpit
1 -
Technology Updates
6,886 -
Technology Updates
408 -
Workload Fluctuations
1
Related Content
- ABAP Cloud Developer Trial 2022 Available Now in Technology Blogs by SAP
- Hack2Build on Business AI – Highlighted Use Cases in Technology Blogs by SAP
- Convert multiple xml's into single Xlsx(MS Excel) using groovy script in Technology Blogs by Members
- Switch on gCTS (for existing packages) in Technology Blogs by SAP
- When to Use Multi-Off in 3SL in Technology Blogs by SAP
Top kudoed authors
| User | Count |
|---|---|
| 13 | |
| 10 | |
| 10 | |
| 9 | |
| 8 | |
| 7 | |
| 6 | |
| 5 | |
| 5 | |
| 5 |