
- SAP Community
- Products and Technology
- Technology
- Technology Blogs by Members
- Installing SAP NetWeaver Developer Edition on an U...
Technology Blogs by Members
Explore a vibrant mix of technical expertise, industry insights, and tech buzz in member blogs covering SAP products, technology, and events. Get in the mix!
Turn on suggestions
Auto-suggest helps you quickly narrow down your search results by suggesting possible matches as you type.
Showing results for
dylan-drummond
Contributor
Options
- Subscribe to RSS Feed
- Mark as New
- Mark as Read
- Bookmark
- Subscribe
- Printer Friendly Page
- Report Inappropriate Content
04-05-2018
7:42 AM
This blog explains in great detail, how you can get an SAP NetWeaver Developer Edition running on an Ubuntu virtual machine.
If you want the concise guide to installing on Ubuntu, then I published one here:
https://blogs.sap.com/2019/10/20/concise-guide-to-install-sap-netweaver-developer-edition-on-ubuntu-...
[UPDATE (June 2021): for installing on Ubuntu, you will find this blog useful, for modifying the installer script so that the installation succeeds:
https://blogs.sap.com/2021/06/07/adjusting-installer-script-for-sap-netweaver-dev-edition-for-distro...
.. so highly recommend also checking that blog, as otherwise you might get stuck].
We illustrate using hosts running mac OS (High Sierra) or Windows 10, and using two free hypervisors: Oracle VirtualBox, and VMWare Workstation Player. [Tested these instructions ok on following Ubuntu Desktop releases(yy.mm): 16.04, 18.04, 19.04, 19.10. Over time the screenshots and procedures noted here may become obsolete, as distros and NetWeaver implementations change. Try to adapt what you see here to the newer reality. From 2020 onwards this non-concise blog is not being updated any longer].
If you like, you can view this blog as the “Ubuntu sibling” of the official SAP blog for installing on openSUSE VM: https://blogs.sap.com/2017/09/04/newbies-guide-installing-abap-as-751-sp02-on-linux/
There are quite a few differences to take into account when installing on Ubuntu.
Before we go through the many steps of this How-To … here's what the screen looked like one afternoon at Stockholm-Arlanda airport, waiting for the flight to Helsinki… the first successful Ubuntu SAP NetWeaver installation has just occurred (ummm, first time it occurred on any of my machines, certainly not the first time this installation has ever happened in the world)… the hypervisor was VirtualBox, running on Mac OS (High Sierra):

So, the steps are as follows:
Register for an SAP NW752 SP04 Developer Edition (or whatever is the most current edition, this was the newest one in October 2019). You may need to get a so-called "P-user" from SAP, by registering when trying to log in to the following site... anyway the idea is to download the set of rar files that are accessible from https://developers.sap.com/trials-downloads.html (might take a while depending on your Internet download speed, for example in October 2019 the 7.52 edition is in 11 rar part files - don't miss out the 11th rar since default search result displays 10 files... each file is about 1.4 GB in size; if using Google Chrome, which usually provides a maximum of 6 concurrent download sockets, you can get the last 4 downloaded more quickly by opening another Chrome persona/profile or using an additional Incognito persona, since the limit applies per persona).
If needed, download and install a tool that can extract multipart rar files, which tool you need depends on whether you intend to do the unpacking on the host machine or in the VM itself (see below for more details on those two options). (Mac: e.g. The Unarchiver - https://theunarchiver.com/ ; Ubuntu: sudo apt install rar unrar ).
Download and install a hypervisor, VirtualBox and/or VMware Workstation Player / Fusion Pro.
VirtualBox website: https://www.virtualbox.org/
VMware website: https://www.vmware.com/products.html (Download -> Free Product Downloads / Free Product Trials and Demos).
Oracle VirtualBox is available for Windows, Mac, and Linux; VMWare Workstation Player available for Windows and Linux (if you are running a non-virtual Ubuntu distro, you can of course choose to just install NetWeaver without using a hypervisor, if you like); VMware Fusion Pro is the trial product for Mac (30 day trial). Anyway the examples in this blog are done using VirtualBox on mac OS (High Sierra) and VMWare Workstation Player on Windows 10).
Install the new Ubuntu VM (maybe the latest LTS version, e.g. in March 2018 we used the version LTS 16.04..4, though this process has also tested ok on 18.10 and 19.04 releases; you can download the .iso from https://ubuntu.com/desktop ), so yes, install a new Ubuntu VM into the hypervisor: (screenshots are taken from an Ubuntu install on VirtualBox on a MacMini; VMWare Player has a similar GUI-based process (not shown in this blog) to create a VM from an image).
[Selected New… then “Expert Mode”…]:

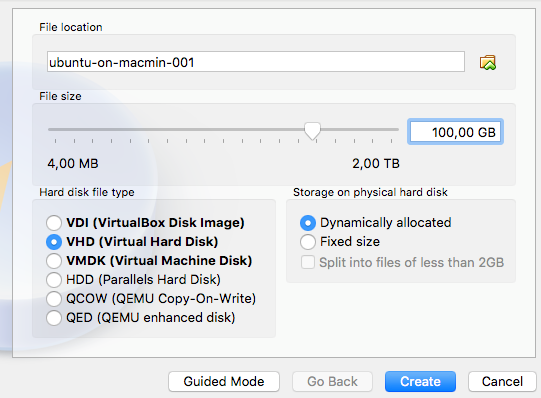
I used VHD in these examples, other virtual disk formats should also work. Allocate at least 5GB of RAM (6GB or more is better, but in above example only 8GB RAM on the host, so 5 or 6GB is a practical maximum for guest VM to use…if you have a machine with available RAM for guest VM of 4GB or less, it is unlikely you can follow this tutorial using that machine); then give the VM around 100GB of storage space (though e.g. 80GB may be enough). When you Power On, you will be asked to specify a boot-disk, we give the path to our Ubuntu .iso file:

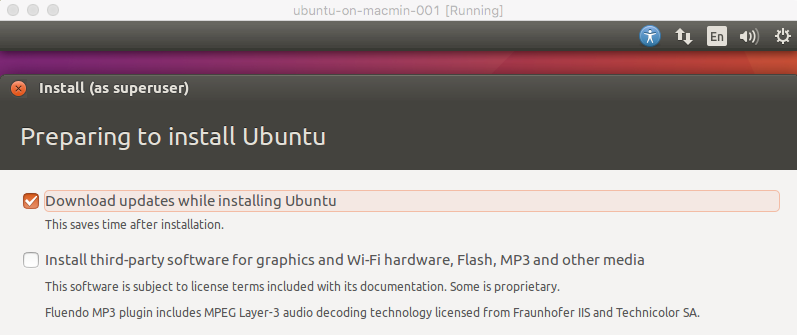
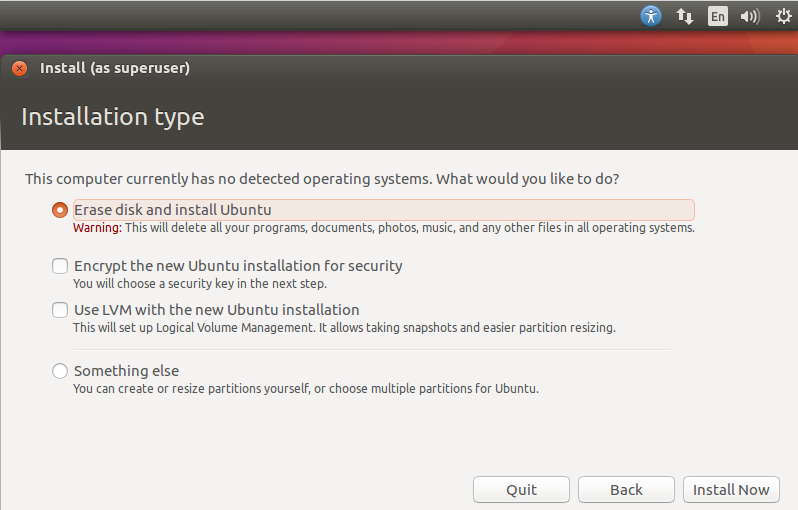
When the actual Ubuntu installation process starts, I chose not to use Logical Volumes (anyway with VirtualBox you have snapshots available from the hypervisor); selected option “Download with updates” as it reduces the amount of time spent doing updates later; language English US (default – safest not to change this); keyboard, well that depends on what keyboard you have, for example for standard Finnish keyboards on Windows I selected Finnish → Finnish, on MacBook Pro and MacMini used Finnish → Finnish (Macintosh).
[In this blog we assume that you use NAT networking i.e. the Hypervisor gives the VM an IPv4 address. Although there are use cases where e.g. bridged networking and statically setting the VM's IPv4 address make more sense, still the NAT solution is the easiest until you know what you are doing].
As part of the installation, it is a good idea to give your computer the hostname: vhcalnplci (although if you are reasonable in naming choices, other hostnames should meet the SAP rules, tested this... watch out for Fiori apps in Launchpad expecting the hostname to be vhcalnplci though; also testing HTTP services in tcode SICF such as "/sap/public/info" etcetera, tests tend to fail; and also I noticed that RFC connections e.g. from JCo client testing with remote-enabled Function Module STFC_CONNECTION, only seems to work if the host was named vhcalnplci - probably the install script has hardcoded some of the RFC server config details according to this hostname).


… you need an OS user (in this example, “marmot”; in other examples screenshotted in this blog, the OS user might be called something else, e.g. “dylan” or “murmeister” or whatever); and why not call your computer “vhcalnplci” since rolling your own name can lead you into dark areas of error log messages 🙂

After installing, a popup asks you to Restart to finish setup… You will be asked to “remove the installation media, and press Enter”, just press Enter and the machine will power off, and hopefully boot up again.
Now you can open a terminal, from the Dash-icon in top left and with a search string, then click on the icon for Terminal

(If you are shown as user “ubuntu” then you are still working off the “CD-trial-instance”, and so you still need to shutdown the VM to finish the installation, and power on to log on as your actual newly created OS user).
So the state of play should be that you have a Terminal window open, and it should show that it is indeed you who is there, ready to continue this installation adventure…

Commands to run on login:
sudo apt update #updates the package repositories. Note that if e.g. Ubuntu Software Updater is also silently checking the “update-status” (e.g. just after logon) and thus locking the package management tools, then you might get an error message when trying to use the “apt”-utility…

if so, get coffee, come back it should work after a few minutes, or at least Software Updater should be informing you that it wants to install updates. You could also use Software Updater, which is basically a GUI-wrapper application for executing the update and upgrade commands then informing you whether you need to restart to finish the upgrade process.
sudo apt upgrade #upgrades the actual packages with newer versions. Hit <Enter> or “Y” to answer any “upgrade this?” questions that may come up.
sudo reboot now #quite often needed just after “initial” apt upgrades
sudo apt install terminator #(optional) an arguably neater command terminal than the standard Ubuntu terminal, in case you are into that kind of thing
sudo apt install tree #(optional) tree is a neat way for viewing directory structures from a terminal
sudo ufw status #the basic Ubuntu firewall should be in status inactive, e.g.:

(If not inactive, you can inactivate it using: sudo ufw disable )
Next, we need to set up a shared folder, so a folder on the host machine that is accessible by the Ubuntu VM, or in Linux/Unix jargon, the host folder is mounted on the Ubuntu filesystem. This works slightly differently according to which host OS and which hypervisor you are using, but mostly the differences are to do with the hypervisor, so we will describe for VirtualBox (mac OS), and for VMWare Player (Windows 10).
VirtualBox: …
For Ubuntu 19.04, before running the Guest Additions CD, install these tools, like so:
sudo apt install virtualbox-guest-dkms build-essential linux-headers-virtual
Before Ubuntu 19.04, e.g 18.04, 16.04, 18.10... the usual pre-install line to run before Guest Additions is:
sudo apt install gcc make perl
Then Menu path: Devices -> Insert Guest Additions CD image… and press the “Run” button:

Authenticate (your OS user’s password needed, in order to sudo):

Anyway, you should arrive at something like this:

Now in this example, I have the rar files in a folder on the host machine called “netweaver”, and then in a subfolder I have already unpacked the rar files (in this case using The Unarchiver). If you want to copy across the rar files themselves into the VM and unpack them inside Ubuntu, see advice on that below. In this example, we instead make the directory of unpacked files available to Ubuntu’s filesystem. So, we set up our shared folder according to that logic. Machine -> Settings -> Shared folders; click “Add folder”, then select the folder from host:

Checkboxes ON for: “Auto-mount”, and “Make permanent”. Give the folder a sensible name for Ubuntu to understand later… Then press OK-button.

Then we need to reboot the computer. And check from inside Ubuntu that we can access this folder ...
Since I gave it the folder name “nw-unpacked”, then it gets mounted in the Ubuntu filesystem at /media/sf_nw-unpacked/

Using the Nautilus “Filesystem GUI” as your non-super-user, you will not be able to open the shared folder. But you can view its contents using a terminal and of course the sudo magic potion:

So, the files are all owned by the root user (which is why you need “sudo” to list them), and any members of group “vboxsf” also have full permissions. So you could make yourself a member of group “vboxsf”, or we can just keep using sudo. Epiphenomenally, let’s mention that the tree-command is good in case you want to view the directory structure at “-L n” levels of the hierarchy:

Next, we look at VMware and its Linux Guest Additions: …

And here is the official help article from VMWare, in case you need that:
https://kb.vmware.com/s/article/1022525
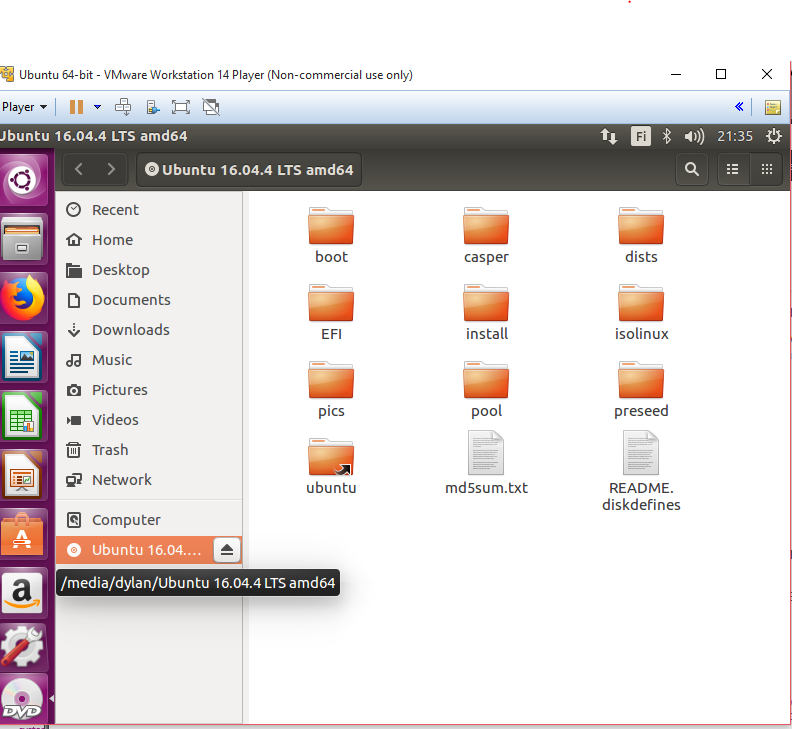
It might be a good idea to eject the Ubuntu installation disk first from the (virtual) CD/DVD drive, so that you can “play” the VMWare Tools virtual CD, so first press the “Eject” icon:

Now you can extract the tools e.g. to your home directory using right-click on the zip, Extract To -> Choose Other location e.g. ~/vmwaretools-local (Create the new subdirectory as you go along). Or we dig out a terminal and sudo make-me-a-sandwich ( https://imgs.xkcd.com/comics/sandwich.png ). Either way you end up with something like this:

So then you can switch to that directory and run the installer sudo ./vmware-install.pl with default answers to script’s questions, except that we answer the first question with “yes” (we want to install the Guest additions): if our Ubuntu installation already contains open-vm-tools, so that is nice… but probably we should still run these config-tools… first run the installer, and that will probably also run the config tools for us (if we answered the first question as “yes”), but if not then change to directory ./bin/ and run the config script from there.
Then… shutdown (Power Off) the VM. (Either use the menu bar, or in terminal: sudo shutdown now ).
For the Ubuntu VM, from the “Management Screen” choose “Edit virtual settings”, or choose menu path Player -> Manage -> Virtual Machine Settings, or choose Ctrl-D.
Then from Options tab, Shared folders – change to “Always enabled”. Then click “Add...” and use the wizard to add and name the shared folder. So for example I call it “nw-unpacked” for an unpacked (from rar) set of files:
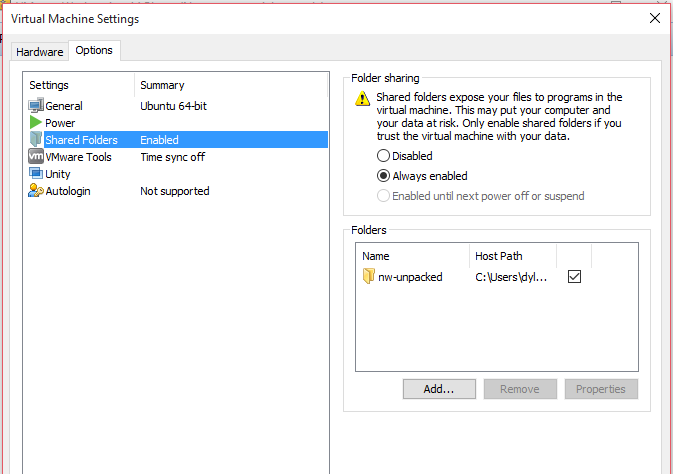

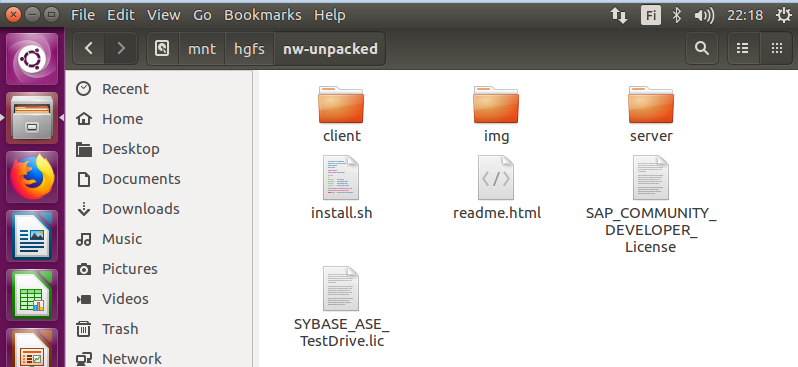
Restart your Ubuntu VM, and the shared folder should be visible, mounted in the filesystem at /mnt/hgfs (hgfs – probably an acronym meaning “host-guest-file-system” … I am guessing yeh).
If not visible, try running the vmware-config-tools.pl script again, from the bin subdirectory:
sudo ./vmware-config-tools.pl
You can also check (if you have the VMware tools installed) for Ubuntu’s new “insider host-like knowledge” about the mounted filesystem (i.e. shared folder) using the command: vmware-hgfsclient

If you are still not finding the shared folder, another thing to try is the following, assuming there is an output from the command vmware-hgfsclient and also that you have installed the Ubuntu open-vm-tools:
sudo apt install open-vm-tools open-vm-tools-desktop
Then you can mount the shared folder(s) using this command, in this case to a directory called "localmnt" in my home directory:
vmhgfs-fuse .host:/$(vmware-hgfsclient) ~/localmnt/
More details in the answer by user1225999 on this thread:
https://askubuntu.com/questions/580319/enabling-shared-folders-with-open-vm-tools
Note that this command using vmhgfs-fuse does not survive a reboot. For a solution that does survive reboot, the trick is to add a line to /etc/fstab as follows:
sudo nano /etc/fstab
Add the line at the end of the table:
.host:/ /mnt/hgfs fuse.vmhgfs-fuse allow_other 0 0
Save and close. Now to pick up this line, we need to run:
sudo mount -a
which rereads the /etc/fstab. Now under /mnt/hgfs/ we will find all the folders we are currently sharing via VMware hypervisor. (If not found and e.g. subdirectory /mnt/hgfs/ not yet created, then it should appear after the next reboot).
Now the shared folder is owned by root (you can check this using ls -l ). We can uproot ourselves a bit later to become root, sudo -i and then we can use the files in this shared folder ok…well I am not sure if that is good practice, but it will make it easier to operate inside that shared folder. First though, we need to install some more stuff in the Ubuntu VM.
So anyway, that was enough about the shared folders and the different ways of setting them up, now we start doing hypervisor-neutral config again i.e. stuff you need to do in Ubuntu, independently of which hypervisor you are using.
More terminal commands:
sudo apt install csh #the C-shell, needed for the install of NetWeaver to work. You can check whether this shell is available by looking at the contents of /etc/shells :

sudo apt search libaio #this libaio is needed, but unlike say with installing MySQL, we cannot expect the SAP installer to have included such a library for convenience. Now there is no package for Ubuntu called libaio, so you need to search for it, hence this “apt search” 🙂 Typical output is:

sudo apt install libaio1 #So we just want the nice standard implementation, which in this case is package libaio1
sudo apt install uuid #this is needed for generating unique id numbers. When installed, it is not automatically switched on (not in active-running state), and using the "enable" option doesn't seem to get it to start automatically after reboot; so, the command to activate it or reactivate it after every system reboot is (note there are 2 'd'-letters in the name of the daemon, unlike in the name of the package containing the daemon):
sudo systemctl start uuidd
There would be various ways to automate this, one not very automatic workaround is just to put a reminder at the login screen:
sudo nano /etc/gdm3/greeter.dconf-defaults
...adding the following two lines:
banner-message-enable=true
banner-message-text='Remember: sudo systemctl start uuidd'
Then Ctrl-O ('O' as in 'Orange') and <Enter> to save te file, Ctrl-X to exit. Then next time you reboot, your login screen gives the greeting message you specified:

Next, check the LANG value:
cat /etc/default/locale #check that LANG=”en_US.UTF-8”, that is the default and is needed by the NW-installer as OS language. If something else, try changing and reboot, e.g. sudo nano /etc/default/locale and recheck
ip addr show #You need to find out your (relevant) IP address, on a VMWare adapter network it will be something like 192.168.48.129 , on a VirtualBox adapter network it will be something like 10.0.2.15.
sudo nano /etc/hosts #comment out the line mapping the Ubuntu loopback IP 127.0.1.1 to vhcalnplci, and add the line mapping your network IP address to the short name and FQDN of your ubuntu VM. Short name is: vhcalnplci , and FQDN is: vhcalnplci.dummy.nodomain

sudo reboot now #reboot. (Good idea after reboot to check using "ip addr show" that your IP address has not changed!).
sudo systemctl start uuidd #start up the uuidd (the 2nd “d” probably refers to the “daemon” of uuid).
systemctl status uuidd #should be up and running, like this:

(Use the letter ‘q’ to exit from the “service-report” back to the user-command-ready state of the terminal).
At this point, if you are using VirtualBox, it is a good idea to take a snapshot of the VM, in case the later steps which are closer to the “actual installation of NetWeaver instance” fail, you can revert back to this pre-NetWeaver-install state. So (mac OS or Windows), use menu-path Machine -> Take snapshot… , and afterwards you can view your snapshots from the management screen under Machine Tools -> Snapshots:

So-ohhhhhh… now it is time to become the root user (but without "su", since "sudo" is better from an auditability angle):
sudo -i
And we cd into the shared folder, which depending on which hypervisor you configured, is either at /media/sf_yourfoldername/ (VirtualBox) or at /mnt/hgfs/yourfoldername e.g. :
cd /mnt/hgfs/nw-unpacked/ or: cd /media/sf_nw-unpacked/
If the install script has not been made into an executable, then we can fix that using:
chmod +x install.sh
And then we press go… ok just joking, there is no “press go” button in the terminal, so instead:
./install.sh
If you get a warning about missing packages, write "yes" then press Enter, to let Ubuntu handle getting these missing packages:

Or if you prefer, you can say no, cancel the install.sh processing, and manually call:
sudo apt install libc6 libstdc++6
… anyway once the install.sh gets started, you need to accept the license agreement(s)… then you have to specify a password which will be given to the “SAP OS users” (such as “npladm”), and if everything goes well, then about 25 minutes till an hour-and-a-half later (depending on various things, but mostly on the number of processors your VM has and the amount of RAM it has), you have an SAP NetWeaver system up and running in your VM.
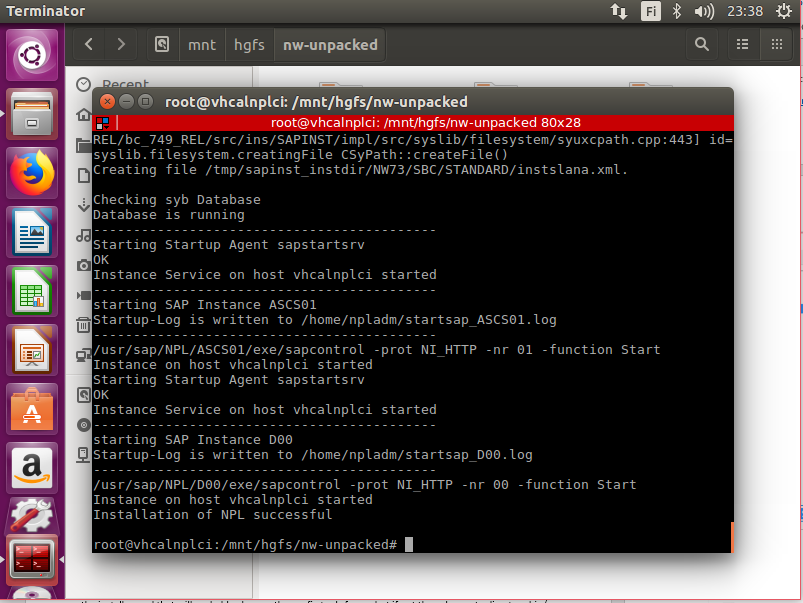
If you get the “Installation of NPL successful” message, then congratulations.
(If the installation fails, then you will need to look around on the various internet forums and so on to troubleshoot that, unfortunately or rather fortunately I have not been able to replicate all the failure cases I have read about on the SAP community pages and elsewhere, nor am I clever enough to invent all workarounds. If you have a VirtualBox snapshot from just before installation phase, then that gives you better chances to try different workarounds from the same “about to install”-state).
So if installation was successful, next step is to become the SAP OS user “npladm”, command: su -l npladm (then enter the npladm user’s password). Then you can execute the basic “healthcheck command” of sapcontrol utility. Note that npladm uses the C-shell (“/bin/csh”):

We aim our healthcheck at the instance 00: sapcontrol -nr 00 -function GetProcessList

Which was nice!
If not all 4 instance 00 processes have status green, this can often be solved as follows (as npladm user):
stopsap ALL
startsap ALL
Another installation-option (in computing, and maybe especially in Linux and Unix, there are usually different ways to get something done), is to copy the rar files into the VM itself, and unpack them from inside the VM… that will take up say 15GB of your 100GB, but as an anecdotal aside of low interest to most readers, that was the way I chose, the first time I got the NetWeaver installation procedure to work on Ubuntu.
E.g. copy the rar files (still as rar files) to e.g. /home/<my-os-user>/nw-local/ or similar so in the shared folder, if you were OS user marmot, you would (su)do:
sudo cp -a rarfolder/. /home/marmot/nw-local/
And unpack the rar files there in the local subdirectory. First, we need a tool to unpack stuff:
sudo apt install unrar rar
Then the GUI-based Archive Manager knows how to unrar the files, just use it like normal. Or you can use the terminal if you like. Anyway you should end up with the unpacked files in the local directory.
And set the sudo chmod +x install.sh there. And then sudo ./install.sh from the local folder. Worked for me (in the airport departure area).
So, all that is left to do is to get it working with SAPGUI, HTTP, and so on… so the port forwarding, it works differently depending on which hypervisor you are using…
For VirtualBox, follow the advice from the main blog here, on setting up the needed Port Forwarding configuration for your VM:
https://blogs.sap.com/2016/11/03/linux-for-newbies-installing-opensuse-on-oracle-virtualbox/
You should end up with something that looks like this:

Now for the Windows 10 and VMWare case… so, the network adapters that come with VMWare Workstation Player, are quite clever, so we can just use those adapters and the IP address that the Ubuntu VM has on the VMNet adapter (in your VM, use the command ifconfig or ip addr show to see this address).

So, it is enough to set up a new SAPGUI Connection Entry, knowing that on VMnet8 our VM has, say, IP address 192.168.48.131 (you may not be able to ping it from host machine without some tricks, as it is not set up to allow ICMP by default, but don’t worry about that, just try using the IP address in SAPGUI config), e.g.:


If you are running SAPGUI for Java and VirtualBox, e.g. on a Unix or Linux host machine, then connection config is simple, since in VirtualBox you did the Port Forwarding mapping already:

(This blog is not going to go into the details of how to set up Java and SAPGUI clients and so on, for that you can search the Internet including SAP Community pages for tutorials).
So now we can logon ok... (use the Default password (in the readme file somewhere - if "Appl1ance" does not work try "Down1oad") e.g. for default user "Developer"):
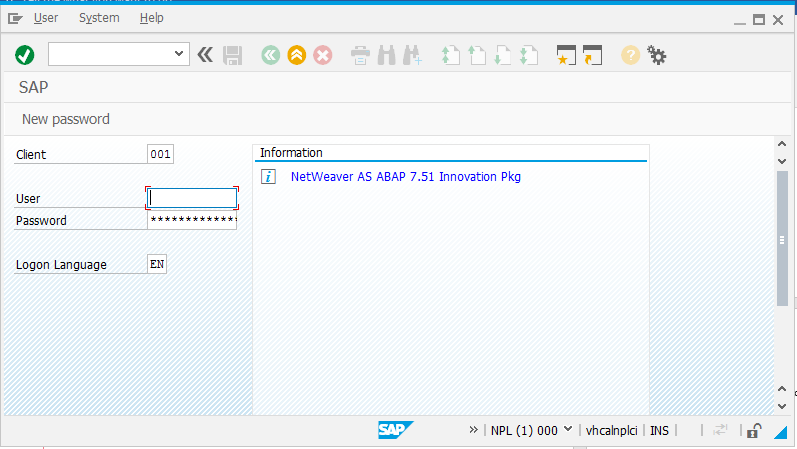

(Interesting to note that the official “Kernel Compilation” is for “Linux GNU SLES-11 x86_64 cc4.8.5 use-pr170509”, but hey, that is nice, that although the target VM is from the Debian distro-branches, everything seems to work using this SUSE-focused compilation).
From this link:
https://blogs.sap.com/2017/09/04/sap-as-abap-7.51-sp2-developer-edition-to-download-concise-installa...
… you find info about renewing abap license (in client 000 with user SAP*). Once you have the hardware key from tcode SLICENSE (client 000, login as user=SAP* - if "Appl1ance" does not work try "Down1oad"), you then go to:
https://go.support.sap.com/minisap/#/minisap

The “NPL.txt” file that you download, is what you then upload as the new license key into SLICENSE of client 000 – remember to delete the temp license before uploading the new one.
After that you can log in to client 001 as user=Developer, and do your SAP programming or whatever it is that you want to do in the NetWeaver box:

Once you have logged off, you can pause the VM (don’t just shut it down!), and resume the VM next time you want to use the NetWeaver box.
If want to shut down the VM (some people, e.g. me, prefer shutting down to suspending VMs), then:
(as OS user npladm): stopsap ALL
and wait for all the sap stuff to stop. Or, if you like to do things the long way round, there is this other way also:
sapcontrol -nr 00 -function StopSystem ALL
Check that nothing belonging to the sapcontrol Process List is running, using:
sapcontrol -nr 00 -function GetProcessList
AND: sapcontrol -nr 01 -function GetProcessList
(the instance number 01 has the NetWeaver Message Server and NetWeaver Enqueue Server).

If anything shows “GREEN” or “YELLOW” or any status other than “GRAY” then there is still stuff stopping, so wait until everything is a uniform grey status.
Once everything is stopped, then you can logout e.g. command: exit from being OS user root or OS user npladm etc, and shut down the Ubuntu VM (e.g. via GUI, or as your own OS user: sudo shutdown now ).
When you reboot, there are 2 ways you can get your NetWeaver instance up and running again… one way is quite easy, the other is a bit tricky…
The first way is for npladm ( su -l npladm ) to say:
startsap ALL
This should work 🙂
The second way, it’s maybe pointlessly difficult compared to the first way, but since I used it up until I realised that startsap ALL would work, so just in case anyone else wants to do things the hard way:
You will want to activate the UUIDD daemon again (as your OS user: sudo systemctl start uuidd && systemctl status uuidd ), and then start up the SAP server again (as OS npladm).
This probably won’t work on your Ubuntu VM (though it works on the openSUSE variant of this installation):
sapcontrol -nr 00 -function StartSystem ALL
If you get an error “FAIL: NIECONN_REFUSED (connection refused) ….” then the solution is here:
https://blogs.sap.com/2015/09/07/how-to-solve-nieconnrefused-issues-during-sapcontrol-execution/
So for example, as OS user npladm, I changed directory to /usr/sap/hostctrl/exe directory (which contains the executable file called sapstartsrv)
cd /usr/sap/hostctrl/exe/ … and then ran the command:
./sapstartsrv pf=/sapmnt/NPL/profile/NPL_D00_vhcalnplci …so here we assign the “start profile for instance NPL (D00 (instance number 00)) running on host vhcalnplci;

also, we must assign the start profile for the ASCS01 (instance number 01, the Abap Central Services instance)), like so:
./sapstartsrv pf=/sapmnt/NPL/profile/NPL_ASCS01_vhcalnplci
Now you can (maybe in another window) as OS user npladm move back to the /home/npladm directory (optional, but generally I like to stay at home unless there is a good excuse to go hillwalking in the Unix filesystem). Now if you run, say, the GetProcessList command, it should provide some non-error information:

So, now you can finally get started, with that command:
sapcontrol -nr 00 -function StartSystem ALL
This time it should work ok.
Again, wait for all “GREEN” statuses from
sapcontrol -nr 01 -function GetProcessList
sapcontrol -nr 00 -function GetProcessList

[The instance 01 will actually start up first, as it has components that the “main” instance 00 knows it needs. But you don’t need to worry about that, though if you like you can go read about the internals e.g. from some of the better SAP Press books, or google it, etc].
After all statuses are showing GREEN, then you can logon to your SAP instance again, here for example the SAP user has gone to tcode SM51, looks fine:

quod erat demonstrandum, etcetera etcetera. Any mistakes or suggestions for improvement, feel free to comment.
UPDATE June 2018: tested Ubuntu 18.04, installs ok, but see my blog about dealing with the differences in how to handle 'ifconfig':
https://blogs.sap.com/2018/06/10/installing-netweaver-dev-edition-with-ifconfig-considered-harmful-o...
UPDATE for Fiori: If you want to use Fiori links easily (and many other SICF services), such as to the Fiori Launchpad and the apps within it, then you probably want to modify the hosts file of your host machine (not of your VM running NetWeaver), so that the hostname of the VM is mapped to whatever the IPv4 address is that you are using... so in the example, where URLs for ports 8000 and 44300 of, say, vhcalnplci, should be reached behind VirtualBox's port forwarding rules, i.e. by forwarding those ports from localhost, then your modified hosts file might look something like this:
Of course, if your VM is reached a different way, e.g. on a non-NAT network at some other IPv4 address, then your hosts file should NOT tag the VM hostname onto the localhost line (because then the URL with "vhcalnplci" would resolve to the wrong IPv4 address; instead, you would specify some new line that maps the IPv4 address of your Ubuntu VM to the hostname (short name and "dummy" FQDN) of the VM e.g.
192.168.56.101 vhcalnplci vhcalnplci.dummy.nodomain
Tip for Mac users: If your machine is set up to look for DNS resolution of IPv6, then you have three choices for e.g. HTTP or RFC destination naming of the host:
(1) add the suffix ".local" e.g "vhcalnplci.local" in your address strings, then mDNS somehow knows to also check for an IPv4 resolution.
(2) turn off IPv6 Configuration from System Preferences -> Network -> Select e.g. Wi-FI if that is what you are using to connect to Internet... Advanced -> TCP/IP -> Set "Configure IPv6" to "Off". Seems that from Catalina macOS release onwards, turning this off from the Settings GUI isn't possible any longer, in that case see screenshot for a hint how to do this via Terminal:

(3) use any IPv4-to-IPv6 converter (free on the Internet, just search for one) on the IPv4 dot-notation address, then add a line to /etc/hosts resolving this IPv6 address. In the example below, 172.16.106.135 maps to IPv6 address 0:0:0:0:0:ffff:ac10:6a87 - which we then also map to vhcalnplci, like so:
Once this hosts file mapping is working, the FLP will be more easily callable, and since inside FLP it uses the hostname of the VM, then also the apps themselves will be callable without strange error messages. If all goes well you can use the supplied Fiori demo apps ok:
--
References (like during most of my hobbyist “mini-projects”, there were many useful websites including https://stackoverflow.com/ and https://askubuntu.com/ visited; below is just a more “official” subset of relevant sites):
https://blogs.sap.com/2017/09/04/sap-as-abap-751-sp02-developer-edition-to-download/
- main blog for nw 751. Links to:
https://blogs.sap.com/2017/09/04/newbies-guide-installing-abap-as-751-sp02-on-linux/
https://blogs.sap.com/2017/09/04/sap-as-abap-7.51-sp2-developer-edition-to-download-concise-installa...
Also, the main blog has a link to the SAPstore for the actual rar files (first you fill in a form, then you get an email link, valid for 48 hours; check you are getting the latest NW version e.g. if you want 7.51, don’t register for 7.50));
Also a link to the new ASE license needed from April 2018 (not mentioned in the blog, but worth having a valid license and easy enough to replace the old one):
https://sap.sharepoint.com/sites/101566/Shared%20Documents/Forms/AllItems.aspx?id=%2Fsites%2F101566%...
Older links:
https://blogs.sap.com/2016/11/03/sap-nw-as-abap-7.50-sp2-developer-edition-to-download-consise-insta...
- for the 7.50 edition, notes the need for: csh, uuidd, and libaio
https://lauton.me/how-to-install-a-mini-sap-netweaver-as-abap-7-50/
- interesting blog by SAP guy and Linux enthusiast
https://blogs.sap.com/2016/11/03/linux-for-newbies-installing-opensuse-on-oracle-virtualbox/
- older blog, with some people noting a modlib error, my guess is that the root cause was not having libaio1 installed.
--
If you want the concise guide to installing on Ubuntu, then I published one here:
https://blogs.sap.com/2019/10/20/concise-guide-to-install-sap-netweaver-developer-edition-on-ubuntu-...
[UPDATE (June 2021): for installing on Ubuntu, you will find this blog useful, for modifying the installer script so that the installation succeeds:
https://blogs.sap.com/2021/06/07/adjusting-installer-script-for-sap-netweaver-dev-edition-for-distro...
.. so highly recommend also checking that blog, as otherwise you might get stuck].
We illustrate using hosts running mac OS (High Sierra) or Windows 10, and using two free hypervisors: Oracle VirtualBox, and VMWare Workstation Player. [Tested these instructions ok on following Ubuntu Desktop releases(yy.mm): 16.04, 18.04, 19.04, 19.10. Over time the screenshots and procedures noted here may become obsolete, as distros and NetWeaver implementations change. Try to adapt what you see here to the newer reality. From 2020 onwards this non-concise blog is not being updated any longer].
If you like, you can view this blog as the “Ubuntu sibling” of the official SAP blog for installing on openSUSE VM: https://blogs.sap.com/2017/09/04/newbies-guide-installing-abap-as-751-sp02-on-linux/
There are quite a few differences to take into account when installing on Ubuntu.
Before we go through the many steps of this How-To … here's what the screen looked like one afternoon at Stockholm-Arlanda airport, waiting for the flight to Helsinki… the first successful Ubuntu SAP NetWeaver installation has just occurred (ummm, first time it occurred on any of my machines, certainly not the first time this installation has ever happened in the world)… the hypervisor was VirtualBox, running on Mac OS (High Sierra):
So, the steps are as follows:
Register for an SAP NW752 SP04 Developer Edition (or whatever is the most current edition, this was the newest one in October 2019). You may need to get a so-called "P-user" from SAP, by registering when trying to log in to the following site... anyway the idea is to download the set of rar files that are accessible from https://developers.sap.com/trials-downloads.html (might take a while depending on your Internet download speed, for example in October 2019 the 7.52 edition is in 11 rar part files - don't miss out the 11th rar since default search result displays 10 files... each file is about 1.4 GB in size; if using Google Chrome, which usually provides a maximum of 6 concurrent download sockets, you can get the last 4 downloaded more quickly by opening another Chrome persona/profile or using an additional Incognito persona, since the limit applies per persona).
If needed, download and install a tool that can extract multipart rar files, which tool you need depends on whether you intend to do the unpacking on the host machine or in the VM itself (see below for more details on those two options). (Mac: e.g. The Unarchiver - https://theunarchiver.com/ ; Ubuntu: sudo apt install rar unrar ).
Download and install a hypervisor, VirtualBox and/or VMware Workstation Player / Fusion Pro.
VirtualBox website: https://www.virtualbox.org/
VMware website: https://www.vmware.com/products.html (Download -> Free Product Downloads / Free Product Trials and Demos).
Oracle VirtualBox is available for Windows, Mac, and Linux; VMWare Workstation Player available for Windows and Linux (if you are running a non-virtual Ubuntu distro, you can of course choose to just install NetWeaver without using a hypervisor, if you like); VMware Fusion Pro is the trial product for Mac (30 day trial). Anyway the examples in this blog are done using VirtualBox on mac OS (High Sierra) and VMWare Workstation Player on Windows 10).
Install the new Ubuntu VM (maybe the latest LTS version, e.g. in March 2018 we used the version LTS 16.04..4, though this process has also tested ok on 18.10 and 19.04 releases; you can download the .iso from https://ubuntu.com/desktop ), so yes, install a new Ubuntu VM into the hypervisor: (screenshots are taken from an Ubuntu install on VirtualBox on a MacMini; VMWare Player has a similar GUI-based process (not shown in this blog) to create a VM from an image).
[Selected New… then “Expert Mode”…]:
I used VHD in these examples, other virtual disk formats should also work. Allocate at least 5GB of RAM (6GB or more is better, but in above example only 8GB RAM on the host, so 5 or 6GB is a practical maximum for guest VM to use…if you have a machine with available RAM for guest VM of 4GB or less, it is unlikely you can follow this tutorial using that machine); then give the VM around 100GB of storage space (though e.g. 80GB may be enough). When you Power On, you will be asked to specify a boot-disk, we give the path to our Ubuntu .iso file:
When the actual Ubuntu installation process starts, I chose not to use Logical Volumes (anyway with VirtualBox you have snapshots available from the hypervisor); selected option “Download with updates” as it reduces the amount of time spent doing updates later; language English US (default – safest not to change this); keyboard, well that depends on what keyboard you have, for example for standard Finnish keyboards on Windows I selected Finnish → Finnish, on MacBook Pro and MacMini used Finnish → Finnish (Macintosh).
[In this blog we assume that you use NAT networking i.e. the Hypervisor gives the VM an IPv4 address. Although there are use cases where e.g. bridged networking and statically setting the VM's IPv4 address make more sense, still the NAT solution is the easiest until you know what you are doing].
As part of the installation, it is a good idea to give your computer the hostname: vhcalnplci (although if you are reasonable in naming choices, other hostnames should meet the SAP rules, tested this... watch out for Fiori apps in Launchpad expecting the hostname to be vhcalnplci though; also testing HTTP services in tcode SICF such as "/sap/public/info" etcetera, tests tend to fail; and also I noticed that RFC connections e.g. from JCo client testing with remote-enabled Function Module STFC_CONNECTION, only seems to work if the host was named vhcalnplci - probably the install script has hardcoded some of the RFC server config details according to this hostname).
… you need an OS user (in this example, “marmot”; in other examples screenshotted in this blog, the OS user might be called something else, e.g. “dylan” or “murmeister” or whatever); and why not call your computer “vhcalnplci” since rolling your own name can lead you into dark areas of error log messages 🙂
After installing, a popup asks you to Restart to finish setup… You will be asked to “remove the installation media, and press Enter”, just press Enter and the machine will power off, and hopefully boot up again.
Now you can open a terminal, from the Dash-icon in top left and with a search string, then click on the icon for Terminal
(If you are shown as user “ubuntu” then you are still working off the “CD-trial-instance”, and so you still need to shutdown the VM to finish the installation, and power on to log on as your actual newly created OS user).
So the state of play should be that you have a Terminal window open, and it should show that it is indeed you who is there, ready to continue this installation adventure…
Commands to run on login:
sudo apt update #updates the package repositories. Note that if e.g. Ubuntu Software Updater is also silently checking the “update-status” (e.g. just after logon) and thus locking the package management tools, then you might get an error message when trying to use the “apt”-utility…
if so, get coffee, come back it should work after a few minutes, or at least Software Updater should be informing you that it wants to install updates. You could also use Software Updater, which is basically a GUI-wrapper application for executing the update and upgrade commands then informing you whether you need to restart to finish the upgrade process.
sudo apt upgrade #upgrades the actual packages with newer versions. Hit <Enter> or “Y” to answer any “upgrade this?” questions that may come up.
sudo reboot now #quite often needed just after “initial” apt upgrades
sudo apt install terminator #(optional) an arguably neater command terminal than the standard Ubuntu terminal, in case you are into that kind of thing
sudo apt install tree #(optional) tree is a neat way for viewing directory structures from a terminal
sudo ufw status #the basic Ubuntu firewall should be in status inactive, e.g.:
(If not inactive, you can inactivate it using: sudo ufw disable )
Next, we need to set up a shared folder, so a folder on the host machine that is accessible by the Ubuntu VM, or in Linux/Unix jargon, the host folder is mounted on the Ubuntu filesystem. This works slightly differently according to which host OS and which hypervisor you are using, but mostly the differences are to do with the hypervisor, so we will describe for VirtualBox (mac OS), and for VMWare Player (Windows 10).
VirtualBox: …
For Ubuntu 19.04, before running the Guest Additions CD, install these tools, like so:
sudo apt install virtualbox-guest-dkms build-essential linux-headers-virtual
Before Ubuntu 19.04, e.g 18.04, 16.04, 18.10... the usual pre-install line to run before Guest Additions is:
sudo apt install gcc make perl
Then Menu path: Devices -> Insert Guest Additions CD image… and press the “Run” button:
Authenticate (your OS user’s password needed, in order to sudo):
Anyway, you should arrive at something like this:
Now in this example, I have the rar files in a folder on the host machine called “netweaver”, and then in a subfolder I have already unpacked the rar files (in this case using The Unarchiver). If you want to copy across the rar files themselves into the VM and unpack them inside Ubuntu, see advice on that below. In this example, we instead make the directory of unpacked files available to Ubuntu’s filesystem. So, we set up our shared folder according to that logic. Machine -> Settings -> Shared folders; click “Add folder”, then select the folder from host:
Checkboxes ON for: “Auto-mount”, and “Make permanent”. Give the folder a sensible name for Ubuntu to understand later… Then press OK-button.
Then we need to reboot the computer. And check from inside Ubuntu that we can access this folder ...
Since I gave it the folder name “nw-unpacked”, then it gets mounted in the Ubuntu filesystem at /media/sf_nw-unpacked/
Using the Nautilus “Filesystem GUI” as your non-super-user, you will not be able to open the shared folder. But you can view its contents using a terminal and of course the sudo magic potion:
So, the files are all owned by the root user (which is why you need “sudo” to list them), and any members of group “vboxsf” also have full permissions. So you could make yourself a member of group “vboxsf”, or we can just keep using sudo. Epiphenomenally, let’s mention that the tree-command is good in case you want to view the directory structure at “-L n” levels of the hierarchy:
Next, we look at VMware and its Linux Guest Additions: …
And here is the official help article from VMWare, in case you need that:
https://kb.vmware.com/s/article/1022525
It might be a good idea to eject the Ubuntu installation disk first from the (virtual) CD/DVD drive, so that you can “play” the VMWare Tools virtual CD, so first press the “Eject” icon:
Then the Manage -> Install VMware Tools… menu-command should work, so you see them in the virtual DVD-drive:
Now you can extract the tools e.g. to your home directory using right-click on the zip, Extract To -> Choose Other location e.g. ~/vmwaretools-local (Create the new subdirectory as you go along). Or we dig out a terminal and sudo make-me-a-sandwich ( https://imgs.xkcd.com/comics/sandwich.png ). Either way you end up with something like this:
So then you can switch to that directory and run the installer sudo ./vmware-install.pl with default answers to script’s questions, except that we answer the first question with “yes” (we want to install the Guest additions): if our Ubuntu installation already contains open-vm-tools, so that is nice… but probably we should still run these config-tools… first run the installer, and that will probably also run the config tools for us (if we answered the first question as “yes”), but if not then change to directory ./bin/ and run the config script from there.
Then… shutdown (Power Off) the VM. (Either use the menu bar, or in terminal: sudo shutdown now ).
For the Ubuntu VM, from the “Management Screen” choose “Edit virtual settings”, or choose menu path Player -> Manage -> Virtual Machine Settings, or choose Ctrl-D.
Then from Options tab, Shared folders – change to “Always enabled”. Then click “Add...” and use the wizard to add and name the shared folder. So for example I call it “nw-unpacked” for an unpacked (from rar) set of files:
Restart your Ubuntu VM, and the shared folder should be visible, mounted in the filesystem at /mnt/hgfs (hgfs – probably an acronym meaning “host-guest-file-system” … I am guessing yeh).
If not visible, try running the vmware-config-tools.pl script again, from the bin subdirectory:
sudo ./vmware-config-tools.pl
You can also check (if you have the VMware tools installed) for Ubuntu’s new “insider host-like knowledge” about the mounted filesystem (i.e. shared folder) using the command: vmware-hgfsclient
If you are still not finding the shared folder, another thing to try is the following, assuming there is an output from the command vmware-hgfsclient and also that you have installed the Ubuntu open-vm-tools:
sudo apt install open-vm-tools open-vm-tools-desktop
Then you can mount the shared folder(s) using this command, in this case to a directory called "localmnt" in my home directory:
vmhgfs-fuse .host:/$(vmware-hgfsclient) ~/localmnt/
More details in the answer by user1225999 on this thread:
https://askubuntu.com/questions/580319/enabling-shared-folders-with-open-vm-tools
Note that this command using vmhgfs-fuse does not survive a reboot. For a solution that does survive reboot, the trick is to add a line to /etc/fstab as follows:
sudo nano /etc/fstab
Add the line at the end of the table:
.host:/ /mnt/hgfs fuse.vmhgfs-fuse allow_other 0 0
Save and close. Now to pick up this line, we need to run:
sudo mount -a
which rereads the /etc/fstab. Now under /mnt/hgfs/ we will find all the folders we are currently sharing via VMware hypervisor. (If not found and e.g. subdirectory /mnt/hgfs/ not yet created, then it should appear after the next reboot).
Now the shared folder is owned by root (you can check this using ls -l ). We can uproot ourselves a bit later to become root, sudo -i and then we can use the files in this shared folder ok…well I am not sure if that is good practice, but it will make it easier to operate inside that shared folder. First though, we need to install some more stuff in the Ubuntu VM.
So anyway, that was enough about the shared folders and the different ways of setting them up, now we start doing hypervisor-neutral config again i.e. stuff you need to do in Ubuntu, independently of which hypervisor you are using.
More terminal commands:
sudo apt install csh #the C-shell, needed for the install of NetWeaver to work. You can check whether this shell is available by looking at the contents of /etc/shells :
sudo apt search libaio #this libaio is needed, but unlike say with installing MySQL, we cannot expect the SAP installer to have included such a library for convenience. Now there is no package for Ubuntu called libaio, so you need to search for it, hence this “apt search” 🙂 Typical output is:
sudo apt install libaio1 #So we just want the nice standard implementation, which in this case is package libaio1
sudo apt install uuid #this is needed for generating unique id numbers. When installed, it is not automatically switched on (not in active-running state), and using the "enable" option doesn't seem to get it to start automatically after reboot; so, the command to activate it or reactivate it after every system reboot is (note there are 2 'd'-letters in the name of the daemon, unlike in the name of the package containing the daemon):
sudo systemctl start uuidd
There would be various ways to automate this, one not very automatic workaround is just to put a reminder at the login screen:
sudo nano /etc/gdm3/greeter.dconf-defaults
...adding the following two lines:
banner-message-enable=true
banner-message-text='Remember: sudo systemctl start uuidd'
Then Ctrl-O ('O' as in 'Orange') and <Enter> to save te file, Ctrl-X to exit. Then next time you reboot, your login screen gives the greeting message you specified:
Next, check the LANG value:
cat /etc/default/locale #check that LANG=”en_US.UTF-8”, that is the default and is needed by the NW-installer as OS language. If something else, try changing and reboot, e.g. sudo nano /etc/default/locale and recheck
ip addr show #You need to find out your (relevant) IP address, on a VMWare adapter network it will be something like 192.168.48.129 , on a VirtualBox adapter network it will be something like 10.0.2.15.
sudo nano /etc/hosts #comment out the line mapping the Ubuntu loopback IP 127.0.1.1 to vhcalnplci, and add the line mapping your network IP address to the short name and FQDN of your ubuntu VM. Short name is: vhcalnplci , and FQDN is: vhcalnplci.dummy.nodomain
sudo reboot now #reboot. (Good idea after reboot to check using "ip addr show" that your IP address has not changed!).
sudo systemctl start uuidd #start up the uuidd (the 2nd “d” probably refers to the “daemon” of uuid).
systemctl status uuidd #should be up and running, like this:
(Use the letter ‘q’ to exit from the “service-report” back to the user-command-ready state of the terminal).
At this point, if you are using VirtualBox, it is a good idea to take a snapshot of the VM, in case the later steps which are closer to the “actual installation of NetWeaver instance” fail, you can revert back to this pre-NetWeaver-install state. So (mac OS or Windows), use menu-path Machine -> Take snapshot… , and afterwards you can view your snapshots from the management screen under Machine Tools -> Snapshots:
So-ohhhhhh… now it is time to become the root user (but without "su", since "sudo" is better from an auditability angle):
sudo -i
And we cd into the shared folder, which depending on which hypervisor you configured, is either at /media/sf_yourfoldername/ (VirtualBox) or at /mnt/hgfs/yourfoldername e.g. :
cd /mnt/hgfs/nw-unpacked/ or: cd /media/sf_nw-unpacked/
If the install script has not been made into an executable, then we can fix that using:
chmod +x install.sh
And then we press go… ok just joking, there is no “press go” button in the terminal, so instead:
./install.sh
If you get a warning about missing packages, write "yes" then press Enter, to let Ubuntu handle getting these missing packages:
Or if you prefer, you can say no, cancel the install.sh processing, and manually call:
sudo apt install libc6 libstdc++6
… anyway once the install.sh gets started, you need to accept the license agreement(s)… then you have to specify a password which will be given to the “SAP OS users” (such as “npladm”), and if everything goes well, then about 25 minutes till an hour-and-a-half later (depending on various things, but mostly on the number of processors your VM has and the amount of RAM it has), you have an SAP NetWeaver system up and running in your VM.
If you get the “Installation of NPL successful” message, then congratulations.
(If the installation fails, then you will need to look around on the various internet forums and so on to troubleshoot that, unfortunately or rather fortunately I have not been able to replicate all the failure cases I have read about on the SAP community pages and elsewhere, nor am I clever enough to invent all workarounds. If you have a VirtualBox snapshot from just before installation phase, then that gives you better chances to try different workarounds from the same “about to install”-state).
So if installation was successful, next step is to become the SAP OS user “npladm”, command: su -l npladm (then enter the npladm user’s password). Then you can execute the basic “healthcheck command” of sapcontrol utility. Note that npladm uses the C-shell (“/bin/csh”):
We aim our healthcheck at the instance 00: sapcontrol -nr 00 -function GetProcessList
Which was nice!
If not all 4 instance 00 processes have status green, this can often be solved as follows (as npladm user):
stopsap ALL
startsap ALL
Another installation-option (in computing, and maybe especially in Linux and Unix, there are usually different ways to get something done), is to copy the rar files into the VM itself, and unpack them from inside the VM… that will take up say 15GB of your 100GB, but as an anecdotal aside of low interest to most readers, that was the way I chose, the first time I got the NetWeaver installation procedure to work on Ubuntu.
E.g. copy the rar files (still as rar files) to e.g. /home/<my-os-user>/nw-local/ or similar so in the shared folder, if you were OS user marmot, you would (su)do:
sudo cp -a rarfolder/. /home/marmot/nw-local/
And unpack the rar files there in the local subdirectory. First, we need a tool to unpack stuff:
sudo apt install unrar rar
Then the GUI-based Archive Manager knows how to unrar the files, just use it like normal. Or you can use the terminal if you like. Anyway you should end up with the unpacked files in the local directory.
And set the sudo chmod +x install.sh there. And then sudo ./install.sh from the local folder. Worked for me (in the airport departure area).
So, all that is left to do is to get it working with SAPGUI, HTTP, and so on… so the port forwarding, it works differently depending on which hypervisor you are using…
For VirtualBox, follow the advice from the main blog here, on setting up the needed Port Forwarding configuration for your VM:
https://blogs.sap.com/2016/11/03/linux-for-newbies-installing-opensuse-on-oracle-virtualbox/
You should end up with something that looks like this:
Now for the Windows 10 and VMWare case… so, the network adapters that come with VMWare Workstation Player, are quite clever, so we can just use those adapters and the IP address that the Ubuntu VM has on the VMNet adapter (in your VM, use the command ifconfig or ip addr show to see this address).
So, it is enough to set up a new SAPGUI Connection Entry, knowing that on VMnet8 our VM has, say, IP address 192.168.48.131 (you may not be able to ping it from host machine without some tricks, as it is not set up to allow ICMP by default, but don’t worry about that, just try using the IP address in SAPGUI config), e.g.:
If you are running SAPGUI for Java and VirtualBox, e.g. on a Unix or Linux host machine, then connection config is simple, since in VirtualBox you did the Port Forwarding mapping already:
(This blog is not going to go into the details of how to set up Java and SAPGUI clients and so on, for that you can search the Internet including SAP Community pages for tutorials).
So now we can logon ok... (use the Default password (in the readme file somewhere - if "Appl1ance" does not work try "Down1oad") e.g. for default user "Developer"):
(Interesting to note that the official “Kernel Compilation” is for “Linux GNU SLES-11 x86_64 cc4.8.5 use-pr170509”, but hey, that is nice, that although the target VM is from the Debian distro-branches, everything seems to work using this SUSE-focused compilation).
From this link:
https://blogs.sap.com/2017/09/04/sap-as-abap-7.51-sp2-developer-edition-to-download-concise-installa...
… you find info about renewing abap license (in client 000 with user SAP*). Once you have the hardware key from tcode SLICENSE (client 000, login as user=SAP* - if "Appl1ance" does not work try "Down1oad"), you then go to:
https://go.support.sap.com/minisap/#/minisap
The “NPL.txt” file that you download, is what you then upload as the new license key into SLICENSE of client 000 – remember to delete the temp license before uploading the new one.
After that you can log in to client 001 as user=Developer, and do your SAP programming or whatever it is that you want to do in the NetWeaver box:
Once you have logged off, you can pause the VM (don’t just shut it down!), and resume the VM next time you want to use the NetWeaver box.
If want to shut down the VM (some people, e.g. me, prefer shutting down to suspending VMs), then:
(as OS user npladm): stopsap ALL
and wait for all the sap stuff to stop. Or, if you like to do things the long way round, there is this other way also:
sapcontrol -nr 00 -function StopSystem ALL
Check that nothing belonging to the sapcontrol Process List is running, using:
sapcontrol -nr 00 -function GetProcessList
AND: sapcontrol -nr 01 -function GetProcessList
(the instance number 01 has the NetWeaver Message Server and NetWeaver Enqueue Server).
If anything shows “GREEN” or “YELLOW” or any status other than “GRAY” then there is still stuff stopping, so wait until everything is a uniform grey status.
Once everything is stopped, then you can logout e.g. command: exit from being OS user root or OS user npladm etc, and shut down the Ubuntu VM (e.g. via GUI, or as your own OS user: sudo shutdown now ).
When you reboot, there are 2 ways you can get your NetWeaver instance up and running again… one way is quite easy, the other is a bit tricky…
The first way is for npladm ( su -l npladm ) to say:
startsap ALL
This should work 🙂
The second way, it’s maybe pointlessly difficult compared to the first way, but since I used it up until I realised that startsap ALL would work, so just in case anyone else wants to do things the hard way:
You will want to activate the UUIDD daemon again (as your OS user: sudo systemctl start uuidd && systemctl status uuidd ), and then start up the SAP server again (as OS npladm).
This probably won’t work on your Ubuntu VM (though it works on the openSUSE variant of this installation):
sapcontrol -nr 00 -function StartSystem ALL
If you get an error “FAIL: NIECONN_REFUSED (connection refused) ….” then the solution is here:
https://blogs.sap.com/2015/09/07/how-to-solve-nieconnrefused-issues-during-sapcontrol-execution/
So for example, as OS user npladm, I changed directory to /usr/sap/hostctrl/exe directory (which contains the executable file called sapstartsrv)
cd /usr/sap/hostctrl/exe/ … and then ran the command:
./sapstartsrv pf=/sapmnt/NPL/profile/NPL_D00_vhcalnplci …so here we assign the “start profile for instance NPL (D00 (instance number 00)) running on host vhcalnplci;
also, we must assign the start profile for the ASCS01 (instance number 01, the Abap Central Services instance)), like so:
./sapstartsrv pf=/sapmnt/NPL/profile/NPL_ASCS01_vhcalnplci
Now you can (maybe in another window) as OS user npladm move back to the /home/npladm directory (optional, but generally I like to stay at home unless there is a good excuse to go hillwalking in the Unix filesystem). Now if you run, say, the GetProcessList command, it should provide some non-error information:
So, now you can finally get started, with that command:
sapcontrol -nr 00 -function StartSystem ALL
This time it should work ok.
Again, wait for all “GREEN” statuses from
sapcontrol -nr 01 -function GetProcessList
sapcontrol -nr 00 -function GetProcessList
[The instance 01 will actually start up first, as it has components that the “main” instance 00 knows it needs. But you don’t need to worry about that, though if you like you can go read about the internals e.g. from some of the better SAP Press books, or google it, etc].
After all statuses are showing GREEN, then you can logon to your SAP instance again, here for example the SAP user has gone to tcode SM51, looks fine:
quod erat demonstrandum, etcetera etcetera. Any mistakes or suggestions for improvement, feel free to comment.
UPDATE June 2018: tested Ubuntu 18.04, installs ok, but see my blog about dealing with the differences in how to handle 'ifconfig':
https://blogs.sap.com/2018/06/10/installing-netweaver-dev-edition-with-ifconfig-considered-harmful-o...
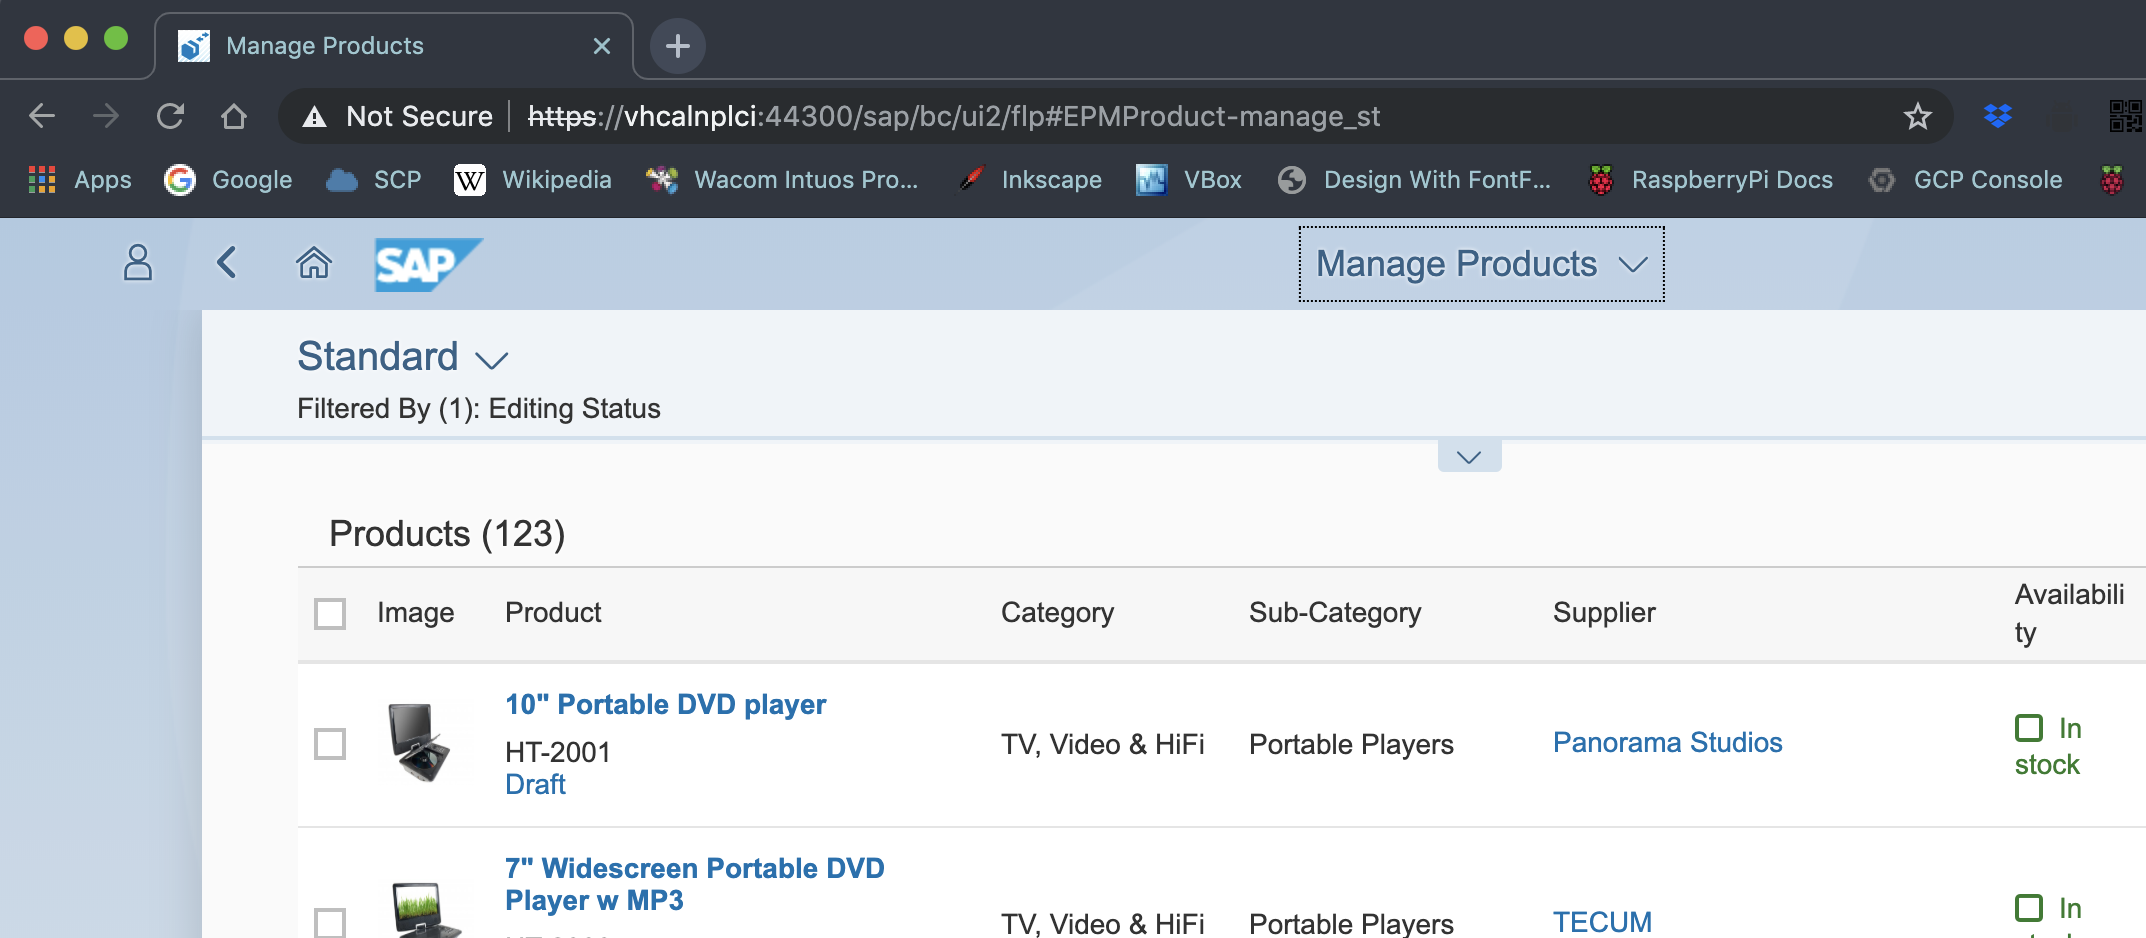
UPDATE for Fiori: If you want to use Fiori links easily (and many other SICF services), such as to the Fiori Launchpad and the apps within it, then you probably want to modify the hosts file of your host machine (not of your VM running NetWeaver), so that the hostname of the VM is mapped to whatever the IPv4 address is that you are using... so in the example, where URLs for ports 8000 and 44300 of, say, vhcalnplci, should be reached behind VirtualBox's port forwarding rules, i.e. by forwarding those ports from localhost, then your modified hosts file might look something like this:
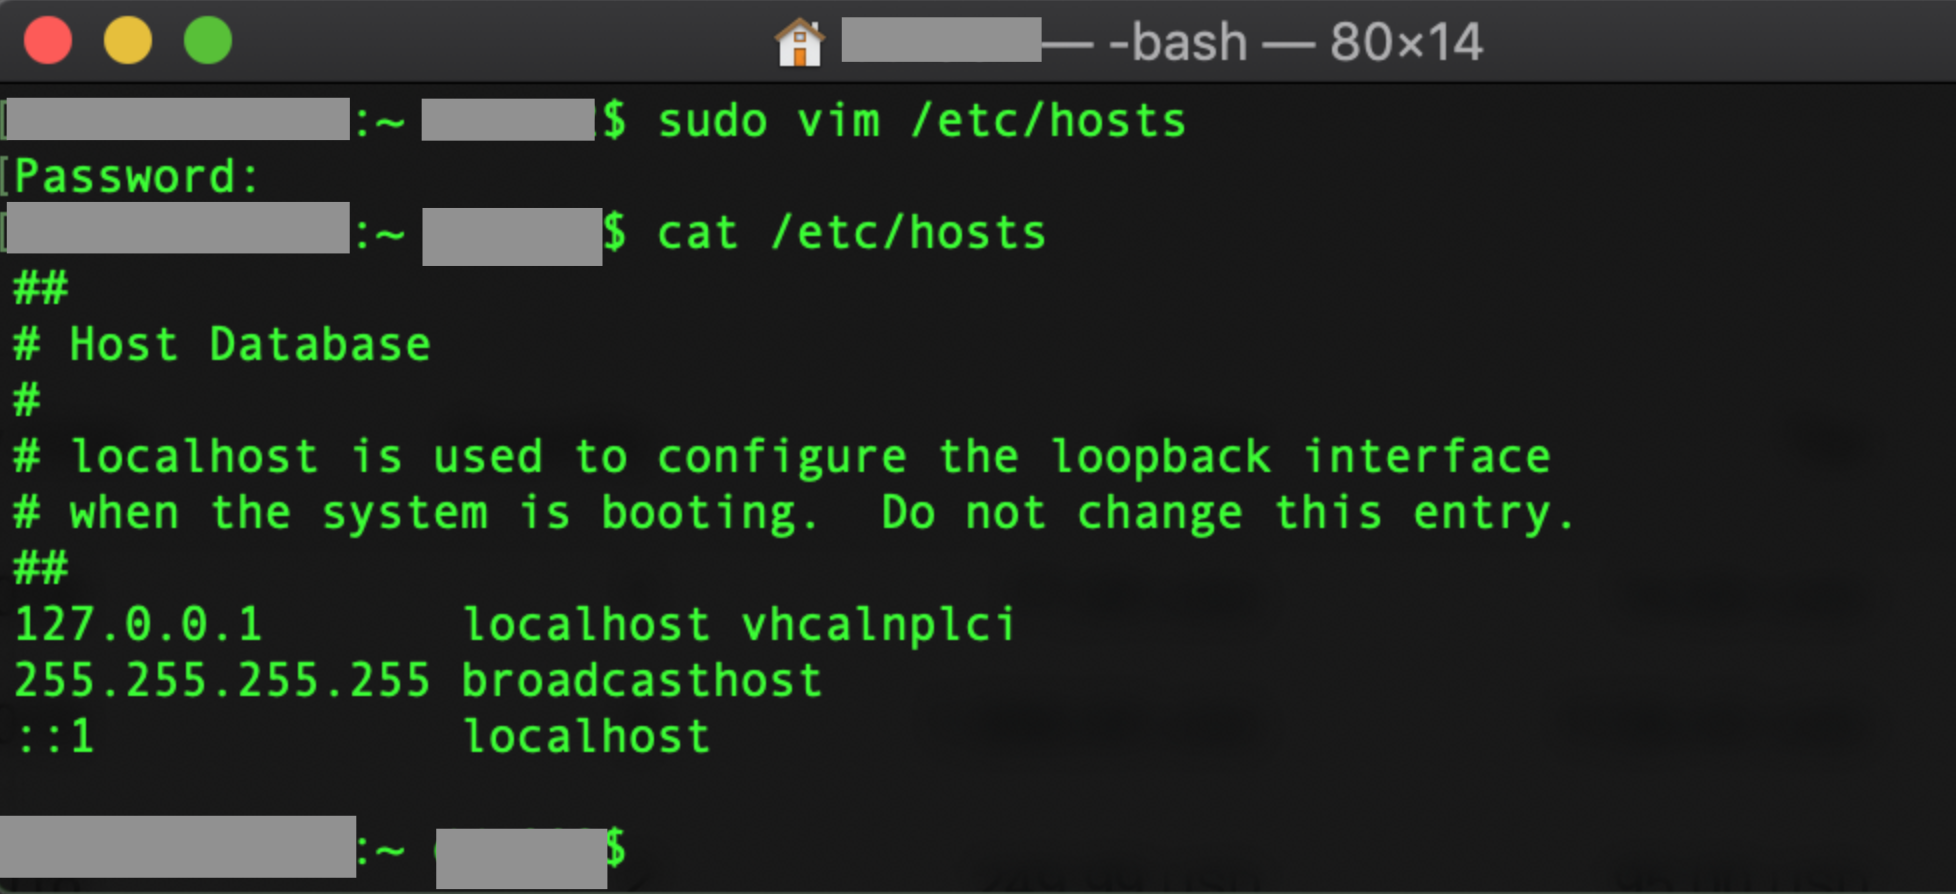
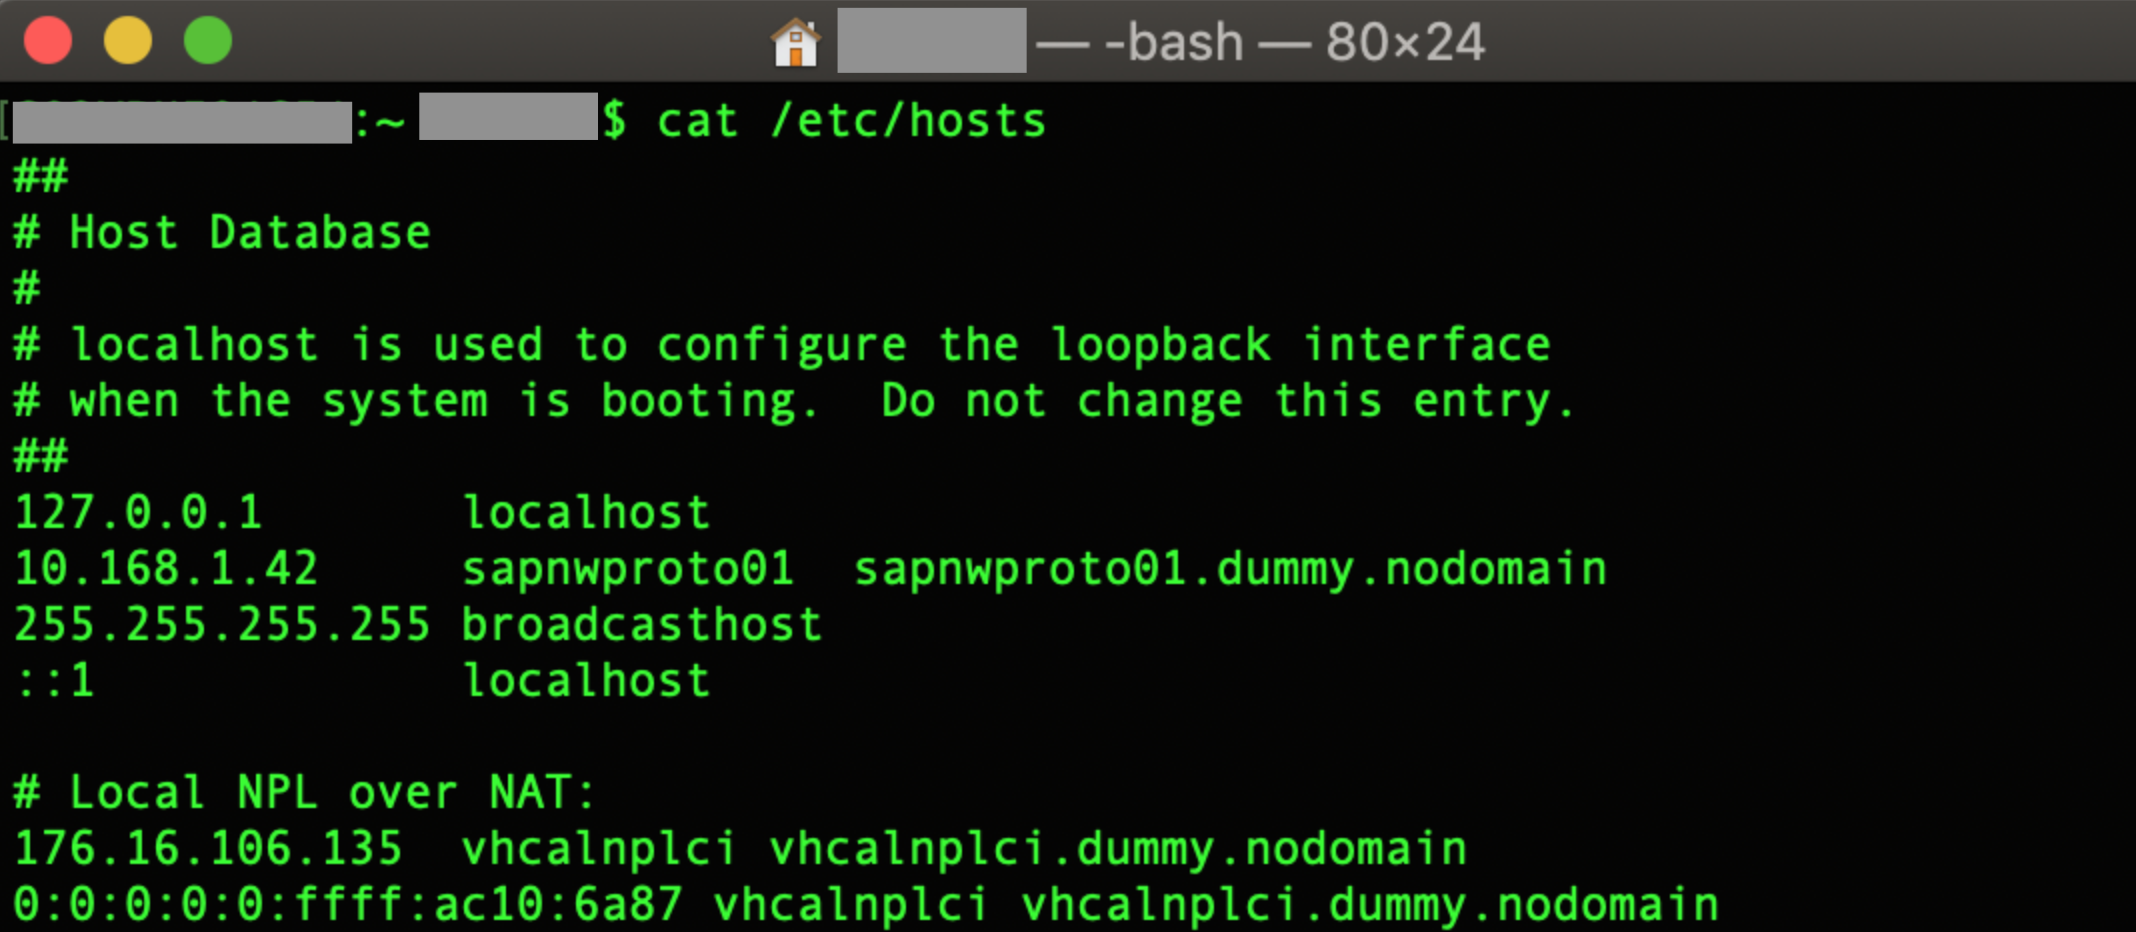
Of course, if your VM is reached a different way, e.g. on a non-NAT network at some other IPv4 address, then your hosts file should NOT tag the VM hostname onto the localhost line (because then the URL with "vhcalnplci" would resolve to the wrong IPv4 address; instead, you would specify some new line that maps the IPv4 address of your Ubuntu VM to the hostname (short name and "dummy" FQDN) of the VM e.g.
192.168.56.101 vhcalnplci vhcalnplci.dummy.nodomain
Tip for Mac users: If your machine is set up to look for DNS resolution of IPv6, then you have three choices for e.g. HTTP or RFC destination naming of the host:
(1) add the suffix ".local" e.g "vhcalnplci.local" in your address strings, then mDNS somehow knows to also check for an IPv4 resolution.
(2) turn off IPv6 Configuration from System Preferences -> Network -> Select e.g. Wi-FI if that is what you are using to connect to Internet... Advanced -> TCP/IP -> Set "Configure IPv6" to "Off". Seems that from Catalina macOS release onwards, turning this off from the Settings GUI isn't possible any longer, in that case see screenshot for a hint how to do this via Terminal:
(3) use any IPv4-to-IPv6 converter (free on the Internet, just search for one) on the IPv4 dot-notation address, then add a line to /etc/hosts resolving this IPv6 address. In the example below, 172.16.106.135 maps to IPv6 address 0:0:0:0:0:ffff:ac10:6a87 - which we then also map to vhcalnplci, like so:
Once this hosts file mapping is working, the FLP will be more easily callable, and since inside FLP it uses the hostname of the VM, then also the apps themselves will be callable without strange error messages. If all goes well you can use the supplied Fiori demo apps ok:
--
References (like during most of my hobbyist “mini-projects”, there were many useful websites including https://stackoverflow.com/ and https://askubuntu.com/ visited; below is just a more “official” subset of relevant sites):
https://blogs.sap.com/2017/09/04/sap-as-abap-751-sp02-developer-edition-to-download/
- main blog for nw 751. Links to:
https://blogs.sap.com/2017/09/04/newbies-guide-installing-abap-as-751-sp02-on-linux/
https://blogs.sap.com/2017/09/04/sap-as-abap-7.51-sp2-developer-edition-to-download-concise-installa...
Also, the main blog has a link to the SAPstore for the actual rar files (first you fill in a form, then you get an email link, valid for 48 hours; check you are getting the latest NW version e.g. if you want 7.51, don’t register for 7.50));
Also a link to the new ASE license needed from April 2018 (not mentioned in the blog, but worth having a valid license and easy enough to replace the old one):
https://sap.sharepoint.com/sites/101566/Shared%20Documents/Forms/AllItems.aspx?id=%2Fsites%2F101566%...
Older links:
https://blogs.sap.com/2016/11/03/sap-nw-as-abap-7.50-sp2-developer-edition-to-download-consise-insta...
- for the 7.50 edition, notes the need for: csh, uuidd, and libaio
https://lauton.me/how-to-install-a-mini-sap-netweaver-as-abap-7-50/
- interesting blog by SAP guy and Linux enthusiast
https://blogs.sap.com/2016/11/03/linux-for-newbies-installing-opensuse-on-oracle-virtualbox/
- older blog, with some people noting a modlib error, my guess is that the root cause was not having libaio1 installed.
--
- SAP Managed Tags:
- SAP NetWeaver Application Server
40 Comments
You must be a registered user to add a comment. If you've already registered, sign in. Otherwise, register and sign in.
Labels in this area
-
"automatische backups"
1 -
"regelmäßige sicherung"
1 -
"TypeScript" "Development" "FeedBack"
1 -
505 Technology Updates 53
1 -
ABAP
14 -
ABAP API
1 -
ABAP CDS Views
2 -
ABAP CDS Views - BW Extraction
1 -
ABAP CDS Views - CDC (Change Data Capture)
1 -
ABAP class
2 -
ABAP Cloud
2 -
ABAP Development
5 -
ABAP in Eclipse
1 -
ABAP Platform Trial
1 -
ABAP Programming
2 -
abap technical
1 -
absl
2 -
access data from SAP Datasphere directly from Snowflake
1 -
Access data from SAP datasphere to Qliksense
1 -
Accrual
1 -
action
1 -
adapter modules
1 -
Addon
1 -
Adobe Document Services
1 -
ADS
1 -
ADS Config
1 -
ADS with ABAP
1 -
ADS with Java
1 -
ADT
2 -
Advance Shipping and Receiving
1 -
Advanced Event Mesh
3 -
AEM
1 -
AI
7 -
AI Launchpad
1 -
AI Projects
1 -
AIML
9 -
Alert in Sap analytical cloud
1 -
Amazon S3
1 -
Analytical Dataset
1 -
Analytical Model
1 -
Analytics
1 -
Analyze Workload Data
1 -
annotations
1 -
API
1 -
API and Integration
3 -
API Call
2 -
API security
1 -
Application Architecture
1 -
Application Development
5 -
Application Development for SAP HANA Cloud
3 -
Applications and Business Processes (AP)
1 -
Artificial Intelligence
1 -
Artificial Intelligence (AI)
5 -
Artificial Intelligence (AI) 1 Business Trends 363 Business Trends 8 Digital Transformation with Cloud ERP (DT) 1 Event Information 462 Event Information 15 Expert Insights 114 Expert Insights 76 Life at SAP 418 Life at SAP 1 Product Updates 4
1 -
Artificial Intelligence (AI) blockchain Data & Analytics
1 -
Artificial Intelligence (AI) blockchain Data & Analytics Intelligent Enterprise
1 -
Artificial Intelligence (AI) blockchain Data & Analytics Intelligent Enterprise Oil Gas IoT Exploration Production
1 -
Artificial Intelligence (AI) blockchain Data & Analytics Intelligent Enterprise sustainability responsibility esg social compliance cybersecurity risk
1 -
ASE
1 -
ASR
2 -
ASUG
1 -
Attachments
1 -
Authorisations
1 -
Automating Processes
1 -
Automation
2 -
aws
2 -
Azure
1 -
Azure AI Studio
1 -
Azure API Center
1 -
Azure API Management
1 -
B2B Integration
1 -
Backorder Processing
1 -
Backup
1 -
Backup and Recovery
1 -
Backup schedule
1 -
BADI_MATERIAL_CHECK error message
1 -
Bank
1 -
BAS
1 -
basis
2 -
Basis Monitoring & Tcodes with Key notes
2 -
Batch Management
1 -
BDC
1 -
Best Practice
1 -
bitcoin
1 -
Blockchain
3 -
bodl
1 -
BOP in aATP
1 -
BOP Segments
1 -
BOP Strategies
1 -
BOP Variant
1 -
BPC
1 -
BPC LIVE
1 -
BTP
12 -
BTP Destination
2 -
Business AI
1 -
Business and IT Integration
1 -
Business application stu
1 -
Business Application Studio
1 -
Business Architecture
1 -
Business Communication Services
1 -
Business Continuity
1 -
Business Data Fabric
3 -
Business Partner
12 -
Business Partner Master Data
10 -
Business Technology Platform
2 -
Business Trends
4 -
CA
1 -
calculation view
1 -
CAP
4 -
Capgemini
1 -
CAPM
1 -
Catalyst for Efficiency: Revolutionizing SAP Integration Suite with Artificial Intelligence (AI) and
1 -
CCMS
2 -
CDQ
12 -
CDS
2 -
Cental Finance
1 -
Certificates
1 -
CFL
1 -
Change Management
1 -
chatbot
1 -
chatgpt
3 -
CL_SALV_TABLE
2 -
Class Runner
1 -
Classrunner
1 -
Cloud ALM Monitoring
1 -
Cloud ALM Operations
1 -
cloud connector
1 -
Cloud Extensibility
1 -
Cloud Foundry
4 -
Cloud Integration
6 -
Cloud Platform Integration
2 -
cloudalm
1 -
communication
1 -
Compensation Information Management
1 -
Compensation Management
1 -
Compliance
1 -
Compound Employee API
1 -
Configuration
1 -
Connectors
1 -
Consolidation Extension for SAP Analytics Cloud
2 -
Control Indicators.
1 -
Controller-Service-Repository pattern
1 -
Conversion
1 -
Cosine similarity
1 -
cryptocurrency
1 -
CSI
1 -
ctms
1 -
Custom chatbot
3 -
Custom Destination Service
1 -
custom fields
1 -
Customer Experience
1 -
Customer Journey
1 -
Customizing
1 -
cyber security
3 -
cybersecurity
1 -
Data
1 -
Data & Analytics
1 -
Data Aging
1 -
Data Analytics
2 -
Data and Analytics (DA)
1 -
Data Archiving
1 -
Data Back-up
1 -
Data Flow
1 -
Data Governance
5 -
Data Integration
2 -
Data Quality
12 -
Data Quality Management
12 -
Data Synchronization
1 -
data transfer
1 -
Data Unleashed
1 -
Data Value
8 -
database tables
1 -
Datasphere
3 -
datenbanksicherung
1 -
dba cockpit
1 -
dbacockpit
1 -
Debugging
2 -
Defender
1 -
Delimiting Pay Components
1 -
Delta Integrations
1 -
Destination
3 -
Destination Service
1 -
Developer extensibility
1 -
Developing with SAP Integration Suite
1 -
Devops
1 -
digital transformation
1 -
Documentation
1 -
Dot Product
1 -
DQM
1 -
dump database
1 -
dump transaction
1 -
e-Invoice
1 -
E4H Conversion
1 -
Eclipse ADT ABAP Development Tools
2 -
edoc
1 -
edocument
1 -
ELA
1 -
Embedded Consolidation
1 -
Embedding
1 -
Embeddings
1 -
Employee Central
1 -
Employee Central Payroll
1 -
Employee Central Time Off
1 -
Employee Information
1 -
Employee Rehires
1 -
Enable Now
1 -
Enable now manager
1 -
endpoint
1 -
Enhancement Request
1 -
Enterprise Architecture
1 -
ESLint
1 -
ETL Business Analytics with SAP Signavio
1 -
Euclidean distance
1 -
Event Dates
1 -
Event Driven Architecture
1 -
Event Mesh
2 -
Event Reason
1 -
EventBasedIntegration
1 -
EWM
1 -
EWM Outbound configuration
1 -
EWM-TM-Integration
1 -
Existing Event Changes
1 -
Expand
1 -
Expert
2 -
Expert Insights
2 -
Exploits
1 -
Fiori
14 -
Fiori Elements
2 -
Fiori SAPUI5
12 -
Flask
1 -
Full Stack
8 -
Funds Management
1 -
General
1 -
General Splitter
1 -
Generative AI
1 -
Getting Started
1 -
GitHub
8 -
Grants Management
1 -
GraphQL
1 -
groovy
1 -
GTP
1 -
HANA
6 -
HANA Cloud
2 -
Hana Cloud Database Integration
2 -
HANA DB
2 -
HANA XS Advanced
1 -
Historical Events
1 -
home labs
1 -
HowTo
1 -
HR Data Management
1 -
html5
8 -
HTML5 Application
1 -
Identity cards validation
1 -
idm
1 -
Implementation
1 -
input parameter
1 -
instant payments
1 -
Integration
3 -
Integration Advisor
1 -
Integration Architecture
1 -
Integration Center
1 -
Integration Suite
1 -
intelligent enterprise
1 -
iot
1 -
Java
1 -
job
1 -
Job Information Changes
1 -
Job-Related Events
1 -
Job_Event_Information
1 -
joule
4 -
Journal Entries
1 -
Just Ask
1 -
Kerberos for ABAP
8 -
Kerberos for JAVA
8 -
KNN
1 -
Launch Wizard
1 -
Learning Content
2 -
Life at SAP
5 -
lightning
1 -
Linear Regression SAP HANA Cloud
1 -
Loading Indicator
1 -
local tax regulations
1 -
LP
1 -
Machine Learning
2 -
Marketing
1 -
Master Data
3 -
Master Data Management
14 -
Maxdb
2 -
MDG
1 -
MDGM
1 -
MDM
1 -
Message box.
1 -
Messages on RF Device
1 -
Microservices Architecture
1 -
Microsoft Universal Print
1 -
Middleware Solutions
1 -
Migration
5 -
ML Model Development
1 -
Modeling in SAP HANA Cloud
8 -
Monitoring
3 -
MTA
1 -
Multi-Record Scenarios
1 -
Multiple Event Triggers
1 -
Myself Transformation
1 -
Neo
1 -
New Event Creation
1 -
New Feature
1 -
Newcomer
1 -
NodeJS
3 -
ODATA
2 -
OData APIs
1 -
odatav2
1 -
ODATAV4
1 -
ODBC
1 -
ODBC Connection
1 -
Onpremise
1 -
open source
2 -
OpenAI API
1 -
Oracle
1 -
PaPM
1 -
PaPM Dynamic Data Copy through Writer function
1 -
PaPM Remote Call
1 -
PAS-C01
1 -
Pay Component Management
1 -
PGP
1 -
Pickle
1 -
PLANNING ARCHITECTURE
1 -
Popup in Sap analytical cloud
1 -
PostgrSQL
1 -
POSTMAN
1 -
Prettier
1 -
Process Automation
2 -
Product Updates
4 -
PSM
1 -
Public Cloud
1 -
Python
4 -
python library - Document information extraction service
1 -
Qlik
1 -
Qualtrics
1 -
RAP
3 -
RAP BO
2 -
Record Deletion
1 -
Recovery
1 -
recurring payments
1 -
redeply
1 -
Release
1 -
Remote Consumption Model
1 -
Replication Flows
1 -
research
1 -
Resilience
1 -
REST
1 -
REST API
2 -
Retagging Required
1 -
Risk
1 -
Rolling Kernel Switch
1 -
route
1 -
rules
1 -
S4 HANA
1 -
S4 HANA Cloud
1 -
S4 HANA On-Premise
1 -
S4HANA
3 -
S4HANA_OP_2023
2 -
SAC
10 -
SAC PLANNING
9 -
SAP
4 -
SAP ABAP
1 -
SAP Advanced Event Mesh
1 -
SAP AI Core
8 -
SAP AI Launchpad
8 -
SAP Analytic Cloud Compass
1 -
Sap Analytical Cloud
1 -
SAP Analytics Cloud
4 -
SAP Analytics Cloud for Consolidation
3 -
SAP Analytics Cloud Story
1 -
SAP analytics clouds
1 -
SAP API Management
1 -
SAP BAS
1 -
SAP Basis
6 -
SAP BODS
1 -
SAP BODS certification.
1 -
SAP BTP
21 -
SAP BTP Build Work Zone
2 -
SAP BTP Cloud Foundry
6 -
SAP BTP Costing
1 -
SAP BTP CTMS
1 -
SAP BTP Innovation
1 -
SAP BTP Migration Tool
1 -
SAP BTP SDK IOS
1 -
SAP Build
11 -
SAP Build App
1 -
SAP Build apps
1 -
SAP Build CodeJam
1 -
SAP Build Process Automation
3 -
SAP Build work zone
10 -
SAP Business Objects Platform
1 -
SAP Business Technology
2 -
SAP Business Technology Platform (XP)
1 -
sap bw
1 -
SAP CAP
2 -
SAP CDC
1 -
SAP CDP
1 -
SAP CDS VIEW
1 -
SAP Certification
1 -
SAP Cloud ALM
4 -
SAP Cloud Application Programming Model
1 -
SAP Cloud Integration for Data Services
1 -
SAP cloud platform
8 -
SAP Companion
1 -
SAP CPI
3 -
SAP CPI (Cloud Platform Integration)
2 -
SAP CPI Discover tab
1 -
sap credential store
1 -
SAP Customer Data Cloud
1 -
SAP Customer Data Platform
1 -
SAP Data Intelligence
1 -
SAP Data Migration in Retail Industry
1 -
SAP Data Services
1 -
SAP DATABASE
1 -
SAP Dataspher to Non SAP BI tools
1 -
SAP Datasphere
9 -
SAP DRC
1 -
SAP EWM
1 -
SAP Fiori
3 -
SAP Fiori App Embedding
1 -
Sap Fiori Extension Project Using BAS
1 -
SAP GRC
1 -
SAP HANA
1 -
SAP HCM (Human Capital Management)
1 -
SAP HR Solutions
1 -
SAP IDM
1 -
SAP Integration Suite
9 -
SAP Integrations
4 -
SAP iRPA
2 -
SAP LAGGING AND SLOW
1 -
SAP Learning Class
1 -
SAP Learning Hub
1 -
SAP Master Data
1 -
SAP Odata
2 -
SAP on Azure
2 -
SAP PartnerEdge
1 -
sap partners
1 -
SAP Password Reset
1 -
SAP PO Migration
1 -
SAP Prepackaged Content
1 -
SAP Process Automation
2 -
SAP Process Integration
2 -
SAP Process Orchestration
1 -
SAP S4HANA
2 -
SAP S4HANA Cloud
1 -
SAP S4HANA Cloud for Finance
1 -
SAP S4HANA Cloud private edition
1 -
SAP Sandbox
1 -
SAP STMS
1 -
SAP successfactors
3 -
SAP SuccessFactors HXM Core
1 -
SAP Time
1 -
SAP TM
2 -
SAP Trading Partner Management
1 -
SAP UI5
1 -
SAP Upgrade
1 -
SAP Utilities
1 -
SAP-GUI
8 -
SAP_COM_0276
1 -
SAPBTP
1 -
SAPCPI
1 -
SAPEWM
1 -
sapmentors
1 -
saponaws
2 -
SAPS4HANA
1 -
SAPUI5
5 -
schedule
1 -
Script Operator
1 -
Secure Login Client Setup
8 -
security
9 -
Selenium Testing
1 -
Self Transformation
1 -
Self-Transformation
1 -
SEN
1 -
SEN Manager
1 -
service
1 -
SET_CELL_TYPE
1 -
SET_CELL_TYPE_COLUMN
1 -
SFTP scenario
2 -
Simplex
1 -
Single Sign On
8 -
Singlesource
1 -
SKLearn
1 -
Slow loading
1 -
soap
1 -
Software Development
1 -
SOLMAN
1 -
solman 7.2
2 -
Solution Manager
3 -
sp_dumpdb
1 -
sp_dumptrans
1 -
SQL
1 -
sql script
1 -
SSL
8 -
SSO
8 -
Substring function
1 -
SuccessFactors
1 -
SuccessFactors Platform
1 -
SuccessFactors Time Tracking
1 -
Sybase
1 -
system copy method
1 -
System owner
1 -
Table splitting
1 -
Tax Integration
1 -
Technical article
1 -
Technical articles
1 -
Technology Updates
14 -
Technology Updates
1 -
Technology_Updates
1 -
terraform
1 -
Threats
2 -
Time Collectors
1 -
Time Off
2 -
Time Sheet
1 -
Time Sheet SAP SuccessFactors Time Tracking
1 -
Tips and tricks
2 -
toggle button
1 -
Tools
1 -
Trainings & Certifications
1 -
Transformation Flow
1 -
Transport in SAP BODS
1 -
Transport Management
1 -
TypeScript
3 -
ui designer
1 -
unbind
1 -
Unified Customer Profile
1 -
UPB
1 -
Use of Parameters for Data Copy in PaPM
1 -
User Unlock
1 -
VA02
1 -
Validations
1 -
Vector Database
2 -
Vector Engine
1 -
Visual Studio Code
1 -
VSCode
2 -
VSCode extenions
1 -
Vulnerabilities
1 -
Web SDK
1 -
work zone
1 -
workload
1 -
xsa
1 -
XSA Refresh
1
- « Previous
- Next »
Related Content
- Supporting Multiple API Gateways with SAP API Management – using Azure API Management as example in Technology Blogs by SAP
- SAP LICENSE RENEWAL FROM BASIS END #ATR in Technology Blogs by Members
- My inbox application with multiple backends(ECC,CRM) configuration Guide in Technology Q&A
- Extend Your Crystal Reports Solutions in the DHTML Viewer With a Free Function Library in Technology Blogs by Members
- Customer & Partner Roundtable for SAP BTP ABAP Environment #12 in Technology Blogs by SAP
Top kudoed authors
| User | Count |
|---|---|
| 8 | |
| 5 | |
| 5 | |
| 4 | |
| 4 | |
| 4 | |
| 4 | |
| 3 | |
| 3 | |
| 3 |