

- SAP Community
- Products and Technology
- Technology
- Technology Blogs by SAP
- Quick Start Guide to SAP Cloud Platform Business R...
Technology Blogs by SAP
Learn how to extend and personalize SAP applications. Follow the SAP technology blog for insights into SAP BTP, ABAP, SAP Analytics Cloud, SAP HANA, and more.
Turn on suggestions
Auto-suggest helps you quickly narrow down your search results by suggesting possible matches as you type.
Showing results for
Product and Topic Expert
Options
- Subscribe to RSS Feed
- Mark as New
- Mark as Read
- Bookmark
- Subscribe
- Printer Friendly Page
- Report Inappropriate Content
03-29-2018
6:33 PM
SAP Cloud Platform together with Cloud Foundry is offering the flexible cloud native enterprise platform to build, deploy and manage applications. SAP is key member and contributor in Cloud Foundry community. There have been great advantages of Cloud Foundry in SAP’s platform-as-a-service strategy, due to which SAP Cloud Platform services in Neo environment have already started being provisioned in Cloud Foundry. Business rules is one of them
SAP Cloud Platform Business Rules Service in now available in Cloud Foundry Trial and Enterprise environment – for both platform-as-a-service (PaaS) and software-as-a-service (SaaS) engagement model. It has been released currently for CF/AWS and Microsoft Azure environments. know more details on the data centres from here
I have put together this quick guide series that introduces you to the business rules service in Cloud Foundry where I have divided the learnings into 2 parts:
In this first blog, I will concentrate on how you can use business rules application in Cloud Foundry in just four steps: (a) Configure Business Rules Entitlement, (b) User Role Assignment, (c) Accessing Business Rules Editor application to model rules and (d) Creating service instance and service keys to execute the business rules
Before I start this section, I would like to highlight certain things about business rules editor. To those who are aware of business rules editor in Neo environment – there is absolutely no change. Infact, the editor in Neo and Cloud Foundry is EXACTLY the same. No learning experience required.
For those who have not seen/used business rules editor before, follow the blogs to know how-to model, manage and deploy rules. This section would not cover modelling of the rules. I would recommend you to go-through the blogs to familiarize yourself with modelling notations and operations for business rules.
Assuming that you know how-to work with business rules editor, let us understand how to get access to the editor. This can be done intwo ways (a) via HTML Application Repository - which is the newer way to get access to the business rules application and (b) via Subscription - which is the old way of enabling the subscription (as in section III below).
>>>>> Subscription is no more supported now >>>>>>>
In this section, we talk about how to enable the business rules editor via HTML Application Repository. There are 2 ways how you can achieve this (a) one is using the command-line tool and (b) other is using the SAP WebIDE. In this blog, I will show using the command-line tool (which is always my personal preference) but you can replicate the same using SAP WebIDE. Both are the pretty simple and straight forward to perform.
If you go to the Applications of your space (where you have deployed the MTAR), you will see bpmruleconsumerapprouter created and started
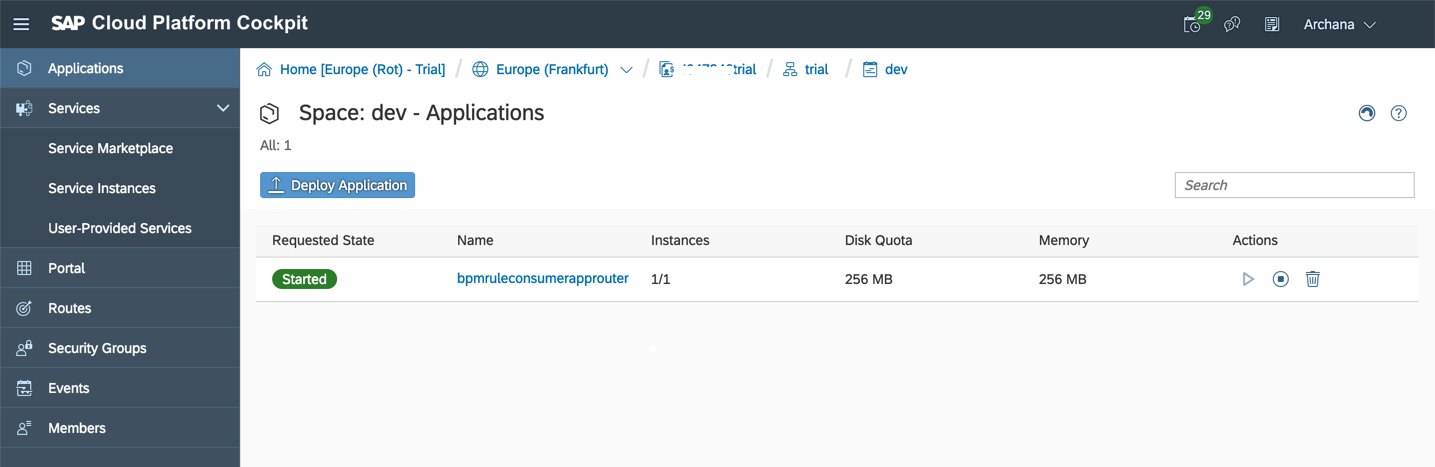
you can also click the application link to see the Service Bindings

In the previous sections, you learnt how you can create business rules service instance in Cloud Foundry and access the rules editor to model, manage and deploy rules. In this section, you will learn about the service broker of business rules - which will be used to create service instance and execute rules in the platform. I will also show you how you can test your rules from any available rest client using service keys of a service instance.
Now you have to assign roles (to your user) associated with the service instance of this business rules service broker. You can either create a new role collection or update the existing one.
Now, click on the link under Application Routes (as highlighted in green in above image) - and this is the business rules editor available for you to model and manage rules in CF environment
So, now you have setup to the business rules application, assigned all desired roles to your user and opened the editor for modelling.
You can choose to model your own rules or as a sample you can import Shopping Cart Promotion Rules from GitHub. If you opt for latter, then after you have imported the rules, you need to activate the artefacts (in this given order: Data Objects, Rule Services, Rules and Rulesets) and deploy the rule services. As you deploy the rule service, a REST service is created which can be accessed via business rules runtime public APIs.
As final step, let us now test the rule service from any rest-client. I will use Postman here, but you can use any available client you have.
>>>> You can also test from API Business Hub. Follow this tutorial >>>>
You can also run repository APIs (in similar fashion) to model and manage the business rules (in case you do not want to use the editor and work on purely PaaS model). In the above example, I showed you how to authenticate business rules runtime APIs with password-grant type, but you can also use other grant-types to call the service.
This concludes the first part of the blog where I focussed mainly on business rules setup and using the manage rules application to model, manage, deploy and invoke rules. I will soon publish the second part of the blog, until then try and use the business rules service in Cloud Foundry and connect back to me if you have any queries or feedback.
♦ Second part of the blog is published now!
SAP Cloud Platform Business Rules Service in now available in Cloud Foundry Trial and Enterprise environment – for both platform-as-a-service (PaaS) and software-as-a-service (SaaS) engagement model. It has been released currently for CF/AWS and Microsoft Azure environments. know more details on the data centres from here
I have put together this quick guide series that introduces you to the business rules service in Cloud Foundry where I have divided the learnings into 2 parts:
- In first part, you will learn how to subscribe to business rules application, use rules editor to model, manage and deploy rules and execute/test business rules service in Cloud Foundry
- In the second part, you will learn on how to consume the service from custom application deployed in Cloud Foundry.
In this first blog, I will concentrate on how you can use business rules application in Cloud Foundry in just four steps: (a) Configure Business Rules Entitlement, (b) User Role Assignment, (c) Accessing Business Rules Editor application to model rules and (d) Creating service instance and service keys to execute the business rules
>>>>>>> we also have SAP Tutorial on Getting Started. Try it out! >>>>>>
I. Configure Business Rules Entitlement
- Login to SAP Cloud Platform trial
https://account.hanatrial.ondemand.com/cockpit#/home/trialhome
[Note: If you are not a registered user then first sign-up for the trial account and then login with the set username and password.]

- Click on Enter Your trial Account to create (if you are login for the first time) and open the trial account. Cloud Foundry is a limited period trial for first 90 days and then you can choose to extend it for another 30 days. You can choose the data center US or Europe to create the trial account
- You will see that a global account and subaccount is already created for you with name <your-user-name>trial and trial respectively, as shown. Click on Go to Space
As a concept in Cloud Foundry accounts management, Global account represents the scope of the functionality and operations you are exposed to. A global account can have one or more sub-accounts that allows you model, deploy and manage your services and applications. For more information, you can read here

- Click on the trial sub-account tile to navigate into the account. It is from this sub-account that we are going to check entitlements and configure business rules service.
In the Overview page you will see all the quota assigned for various services and memory allocations for applications in your trial account. This quota or resource allocation defines which and to-what-extend you can use specified set of resources.

- Click the Entitlements, to see if you have the needed Business Rules entitlement. In trial account, the entitlements will automatically be there, but in your other accounts it might not be there, in that case follow this guide to assign the entitlement. Also note, the Plan of the entitlement - for trial it will be lite and otherwise it will be standard plan for business rules

II. Access Business Rules Editor Application via HTML Application Repository (new & recommended)
Before I start this section, I would like to highlight certain things about business rules editor. To those who are aware of business rules editor in Neo environment – there is absolutely no change. Infact, the editor in Neo and Cloud Foundry is EXACTLY the same. No learning experience required.
For those who have not seen/used business rules editor before, follow the blogs to know how-to model, manage and deploy rules. This section would not cover modelling of the rules. I would recommend you to go-through the blogs to familiarize yourself with modelling notations and operations for business rules.
Assuming that you know how-to work with business rules editor, let us understand how to get access to the editor. This can be done in
>>>>> Subscription is no more supported now >>>>>>>
In this section, we talk about how to enable the business rules editor via HTML Application Repository. There are 2 ways how you can achieve this (a) one is using the command-line tool and (b) other is using the SAP WebIDE. In this blog, I will show using the command-line tool (which is always my personal preference) but you can replicate the same using SAP WebIDE. Both are the pretty simple and straight forward to perform.
- Create the folder structure as shown in your eclipse environment (or anywhere in your local file system)

- Copy and paste the code mentioned in this documentation (step 2, 3 and 4) for package.json, xs-app.json and mta.yaml respectively.

- Execute the following commands one-after-another to create the MTAR file. This MTAR file will be deployed in the CF environment to create required approuter and service instance to access business rules editornote: Open the command-line tool and ensure that you are in businessrules_editor/approuter folder and then run these commands
npm config set @sap:registry https://npm.sap.com

npm install

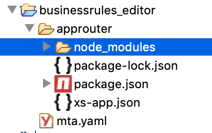
⇒ Once you complete the installation, you will notice the node_modules folder created inside your businessrules_editor/approuter folder
- Navigate to the parent folder but before you run the nest set of commands ensure that you have download the mta jar file from cloud tools under section Multi-Target Application Archive Builder

cd ..

java -jar <path to mta jar downloaded from cloud tools> --build-target=CF build

⇒ Once the command is successfully completed, you will see a businessrules_editor.mtar generated in your folder as shown in the screenshot

- Now we need to deploy the generated MTAR file into the cf environment. For that you need to login the to CF using the following commands and enter the username, password of the account and org where you want to deploy the application
cf api <api-endpoint>

cf login
⇒ before you deploy you need to ensure that you have the right set of commands installed. For this you run the command cf help and you must see deploy command listed as shown:

⇒ If you do not see this listed, then you need download and install CF MTA Plugin from cloud tools

(goto the readme text of the highlighted link and install the plugins are mentioned there)
⇒ Once you are ready, run the deploy cf command in command-line
cf deploy <location of the generated mtar file>If you go to the Applications of your space (where you have deployed the MTAR), you will see bpmruleconsumerapprouter created and started
you can also click the application link to see the Service Bindings
III. Create Business Rules Service Instance
In the previous sections, you learnt how you can create business rules service instance in Cloud Foundry and access the rules editor to model, manage and deploy rules. In this section, you will learn about the service broker of business rules - which will be used to create service instance and execute rules in the platform. I will also show you how you can test your rules from any available rest client using service keys of a service instance.
- Open your Sub Account in Cloud Foundry trial and go to Entitlements and check if you can see Business Rules service already added. In trial account, the entitlements will automatically be there, but in your other accounts it might not be there, in that case follow this guide to assign the entitlement. Also note, the Plan of the entitlement - for trial it will be lite and otherwise it will be standard plan for business rules

- While working on trial, a dev space would already have been created for you. Go into the dev space to create service instance and bindings

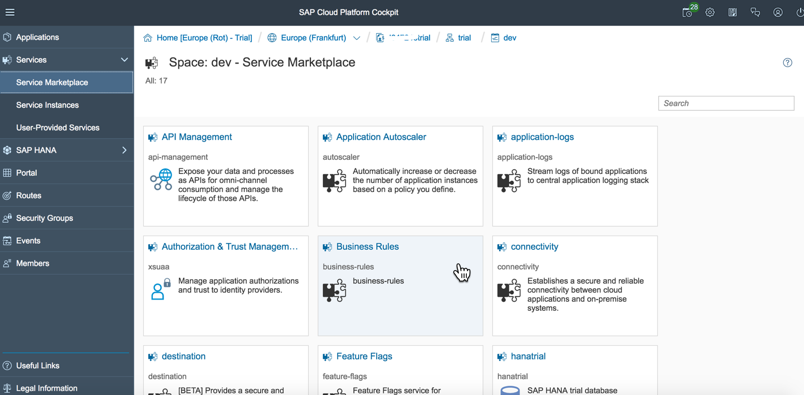
- Open Business Rules service from Service Marketplace and create a new instance with name of your choice. For more information on services in Cloud Foundry, read here
While creating the service instance keep all the options as they appear by default and give the Instance Name of your choice.

- Now lets us create service keys that will generate credentials which will be used to communicate with the service instance. To do so, navigate into the service instance you have created above

- Switch to Service Keys and create a new service key with name of your choice

Here you have to note down certain values because we use them while testing our business rules from rest client and also when you want to consume this service from your custom application:
- clientid: used as username for any grant-type option
- clientsecret: used as password for any grant-type option
- url: used to generate the authorization token to access APIs
- runtime_url: host url to execute the rules runtime APIs
- repository_url: host url to execute rules design time APIs
V. Configure Trust and Assign Authorizations
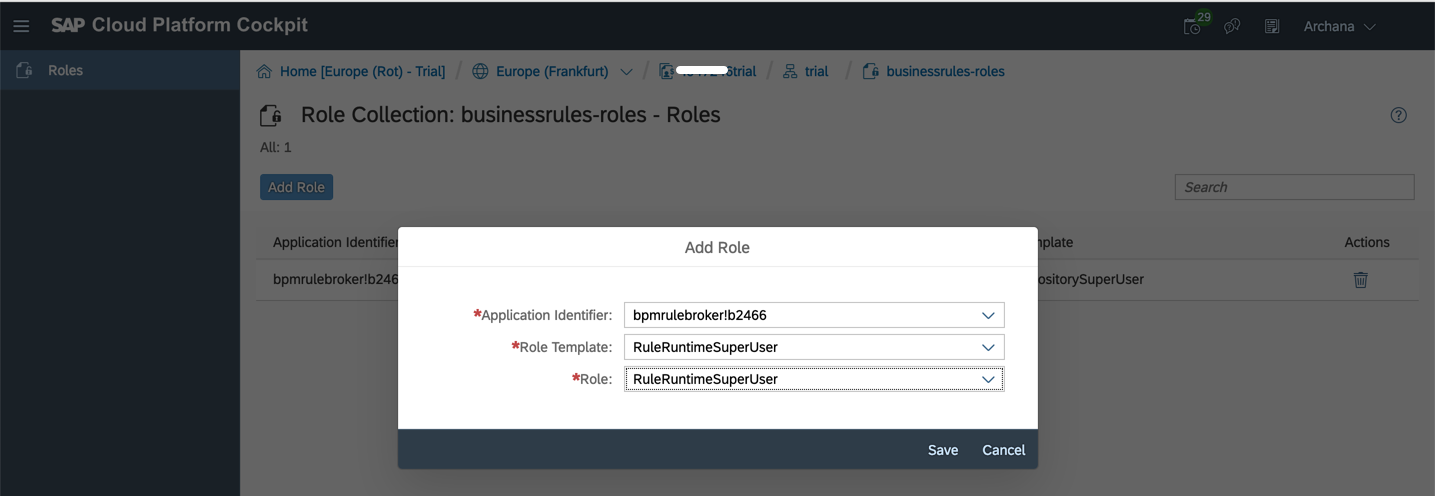
Now you have to assign roles (to your user) associated with the service instance of this business rules service broker. You can either create a new role collection or update the existing one.
- Open your trial subaccount and go to Members. Check if your username is already added. As this is a trial account, you should be already a member, by-default.

- To assign business rules roles, first you need to create the role collection. For that, open Security --> Role Collection and add a new role collection with name of your choice let’s say “Business Rules”. If you already have a role collection where you want to add business rules roles, then you don’t need to create a new collection.
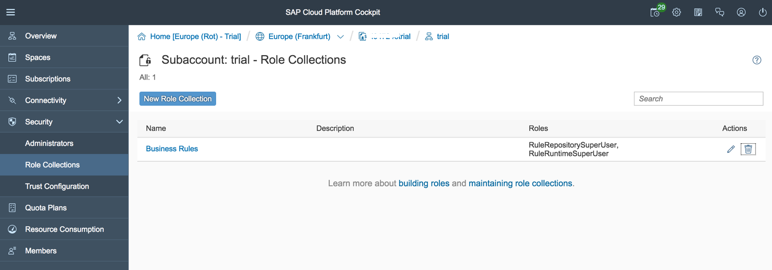
- Go into the role collection to add 2 roles (RuleRepositorySuperUser and RuleRuntimeSuperUser of bpmrulebroker) to the collection. These roles are required to access the business rules editor to model, manage and deploy rules.

- Open Security --> Trust Configuration to assign the role collection to your IDP service (which is SAP IDP is case of trial)

Enter your user id or email address to see what role collections are assigned to you. To assign the newly created role collection to your user, use Add Assignment option. If you already have a role collection where you just want to assign role associated with business rules, then you do not need do this step.

VI. Access Business Rules Editor Application (new & recommended)
- Bind the service instance and application by
- going into the space and open Services --> Service Instances
- select the service instance for business-rules service as shown
- Click on the "link" icon

- In the pop-up, select the bpmruleconsumerapprouter application to bind this application with the approuter and Save the configuration.

- Due to new bindings, the given application need to be restarted. Go into the Applications and select the bpmruleconsumerapprouter application.
- From Overview section and click on the Restart button.
- Wait for the application to the restart

Now, click on the link under Application Routes (as highlighted in green in above image) - and this is the business rules editor available for you to model and manage rules in CF environment
So, now you have setup to the business rules application, assigned all desired roles to your user and opened the editor for modelling.
You can choose to model your own rules or as a sample you can import Shopping Cart Promotion Rules from GitHub. If you opt for latter, then after you have imported the rules, you need to activate the artefacts (in this given order: Data Objects, Rule Services, Rules and Rulesets) and deploy the rule services. As you deploy the rule service, a REST service is created which can be accessed via business rules runtime public APIs.
VII. Test Business Rules
As final step, let us now test the rule service from any rest-client. I will use Postman here, but you can use any available client you have.
>>>> You can also test from API Business Hub. Follow this tutorial >>>>
- Open Postman and enter following details according to your trial.
As an example, I am executing the sample Shopping Cart Promotion Rules that I referred in the previous section. If you have your own rules, then you need to change the URL and body accordingly.
Method: POST
where https://bpmruleruntime.cfapps.eu10.hana.ondemand.com is the runtime_url from service key
Authorization
Select TYPE as OAuth 2.0 and then click Get New Access Token and enter these details and then click Request Token. Once you get the token click Use Token.
(a) Grant Type as Client Credentials
(b) Access Token URL, Client ID and Client Secret which you can get from service key (as explained in step 13 above)


Headers
Content-Type: application/json
Authorization: Bearer <access_token> (this will already be filled after requesting token)
Body
[
{
"__type__":"Product",
"Category":"Flat Screen TVs",
"Quantity":11,
"Soldby": "Very Best Screens"
},
{
"__type__":"Seller",
"Name": "Very Best Screens"
}
]


when you execute the business rules, you can see the discount output from the rules in the response body as shown. [Note: I am also showing you the snippets of the decision table rule so that you can understand the response we got after execution of the business rules]


You can also run repository APIs (in similar fashion) to model and manage the business rules (in case you do not want to use the editor and work on purely PaaS model). In the above example, I showed you how to authenticate business rules runtime APIs with password-grant type, but you can also use other grant-types to call the service.
This concludes the first part of the blog where I focussed mainly on business rules setup and using the manage rules application to model, manage, deploy and invoke rules. I will soon publish the second part of the blog, until then try and use the business rules service in Cloud Foundry and connect back to me if you have any queries or feedback.
♦ Second part of the blog is published now!
Labels:
37 Comments
You must be a registered user to add a comment. If you've already registered, sign in. Otherwise, register and sign in.
Labels in this area
-
ABAP CDS Views - CDC (Change Data Capture)
2 -
AI
1 -
Analyze Workload Data
1 -
BTP
1 -
Business and IT Integration
2 -
Business application stu
1 -
Business Technology Platform
1 -
Business Trends
1,661 -
Business Trends
88 -
CAP
1 -
cf
1 -
Cloud Foundry
1 -
Confluent
1 -
Customer COE Basics and Fundamentals
1 -
Customer COE Latest and Greatest
3 -
Customer Data Browser app
1 -
Data Analysis Tool
1 -
data migration
1 -
data transfer
1 -
Datasphere
2 -
Event Information
1,400 -
Event Information
65 -
Expert
1 -
Expert Insights
178 -
Expert Insights
280 -
General
1 -
Google cloud
1 -
Google Next'24
1 -
Kafka
1 -
Life at SAP
784 -
Life at SAP
11 -
Migrate your Data App
1 -
MTA
1 -
Network Performance Analysis
1 -
NodeJS
1 -
PDF
1 -
POC
1 -
Product Updates
4,577 -
Product Updates
330 -
Replication Flow
1 -
RisewithSAP
1 -
SAP BTP
1 -
SAP BTP Cloud Foundry
1 -
SAP Cloud ALM
1 -
SAP Cloud Application Programming Model
1 -
SAP Datasphere
2 -
SAP S4HANA Cloud
1 -
SAP S4HANA Migration Cockpit
1 -
Technology Updates
6,886 -
Technology Updates
408 -
Workload Fluctuations
1
Related Content
- ABAP Cloud Developer Trial 2022 Available Now in Technology Blogs by SAP
- Hack2Build on Business AI – Highlighted Use Cases in Technology Blogs by SAP
- SAP Partners unleash Business AI potential at global Hack2Build in Technology Blogs by SAP
- It’s Official - SAP BTP is Again a Leader in G2’s Reports in Technology Blogs by SAP
- SAP HANA Cloud Vector Engine: Quick FAQ Reference in Technology Blogs by SAP
Top kudoed authors
| User | Count |
|---|---|
| 13 | |
| 11 | |
| 10 | |
| 9 | |
| 9 | |
| 7 | |
| 6 | |
| 5 | |
| 5 | |
| 5 |