
- SAP Community
- Products and Technology
- Human Capital Management
- HCM Blogs by SAP
- Exporting Benefits data using Integration Center E...
Human Capital Management Blogs by SAP
Get insider info on HCM solutions for core HR and payroll, time and attendance, talent management, employee experience management, and more in this SAP blog.
Turn on suggestions
Auto-suggest helps you quickly narrow down your search results by suggesting possible matches as you type.
Showing results for
Product and Topic Expert
Options
- Subscribe to RSS Feed
- Mark as New
- Mark as Read
- Bookmark
- Subscribe
- Printer Friendly Page
- Report Inappropriate Content
03-25-2018
4:53 AM
Integration Center is a extension available as part of the SuccessFactors application to point to point integrations with external applications. To know more, look at the links of other interesting articles on Integration Center at the end of the page.
As part of the series of feature exploration with business use-cases, this blog talks about the EDI (Electronic Data Interchange) format for exporting Benefits related details from Employee Central.
Consider the scenario where customer would like to send out all Employee details on a regular basis to benefits provider like Kaiser or United health care. The list of employees as well as the dependents are the most common details required to be published. Using Integration Center wizard approach, any administration could configure a job to extract and forward the information.
From the Admin Center, you could search for Integration Center. Here below is the landing page[1] of the application.

Click on the My Integration tile which navigates to the section which list the integrations already existing in system along with the last seven days of execution status and some actions to modify, list older versions and deleting of the integration.
Use the '+ Create' button at the right top (above the list) to open the menu and select Scheduled EDI/Stacked File Output Integration as show below

Integration Center is based on the public OData APIs available in the system across different modules like Employee Center, Recruiting Management, Performance, Goals etc. See Ref [2] to understand how the Data Model Navigator helps in identifying the starting entity for different usecases. For this one, we will start with Person Info (PerPerson) to extract the personal information of a user. Click Select to open the integration center wizard.

The integration opens with the Options tab which requires you to modify the default name given to the integration, add an (optional) description and some EDI specific configurations, like Output File Type, File Delimiter and Line End Settings. Hover on each of the elements to read more as part of the tooltip. Here we are going with EDI/Stacked Delimiter & Comma, with the default Carriage Return/New Line line end settings.

From integrations aspect, this tab does the mapping of SuccessFactors data model, to the output format the use-case require. So from our use-case perspective, it transforms the SuccessFactors OData Public API of Person Info, into an EDI Format required by Benefits Provider.
The Configure Field tab uses two of the EDI Terminologies of Segment and Element. The first column of the table represent the segment. This is actually just a visual representation and you could label it for better readability. All the other columns represents the actual Data Element and would show up in the output. So let us go step by step through to build our Befits output.

Click on the + sign above the table and select Insert Sibling. The first Sibling is added with the first data element given by default.

In the above image, currently the selection is in the first column, first cell and hence 'New Segment' is showing up.
Now select the 'New Segment' (column 1) & name it 'Header' and 'New Element' & name it 'Date'. Additionally, using the More Field Options in the hamburg-icon menu, you can map it to the available <NOW> function

The dialog opens up and on the right side, select the Data Type as 'DateTime', Default Value as <NOW> from the drop down menus and the format of your choice. I went with MM/dd/yyyy. Click OK to close the dialog.

Now select the 'Date' cell which we have just defined and click on the + icon to click on Insert Sibling. Note it will add another column for adding Time with format HH:mm:ss - see results below
Now as specified in the application selection behavior, select Column 1 and then use the + sign to Insert Sibling which would create another segment. Name the segment Body. Similarly add another segment and name it Trailer. I have added couple of Segment also and I have not mapped them to anything right now.
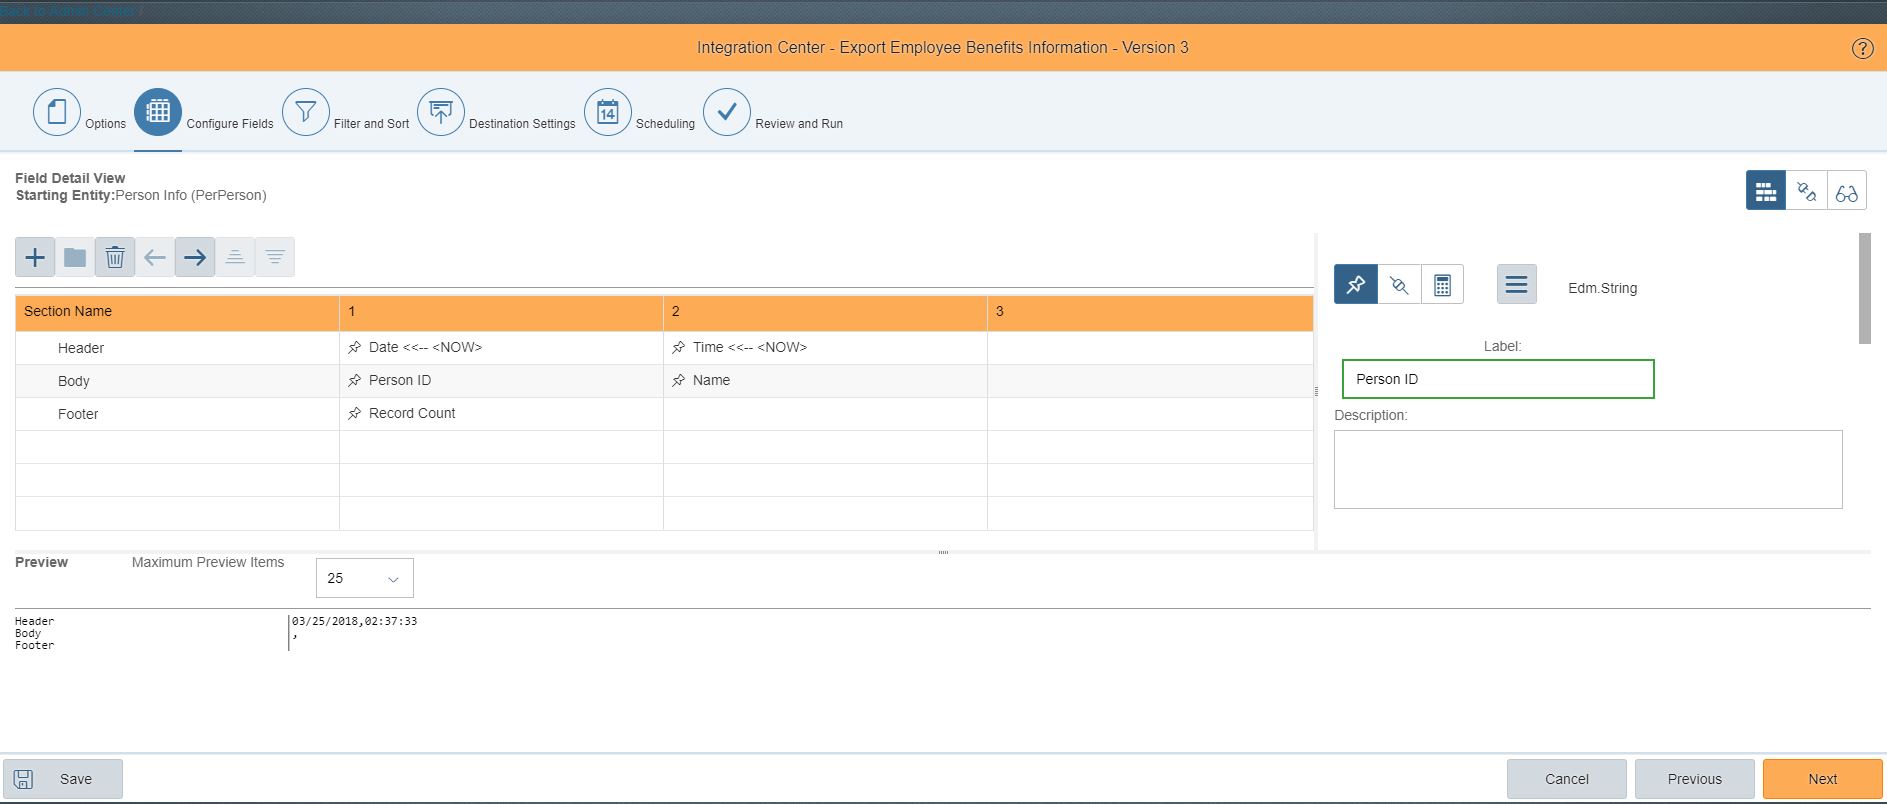
So above what we have done is created a section for each person to be added with his ID and Name. This will form the body of our output. At the end just to provide additional information, we have a footer with the record count. Like before use the More Options Field to map the Record Count data element as a numeric value and <RECORDCOUNT> function. I left it with default formatting.
Additionally, now we would need to add all the dependents of the employee whose ID we have will map. For this select the Body segment (Column 1, Cell 2) and click the + icon to Insert Sibling. The new segment would be called Dependents and it will have three data element, ID, Name and Relationship. The work in progress image looks as below.

Next we would mark the Body segment as a paging/batching node by selecting it and click on folder icon next to the + icon. See the below image with highlighted red box (please be very careful the Body cell is selected)

Now it is time to map our Person ID and it's Name in the Body segment. I am below depicting how to do the Field Association for Person ID where as for Name, I have used the Advance Calculation feature to contact the First Name and Last Name. Advance Calculation is not covered part of this article, so if you are unaware, just map for the time being to First Name using the same way we associated Person ID.


One of the other ways of mapping is using the Field Mapping View, where an easy to use Drag and Drop is available. Below, we use the same feature to map the Person ID

The last part of the mapping is to handle the 1:m navigation based or dependents data. This is one area of complexity, but in simple use-case - like in taxation season, anyone adds his or her multiple dependents, similarly, we are adding in the next row, all his dependents. Again the simple Drag and Drop feature of Integration Center helps first binds the navigation.

Post this mapping of 'PerPersonRelationhip' node on left side to the Dependent segment on right, expand the node on the left and start mapping the Related Person ID and Relationship and you could also make an association with First Name or you can experiment with Advance Calculation to create the Name using concatenation of First Name and Last Name

What is above highlighted in the BLUE box is the final EDI formatted output. Integration Center makes it so easy to provide such an easy to use
One of the asked for requirements is to support multiple headers. Customer might have an end system which processes information in a certain way. I transformed our existing example, to have Date and Time in multiple header file as displayed below. The output from the output csv follows

[1] The landing page consist of 4 tiles as of the time this article was written namely "My Integrations", "Monitor Integrations", "Data Model Navigator" and "Security Center". In upcoming series we would like to cover the different use-cases which talks about Security Center too.
[2] Refer to one of my colleagues David Hock explaining how best to select the starting entity in his own words - (In case you do not have access to the successfactors community, please leave a message on this article and I will try to copy it to SAP community)
[3] Video recording of one such EDI developement is available on Successfactors Community
A viable and flexible alternative for LMS Connector by Rinky Karthik
Design your inbound (to SuccessFactors) integration in few clicks by Biplab Das
As part of the series of feature exploration with business use-cases, this blog talks about the EDI (Electronic Data Interchange) format for exporting Benefits related details from Employee Central.
Business Use-Case
Consider the scenario where customer would like to send out all Employee details on a regular basis to benefits provider like Kaiser or United health care. The list of employees as well as the dependents are the most common details required to be published. Using Integration Center wizard approach, any administration could configure a job to extract and forward the information.
Developing the Integration
Navigate to Integration Center
From the Admin Center, you could search for Integration Center. Here below is the landing page[1] of the application.
Click on the My Integration tile which navigates to the section which list the integrations already existing in system along with the last seven days of execution status and some actions to modify, list older versions and deleting of the integration.
Use the '+ Create' button at the right top (above the list) to open the menu and select Scheduled EDI/Stacked File Output Integration as show below
Selecting the Entity
Integration Center is based on the public OData APIs available in the system across different modules like Employee Center, Recruiting Management, Performance, Goals etc. See Ref [2] to understand how the Data Model Navigator helps in identifying the starting entity for different usecases. For this one, we will start with Person Info (PerPerson) to extract the personal information of a user. Click Select to open the integration center wizard.
Integration Center Wizard
The integration opens with the Options tab which requires you to modify the default name given to the integration, add an (optional) description and some EDI specific configurations, like Output File Type, File Delimiter and Line End Settings. Hover on each of the elements to read more as part of the tooltip. Here we are going with EDI/Stacked Delimiter & Comma, with the default Carriage Return/New Line line end settings.
Configure Field
From integrations aspect, this tab does the mapping of SuccessFactors data model, to the output format the use-case require. So from our use-case perspective, it transforms the SuccessFactors OData Public API of Person Info, into an EDI Format required by Benefits Provider.
The Configure Field tab uses two of the EDI Terminologies of Segment and Element. The first column of the table represent the segment. This is actually just a visual representation and you could label it for better readability. All the other columns represents the actual Data Element and would show up in the output. So let us go step by step through to build our Befits output.
1. Initial Empty table
2. Adding Segment and Data Element
Click on the + sign above the table and select Insert Sibling. The first Sibling is added with the first data element given by default.
NOTE: The selection in the table is cell specific. So even though the highlighting is for the whole row, it is always necessary to select cell and use the detail display on the right to understand the cell context.
In the above image, currently the selection is in the first column, first cell and hence 'New Segment' is showing up.
Application Selection Behavior - It is important to share at this point of time, that if the focus is at the first column, then selecting from the + icon > Insert Sibling, would create a new Segment, where as if the focus is in any other columns, then selecting from the + icon > Insert Sibling, would add another Data Element.
Now select the 'New Segment' (column 1) & name it 'Header' and 'New Element' & name it 'Date'. Additionally, using the More Field Options in the hamburg-icon menu, you can map it to the available <NOW> function
The dialog opens up and on the right side, select the Data Type as 'DateTime', Default Value as <NOW> from the drop down menus and the format of your choice. I went with MM/dd/yyyy. Click OK to close the dialog.
Now select the 'Date' cell which we have just defined and click on the + icon to click on Insert Sibling. Note it will add another column for adding Time with format HH:mm:ss - see results below
Now as specified in the application selection behavior, select Column 1 and then use the + sign to Insert Sibling which would create another segment. Name the segment Body. Similarly add another segment and name it Trailer. I have added couple of Segment also and I have not mapped them to anything right now.
So above what we have done is created a section for each person to be added with his ID and Name. This will form the body of our output. At the end just to provide additional information, we have a footer with the record count. Like before use the More Options Field to map the Record Count data element as a numeric value and <RECORDCOUNT> function. I left it with default formatting.
Additionally, now we would need to add all the dependents of the employee whose ID we have will map. For this select the Body segment (Column 1, Cell 2) and click the + icon to Insert Sibling. The new segment would be called Dependents and it will have three data element, ID, Name and Relationship. The work in progress image looks as below.
Save the integration before you go to the next steps. This is because sometimes we end up marking the wrong node as pagination and unnecessary have to delete the nodes to fix the structure. I prefer to just reopen and result work.
3. Mapping the fields
Next we would mark the Body segment as a paging/batching node by selecting it and click on folder icon next to the + icon. See the below image with highlighted red box (please be very careful the Body cell is selected)
Now it is time to map our Person ID and it's Name in the Body segment. I am below depicting how to do the Field Association for Person ID where as for Name, I have used the Advance Calculation feature to contact the First Name and Last Name. Advance Calculation is not covered part of this article, so if you are unaware, just map for the time being to First Name using the same way we associated Person ID.
Note for all further mapping, we would switch to Field Mapping View (see red highlighted mark on top right)
One of the other ways of mapping is using the Field Mapping View, where an easy to use Drag and Drop is available. Below, we use the same feature to map the Person ID
The last part of the mapping is to handle the 1:m navigation based or dependents data. This is one area of complexity, but in simple use-case - like in taxation season, anyone adds his or her multiple dependents, similarly, we are adding in the next row, all his dependents. Again the simple Drag and Drop feature of Integration Center helps first binds the navigation.
Note 1: Please drag it on to the Dependent text in first column. If you see any weird pop-up messages, understand you dragged to the wrong cell. If there is a cross icon, then it is the same too.


Note 2: IMPORTANT to map the 1:m parent node before you map the child nodes. Here you need to drop the perPersonRelationNav to Dependent, then only map the Name and Relationship fields. Else you would have one heck of a messed up integration.
Post this mapping of 'PerPersonRelationhip' node on left side to the Dependent segment on right, expand the node on the left and start mapping the Related Person ID and Relationship and you could also make an association with First Name or you can experiment with Advance Calculation to create the Name using concatenation of First Name and Last Name
Final Result
What is above highlighted in the BLUE box is the final EDI formatted output. Integration Center makes it so easy to provide such an easy to use
03/25/2018,03:45:25

qqqq,Mike Smith

20_d5558,Dominic Smith,5979

sfapi,sfapi user

858_d939,WWWW NNNN,5973

858_d958,GGGG NNNN,5973

2
Easter Egg
One of the asked for requirements is to support multiple headers. Customer might have an end system which processes information in a certain way. I transformed our existing example, to have Date and Time in multiple header file as displayed below. The output from the output csv follows
03/26/2018

23:02

qqqq,Mike Smith

20_d5558,Dominic Smith,5979

sfapi,sfapi user

858_d939,WWWW NNNN,5973

858_d958,GGGG NNNN,5973

2
Remarks
- For brevity, article actually filter the record set to only 2 specific records (with some really weird data)
- Article omits the part of scheduling and running the integration. In the self explanatory tab of Destination Settings you could specify the sFTP server details.
- Please use encryption aspect to secure all information sent via file system (unless the receiving system doesn't handle PGP encryption).
- The self-explanatory tab of Scheduling allows you to opt for the frequency at which data should be exported out of the system.
References
[1] The landing page consist of 4 tiles as of the time this article was written namely "My Integrations", "Monitor Integrations", "Data Model Navigator" and "Security Center". In upcoming series we would like to cover the different use-cases which talks about Security Center too.
[2] Refer to one of my colleagues David Hock explaining how best to select the starting entity in his own words - (In case you do not have access to the successfactors community, please leave a message on this article and I will try to copy it to SAP community)
[3] Video recording of one such EDI developement is available on Successfactors Community
Other interesting articles
A viable and flexible alternative for LMS Connector by Rinky Karthik
Design your inbound (to SuccessFactors) integration in few clicks by Biplab Das
6 Comments
You must be a registered user to add a comment. If you've already registered, sign in. Otherwise, register and sign in.
Labels in this area
-
1H 2023 Product Release
3 -
2H 2023 Product Release
3 -
Business Trends
104 -
Business Trends
4 -
Cross-Products
13 -
Event Information
75 -
Event Information
9 -
Events
5 -
Expert Insights
26 -
Expert Insights
15 -
Feature Highlights
16 -
Hot Topics
20 -
Innovation Alert
8 -
Leadership Insights
4 -
Life at SAP
67 -
Life at SAP
1 -
Product Advisory
5 -
Product Updates
499 -
Product Updates
28 -
Release
6 -
Technology Updates
408 -
Technology Updates
6
Related Content
- List of Employee Central & Employee Central Payroll Guide Updates for the 1H 2024 Release in Human Capital Management Blogs by SAP
- Exploring Cloud-Based HR Software Solutions in Human Capital Management Q&A
- Reducing Active User Counts by Terminating Producer Details in APM in Human Capital Management Blogs by SAP
- Qualtrics & Sf LMS Integration Best Practice & Experiences in Human Capital Management Q&A
- SAP Enable Now Information Sessions - Previous Webinar Recordings in Human Capital Management Blogs by SAP
Top kudoed authors
| User | Count |
|---|---|
| 4 | |
| 4 | |
| 2 | |
| 2 | |
| 2 | |
| 2 | |
| 1 | |
| 1 | |
| 1 | |
| 1 |