
- SAP Community
- Products and Technology
- CRM and Customer Experience
- CRM and CX Blogs by SAP
- Integrate SurveyMonkey surveys with SAP Hybris Mar...
CRM and CX Blogs by SAP
Stay up-to-date on the latest developments and product news about intelligent customer experience and CRM technologies through blog posts from SAP experts.
Turn on suggestions
Auto-suggest helps you quickly narrow down your search results by suggesting possible matches as you type.
Showing results for
former_member24
Active Participant
Options
- Subscribe to RSS Feed
- Mark as New
- Mark as Read
- Bookmark
- Subscribe
- Printer Friendly Page
- Report Inappropriate Content
03-15-2018
4:19 PM

Introduction
Welcome to the blog posts of the SAP CX Services Marketing Practice.
We are happy to share with you our experience around Marketing Business, Technology and Analytics.
You want to see more blogs from us? Click here.
- Part 1
- Overview
- SurveyMonkey Configuration
- SAP Hybris Marketing Configuration
- SAP API Management - create API
- Part 2
- SAP Cloud Platform Integration Configuration
- Create SAP Hybris Marketing Cloud IFlows
- Summary
Background
SAP Hybris Marketing provides out-of-the-box functionality to integrate with 3rd party Survey tools.
For this simplified Integration Scenario, we have used SurveyMonkey for generating and maintaining surveys.
The described approach can be different depending on the connectivity options provided by the Survey tool you are using.
This Scenario is build using SAP Hybris Marketing Cloud with release 1711.
In this Blog Post,
we will walk through the technical setup on how to integrate SurveyMonkey with SAP Hybris Marketing Cloud. This is a concept IFlow and does not represent a real customer use case. This blog post describes the general procedure and approach how to integrate survey data with SAP Hybris Marketing.
The general approach and setup is described.
- SAP Hybris Marketing Cloud (MKC)
- Basic Communication Setup only
- SAP Cloud Platform Integration (CPI)
- IFlow design and configuration
- SAP Cloud Platform API Management (APIM)
- API creation
- SurveyMonkey
- Survey creation and management
Technical Configuration Overview
The following picture illustrates the scenarios covered with this blog post.
This becomes more clear in the description for each scenario, followed in the blog post.

SurveyMonkey Configuration
Create a SurveyMonkey App
Create a SurveyMonkey Account and login to: https://developer.surveymonkey.com
Go to My Apps and create a new app.
Note:
We are using a private App.

Review the credentials and select the scope items used in your scenario.
This can be changed any time
Once we created the app we can create a new survey.
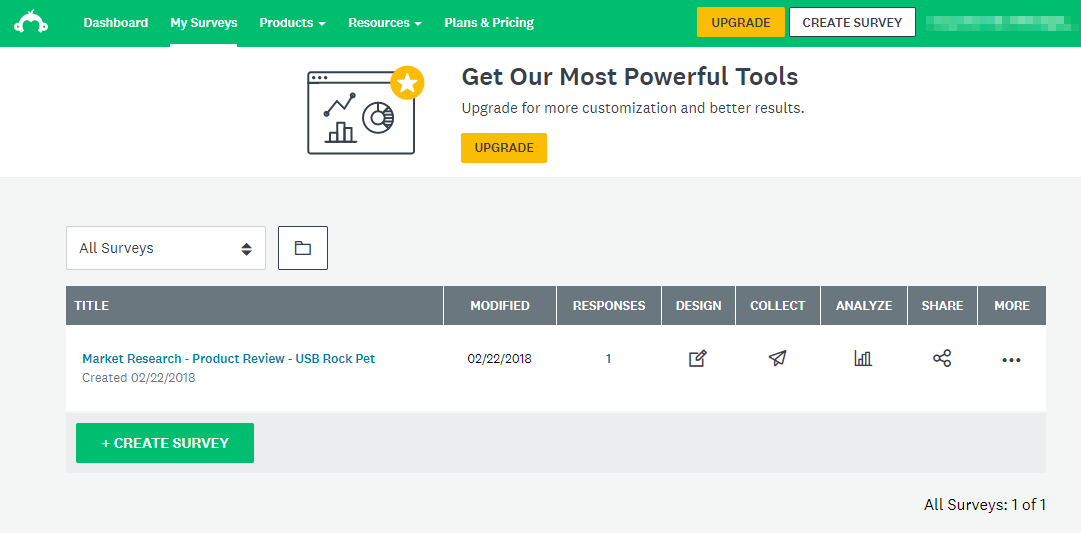
Go to https://www.surveymonkey.com/ and login with your account.
Select My Surveys and create a new survey.
Go through the wizard and create a new Survey.
In the Collect Responses tab, add a new Email collector. You can create one from the wizard or through the API.
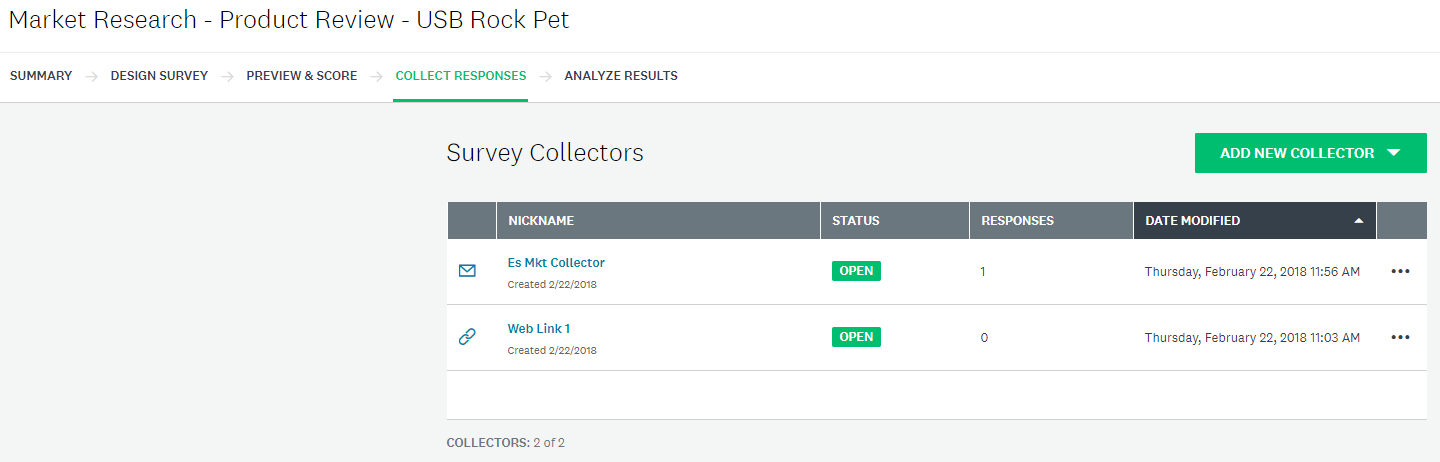
You're all set.
- Create SurveyMonkey App
- Create a Survey
- Add collectors to the survey
Now we have an active survey that is accessible for selected recipients.
In the next steps we need to make sure that we are notified when someone completed the survey and provide this information to SAP Hybris Marketing.
To do so, we need to activate a Webhook with a callback to receive any notification from SurveyMonkey.
SurveyMonkey provides an API to manage webhooks.
Create a SurveyMonkey Webhook
Create a new Iflow to create the SurveyMonkey webhook.

We're creating the following request.
Alternatively you can also use Postman to trigger the webhook create and validation.
POST /v3/webhooks HTTP/1.1

Host: api.surveymonkey.com

Authorization: bearer {access token}

Content-Type: application/json

{

	"name": "{Webhook Name}",

	"event_type": "response_completed",

	"object_type": "survey",

	"object_ids": ["{survey ID}"],

	"subscription_url": "https://{SAP API Management API Proxy URL}"

}
To make further usage easier and repeatable we externalized the parameters to make the Iflow easy to configure for further campaigns.

You can create a new Iflow to create a SurveyMonkey email collector if you have not done this already. The IFlow setup is similar as for creating the webhook but we need to create a different request and use a different API.
The collector is needed to collect information from collect survey information when sending the surveys to Email recipients.
POST /v3/surveys/131069188/collectors HTTP/1.1

Host: api.surveymonkey.com

Authorization: bearer dbOQpCLSgiGAgu4xPR8K8O6LOe4g-W.U0Od8qNwUkgoBkpAK6RWHMkCCIKsEDAdbl00XbL-zyyH.531r6VudYLYM3ZwrLJqMbbxne1NxzVE.4ifjdUJfvWb-b7BfNwtU

Content-Type: application/json


{

	"type":"email",

	"name": "My Collector"

}
Before sending the webhook creation request we need to make sure that the subscription URL is available.
Since the notifications are sent without one of the supported Authentication methods provided on CPI, we need to set up a new API to receive the webhook validation request and the notification.
Reviewing the illustration, we need to create the following.
- API on SAP API Management to receive messages from SurveyMonkey
- Iflow on SAP Cloud Platform Integration as target URL from SAP API Management

Create an API on SAP API Management
To create an API, we logon to the SAP API Management API Portal.
For our purpose, I am using a SAP API Management Trial Account on the SAP Cloud Platform Trial.

You can create a trial account for SAP Cloud Platform Integration here:
https://account.hanatrial.ondemand.com/
SAP API Management is available in the Service tab on your SAP Cloud Platform account.
View this Blog Post for further information:
https://blogs.sap.com/2016/02/02/free-trial-of-sap-api-management-on-hana-cloud-platform-is-availabl...
Go to Develop and create a new API.
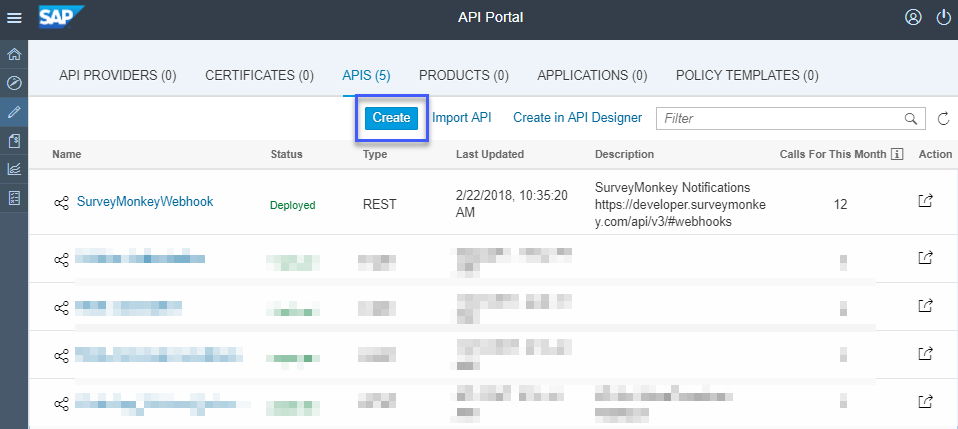
Create an API
API Provider: None
URL: {SAP Cloud Platform Integration HTTP Endpoint}
Name: {API Name}
Title: {API Title}
Description: {API description}
Host Alias: {your APIM account}
API Base URL: {SAP API Management API Proxy URL}
Service Type: REST
Go to the Resources tab and define a new resource.
Define operations the API allows.
For this API we need to at least enable HEAD and POST on the resource created.

Next we need to create a couple policies to enable forwarding notifications to CPI and send the expected responses back to SurveyMonkey.
First, we create the response for the ping from SurveyMonkey.
When creating a webhook, SurveyMonkey validated the subscription URL by sending a Ping to the subscription URL, expecting a HTTP 200 response.
Second, we enable forwarding the inbound request in APIM to CPI, by simply adding an Authorization header.
Note:
We don’t cover security measures on this API in this blog post.

Sending a 200 response to SurveyMonkey for verified subscription URL.
Add a Raise Fault policy to the inbound PreFlow.
Make sure the Raise Fault policy is only executed when the correct resource is called and the verb equals HEAD.
https://developer.surveymonkey.com/api/v3/#webhooks
Condition String: (proxy.pathsuffix MatchesPath "/notification" OR proxy.pathsuffix MatchesPath "/notification/**" OR proxy.pathsuffix MatchesPath "/notification(**") AND request.verb = "HEAD"


<!-- can be used to create custom messages in case of an error condition -->

<RaiseFault async="true" continueOnError="false" enabled="true" xmlns="http://www.sap.com/apimgmt">

	<!-- Defines the response message returned to the requesting client -->

	<FaultResponse>

		<Set>

			<!-- Sets or overwrites HTTP headers in the respone message -->

			<Headers/>

			<Payload contentType="text/plain"> </Payload> <StatusCode>200</StatusCode>

			<!-- sets the reason phrase of the response -->

			<ReasonPhrase>Successful</ReasonPhrase>

		</Set>

	</FaultResponse>

	<IgnoreUnresolvedVariables>true</IgnoreUnresolvedVariables>

</RaiseFault>
Enable Basic authentication with the created CPI HTTP Enpoint.
We simple add an Authorization header with the user credentials. This is ok for a test environment but not recommended for a productive system.
SurveyMonkey Webhook documentation: https://developer.surveymonkey.com/api/v3/#webhooks
<!-- This policy can be used to create or modify the standard HTTP request and response messages -->
<AssignMessage async="false" continueOnError="false" enabled="true" xmlns='http://www.sap.com/apimgmt'>
<!-- Sets a new value to the existing parameter -->
<Set>
<Headers>
<Header name="Authorization">Basic {Base 64 encoded Username:Password}</Header>
</Headers>
</Set>
<IgnoreUnresolvedVariables>false</IgnoreUnresolvedVariables>
<AssignTo createNew="false" transport="http" type="request"></AssignTo>
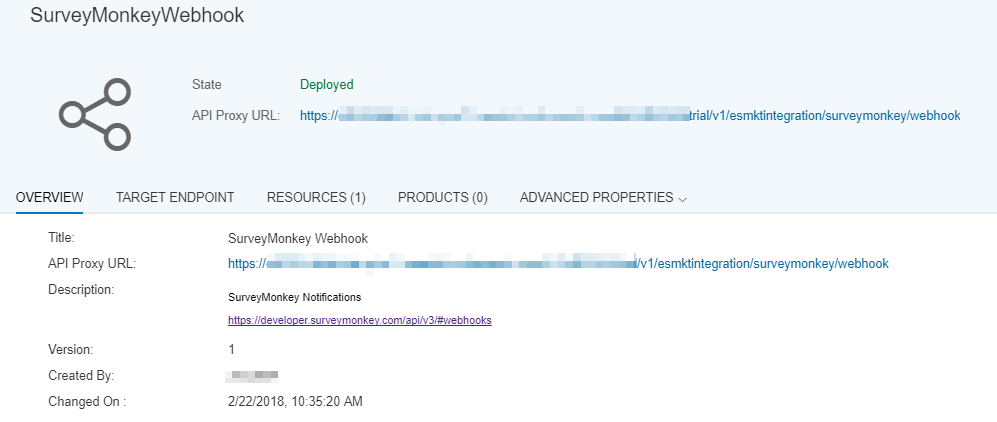
</AssignMessage>Save and deploy the API
Create a Reveiver IFlow on SAP Cloud Platform Integration
From APIM we are referring to a target endpoint on CPI.
That endpoint is not created yet.
Logon to SAP Cloud Platform Integration and create a new IFlow.
We start with a simple IFlow to receive the inbound message and refine the IFlow later.
This IFlow is later used to receive SurveyMonkey notification when someone completed the survey.
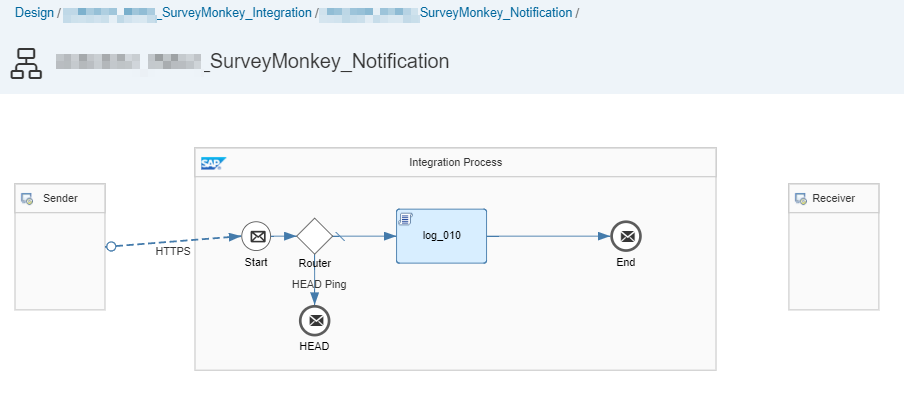
Configure a HTTP Sender Channel and define an address path.
The HTTP endpoint created when deploying the IFlow is constructed in the following format.
https:// {CPI Worker Node URL}/http{Address Path}
Set Authorization to User Role and disable CSRF Protected.
Enabling CSRF Protection add validation of a csrf token. In this demo scenario we kept this as simple as possible.

After receiving the message we add a router to route inbound HEAD request to an end message event to avoid processing empty messages. This is only mandatory when connecting directly to CPI with HEAD, in our scenario we don’t send head request directly but like to avoid and request that is send with HEAD.
Condition Expression: ${header.CamelHttpMethod} = ‘HEAD’
We added an additional Message Log script to log the payload. This does not have any effect on the functionality of the IFlow but needs to be used with care.
CPI limits the use of attachments per day. Writing too many attachments increases the chance of exceeding the size limitation per day.
When all configuration is done, save and deploy the IFlow
Run an initial test if the creation of the webhook works and if a message is received on SAP APIM and SAP CPI.
SurveyMonkey
- SurveyMonkey Private App
- SurveyMonkey Survey
SAP API Management
- API to receive HTTP request from SurveyMonkey
SAP Cloud Platform Integration
- Webhook creation IFlow
- Notification IFlow
Now your integration scenario is set-up to register a webhook for the survey you have created on SurveyMonkey and receive notification.
Configure SAP Hybris Marketing
SAP Hybris Marketing (yMKT) provides functionalities to integrate with third-party survey data.
In this blog post we just describe the basic configuration steps. The configuration steps are described in the help documentation on https://help.sap.com/viewer/p/SAP_HYBRIS_MARKETING_CLOUD.
Please refer to the official documentation for more detailed information.
- Integrating Survey: https://help.sap.com/viewer/0f9408e4921e4ba3bb4a7a1f75f837a7/1802%20500/en-US/1ee35503a2e348e6aece59...
- Survey Odata API: https://help.sap.com/viewer/0f9408e4921e4ba3bb4a7a1f75f837a7/1802%20500/en-US/98818494e2474aabac1f60...
Launch the Manage Your Solution App and go to Configure Your Solution and select Manage Integration Content.
Add a new Interaction Channel Survey with Communication Medium WEB and Interaction Type SURVEY_RESPONSE.

For this PoC we have decided using a different approach on publishing the Survey.
We’ll configure Open Channel to populate the SurveyMonkey Contact list and distribute the Survey Email notifications from SurveyMonkey. We’re collecting the Survey responses and import them to SAP Hybris Marketing using the Survey API.
Define Custom Logic
Define a custom logic with the mandatory extension.
Business Context: Marketing: Campaign
Definition Description: (1) Open Channel: Define Implementations
Implementation Description: {Custom Logic Name}
Define a Implementation ID in the default code.

Create a new Communication System for the SurveyMonkey Integration scenario.
System ID: {Define a System ID}
System Name: {Define a System Name}
Host Name: {Host name of the SAP Cloud Platform Worker Node (Runtime)}
User for Inbound Communication: Define a user for Inbound communication used by CPI to connect to yMKT
User for Outbound Communication: Define a user used for outbound communication. The user must exist for the CPI tenant and must have the role ESBMessaging.send assigned.
Create Open Channel Communication Arrangement and use the Communication Scenario SAP_COM_0049.
Select the Communication System created in the step before.
Add the Implementation ID defined in the custom logic and select the defined outbound communication user.
In Outbound Services deactivate the Pre-processing. The IFlow is already deployed you can check the connectivity from the Communication Arrangement.

Create an Export Definition
Go to the Export Definition App and create a new Export Definition.
Definition: {Your Export Definition Name}
Usage: Open Channel
Segmentation Profile: Use the Segmentation profile you like to use for your Export Definition. We used All Consumers for the example.
Export Profile: File Export
Select the field that need to be exported with the Open Channel

Now we need to create a new Campaign to trigger an outbound message from SAP Hybris Marketing Cloud.
Open the Segmentation Modeling App and make sure you’re using the right Segmentation Profile. Create a consumer segment you like to target with your survey.
Note: For product reviews it would make sense to have consumers reviewing the product that bought the product in the last couple of weeks. Unfortunately, the system we used for this demo had no Hybris Commerce Data integrated.

Create a new target group and do a quick review of the created target group. Now we need to release the target group to be used in the campaign execution. Make sure your target group is in released status.

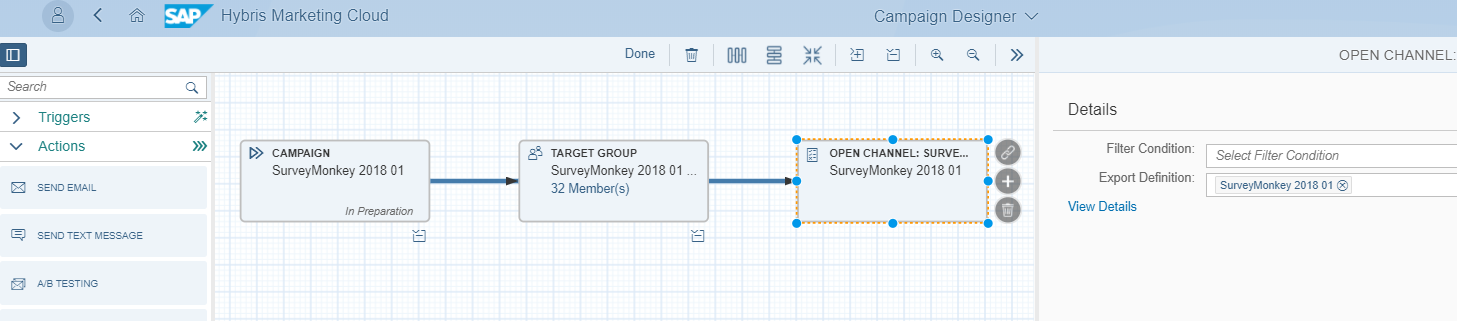
When we’re done reviewing the target group we open the Campaigns App and create a new campaign.
Create a new Blank Campaign.
Name: {your Campaign Name}
Category: Automated Campaign
Marketing Area: Global (if not configured otherwise)
Target Group: Select the Target Group we created and released.
In the Campaign Automation select a new action and select the Open Channel implementation you have created.
In the Open Channel action select the created export definition and click done.
Review your campaign settings and release the campaign.

Since we only deployed a very basic IFlow to receive the message, you just logged the message to review the fields available from SAP Hybris Marketing.
If you didn’t create an IFlow for receiving messages from SAP Hybris Marketing yet, the campaign will throw an error and you can restart the campaign when the IFlow is available.
Every target group member holds the information of the field we selected in the Export Definition.
With this message provided by yMKT we need to transform this message and form requests the SurveyMonkey APIs understand.
{

	"d": {

		"Campaign": {

			"CampaignId": "0000000498",

			"Name": "SurveyMonkey 2018 0",

			"MarketingAreaId": "CXXGLOBAL",

			"SegmentationObject": "SAP_CE_CONTACT_ENGAGEMENT",

			"ImplementationId": "ZOC_SURVEYMONKEY_OC"

		},

		"PackageId": 1,

		"ExecutionStartDateTime": "2018-02-23T22:38:51Z",

		"ExecutionRunKey": "8D88691FE6421EE8869D4910DB29995D",

		"CampaignTargetGroupMembers": [{

			"OutboundId": "E5F5000F3212AA7F40BA8C7C838B3XXXXXXXXXX",

			"PackageId": 1,

			"ExecutionRunKey": "8D88691FE6421EE8869D4910DB29995D",

			"TargetGroupMemberAttributeData": [{

				"AttributeId": "DA-SAP_CE_IC_CONTACT-SMTP_ADDR",

				"Value": "acbdef@saptrial.com",

				"EdmTypeId": "Edm.String",

				"OutboundId": "E5F5000F3212AA7F40BA8C7C838B3XXXXXXXXXX"

			},

			{

				"AttributeId": "DA-SAP_CE_IC_CONTACT-NAME_LAST",

				"Value": "def",

				"EdmTypeId": "Edm.String",

				"OutboundId": "E5F5000F3212AA7F40BA8C7C838B3XXXXXXXXXX"

			},

			{

				"AttributeId": "DA-SAP_CE_IC_CONTACT-NAME_FIRST",

				"Value": "abc",

				"EdmTypeId": "Edm.String",

				"OutboundId": "E5F5000F3212AA7F40BA8C7C838B3XXXXXXXXXX"

			},

			{

				"AttributeId": "DA-SAP_CE_IC_CONTACT-IC_ID_ORIGIN",

				"Value": "EMAIL,PHONE",

				"EdmTypeId": "Edm.String",

				"OutboundId": "E5F5000F3212AA7F40BA8C7C838B3XXXXXXXXXX"

			},

			{

				"AttributeId": "DA-SAP_CE_IC_CONTACT-IC_ID",

				"Value": "abcdef@saptrial.com,+123123",

				"EdmTypeId": "Edm.String",

				"OutboundId": "E5F5000F3212AA7F40BA8C7C838B3XXXXXXXXXX"

			}]

		},

		{

			"OutboundId": "10D5856A4F25D16A29DE1B84AE8XXXXXXXXXXXX",

			"PackageId": 1,

			"ExecutionRunKey": "8D88691FE6421EE8869D4910DB29995D",

			"TargetGroupMemberAttributeData": [{

				"AttributeId": "DA-SAP_CE_IC_CONTACT-SMTP_ADDR",

				"Value": "tomtest@saptrial.com",

				"EdmTypeId": "Edm.String",

				"OutboundId": "10D5856A4F25D16A29DE1B84AE8XXXXXXXXXXXX"

			},

			{

				"AttributeId": "DA-SAP_CE_IC_CONTACT-NAME_LAST",

				"Value": "test",

				"EdmTypeId": "Edm.String",

				"OutboundId": "10D5856A4F25D16A29DE1B84AE8XXXXXXXXXXXX"

			},

			{

				"AttributeId": "DA-SAP_CE_IC_CONTACT-NAME_FIRST",

				"Value": "tom",

				"EdmTypeId": "Edm.String",

				"OutboundId": "10D5856A4F25D16A29DE1B84AE8XXXXXXXXXXXX"

			},

			{

				"AttributeId": "DA-SAP_CE_IC_CONTACT-IC_ID_ORIGIN",

				"Value": "EMAIL,PHONE",

				"EdmTypeId": "Edm.String",

				"OutboundId": "10D5856A4F25D16A29DE1B84AE8XXXXXXXXXXXX"

			},

			{

				"AttributeId": "DA-SAP_CE_IC_CONTACT-IC_ID",

				"Value": "tomtest@saptrial.com,+123456789",

				"EdmTypeId": "Edm.String",

				"OutboundId": "10D5856A4F25D16A29DE1B84AE8XXXXXXXXXXXX"

			}]

		}]

	}

}
To create a new contact from the SurveyMonkey Contact, we need to configure a new Communication Arrangement. We are using the Odata APIs for contacts released with 1708.
Create a new Communication Arrangement in the Communication Arrangement App. The scenario ID is SAP_COM_0207.
Review the API Documentation on:
https://help.sap.com/viewer/0f9408e4921e4ba3bb4a7a1f75f837a7/1802%20500/en-US/06526bdbae42455ba69a4a...

Since we are connecting a new data source we’ll define a new Contact Origin for SurveyMonkey.
Open the Manage Your Solution App on SAP Hybris Marketing and add a new Contact Origin.
Contact Origin: SURVEYMONKEY_ID
We also add two custom fields we can use later in the segmentation.
Campaign ID
YY1_SM_CampaignID_MPS
Business Context: Marketing: Contact
Length: 10
Uis and Reports: Marketing: Contact API
Odata APIs: Marketing Data Import
OutboundID
YY1_OutboundID_MPS
Business Context: Marketing: Contact
Length: 10
Uis and Reports: Marketing: Contact API
Odata APIs: Marketing Data Import
Part 2
You want to see more articles from SAP Services? Click on the banner below.
Your SAP CX Services – Marketing Practice team.

- SAP Managed Tags:
- SAP Integration Suite,
- API Management,
- Cloud Integration,
- SAP Marketing
Labels:
8 Comments
You must be a registered user to add a comment. If you've already registered, sign in. Otherwise, register and sign in.
Labels in this area
-
Business Trends
270 -
Business Trends
9 -
chitchat
1 -
customerexperience
1 -
Event Information
256 -
Event Information
17 -
Expert Insights
30 -
Expert Insights
45 -
Life at SAP
133 -
Life at SAP
1 -
Product Updates
666 -
Product Updates
23 -
SAP HANA Service
1 -
SAPHANACloud
1 -
SAPHANAService
1 -
Technology Updates
453 -
Technology Updates
15
Related Content
- SAP Commerce Cloud Q1 ‘24 Release Highlights in CRM and CX Blogs by SAP
- SAP Commerce Cloud Q4 ‘23 Release Highlights in CRM and CX Blogs by SAP
- Search tuning in SAP Commerce Cloud in CRM and CX Blogs by SAP
- Advanced Development Best Practices for SAP Commerce Cloud in CRM and CX Blogs by SAP
- Customer Data Platform: The Core Element for Customer Information in CRM and CX Blogs by SAP
Top kudoed authors
| User | Count |
|---|---|
| 4 | |
| 2 | |
| 2 | |
| 2 | |
| 1 | |
| 1 | |
| 1 | |
| 1 | |
| 1 | |
| 1 |