
- SAP Community
- Products and Technology
- CRM and Customer Experience
- CRM and CX Blogs by SAP
- Best Practices for Data Migration into SAP Hybris ...
CRM and CX Blogs by SAP
Stay up-to-date on the latest developments and product news about intelligent customer experience and CRM technologies through blog posts from SAP experts.
Turn on suggestions
Auto-suggest helps you quickly narrow down your search results by suggesting possible matches as you type.
Showing results for
Advisor
Options
- Subscribe to RSS Feed
- Mark as New
- Mark as Read
- Bookmark
- Subscribe
- Printer Friendly Page
- Report Inappropriate Content
02-28-2018
9:37 AM
This document describes the best practices when migrating data into SAP Hybris Cloud for Customer using the migration workbench.
Create a precise project plan for all tasks regarding to the data load
Following tasks need to be performed to schedule the data load tasks:
*Plan buffers for resolution of unexpected situations
Cleanse the source data that will be loaded into C4C
Export the data from the source system(s)
Recommendation:
Note that this step may be performed prior to the Cleanse step, in which case the data is cleansed within the extracted files and not directly within the source system
Copy the data from step 3 into the migration templates provided by SAP
Use most recent migration templates if possible, old migration templates can lead to issues in rare cases
In case of extension fields, the migration template need to be enhanced by the extension fields prior to the download of the migration templates
Perform test loads of source data, a successful test load ensures a safe and smooth cutover
Adjust the Cutover Data Load plan in case missing steps are identified during dry run
Why is testing important:
Verify the loaded data in C4C test tenant
Perform final load of source data into the productive C4C
Recommendation: Create a Restore Point before loading data into the production tenant
Embedded in Activity List of Implementation Project


Certain features are performed on every save, what consumes a major part of system resources in cases of mass data load.
Verify if following features can be switched off during the data load
In order to identify issues with the loaded data early in the process, start the load with small sets of data
Load the data in the sequence described in the respective initial load document.
If objects in the sequence are created manually in C4C or loaded via file upload (e.g. Org Model, Job IDs, etc.), maintain the ID mapping for integration for these objects before replicate subsequent objects
The migration workbench imports the records in the migration template in bundles. If one of the records in the bundle is erroneous, the complete bundle is rejected. The remaining records of the bundle will be imported in a second step.
In order to avoid reprocessing of bundle, avoid errors during the import step if possible.

Execute the import for multiple files in parallel. However, file uploads and simulations should not be executed in parallel.
Simulation should be used to identify potential errors before the actual import, but it takes some time to run. Hence the recommendation is to perform the simulation for a representative subset of data and skip it for the remaining data in order to save time.
In order to skip the simulation step, select Cancel after you maintained all value conversions in the step Convert Values. In the staging area select Execute Migration > Execute Data Import Immediately.
Note: It is recommended to execute the validation and value conversion steps for each file.


In order to import multiple files in parallel select Run in Background while the import is running and start the import for the next file from the staging area by selecting Execute Migration > Execute Data Import Immediately.
Note: Number of files that can be imported in parallel depends on the complexity of the business object and data. It is recommended to test the parallel processing to find the correct factor. Usually it is 2 - 4 files in parallel.
In order to avoid errors wait until the progress bar reached approx. 10% (this can take up to 10 minutes) before you start the import of the next file.

If the cutover period is shorter than the load of the complete data would take, focus first on data that is essential for the go-live and load the remaining data afterwards.
Example: Load of historical data is usually taking the most time during migration. However historical data, like 3 years old phone calls, are usually not business critical and can be loaded after the go-live.
Setup, configuration, volume and data in the test landscape should be equal to productive landscape for meaningful tests
Therefore, manual adjustments of test tenant or even test tenant refresh might be required if test landscape deviates from productive landscape
Test with real productive data and complete volume to identify and correct issues during test phase (recommended).
Test data is often different than productive data and has less complexity.
Tests with real productive data ensures a smooth cutover load into productive system.
C4C is maintained and upgraded regularly, during which C4C is not available. Consider the planned maintenance and release schedules in your planning to avoid abortion of migration activities due to a downtime.
The migration workbench is designed to handle external IDs. While importing objects into C4C, the migration workbench maintains a value conversion (ID mapping) of the external ID and the new C4C ID of the object. For example, a customer record with the external ID CUST-100 (provided in the migration template) would get the ID 10001 in C4C (determined by the respective number range in C4C).
When importing subsequent business objects that are referring to a previously migrated business object, the migration workbench handles the ID referring to the other business object as an external ID. Based on the external ID the migration workbench will look up the internal ID in the value conversion. For example, opportunity OPP-100 is linked to customer CUST-100 in the migration template. Using the value conversion, the migration workbench will assign the imported opportunity to customer 10001.
This is valid for all business objects references in the migration templates of the migration workbench. For example, although the opportunity with external ID OPP-100 gets the C4C ID 20001, you can use external ID OPP-100 when importing activities referring to this opportunity.
There are two things to consider:
In rare cases, it is possible to cause a situation in which the migrated business object raises an error message without preventing the save of the business object.
This situation causes creation of duplicate records during the import of the object.
This situation can be caused by custom coding (PDI) and when business objects are saved in an inconsistent state.
Migration Process
1. Schedule
Create a precise project plan for all tasks regarding to the data load
Following tasks need to be performed to schedule the data load tasks:
- Define the scope that is relevant to the implementation project
- Select the objects relevant for data load
- Define mile stones and sequence for the load of each data object into a test tenant according to SAP documentation*
- Define mile stones and sequence for the load of each data object into the production tenant according SAP documentation*
*Plan buffers for resolution of unexpected situations
2. Cleanse
Cleanse the source data that will be loaded into C4C
- Deleting duplicate records
- Removing obsolete records and any associated transactions
- Check data quality and correct if required, e.g. wrong values in fields
- Validating address data is complete, enrich data if required
- Ensure the format of contact data fits to expected format from C4C, such as e-mail addresses, postal codes, phone numbers, etc.
3. Extract Source Data
Export the data from the source system(s)
- Review the format required for entering the data into the C4C migration templates to export the data in similar structure (such as format and order or columns)
- Extract the data using a report or database query into a .csv, or another flat file format
Recommendation:
- Extract the data in UTF-8 format
- Use the structure of the migration templates as a reference when extracting the legacy data from your legacy system.
Note that this step may be performed prior to the Cleanse step, in which case the data is cleansed within the extracted files and not directly within the source system
4. Populate Migration Template
Copy the data from step 3 into the migration templates provided by SAP
- Download required migration templates directly from Cloud for Customer
Use most recent migration templates if possible, old migration templates can lead to issues in rare cases
- Copy extracted data into the templates
In case of extension fields, the migration template need to be enhanced by the extension fields prior to the download of the migration templates
5. Test Load
Perform test loads of source data, a successful test load ensures a safe and smooth cutover
- Review the configuration and best practices for optimal performance of data loads into Cloud for Customer (https://archive.sap.com/documents/docs/DOC-62439)
- Create manually or import required data that is not part of the data load (e.g. Org Structure, Job IDs, etc.)
- Perform simulation of a representative subset of data to be loaded and resolve all errors coming up during simulation for all records
- Load data into C4C test tenant, in the order defined within the project plan
- Accurately map the values within the source data to Cloud for Customer using the value conversion tool (e.g. US = United States)
- Start with small sets of data and verify the replicated data – important!
- Load a small set of end-to-end data and verify by executing end-to-end scenarios with the data
- Gradually increase the set size (3, 10, 50, 100, etc.)
- Resolve errors before loading next set of data
- Apply the correction in productive landscape and data as well to avoid the error to come up during cutover into production
- Recommended: Dry run the complete production data load in the test tenant, with the same configuration as the production tenant will have during the cutover
- Measure performance and throughput and adjust cutover plan if required
Adjust the Cutover Data Load plan in case missing steps are identified during dry run
Why is testing important:
- Customer specific configuration, customization and business data can lead to unexpected situations during data load, which might require workarounds and additional effort
- System setup, sizing, customizing and business data is unique for each customer. Realistic performance and throughput expectations can only be made based on tests in customer landscape
- Custom coding in C4C can cause replication loops and performance issues
- Deletion not possible for many records in C4C. Once loaded, records will always be there in C4C
6. Verify
Verify the loaded data in C4C test tenant
- Confirm the number of loaded records is as expected
- Perform spot checks of loaded records
- Run end-to-end business scenarios within C4C test tenant using the loaded records
7. Cutover
Perform final load of source data into the productive C4C
- Review the configuration and best practices for optimal performance of data loads into C4C (https://archive.sap.com/documents/docs/DOC-62439)
- Load data into the C4C production tenant, in the order defined within the Project Schedule for Data Migration
- Start with small sets of data and verify the replicated data – important!
- Gradually increase the set size (3, 10, 50, 100, etc.) – up to max. 30000 records
- Resolve errors before loading next set of data
- Verify that all data was imported successfully
Recommendation: Create a Restore Point before loading data into the production tenant
Migration Workbench
Where to find
Embedded in Activity List of Implementation Project
- Section Integrate and Extend
- Contains documentation for each migration activity…
- And the actual migration activity
How to use
Download the migration templates in the actual migration activity
- You Can Also > Download Migration Template (XML templates recommended for general use)
Fill XML template with data in MS Excel, save as XML and Upload
- Row 7 contains additional information for each field
- Data format need to match, e.g. Date format
- IDs and code values can be mapped during migration
Select Migration Mode
- Add new records
- Records currently being imported are added to the records previously imported. Existing records are not changed. This is the default migration mode.
- Enhance already existing records
- Migration mode to enhance existing master data by adding new sheets or new entries in sheets. For example, to add new responsibilities.
- Modify already existing records
- Migration mode to modify field contents only for those fields for which there is an entry in the template. Blank field contents are ignored. For example, to populate new field extensions.
- Replace already existing records
- Migration mode to overwrite existing records completely with data from the source file that has the same ID. New records are added. Any previously imported information in fields that are blank now, is lost. You can use this, for example, to overwrite master data before Go Live.
Execute Migration Step by Step
- Step 1: Validate File
- The validation checks the consistency of the source data, e.g. value formatting. Correct inconsistent values identified by the validation.
- Step 2: Convert Values
- Review and edit Value Conversion for IDs and Codes
- Object specific setting, like settings for Number Assignment for Customer IDs
- Step 3: Simulate Import
- Import simulation of the source data checks the consistency of the source data, e.g. business logic check. Correct inconsistencies identified by the simulation.
- Step 4: Execute Import
- Uploading the data into the target system. Not imported records will be copied to a separate file automatically.
- Step 5: Confirmation
- Summary and creation of delta files for records that were not imported due to errors
Performance Best Practices
Switch off performance impacting features during data load
Certain features are performed on every save, what consumes a major part of system resources in cases of mass data load.
Verify if following features can be switched off during the data load
- Feeds
- Address Checks
- Business Task Management Notifications
- Workflow Rules (e.g. Territory Realignment on every Save)
- SDK (PDI) coding
- Outbound replication
Start with small number of records – important!
In order to identify issues with the loaded data early in the process, start the load with small sets of data
- Load a small set of end-to-end (Account, Opportunity, Quote, Order, Activities, etc.) data and verify by executing end-to-end scenarios with the data
- Start with a few records (e.g. 3) for each object and increase the number or records gradually (10, 50, 100, …) – up to max. 30000 records
- Fix identified errors for all remaining records before continue with the next set of records
Load the data in the correct sequence
Load the data in the sequence described in the respective initial load document.
If objects in the sequence are created manually in C4C or loaded via file upload (e.g. Org Model, Job IDs, etc.), maintain the ID mapping for integration for these objects before replicate subsequent objects
Avoid errors during the Import
The migration workbench imports the records in the migration template in bundles. If one of the records in the bundle is erroneous, the complete bundle is rejected. The remaining records of the bundle will be imported in a second step.
In order to avoid reprocessing of bundle, avoid errors during the import step if possible.
Adjust Workbench and Templates
- Create files of max. 30000 records and max. 100 MB file size
- For very lean records (e.g. only general sheet filled) the maximum number of records per file can be up to 50000
- Upload only one migration file at a time into the staging area
- Increase parallelization factor
- Parallelization factor defines how many parallel processes can be used at the same time
- Default parallelization factor is “4”
- If required, increase the parallelization factor (e.g. 16 shows best performance in some cases)
- Adjust the value and validate the impact for each migration object individually
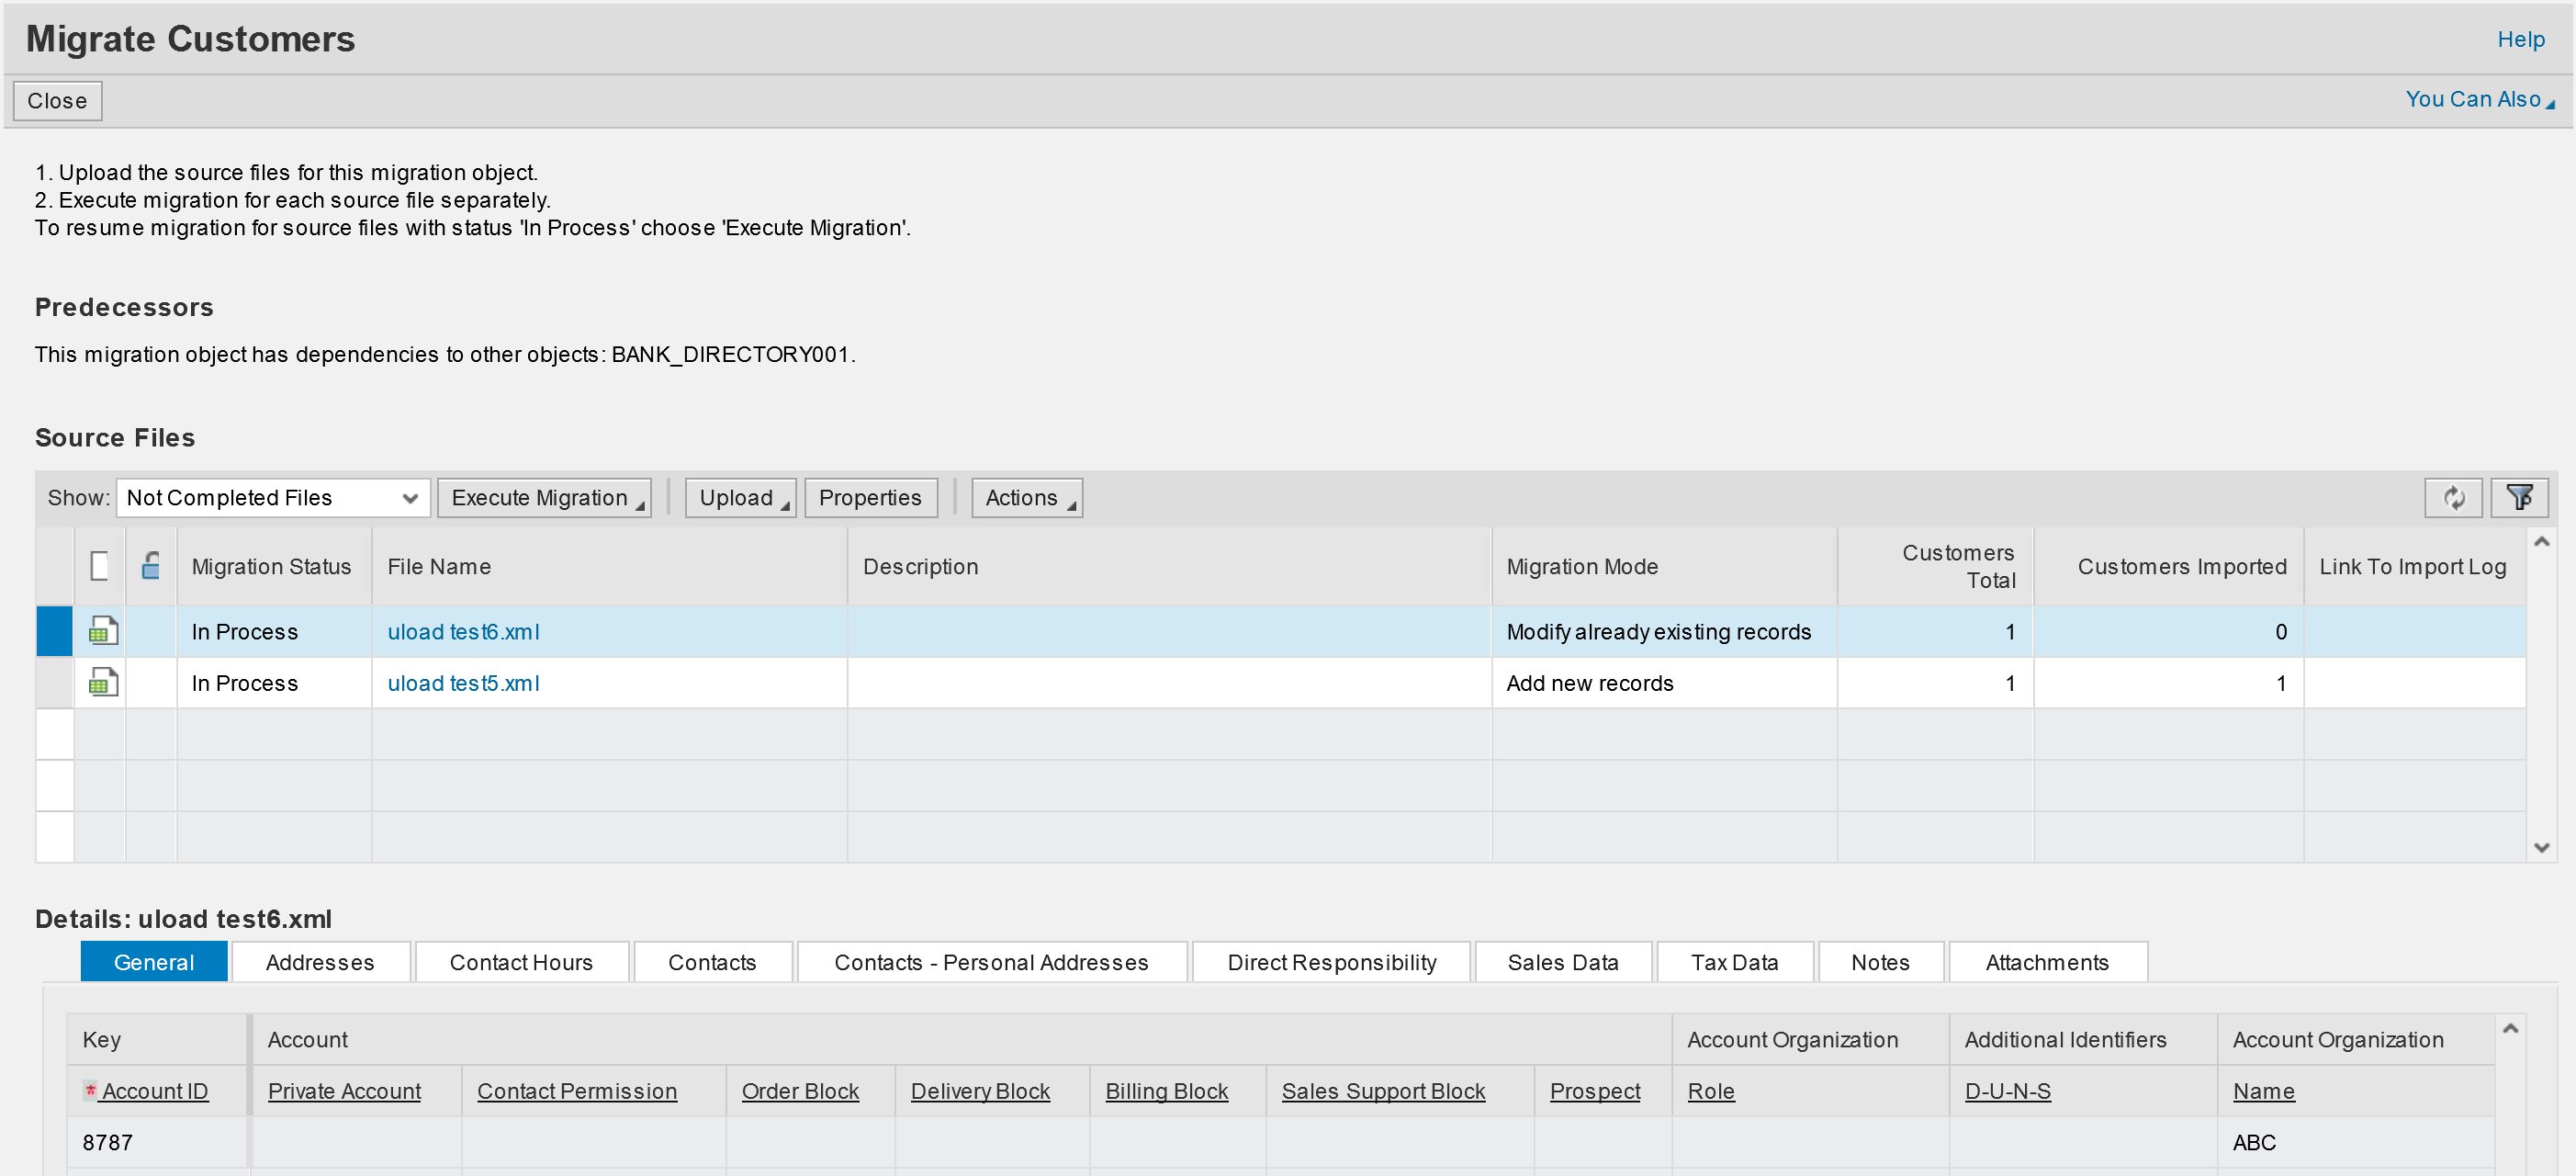
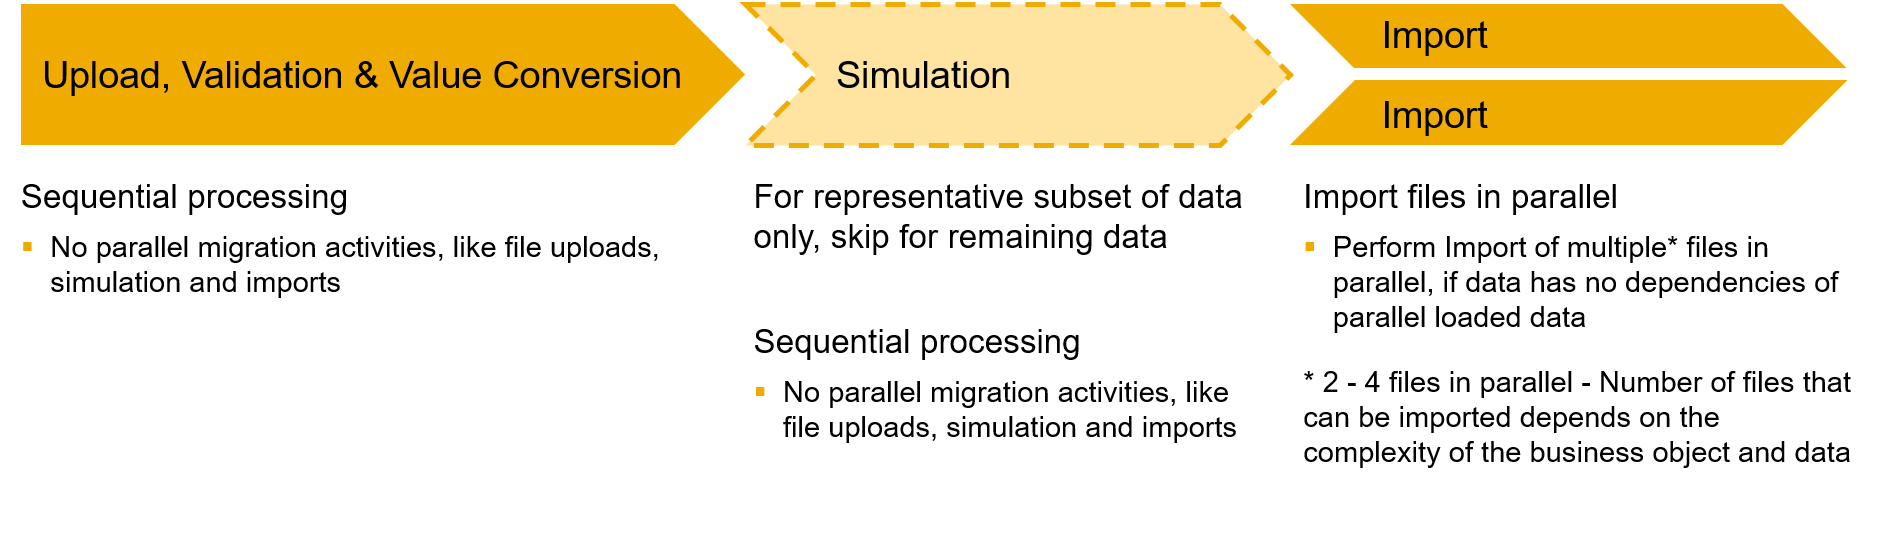
Start multiple imports in parallel/background
Execute the import for multiple files in parallel. However, file uploads and simulations should not be executed in parallel.
Simulation should be used to identify potential errors before the actual import, but it takes some time to run. Hence the recommendation is to perform the simulation for a representative subset of data and skip it for the remaining data in order to save time.
In order to skip the simulation step, select Cancel after you maintained all value conversions in the step Convert Values. In the staging area select Execute Migration > Execute Data Import Immediately.
Note: It is recommended to execute the validation and value conversion steps for each file.
In order to import multiple files in parallel select Run in Background while the import is running and start the import for the next file from the staging area by selecting Execute Migration > Execute Data Import Immediately.
Note: Number of files that can be imported in parallel depends on the complexity of the business object and data. It is recommended to test the parallel processing to find the correct factor. Usually it is 2 - 4 files in parallel.
In order to avoid errors wait until the progress bar reached approx. 10% (this can take up to 10 minutes) before you start the import of the next file.
Focus on data that is essential for Go-Live
If the cutover period is shorter than the load of the complete data would take, focus first on data that is essential for the go-live and load the remaining data afterwards.
Example: Load of historical data is usually taking the most time during migration. However historical data, like 3 years old phone calls, are usually not business critical and can be loaded after the go-live.
Test Recommendations
Test landscape should be equal with productive landscape
Setup, configuration, volume and data in the test landscape should be equal to productive landscape for meaningful tests
Therefore, manual adjustments of test tenant or even test tenant refresh might be required if test landscape deviates from productive landscape
Test with productive data and volume
Test with real productive data and complete volume to identify and correct issues during test phase (recommended).
Test data is often different than productive data and has less complexity.
Tests with real productive data ensures a smooth cutover load into productive system.
Tipps
Consider the Release and Maintenance Schedule
C4C is maintained and upgraded regularly, during which C4C is not available. Consider the planned maintenance and release schedules in your planning to avoid abortion of migration activities due to a downtime.
Use external IDs in migration templates
The migration workbench is designed to handle external IDs. While importing objects into C4C, the migration workbench maintains a value conversion (ID mapping) of the external ID and the new C4C ID of the object. For example, a customer record with the external ID CUST-100 (provided in the migration template) would get the ID 10001 in C4C (determined by the respective number range in C4C).
When importing subsequent business objects that are referring to a previously migrated business object, the migration workbench handles the ID referring to the other business object as an external ID. Based on the external ID the migration workbench will look up the internal ID in the value conversion. For example, opportunity OPP-100 is linked to customer CUST-100 in the migration template. Using the value conversion, the migration workbench will assign the imported opportunity to customer 10001.
This is valid for all business objects references in the migration templates of the migration workbench. For example, although the opportunity with external ID OPP-100 gets the C4C ID 20001, you can use external ID OPP-100 when importing activities referring to this opportunity.
There are two things to consider:
- The IDs provided in the migration template a handled as external IDs first. Only in cases where no matching external ID can be found in the value conversion, the migration workbench would search for an instance with an internal ID matching the ID provided in the migration template. This means that it is possible to use C4C ID as well to refer to other objects. However, in this case the external IDs and the C4C IDs must not overlap to avoid wrong assignments.
- The value conversion is internal to the migration workbench and is not exchanged with other tools or scenarios like data workbench or the integration scenarios. However, you can download the value conversion from the migration workbench if you require the mapping of the external and internal IDs. Automatic maintenance of the ID mapping for integration is possible in some cases, this will be covered in another blog.
Avoid business object error messages that do not prevent the save
In rare cases, it is possible to cause a situation in which the migrated business object raises an error message without preventing the save of the business object.
This situation causes creation of duplicate records during the import of the object.
This situation can be caused by custom coding (PDI) and when business objects are saved in an inconsistent state.
- SAP Managed Tags:
- SAP Cloud for Customer add-ins
7 Comments
You must be a registered user to add a comment. If you've already registered, sign in. Otherwise, register and sign in.
Labels in this area
-
Business Trends
270 -
Business Trends
11 -
chitchat
1 -
customerexperience
1 -
Event Information
256 -
Event Information
18 -
Expert Insights
30 -
Expert Insights
51 -
Life at SAP
133 -
Life at SAP
1 -
Product Updates
666 -
Product Updates
24 -
SAP HANA Service
1 -
SAPHANACloud
1 -
SAPHANAService
1 -
Technology Updates
453 -
Technology Updates
15
Related Content
- SAP Commerce 2205 - rush link generates wrong symbolic link for custom smartedit extension in CRM and CX Questions
- Best practices for S/4HANA to Employee central Implementation, Data migration and Integrations in CRM and CX Questions
- Migrate from multi tenant architecture to CCV2 in CRM and CX Questions
- Error after migration 2211 on methods that returns a String from OCC in CRM and CX Questions
- Introduction to Permission Marketing in CRM and CX Blogs by SAP
Top kudoed authors
| User | Count |
|---|---|
| 4 | |
| 2 | |
| 2 | |
| 2 | |
| 1 | |
| 1 | |
| 1 | |
| 1 | |
| 1 | |
| 1 |