
- SAP Community
- Products and Technology
- Technology
- Technology Blogs by SAP
- ADFS with SAP Business Intelligence Platform
Technology Blogs by SAP
Learn how to extend and personalize SAP applications. Follow the SAP technology blog for insights into SAP BTP, ABAP, SAP Analytics Cloud, SAP HANA, and more.
Turn on suggestions
Auto-suggest helps you quickly narrow down your search results by suggesting possible matches as you type.
Showing results for
Advisor
Options
- Subscribe to RSS Feed
- Mark as New
- Mark as Read
- Bookmark
- Subscribe
- Printer Friendly Page
- Report Inappropriate Content
02-22-2018
1:44 PM
The sole purpose of this blog is to easily integrate an existing BO deployment with ADFS as an identity provider and to enable customers to use a service Provider initiated request from Business Objects to an identity provider like ADFS with single sign on through trusted authentication.
Prerequisites : Business Objects Deployment needs to be 4.2 SP05 and above and ADFS needs to be version 2.0 and above
What is Idp (Claims Provider CP) ?
An Identity Provider (Idp) is sometimes called an Identity Service Provider.An identity provider is a trusted provider that lets you use single sign on (SSO) to access other websites, authenticates users on the internet by means of security tokens, one of which is SAML.
The Microsoft terminology for Identity provider is Claims Provider.
What is Service Provider (Relying Party RP) ?
A Service Provider (SP) is an entity that provides Web Services
A Service Provider relies on a trusted Identity Provider (Idp or Claims Provider) or Security Token Service (STS) for authentication and authorization.The Microsoft Terminology for Service provider is Relying Party.
What is ADFS ?
Active Directory Federation Services (AD FS) is a feature from Windows Server 2003 R2 operating systems and higher that supports Web single-sign-on (SSO) technologies to authenticate a user to multiple web applications, ADFS integrates with Active Directory Domain Services, using it as an identity provider.
Features in ADFS
-Web single sign on (SSO)
-Web Services interoperability
-Extensible architecture
SAP BI Configuration
Unlike other Web Application servers WebSphere, NetWeaver, Tomcat does not come with inbuilt Service Provider, we have to implement our own Service Provider for Tomcat.
We will be using Spring SAML Security Assertion Service Provider for Tomcat.
Adding Tomcat Service Provider Jars
Configure Tomcat for HTTPS SSL
Before Tomcat can accept secure connections, you need to configure an SSL Connector.
a. In a text editor, open the Tomcat server.xml file.
The server.xml file is usually located in the conf folder of your Tomcat's home directory.
b. Locate the connector that you want to use the new keystore to secure.
Usually, a connector with port 443 or 8443 is used, as shown in step 4.
c. If necessary, uncomment the connector.
To uncomment a connector, remove the comment tags (<!-- and -->).
d.Specify the correct keystore filename and password in your connector configuration.
4. When you are done, your connector should look something like this:
<Connector port="8443" maxHttpHeaderSize="8192" maxThreads="150" minSpareThreads="25" maxSpareThreads="75" enableLookups="false" disableUploadTimeout="true" acceptCount="100" scheme="https" secure="true" SSLEnabled="true" clientAuth="false" sslProtocol="TLS" keyAlias="server" keystoreFile="/home/user_name/your_site_name.jks" keystorePass="your_keystore_password" />
Enabling SAML for required Web Applications Properties
SAML authentication has to be enabled for the different web applications. This can be done by uncommenting the respective endpoint in securityContext.xml and also by editing saml.enabled in customproperties files of the respective applications.
In this we will be enabling SAML for Old BI Launchpad BOE/BI
In the securityContext.xml under<BOE Install Dir>\tomcat\webapps\BOE\WEB-INF , there is a section for the SAML entry endpoints.
By default, only the SAML entry endpoint for Classic BI Launchpad is enabled.

2. SAML Authentication can also be enabled for other applications Opendocument, Fiori Launchpad by uncommenting <security:intercept line of that particular application.
3. Also in case SAML authentication has to be enabled only for one application ex : BI Launchpad alone, the <security:intercept-url pattern="/BI" access="IS_AUTHENTICATED_FULLY"/> has to been uncommented, comment the entry points for Opendocument, Fiori Launchpad.
Changes in BILaunchpad.properties
Create BILaunchpad.properties file in the <BOE Install Dir> \SAP BusinessObjects\tomcat\webapps\BOE\WEB-INF\config\custom assuming custom properties file does not exist. If it is already does, only need to add the property saml.enabled=true
Configurations in the deployment descriptor – web.xml
Enabling SAML in the SP configuration
Activate the SAML context configuration


A new filter has been introduced for SAML, the relevant section in the web.xml will be kept commented by default.
Enabling filters in web.xml of BOE webapps by uncommenting the SAML sections.
Web.xml file path - <BOE Install Dir>\tomcat\webapps\BOE\WEB-INF\web.xml
Note: SAML authentication enablement is done the web application level, that is in BOE itself and not in individual webpath bundles.
Update IDP metadata in SP
The IDP metadata has to be downloaded from the respective IDP. Run the below URL in browser and download the IDP metadata file.
Rename the file to idp-meta-downloaded.xml
Copy the ADFS IDP idp-meta-downloaded.xml file to
<BOE Install Dir>\tomcat\webapps\BOE\WEB-INF
In Case if BOE is deployed on a Linux machine (non -windows) the path separators in file path to the idp metadata under the bean FilesystemMetadataProvider should be changed in securityContext.xml under <BOE Install Dir>\tomcat\webapps\BOE\WEB-INF.
i.e <value type="java.io.File">/WEB-INF/idp-meta-downloaded.xml</value> has to be changed to <value type="java.io.File">\WEB-INF\idp-meta-downloaded.xml</value> for Linux
For windows, it looks like

SAML keystore generation
SAML exchanges involve usage of cryptography for signing and encryption of data.
You can generate your own self-signed key using the Java utility keytool by following steps
Navigate to <BOE Install Dir>\SAP BusinessObjects Enterprise XI 4.0\win64_x64\sapjvm\bin and run the following command to generate certificate.
keytool -genkeypair -alias <aliasname> -keypass <Password> -keystore <sampleKeystore.jks> -keyalg RSA -validity <numberofdays>
aliasname - certificate alias name, Password -password of your choice, numberofdays - number of the days during which the self-signed certificate is valid, sampletestKeystore.jks is name of the keystore file.
Example - keytool -genkeypair -alias Testkey -keypass Password1 -keystore sampletestKeystore.jks -keyalg RSA -validity 735
The generated keystore file has to be copied from bin folder and pasted under <BOE Install Dir>\tomcat\webapps\BOE\WEB-INF and the references of the new aliasname, Password, keyStore file name has to be changed in securityContext.xml file

The first argument (sampleKeystore.jks) points to the used key store file,
second line contains password (Password1) for the keystore which you enter in command prompt after entering the keystore generation command,
third line then maps with passwords for private keys with alias-password value pairs(Password1). Fourth line Alias of the default certificate is the last parameter.(Testkey).
Note: SP metadata has to be generated everytime this keystore file is changed.
After making all the above changes, Restart tomcat.
Generate and upload SP metadata
NOTE: A pre-generated service Provider (SP) metadata file will be shipped by default. User may edit this and upload the same. The IP/hostname should be one property that has to be changed.The file will be available under
<BOE Install Dir>\tomcat\webapps\biprws\WEB-INF spring_saml_metadata.xml
Type the URL https://BOEHOST:8443/BOE/saml/metadata.
This will automatically download a xml file spring_saml_metadata.xml
ADFS Configuration
Export the ADFS Certificates
Download the certificates from ADFS server and transfer them to the Service Provider server.
There should be three certificates – one for service communications, one for token-decrypting, and one for token signing.
3. Right-click the first certificate, select View Certificate, go to the details tab, and then click the Copy the File button.

4.Specify the export file name, and then click Next

5.Click Finish to finish the export.

6.Repeat the previous steps for the other two certificates.

Import the ADFS certificates into the SP SAML keystore
Import the three certificates to the SP SAML key store located in <BOE Install Dir>\tomcat\webapps\BOE\WEB-INF\samltestKeystore.jks.
Run the following command for each of the three certificates.
keytool -v -importcert -file <certificate filename> -keystore samlKeystore.jks -alias <certificate alias>
Example
keytool -v -importcert -file ADFS1.cer -keystore samlKeystore.jks -alias ADFS1
keytool -v -importcert -file ADFS2.cer -keystore samlKeystore.jks -alias ADFS2
keytool -v -importcert -file ADFS3.cer -keystore samlKeystore.jks -alias ADFS3
Import the service provider metadata file in ADFS
Add Relying Party Trust – import the Service Provider metadata file in ADFS


3. Select I do not want to configure multi-factor authentication settings for this relying party trust at this time.

4. Issuance Authorization Rules, select Permit all users to access this relying party


SAP Business Intelligence from AD login to Name ID


This is a transformation example, from Login name in active directory to Name ID that can be used in SAP Business Intelligence
Configure Trusted Authentication for Tomcat with Web session
sso.enabled=true
trusted.auth.shared.secret=MySecret
trusted.auth.user.param=MyUser
trusted.auth.user.retrieval=WEB_SESSION
<INSTALLDIR>\SAP BusinessObjects Enterprise XI 4.0\win64_x64\
<INSTALLDIR>\SAP BusinessObjects Enterprise XI 4.0\win32_x86\
Create the IDP user in BOE
The IDP user has to be created in BOE or imported through some SDK script or export using CSV option in CMC.
The SAML based authentication relies on TrustedAuth from the web-server to the CMS. For this, the IDP users will have to be created in BOE as Enterprise users.
Import the bulk users into BIPlatform:
https://blogs.sap.com/2013/05/16/bi-40-sp6-how-to-import-users-in-bulk-from-central-management-conso...
Locate the custom.jsp file inside the web folder at C:\Program Files (x86)\SAP BusinessObjects\tomcat\webapps\BOE\WEB-INF\eclipse\plugins\webpath.InfoView\web\custom.jsp
Make the following changes to the custom.jsp file in the location mentioned above
<\!DOCTYPE HTML PUBLIC "-//W3C//DTD HTML 4.01 Transitional//EN" "http://www.w3.org/TR/html4/loose.dtd">
<%@ page language="java" contentType="text/html;charset=utf-8" %>
<% //custom Java code

%>
Restart Tomcat.
Verification
SAML is configured for BILaunchpad endpoint
Hit the URL https://BOEHOST:8443/BOE/BI
it redirects to IDP authentication, enter your domain users details

If the configuration is correct and mapping is successful and trusted authentication is configured correctly, you will be logged in into BOE/BI

This completes the configuration.
Users will be able to use SAML to login into SAP Business Intelligence.
Blog by:
Dhrubajyoti Paul
Ashraf Mohammed
Prerequisites : Business Objects Deployment needs to be 4.2 SP05 and above and ADFS needs to be version 2.0 and above
What is Idp (Claims Provider CP) ?
An Identity Provider (Idp) is sometimes called an Identity Service Provider.An identity provider is a trusted provider that lets you use single sign on (SSO) to access other websites, authenticates users on the internet by means of security tokens, one of which is SAML.
The Microsoft terminology for Identity provider is Claims Provider.
What is Service Provider (Relying Party RP) ?
A Service Provider (SP) is an entity that provides Web Services
A Service Provider relies on a trusted Identity Provider (Idp or Claims Provider) or Security Token Service (STS) for authentication and authorization.The Microsoft Terminology for Service provider is Relying Party.
What is ADFS ?
Active Directory Federation Services (AD FS) is a feature from Windows Server 2003 R2 operating systems and higher that supports Web single-sign-on (SSO) technologies to authenticate a user to multiple web applications, ADFS integrates with Active Directory Domain Services, using it as an identity provider.
Features in ADFS
-Web single sign on (SSO)
-Web Services interoperability
-Extensible architecture
SAP BI Configuration
Unlike other Web Application servers WebSphere, NetWeaver, Tomcat does not come with inbuilt Service Provider, we have to implement our own Service Provider for Tomcat.
We will be using Spring SAML Security Assertion Service Provider for Tomcat.
Adding Tomcat Service Provider Jars
- The Spring SAML Service Provider Jars are available inside <BOE Install Dir> \SAP BusinessObjects Enterprise XI 4.0\SAMLJARS,
- Copy these jars to <BOE Install Dir>\tomcat\webapps\BOE\WEB-INF\lib
- Stop Tomcat, delete tomcat work directory from <BOE Install Dir>\tomcat
- Start Tomcat
Configure Tomcat for HTTPS SSL
- Create a certificate keystore by executing the following command
keytool -genkey -alias <create_AliasName> -keyalg RSA -keystore <path_and_create_KeystoreFilename> -keysize 2048 - This command will prompt for the attributes, enter all the attributes for the certificate.
- Configuring your SSL Connector
Before Tomcat can accept secure connections, you need to configure an SSL Connector.
a. In a text editor, open the Tomcat server.xml file.
The server.xml file is usually located in the conf folder of your Tomcat's home directory.
b. Locate the connector that you want to use the new keystore to secure.
Usually, a connector with port 443 or 8443 is used, as shown in step 4.
c. If necessary, uncomment the connector.
To uncomment a connector, remove the comment tags (<!-- and -->).
d.Specify the correct keystore filename and password in your connector configuration.
4. When you are done, your connector should look something like this:
<Connector port="8443" maxHttpHeaderSize="8192" maxThreads="150" minSpareThreads="25" maxSpareThreads="75" enableLookups="false" disableUploadTimeout="true" acceptCount="100" scheme="https" secure="true" SSLEnabled="true" clientAuth="false" sslProtocol="TLS" keyAlias="server" keystoreFile="/home/user_name/your_site_name.jks" keystorePass="your_keystore_password" />
Enabling SAML for required Web Applications Properties
SAML authentication has to be enabled for the different web applications. This can be done by uncommenting the respective endpoint in securityContext.xml and also by editing saml.enabled in customproperties files of the respective applications.
In this we will be enabling SAML for Old BI Launchpad BOE/BI
- Changes in securityContext.xml file
In the securityContext.xml under<BOE Install Dir>\tomcat\webapps\BOE\WEB-INF , there is a section for the SAML entry endpoints.
By default, only the SAML entry endpoint for Classic BI Launchpad is enabled.
2. SAML Authentication can also be enabled for other applications Opendocument, Fiori Launchpad by uncommenting <security:intercept line of that particular application.
3. Also in case SAML authentication has to be enabled only for one application ex : BI Launchpad alone, the <security:intercept-url pattern="/BI" access="IS_AUTHENTICATED_FULLY"/> has to been uncommented, comment the entry points for Opendocument, Fiori Launchpad.
Changes in BILaunchpad.properties
Create BILaunchpad.properties file in the <BOE Install Dir> \SAP BusinessObjects\tomcat\webapps\BOE\WEB-INF\config\custom assuming custom properties file does not exist. If it is already does, only need to add the property saml.enabled=true
Configurations in the deployment descriptor – web.xml
Enabling SAML in the SP configuration
Activate the SAML context configuration
- Open the <BOE Install Dir>\tomcat\webapps\BOE\WEB-INF\web.xml file in a text editor.
- Remove the lines (<!—and -->) that comment out the contents of the START SAML / END SAML comments wherever you find in the web.xml file. Below snapshots show the uncommented part
A new filter has been introduced for SAML, the relevant section in the web.xml will be kept commented by default.
Enabling filters in web.xml of BOE webapps by uncommenting the SAML sections.
Web.xml file path - <BOE Install Dir>\tomcat\webapps\BOE\WEB-INF\web.xml
Note: SAML authentication enablement is done the web application level, that is in BOE itself and not in individual webpath bundles.
Update IDP metadata in SP
The IDP metadata has to be downloaded from the respective IDP. Run the below URL in browser and download the IDP metadata file.
Rename the file to idp-meta-downloaded.xml
Copy the ADFS IDP idp-meta-downloaded.xml file to
<BOE Install Dir>\tomcat\webapps\BOE\WEB-INF
In Case if BOE is deployed on a Linux machine (non -windows) the path separators in file path to the idp metadata under the bean FilesystemMetadataProvider should be changed in securityContext.xml under <BOE Install Dir>\tomcat\webapps\BOE\WEB-INF.
i.e <value type="java.io.File">/WEB-INF/idp-meta-downloaded.xml</value> has to be changed to <value type="java.io.File">\WEB-INF\idp-meta-downloaded.xml</value> for Linux
For windows, it looks like
SAML keystore generation
SAML exchanges involve usage of cryptography for signing and encryption of data.
You can generate your own self-signed key using the Java utility keytool by following steps
Navigate to <BOE Install Dir>\SAP BusinessObjects Enterprise XI 4.0\win64_x64\sapjvm\bin and run the following command to generate certificate.
keytool -genkeypair -alias <aliasname> -keypass <Password> -keystore <sampleKeystore.jks> -keyalg RSA -validity <numberofdays>
aliasname - certificate alias name, Password -password of your choice, numberofdays - number of the days during which the self-signed certificate is valid, sampletestKeystore.jks is name of the keystore file.
Example - keytool -genkeypair -alias Testkey -keypass Password1 -keystore sampletestKeystore.jks -keyalg RSA -validity 735
The generated keystore file has to be copied from bin folder and pasted under <BOE Install Dir>\tomcat\webapps\BOE\WEB-INF and the references of the new aliasname, Password, keyStore file name has to be changed in securityContext.xml file
The first argument (sampleKeystore.jks) points to the used key store file,
second line contains password (Password1) for the keystore which you enter in command prompt after entering the keystore generation command,
third line then maps with passwords for private keys with alias-password value pairs(Password1). Fourth line Alias of the default certificate is the last parameter.(Testkey).
Note: SP metadata has to be generated everytime this keystore file is changed.
After making all the above changes, Restart tomcat.
Generate and upload SP metadata
NOTE: A pre-generated service Provider (SP) metadata file will be shipped by default. User may edit this and upload the same. The IP/hostname should be one property that has to be changed.The file will be available under
<BOE Install Dir>\tomcat\webapps\biprws\WEB-INF spring_saml_metadata.xml
Type the URL https://BOEHOST:8443/BOE/saml/metadata.
This will automatically download a xml file spring_saml_metadata.xml
ADFS Configuration
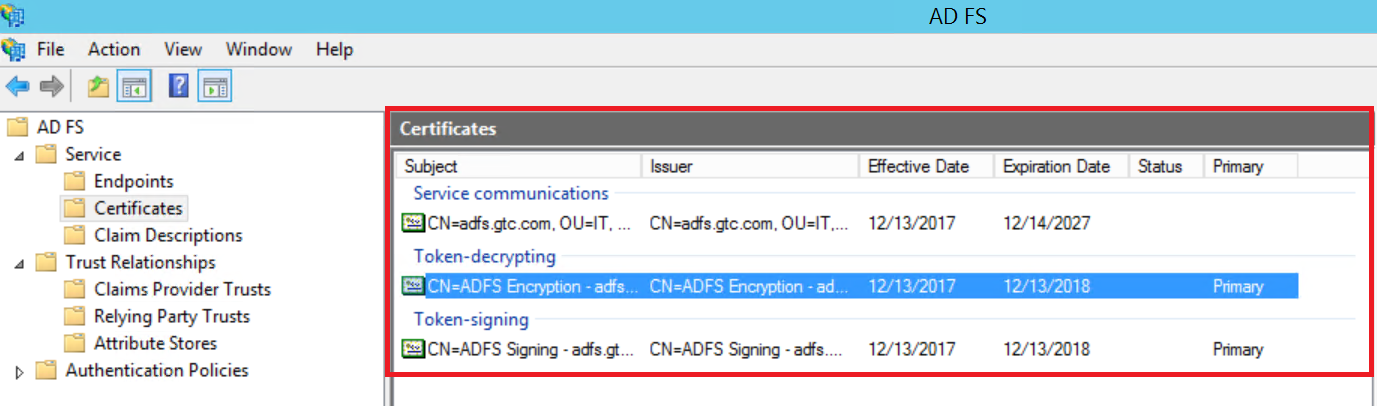
Export the ADFS Certificates
Download the certificates from ADFS server and transfer them to the Service Provider server.
- Login to the ADFS server.
- Find the certificates on the “ADFS Management”
There should be three certificates – one for service communications, one for token-decrypting, and one for token signing.
3. Right-click the first certificate, select View Certificate, go to the details tab, and then click the Copy the File button.
4.Specify the export file name, and then click Next
5.Click Finish to finish the export.
6.Repeat the previous steps for the other two certificates.
Import the ADFS certificates into the SP SAML keystore
Import the three certificates to the SP SAML key store located in <BOE Install Dir>\tomcat\webapps\BOE\WEB-INF\samltestKeystore.jks.
Run the following command for each of the three certificates.
keytool -v -importcert -file <certificate filename> -keystore samlKeystore.jks -alias <certificate alias>
Example
keytool -v -importcert -file ADFS1.cer -keystore samlKeystore.jks -alias ADFS1
keytool -v -importcert -file ADFS2.cer -keystore samlKeystore.jks -alias ADFS2
keytool -v -importcert -file ADFS3.cer -keystore samlKeystore.jks -alias ADFS3
Import the service provider metadata file in ADFS
Add Relying Party Trust – import the Service Provider metadata file in ADFS
- After importing file, click on next
- Specify Display name and click on next
3. Select I do not want to configure multi-factor authentication settings for this relying party trust at this time.
4. Issuance Authorization Rules, select Permit all users to access this relying party
- Click on next and finish
- Add Claim Rule for SAP Analytics Cloud.
Select Send LDAP Attribute as Claims and click on next
- Enter Claim Rule name
SAP Business Intelligence from AD login to Name ID
- Select attribute store – Active Directory and mapping of LDAP attributes
This is a transformation example, from Login name in active directory to Name ID that can be used in SAP Business Intelligence
Configure Trusted Authentication for Tomcat with Web session
- Add the global.properties file under <BOE Install Dir>\tomcat\webapps\BOE\WEB-INF\config\custom and make the below changes
sso.enabled=true
trusted.auth.shared.secret=MySecret
trusted.auth.user.param=MyUser
trusted.auth.user.retrieval=WEB_SESSION
- Goto CMC --> Authentication --> Enterprise
- Enable Trusted Auhentication
- Set validity and download the shared secret key TrustedPrincipal.conf
- Click Save, and save the TrustedPrincipal.conf file to the following directories:
<INSTALLDIR>\SAP BusinessObjects Enterprise XI 4.0\win64_x64\
<INSTALLDIR>\SAP BusinessObjects Enterprise XI 4.0\win32_x86\
Create the IDP user in BOE
The IDP user has to be created in BOE or imported through some SDK script or export using CSV option in CMC.
The SAML based authentication relies on TrustedAuth from the web-server to the CMS. For this, the IDP users will have to be created in BOE as Enterprise users.
Import the bulk users into BIPlatform:
https://blogs.sap.com/2013/05/16/bi-40-sp6-how-to-import-users-in-bulk-from-central-management-conso...
Locate the custom.jsp file inside the web folder at C:\Program Files (x86)\SAP BusinessObjects\tomcat\webapps\BOE\WEB-INF\eclipse\plugins\webpath.InfoView\web\custom.jsp
Make the following changes to the custom.jsp file in the location mentioned above
<\!DOCTYPE HTML PUBLIC "-//W3C//DTD HTML 4.01 Transitional//EN" "http://www.w3.org/TR/html4/loose.dtd">
<%@ page language="java" contentType="text/html;charset=utf-8" %>
<% //custom Java code
%>
Restart Tomcat.
Verification
SAML is configured for BILaunchpad endpoint
Hit the URL https://BOEHOST:8443/BOE/BI
it redirects to IDP authentication, enter your domain users details
If the configuration is correct and mapping is successful and trusted authentication is configured correctly, you will be logged in into BOE/BI
This completes the configuration.
Users will be able to use SAML to login into SAP Business Intelligence.
Blog by:
Dhrubajyoti Paul
Ashraf Mohammed
35 Comments
You must be a registered user to add a comment. If you've already registered, sign in. Otherwise, register and sign in.
Labels in this area
-
ABAP CDS Views - CDC (Change Data Capture)
2 -
AI
1 -
Analyze Workload Data
1 -
BTP
1 -
Business and IT Integration
2 -
Business application stu
1 -
Business Technology Platform
1 -
Business Trends
1,661 -
Business Trends
88 -
CAP
1 -
cf
1 -
Cloud Foundry
1 -
Confluent
1 -
Customer COE Basics and Fundamentals
1 -
Customer COE Latest and Greatest
3 -
Customer Data Browser app
1 -
Data Analysis Tool
1 -
data migration
1 -
data transfer
1 -
Datasphere
2 -
Event Information
1,400 -
Event Information
65 -
Expert
1 -
Expert Insights
178 -
Expert Insights
283 -
General
1 -
Google cloud
1 -
Google Next'24
1 -
Kafka
1 -
Life at SAP
784 -
Life at SAP
11 -
Migrate your Data App
1 -
MTA
1 -
Network Performance Analysis
1 -
NodeJS
1 -
PDF
1 -
POC
1 -
Product Updates
4,577 -
Product Updates
330 -
Replication Flow
1 -
RisewithSAP
1 -
SAP BTP
1 -
SAP BTP Cloud Foundry
1 -
SAP Cloud ALM
1 -
SAP Cloud Application Programming Model
1 -
SAP Datasphere
2 -
SAP S4HANA Cloud
1 -
SAP S4HANA Migration Cockpit
1 -
Technology Updates
6,886 -
Technology Updates
409 -
Workload Fluctuations
1
Related Content
- ABAP Cloud Developer Trial 2022 Available Now in Technology Blogs by SAP
- Hack2Build on Business AI – Highlighted Use Cases in Technology Blogs by SAP
- SAP Partners unleash Business AI potential at global Hack2Build in Technology Blogs by SAP
- It’s Official - SAP BTP is Again a Leader in G2’s Reports in Technology Blogs by SAP
- New Machine Learning features in SAP HANA Cloud in Technology Blogs by SAP
Top kudoed authors
| User | Count |
|---|---|
| 14 | |
| 12 | |
| 10 | |
| 10 | |
| 9 | |
| 7 | |
| 6 | |
| 5 | |
| 5 | |
| 5 |