
- SAP Community
- Products and Technology
- Technology
- Technology Blogs by SAP
- Boost your Cloud Foundry NodeJS Edit-Build-Test Sp...
Technology Blogs by SAP
Learn how to extend and personalize SAP applications. Follow the SAP technology blog for insights into SAP BTP, ABAP, SAP Analytics Cloud, SAP HANA, and more.
Turn on suggestions
Auto-suggest helps you quickly narrow down your search results by suggesting possible matches as you type.
Showing results for
Product and Topic Expert
Options
- Subscribe to RSS Feed
- Mark as New
- Mark as Read
- Bookmark
- Subscribe
- Printer Friendly Page
- Report Inappropriate Content
02-20-2018
4:54 AM
So you've taken the dive into micro-services enterprise development, you've joined the church of the twelve-factor app and now you've got your SAP Cloud Foundry Cloud Platform account and are ready to burn away the cloud. You're on the right path by following all the best practices and are using the multi-target application architecture to coordinate it all and have divided your monolithic enterprise app into a reasonable number of application modules. You crank up your trusty WebIDE and build and wait and deploy and wait and test and see an issue and start all over again.
If you've got your application deployed into Cloud Foundry and you're focusing your efforts on a couple of NodeJS modules, there is a much faster way. Use the cf ssh command to edit the already deployed files in CloudFoundry in order to quickly figure out what changes need to be made and then incorporate them back into your project.
Currently the WebIDE will only support fully deployment of your whole application. Remember that each application module is in it's own right a web server plus other logic for doing it's work. So if you have four application modules and an app-router, you have to pull the dependencies for 5 web servers, build the mtar, deploy and test. If you're only working on one module, that's a lot of building and copying and running for nothing. Now you can take matters into your own hands and clone (you are using Git right) your project into a local directory and use cf push to deploy one module at a time but then you have to manage the attributes of how it gets pushed and any binding that may be required for the module to access the services it needs.
When working with NodeJS modules in development (not production) the trick is to launch your NodeJS module with a module called nodemon instead of node as you normally would. Nodemon watches for file changes an reloads the server when it sees that something has changed.
I'm going to demonstrate how to set all of this up using the HANA WebIDE found in HANA Express edition. The basic nuts and bolts can also be performed on your local workstation with the CF CLI and MTA plugin.
The core of the technique I'm using here can be found at this cloud foundry docs page:
https://docs.cloudfoundry.org/devguide/deploy-apps/ssh-apps.html#ssh-command
I'm using a HANA Express (HXE) system that is hosted on AWS, but you should be able to do the same thing with HXE installed in a VM on your local workstation. I've can run it on my 16GB Macbook Pro under VMWare Fusion with 12GB, but it pretty much uses every bit of 12GB so this is for utilizing the tools and not doing large data-set testing.
I'm going to use the HXE administrative user in these examples. You can use a different user, but since the files that drive the WebIDE are already owned by the hxeadm user, it makes for a simpler setup.
Make sure you can ssh into your HXE server and become the hxeadm user.
Return to the root user and double check that you have the cf cli tool available and that it's the current version. Here are the links to the installer and the MTA plugin that's needed.
CF CLI CloudFoundry CLI
CF CLI MTA Plugin CloudFoundry CLI Plugin Page
If you need help installing the plugin, look here:
https://docs.cloudfoundry.org/cf-cli/use-cli-plugins.html#plugin-install
Note that the plugin is installed for each user so if you change users, you'll need to install the plugin again for that user.
Double check that your cf cli version is what you expect and you're not picking up an older version that might be lurking in your path.
Also check that the plugins got installed correctly.

We need to make sure the hxeadm user is prepared for ssh connections.
The WebIDE creates a directory on the server for each user that contains their projects in their workspace. Since the name of the directory is system generated, it's best to discover it. Log into the WebIDE web interface and create a sample MTA project with a unique project name that will stand out. In this case we'll use abcxyz.

Since this is a HANA Express installation, we know that the xs files are located in
Now let's look for that mta.yaml file starting at this directory.

We see the long directory name with abcxyz in it. This is our workspace directory. Make a note of it.
Change into it so that we can grab it's full path. You'll have to modify the specifics for your situation.

Copy that full path into your clipboard. Then change back to the home directory of the hxeadm user.
Now to make things easier, create a symbolic link to your workspace in the hxeadm home directory.
You will of course need to change the system generated values with the ones on your system.
Change into it and look at the files. Should be the same as what you see in the WebIDE interface.
Go ahead and delete this abcxyz project. It's served it's purpose for us.
Now for grins, go back to the WebIDE web interface in your browser. Notice that it seems like the project is still there. It's not. It's just that we're modifying the underlying files directly on the server. To put things back in sync with the WebIDE, perform a refresh from the Workspace level.

It should disappear.
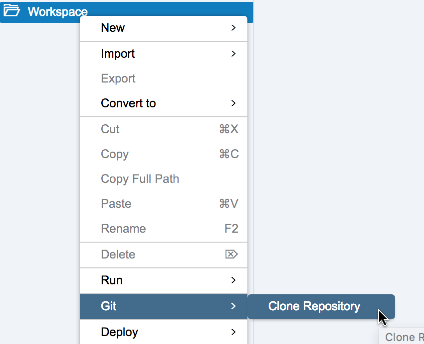
From here we're going to work with an existing simple NodeJS application called scp2cf. Clone the following project into your server.

This is a basic multi-target application with a single NodeJS module called monme and a supporting script. There is also a tmp folder with will be used to hold some temporary files in a bit.
The only difference between this sample NodeJS application and the default one is that I've included a dependency for a module called nodemon and I've replace node in the start command with nodemon. This allows the server.js (or any other file that your server relies on) to be modified and automatically reloaded when a change is detected.

Build your project by right-clicking on the project level and selecting Build. This creates a .mtar file in the

Deploy your .mtar to Cloud Foundry by right-clicking on it and picking Deploy > To Cloud Foundry.

Enter your Cloud Foundry API endpoint URL: https://api.cf.us10.hana.ondemand.com and hit tab.
You have to wait for a while for the system to get your orgs and spaces. If needed you'll be asked to authenticate. This is the SAP-ID username and SAP-ID password.

Watch the console for any issues during deploy. If it fails you can use the following cf commands.
You may find that you have to abort a failed deploy and cf undeploy it and try again.
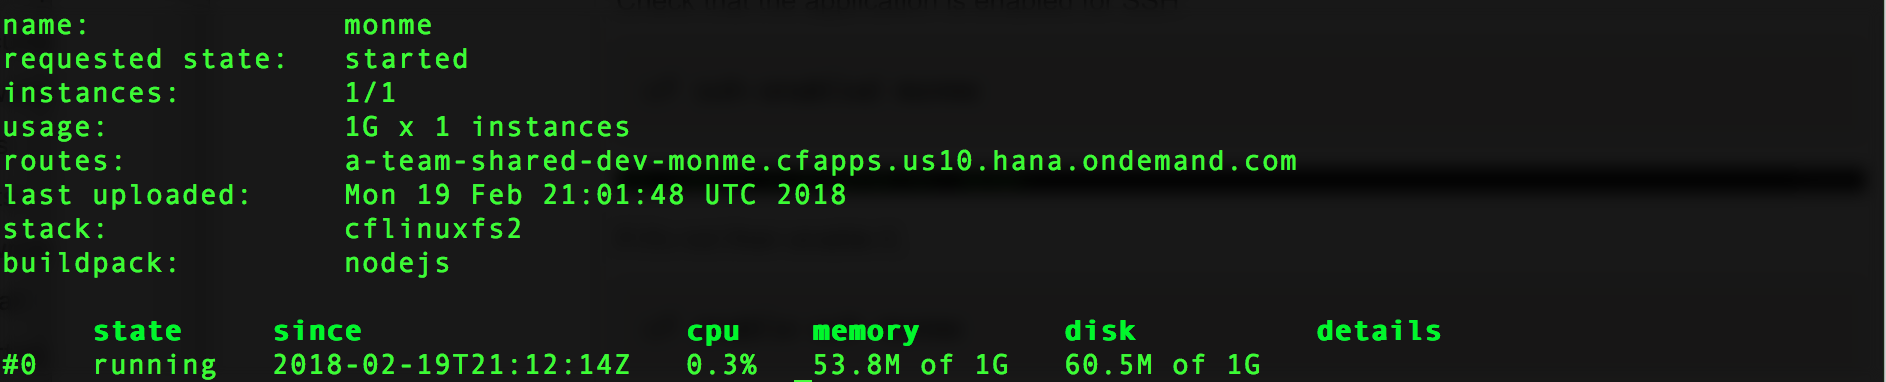
Check your running apps.

OK, now that we know our app is running, let's figure out how to ssh into it's container.
Check that the space in CF is enabled for SSH.
If it's not then have your space's Manager enable it for your.
Find your app's url by displaying it's details. routes:
Open your application in a browser and check that it's working.
https://a-team-shared-dev-monme.cfapps.us10.hana.ondemand.com/
You should see this:

If you wanted to make a change, you'd have to go back to the WebIDE, edit the file, rebuild the mtar file, redeploy it, hope nothing bad happened, and then test it again. This can take a significant amount of time and as your multi-target application get larger, the time gets longer.
But there is a better way. You can ssh into your application module's container and manipulate the files directly after they are deployed. To do this continue on. You'll need to get ssh'd into your server and start using the cf cli.
Check that the application is enabled for SSH

If it's not then enable it.

IMPORTANT!!! You won't be able to ssh into your application until to restage it.
Now. Test that you can connect to the application with the cf ssh command.
You should get a prompt that starts with vcap@. If you do you've ssh'd into your application.

You can perform a limited set of linux commands like, ls, pwd, cat, cd, and vi etc.
You'll find your application files in the app directory.

Since vi is available, you can use it to edit the server.js file and save it. Once you do so, NodeJS will be reloaded and you can browse to your application's URL and see the change.
Type exit to return to your system.
This is a great time saver when you want to jump in and tweek a few files to make sure that things are working as you expect or experiment while using the live cloud foundry environment. You'll want to have a ssh window open with the cf logs command running to keep an eye on what's happening. Keep in mind that you're changing files on the live cloud foundry environment. If you don't make the same changes back in your WebIDE, they will be lost. In fact if you do something that causes the application to fail, the system will restart it with the last staged files and your latest changes will be lost. If you'd rather continue working on the file within the WebIDE, then there are things you can do to help facilitate this automatically.
The cf ssh command is great, but what if you want to use the normal scp command to send modified files into cloud foundry? There is a way to do this but it's a bit more complicated.
Let's ssh into the application container again but this time use the ssh command.
First we need to know your applicaiton's guid.

I'll continue to use mine in this example, but you'll need to use yours.
Ask your cloud foundry system for a special one-time-use password code for sshing in.

Now put the guid into this form of the ssh command. Alter the guid and cf region to match yours.
When prompted for the password, use the string that cf ssh-code returned.
If this works for you, then you're ready to try the scp version of the command.
In order to facilitate this automatically, I'm using a linux program called expect and wrapping the details into a shell script called scp2cf2.sh. This script will need to read and write files to a local folder, so I've included one called tmp. Also, for reasons I'll show shortly, I need to invoke this script from within the module's source directory so there are several relative path specifiers involved.
Change into the workspace folder as described above.
Change into the project mta_scp2cf.
The script expects the guid of your application module to be in the file tmp/guid so do this.
Change into the monme module directory.
If you get permission denied, you'll need to change the script's permissions.

Re-run the command.
If all goes well, you should see scp's progress bar and that the file is 100% transmitted. If you don't then go over the steps above and verify each one and troubleshoot.
Now go into the WebIDE and change the file server.js. I added "I'm changed.". and save it.

No go back to your ssh window and re-run the last command.
And reload your browser.

Now you can edit files in the WebIDE and see the results pretty quickly.
One last thing. You can take advantage of a linux command called inotifywait to automate this for you! I won't get into the details, but if you run have inotify installed on your linux system you can paste this script into your ssh console and then all you have to do is to edit your files in the WebIDE and save them, then go reload the browser to test! Pretty handy.
Again, I'm doing this on a linux machine. MacOS and Windows has similar mechanisms if you want to use your local workstation and the cf cli tools.
Another note is that while the cf ssh command should would with any language, each language and web server handles how it's re-loaded differently so you'll need to modify things for java or python or PHP accordingly but the same principal applies.
I hope this saves someone out there a ton of time.
If you've got your application deployed into Cloud Foundry and you're focusing your efforts on a couple of NodeJS modules, there is a much faster way. Use the cf ssh command to edit the already deployed files in CloudFoundry in order to quickly figure out what changes need to be made and then incorporate them back into your project.
Currently the WebIDE will only support fully deployment of your whole application. Remember that each application module is in it's own right a web server plus other logic for doing it's work. So if you have four application modules and an app-router, you have to pull the dependencies for 5 web servers, build the mtar, deploy and test. If you're only working on one module, that's a lot of building and copying and running for nothing. Now you can take matters into your own hands and clone (you are using Git right) your project into a local directory and use cf push to deploy one module at a time but then you have to manage the attributes of how it gets pushed and any binding that may be required for the module to access the services it needs.
When working with NodeJS modules in development (not production) the trick is to launch your NodeJS module with a module called nodemon instead of node as you normally would. Nodemon watches for file changes an reloads the server when it sees that something has changed.
Sidebar: I've created another blog that addresses this same issue for python.
Boost your Cloud Foundry Python Edit-Build-Test Speed!
I'm going to demonstrate how to set all of this up using the HANA WebIDE found in HANA Express edition. The basic nuts and bolts can also be performed on your local workstation with the CF CLI and MTA plugin.
The core of the technique I'm using here can be found at this cloud foundry docs page:
https://docs.cloudfoundry.org/devguide/deploy-apps/ssh-apps.html#ssh-command
I'm using a HANA Express (HXE) system that is hosted on AWS, but you should be able to do the same thing with HXE installed in a VM on your local workstation. I've can run it on my 16GB Macbook Pro under VMWare Fusion with 12GB, but it pretty much uses every bit of 12GB so this is for utilizing the tools and not doing large data-set testing.
I'm going to use the HXE administrative user in these examples. You can use a different user, but since the files that drive the WebIDE are already owned by the hxeadm user, it makes for a simpler setup.
Make sure you can ssh into your HXE server and become the hxeadm user.
su - hxeadmReturn to the root user and double check that you have the cf cli tool available and that it's the current version. Here are the links to the installer and the MTA plugin that's needed.
CF CLI CloudFoundry CLI
CF CLI MTA Plugin CloudFoundry CLI Plugin Page
If you need help installing the plugin, look here:
https://docs.cloudfoundry.org/cf-cli/use-cli-plugins.html#plugin-install
cf install-plugin /tmp/cf-cli-mta-plugin-1.0.2-linux.binNote that the plugin is installed for each user so if you change users, you'll need to install the plugin again for that user.
Double check that your cf cli version is what you expect and you're not picking up an older version that might be lurking in your path.
cf --version
Also check that the plugins got installed correctly.
cf pluginsWe need to make sure the hxeadm user is prepared for ssh connections.
ls -al ~/.sshIf no files are seen, then generate new id files.
ssh-keygenGenerating public/private rsa key pair.
Enter file in which to save the key (/usr/sap/HXE/home/.ssh/id_rsa): (blank for default)
Enter passphrase (empty for no passphrase): (blank for no passphrase)
Enter same passphrase again: (leave blank again)
Your identification has been saved in /usr/sap/HXE/home/.ssh/id_rsa.
Your public key has been saved in /usr/sap/HXE/home/.ssh/id_rsa.pub.
The key fingerprint is:
...
+----[SHA256]-----+The WebIDE creates a directory on the server for each user that contains their projects in their workspace. Since the name of the directory is system generated, it's best to discover it. Log into the WebIDE web interface and create a sample MTA project with a unique project name that will stand out. In this case we'll use abcxyz.
Since this is a HANA Express installation, we know that the xs files are located in
/hana/shared/HXE/xs/ so change into that directory.
cd /hana/shared/HXE/xs/Now let's look for that mta.yaml file starting at this directory.
find . -name mta.yaml -printWe see the long directory name with abcxyz in it. This is our workspace directory. Make a note of it.
Change into it so that we can grab it's full path. You'll have to modify the specifics for your situation.
cd ./controller_data/fss/625dcf6b-27d8-4323-b3cc-eff7bf02a40c/7a/0d/85/workspaceusr8phhempsj98re/pwdCopy that full path into your clipboard. Then change back to the home directory of the hxeadm user.
cd /usr/sap/HXE/HDB00/Now to make things easier, create a symbolic link to your workspace in the hxeadm home directory.
You will of course need to change the system generated values with the ones on your system.
ln -s /hana/shared/HXE/xs/controller_data/fss/625dcf6b-27d8-4323-b3cc-eff7bf02a40c/7a/0d/85/workspaceusr8phhempsj98re workspaceChange into it and look at the files. Should be the same as what you see in the WebIDE interface.
Go ahead and delete this abcxyz project. It's served it's purpose for us.
rm -rf abcxyzNow for grins, go back to the WebIDE web interface in your browser. Notice that it seems like the project is still there. It's not. It's just that we're modifying the underlying files directly on the server. To put things back in sync with the WebIDE, perform a refresh from the Workspace level.
It should disappear.
From here we're going to work with an existing simple NodeJS application called scp2cf. Clone the following project into your server.
https://github.com/alundesap/mta_scp2cf.gitThis is a basic multi-target application with a single NodeJS module called monme and a supporting script. There is also a tmp folder with will be used to hold some temporary files in a bit.
The only difference between this sample NodeJS application and the default one is that I've included a dependency for a module called nodemon and I've replace node in the start command with nodemon. This allows the server.js (or any other file that your server relies on) to be modified and automatically reloaded when a change is detected.
Build your project by right-clicking on the project level and selecting Build. This creates a .mtar file in the
Deploy your .mtar to Cloud Foundry by right-clicking on it and picking Deploy > To Cloud Foundry.
Enter your Cloud Foundry API endpoint URL: https://api.cf.us10.hana.ondemand.com and hit tab.
You have to wait for a while for the system to get your orgs and spaces. If needed you'll be asked to authenticate. This is the SAP-ID username and SAP-ID password.
Watch the console for any issues during deploy. If it fails you can use the following cf commands.
cf mta-ops

cf deploy -i ### -a monitor

cf dmol
You may find that you have to abort a failed deploy and cf undeploy it and try again.
Check your running apps.
cf aOK, now that we know our app is running, let's figure out how to ssh into it's container.
Check that the space in CF is enabled for SSH.
cf space-ssh-allowedIf it's not then have your space's Manager enable it for your.
cf allow-space-sshFind your app's url by displaying it's details. routes:
cf app monmeOpen your application in a browser and check that it's working.
https://a-team-shared-dev-monme.cfapps.us10.hana.ondemand.com/
You should see this:
If you wanted to make a change, you'd have to go back to the WebIDE, edit the file, rebuild the mtar file, redeploy it, hope nothing bad happened, and then test it again. This can take a significant amount of time and as your multi-target application get larger, the time gets longer.
But there is a better way. You can ssh into your application module's container and manipulate the files directly after they are deployed. To do this continue on. You'll need to get ssh'd into your server and start using the cf cli.
Check that the application is enabled for SSH
cf ssh-enabled monmeIf it's not then enable it.
cf enable-ssh monmeIMPORTANT!!! You won't be able to ssh into your application until to restage it.
cf restage monmeNow. Test that you can connect to the application with the cf ssh command.
cf ssh monmeYou should get a prompt that starts with vcap@. If you do you've ssh'd into your application.
You can perform a limited set of linux commands like, ls, pwd, cat, cd, and vi etc.
You'll find your application files in the app directory.
cd appSince vi is available, you can use it to edit the server.js file and save it. Once you do so, NodeJS will be reloaded and you can browse to your application's URL and see the change.
Type exit to return to your system.
This is a great time saver when you want to jump in and tweek a few files to make sure that things are working as you expect or experiment while using the live cloud foundry environment. You'll want to have a ssh window open with the cf logs command running to keep an eye on what's happening. Keep in mind that you're changing files on the live cloud foundry environment. If you don't make the same changes back in your WebIDE, they will be lost. In fact if you do something that causes the application to fail, the system will restart it with the last staged files and your latest changes will be lost. If you'd rather continue working on the file within the WebIDE, then there are things you can do to help facilitate this automatically.
The cf ssh command is great, but what if you want to use the normal scp command to send modified files into cloud foundry? There is a way to do this but it's a bit more complicated.
Let's ssh into the application container again but this time use the ssh command.
First we need to know your applicaiton's guid.
cf app monme --guid
I'll continue to use mine in this example, but you'll need to use yours.
Ask your cloud foundry system for a special one-time-use password code for sshing in.
cf ssh-codeNow put the guid into this form of the ssh command. Alter the guid and cf region to match yours.
ssh -p 2222 cf:8aa9f796-e53e-4564-b4e3-597e82d7c2e7/0@ssh.cf.us10.hana.ondemand.com
When prompted for the password, use the string that cf ssh-code returned.
> cf ssh-code

CWgTh2ZmZH

> ssh -p 2222 cf:8aa9f796-e53e-4564-b4e3-597e82d7c2e7/0@ssh.cf.us10.hana.ondemand.com

cf:8aa9f796-e53e-4564-b4e3-597@ssh.cf.us10.hana.ondemand.com's password: CWgTh2ZmZH

vcap@f576b9fe-b05a-47aa-589b-2489:~$
If this works for you, then you're ready to try the scp version of the command.
In order to facilitate this automatically, I'm using a linux program called expect and wrapping the details into a shell script called scp2cf2.sh. This script will need to read and write files to a local folder, so I've included one called tmp. Also, for reasons I'll show shortly, I need to invoke this script from within the module's source directory so there are several relative path specifiers involved.
Change into the workspace folder as described above.
cd workspaceChange into the project mta_scp2cf.
cd mta_scp2cfThe script expects the guid of your application module to be in the file tmp/guid so do this.
cf app monme --guid > tmp/guidChange into the monme module directory.
cd monmeRun the script from the parent directory like this. Specifying the file you want to copy to into your app running in cloud foundry. Notice I'm chaining 2 commands together with a ";".
cf ssh-code > ../tmp/code ; ../cp2cf2.sh server.jsIf you get permission denied, you'll need to change the script's permissions.
chmod 755 ../cp2cf2.shRe-run the command.
cf ssh-code > ../tmp/code ; ../cp2cf2.sh server.jsIf all goes well, you should see scp's progress bar and that the file is 100% transmitted. If you don't then go over the steps above and verify each one and troubleshoot.
Now go into the WebIDE and change the file server.js. I added "I'm changed.". and save it.
No go back to your ssh window and re-run the last command.
server.js ssh.cf.us10.hana.ondemand.com:/home/vcap/app/server.jsAnd reload your browser.
Now you can edit files in the WebIDE and see the results pretty quickly.
One last thing. You can take advantage of a linux command called inotifywait to automate this for you! I won't get into the details, but if you run have inotify installed on your linux system you can paste this script into your ssh console and then all you have to do is to edit your files in the WebIDE and save them, then go reload the browser to test! Pretty handy.
DIFF=0

LAST=0

inotifywait -re modify -m --exclude '/\..+' . |

while read -r directory events filename; do

echo "Events: $events"

relpath=$directory$filename

echo "RelPath: $relpath"

NOW=$(date +%s)

printf "%s\n" "$NOW"

DIFF=$(($NOW - $LAST))

if [[ $DIFF -gt 10 ]]; then cf ssh-code > ../tmp/code ; ../cp2cf2.sh $relpath; else echo "Skip"; fi

LAST=$NOW

done
Again, I'm doing this on a linux machine. MacOS and Windows has similar mechanisms if you want to use your local workstation and the cf cli tools.
Another note is that while the cf ssh command should would with any language, each language and web server handles how it's re-loaded differently so you'll need to modify things for java or python or PHP accordingly but the same principal applies.
I hope this saves someone out there a ton of time.
- SAP Managed Tags:
- Node.js,
- SAP BTP, Cloud Foundry runtime and environment,
- SAP Web IDE
1 Comment
You must be a registered user to add a comment. If you've already registered, sign in. Otherwise, register and sign in.
Labels in this area
-
ABAP CDS Views - CDC (Change Data Capture)
2 -
AI
1 -
Analyze Workload Data
1 -
BTP
1 -
Business and IT Integration
2 -
Business application stu
1 -
Business Technology Platform
1 -
Business Trends
1,658 -
Business Trends
91 -
CAP
1 -
cf
1 -
Cloud Foundry
1 -
Confluent
1 -
Customer COE Basics and Fundamentals
1 -
Customer COE Latest and Greatest
3 -
Customer Data Browser app
1 -
Data Analysis Tool
1 -
data migration
1 -
data transfer
1 -
Datasphere
2 -
Event Information
1,400 -
Event Information
66 -
Expert
1 -
Expert Insights
177 -
Expert Insights
297 -
General
1 -
Google cloud
1 -
Google Next'24
1 -
Kafka
1 -
Life at SAP
780 -
Life at SAP
13 -
Migrate your Data App
1 -
MTA
1 -
Network Performance Analysis
1 -
NodeJS
1 -
PDF
1 -
POC
1 -
Product Updates
4,577 -
Product Updates
343 -
Replication Flow
1 -
RisewithSAP
1 -
SAP BTP
1 -
SAP BTP Cloud Foundry
1 -
SAP Cloud ALM
1 -
SAP Cloud Application Programming Model
1 -
SAP Datasphere
2 -
SAP S4HANA Cloud
1 -
SAP S4HANA Migration Cockpit
1 -
Technology Updates
6,873 -
Technology Updates
420 -
Workload Fluctuations
1
Related Content
- LLM, RAG and Cloud Foundry: No space left on device in Technology Q&A
- Consuming SAP with SAP Build Apps - Mobile Apps for iOS and Android in Technology Blogs by SAP
- Connect to ABAP environment using RFC in Technology Q&A
- Developing & Deploying the UI5 App to Cloud Foundry and Accessing from App-router End-to-End Steps in Technology Blogs by Members
- Easy way to automate and configure the setup of a BTP account and Cloud Foundry using Terraform. in Technology Blogs by Members
Top kudoed authors
| User | Count |
|---|---|
| 37 | |
| 25 | |
| 17 | |
| 13 | |
| 7 | |
| 7 | |
| 7 | |
| 6 | |
| 6 | |
| 6 |