
- SAP Community
- Products and Technology
- Enterprise Resource Planning
- ERP Blogs by SAP
- End to End Development – SAP HANA and Web IDE
Enterprise Resource Planning Blogs by SAP
Get insights and updates about cloud ERP and RISE with SAP, SAP S/4HANA and SAP S/4HANA Cloud, and more enterprise management capabilities with SAP blog posts.
Turn on suggestions
Auto-suggest helps you quickly narrow down your search results by suggesting possible matches as you type.
Showing results for
Esha1
Active Participant
Options
- Subscribe to RSS Feed
- Mark as New
- Mark as Read
- Bookmark
- Subscribe
- Printer Friendly Page
- Report Inappropriate Content
02-19-2018
6:04 AM
In this blog, we cover end to end application development starting from creating a database table in SAP HANA, develop virtual data models on top of database tables and finally use Smart templates available in Web IDE to create a Fiori Application consuming virtual data models.
Smart templates, also known as SAP Fiori Elements, provide a framework for generating UIs at runtime based on metadata annotations and predefined templates for the most-used application patterns.
We use CDS to model data source and expose CDS through Gateway without writing line of code using CDS rich semantic annotations. Follow the below steps to create an application. For details on CDS refer to blogs [https://blogs.sap.com/2017/07/05/jump-start-to-abap-core-data-services/].
Step1: First step is to create database tables and inserting records to column store tables.
Figure 1 and Figure 2 shows the structure of the tables used for modelling the views.

Figure 1: Structure ZCAR_COLOR

Figure 2: Structure ZCOMPANY_CAR
Step2: Second step is to create CDS views on top of database tables.
Find below the details of annotations used while creating CDS views.
View level Annotations: Applied to entire view and written before the define view statement.
Annotation @Search.searchable: true indicates that CDS View is relevant to search scenarios.
Annotation @EnterpriseSearch.enabled: true indicates that an Enterprise Search connector should be created and activated.
Annotation @Metadata.allowExtensions: true indicates that the Enterprise Search connector can be enhanced/adapted.
All the above-mentioned Annotations are required for performing Enterprise Search Views.
Annotation “@OData.publish: true” is used to expose the CDS view. Exposing CDS view through Gateway Service in just one step without writing any piece of code using T-Code /IWFND/MAINT_SERVICE.
Annotation @EndUserText.label: 'My smart CDS search view' is used to define the description of the Enterprise Search connector.
Annotation @ObjectModel.semanticKey: ['MY_KEY_FIELD_1', 'MY_KEY_FIELD_2', 'MY_KEY_FIELD_3'] is used to define Enterprise Search Semantic Key. Semantic key is strictly not a key in terms of database theory. It identifies an instance of an object from business/search perspective.
Annotation @UI.headerInfo.title: {value: 'MY_TITLE_ELEMENT'} is used to define an element or field as title field.
Element level Annotations: Applied to entire view and written inside the curly braces before the field selection while doing selection of fields.
Annotation @Search.defaultSearchElement: true is used to mark the element/field as a freestyle request field. For performance reasons, it is not recommended to have more than 15 freestyle request fields.
The element/field weight for ranking purposes can be defined via annotation @Search.ranking. Ranking can be set as #HIGH, #MEDIUM and #LOW.
Annotation @UI.selectionField.position: ‘Position’ This annotation is used to specify the order of selection fields that are used for filtering.
CDS View Name Z_I_CAR_COLOR
CDS View Name Z_I_COMPANY_CAR_DETAILS
CDS View Name Z_C_CAR_SEARCH
As indicated in Figure 3, OData Service is created automatically. On highlighting the yellow indicator, it shows message that OData Service is not activated.

Figure3: Name of OData Service
Step3: Third step is to activate the OData Service. OData Layer at Gateway level is used to expose the data to outside world.
Go to Transaction: /IWFND/MAINT_SERVICE
Add the service which is automatically created after specifying “@OData.publish: true” annotation in the CDS view. Next step is to activate the service. Figure 4a, 4b and 4c shows services is added and activated.

Figure 4a: Add Service Option
In this case SAP Gateway is in Embedded Deployment Scenario hence we select LOCAL in system Alias.

Figure 4b: Get the required service
Provide the package name in which you want to assign the service. Adding the service would provide a message ‘Z_C_CAR_SEARCH_CDS' was created and its metadata was loaded successfully.

Figure 4c: Service Added and Activated.
Click on call browser or SAP Gateway Client to check whether the service is working fine or not. Figure 5a shows that service is working fine (Return Code 200) and Figure 5b and 5c shows the URL to view the metadata and metadata of the service.

Figure 5a Service Working Properly

Figure 5b URL to view the Metadata

Figure 5c: Metadata of the service
Step4: Fourth Step is to build the User Interface using SAP Fiori SMART Template consuming OData Service which is created in previous step3.
With HANA 2.0, SAP Web-IDE is integrated development environment used for any kind of development (ABAP, JAVA, NODE.JS, XSJS etc.) going forward.
Follow the below steps:

Figure 6: Worklist Application as Template
Select the system where your OData resides and the pick the OData service as shown in Figure 7. HANA connector can be one of the option to maintain the connection between Web-IDE and backend/On-premise system.

Figure 7 System and OData Service
Provide the application setting and perform data binding as per the requirement. Once we are done with the configurations and bindings, click on Finish button. This will create a project in our workspace. Figure 8 shows the application interface after execution of the project.

Figure 8: Application Interface
Figure 9 shows the search operation performed for brand name.
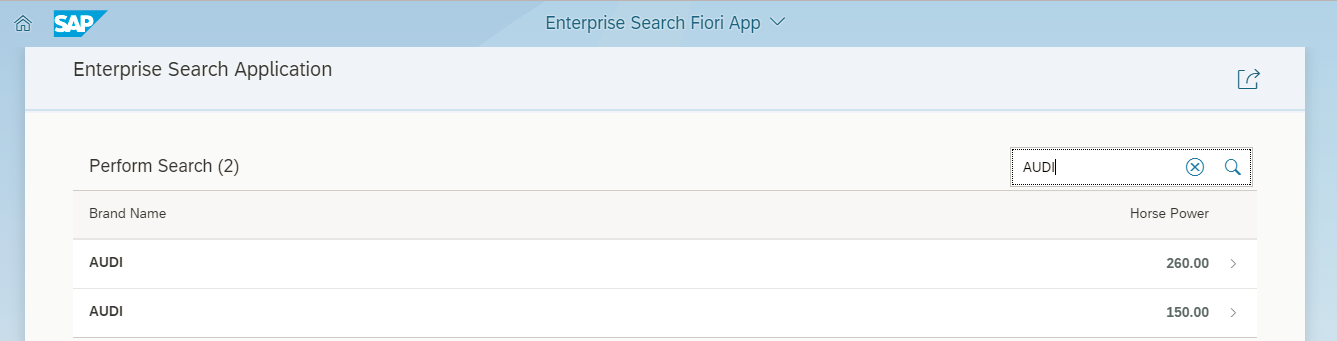
Figure 9: Search Operation
To summarize, SAP Web IDE is powerful, extensible web based integrated development tool that simplifies end to end application development.
Smart templates, also known as SAP Fiori Elements, provide a framework for generating UIs at runtime based on metadata annotations and predefined templates for the most-used application patterns.
We use CDS to model data source and expose CDS through Gateway without writing line of code using CDS rich semantic annotations. Follow the below steps to create an application. For details on CDS refer to blogs [https://blogs.sap.com/2017/07/05/jump-start-to-abap-core-data-services/].
Step1: First step is to create database tables and inserting records to column store tables.
Figure 1 and Figure 2 shows the structure of the tables used for modelling the views.
Figure 1: Structure ZCAR_COLOR
Figure 2: Structure ZCOMPANY_CAR
Step2: Second step is to create CDS views on top of database tables.
Find below the details of annotations used while creating CDS views.
View level Annotations: Applied to entire view and written before the define view statement.
Annotation @Search.searchable: true indicates that CDS View is relevant to search scenarios.
Annotation @EnterpriseSearch.enabled: true indicates that an Enterprise Search connector should be created and activated.
Annotation @Metadata.allowExtensions: true indicates that the Enterprise Search connector can be enhanced/adapted.
All the above-mentioned Annotations are required for performing Enterprise Search Views.
Annotation “@OData.publish: true” is used to expose the CDS view. Exposing CDS view through Gateway Service in just one step without writing any piece of code using T-Code /IWFND/MAINT_SERVICE.
Annotation @EndUserText.label: 'My smart CDS search view' is used to define the description of the Enterprise Search connector.
Annotation @ObjectModel.semanticKey: ['MY_KEY_FIELD_1', 'MY_KEY_FIELD_2', 'MY_KEY_FIELD_3'] is used to define Enterprise Search Semantic Key. Semantic key is strictly not a key in terms of database theory. It identifies an instance of an object from business/search perspective.
Annotation @UI.headerInfo.title: {value: 'MY_TITLE_ELEMENT'} is used to define an element or field as title field.
Element level Annotations: Applied to entire view and written inside the curly braces before the field selection while doing selection of fields.
Annotation @Search.defaultSearchElement: true is used to mark the element/field as a freestyle request field. For performance reasons, it is not recommended to have more than 15 freestyle request fields.
The element/field weight for ranking purposes can be defined via annotation @Search.ranking. Ranking can be set as #HIGH, #MEDIUM and #LOW.
Annotation @UI.selectionField.position: ‘Position’ This annotation is used to specify the order of selection fields that are used for filtering.
CDS View Name Z_I_CAR_COLOR
@AbapCatalog.sqlViewName: 'ZICARCOLOR'

@AccessControl.authorizationCheck:  #NOT_REQUIRED

@EndUserText.label: 'Car Color Texts CDS View'

define view Z_I_CAR_COLOR

as select from zcar_color

{

   //zcar_color

 key  color_code,

 key  langu,

      color_name

}
CDS View Name Z_I_COMPANY_CAR_DETAILS
@AbapCatalog.sqlViewName: 'ZICOMPANYCARD'

@AccessControl.authorizationCheck: #NOT_REQUIRED

@EndUserText.label: 'Company Car Details CDS View'

define view Z_I_COMPANY_CAR_DETAILS

as select from zcompany_car

association[0..*] to Z_I_CAR_COLOR as _ColorText

on $projection.color = _ColorText.color_code

{

   //zcompany_car

key   license,

      brand,

      color,

      power,

      _ColorText

}
CDS View Name Z_C_CAR_SEARCH
@AbapCatalog.sqlViewName: 'ZCARSEARCH'

@AccessControl.authorizationCheck: #NOT_REQUIRED

@EndUserText.label: 'Car Search CDS View'

@Search.searchable: true

@EnterpriseSearch.enabled: true

@Metadata.allowExtensions: true

@ObjectModel.semanticKey: ['LICENSE_PLATE']

@OData.publish: true

@UI.headerInfo.title: {value: 'Enterprise Search Application'}


define view Z_C_CAR_SEARCH

as select from Z_I_COMPANY_CAR_DETAILS

{

  @UI.selectionField.position: 10

  @EndUserText.label: 'License Plate'

  @Search.ranking: #HIGH

  @Search.defaultSearchElement: true

  key license as license_plate,

  @UI.selectionField.position: 20

  @EndUserText.label: 'Auto Brand'

  @Search.ranking: #HIGH

  @Search.defaultSearchElement: true

  brand,

  @UI.selectionField.position: 30

  @EndUserText.label: 'Horse Power'

  power,

  @UI.selectionField.position: 40

  @EndUserText.label: 'Car Color'

  @Search.ranking: #MEDIUM

  @Search.defaultSearchElement: true

  _ColorText[ 1: langu = $session.system_language ].color_name as car_color

}
As indicated in Figure 3, OData Service is created automatically. On highlighting the yellow indicator, it shows message that OData Service is not activated.
Figure3: Name of OData Service
Step3: Third step is to activate the OData Service. OData Layer at Gateway level is used to expose the data to outside world.
Go to Transaction: /IWFND/MAINT_SERVICE
Add the service which is automatically created after specifying “@OData.publish: true” annotation in the CDS view. Next step is to activate the service. Figure 4a, 4b and 4c shows services is added and activated.
Figure 4a: Add Service Option
In this case SAP Gateway is in Embedded Deployment Scenario hence we select LOCAL in system Alias.
Figure 4b: Get the required service
Provide the package name in which you want to assign the service. Adding the service would provide a message ‘Z_C_CAR_SEARCH_CDS' was created and its metadata was loaded successfully.
Figure 4c: Service Added and Activated.
Click on call browser or SAP Gateway Client to check whether the service is working fine or not. Figure 5a shows that service is working fine (Return Code 200) and Figure 5b and 5c shows the URL to view the metadata and metadata of the service.
Figure 5a Service Working Properly
Figure 5b URL to view the Metadata
Figure 5c: Metadata of the service
Step4: Fourth Step is to build the User Interface using SAP Fiori SMART Template consuming OData Service which is created in previous step3.
With HANA 2.0, SAP Web-IDE is integrated development environment used for any kind of development (ABAP, JAVA, NODE.JS, XSJS etc.) going forward.
Follow the below steps:
- Open Web-IDE, go to FILE in menu option
- Click on New
- Select Project from Template
- Choose SAP Fiori Worklist Application from available templates as shown in Figure 6
Figure 6: Worklist Application as Template
Select the system where your OData resides and the pick the OData service as shown in Figure 7. HANA connector can be one of the option to maintain the connection between Web-IDE and backend/On-premise system.
Figure 7 System and OData Service
Provide the application setting and perform data binding as per the requirement. Once we are done with the configurations and bindings, click on Finish button. This will create a project in our workspace. Figure 8 shows the application interface after execution of the project.
Figure 8: Application Interface
Figure 9 shows the search operation performed for brand name.
Figure 9: Search Operation
To summarize, SAP Web IDE is powerful, extensible web based integrated development tool that simplifies end to end application development.
- SAP Managed Tags:
- SAP Fiori,
- SAP HANA,
- SAP S/4HANA,
- SAP Web IDE
10 Comments
You must be a registered user to add a comment. If you've already registered, sign in. Otherwise, register and sign in.
Labels in this area
-
Artificial Intelligence (AI)
1 -
Business Trends
363 -
Business Trends
21 -
Customer COE Basics and Fundamentals
1 -
Digital Transformation with Cloud ERP (DT)
1 -
Event Information
461 -
Event Information
24 -
Expert Insights
114 -
Expert Insights
153 -
General
1 -
Governance and Organization
1 -
Introduction
1 -
Life at SAP
415 -
Life at SAP
2 -
Product Updates
4,685 -
Product Updates
212 -
Roadmap and Strategy
1 -
Technology Updates
1,502 -
Technology Updates
89
Related Content
- Value disappeared in Enhanced Limit tab in PR in Enterprise Resource Planning Q&A
- Difference between Enhanced Limit tab and Limit tab in Purchase requisition in Enterprise Resource Planning Q&A
- Recursive Item Structure (Exploded BOM) in Enterprise Resource Planning Q&A
- The length of the field in the source, compare to the target structure, is different in Enterprise Resource Planning Q&A
- S/4 HANA Mock/Test Migration on 3SL to use another client in Test System in Enterprise Resource Planning Q&A
Top kudoed authors
| User | Count |
|---|---|
| 11 | |
| 10 | |
| 7 | |
| 7 | |
| 4 | |
| 4 | |
| 4 | |
| 4 | |
| 3 | |
| 3 |