
- SAP Community
- Products and Technology
- CRM and Customer Experience
- CRM and CX Blogs by SAP
- Cloud for Customer Mashup: Call an ERP transaction...
CRM and CX Blogs by SAP
Stay up-to-date on the latest developments and product news about intelligent customer experience and CRM technologies through blog posts from SAP experts.
Turn on suggestions
Auto-suggest helps you quickly narrow down your search results by suggesting possible matches as you type.
Showing results for
Advisor
Options
- Subscribe to RSS Feed
- Mark as New
- Mark as Read
- Bookmark
- Subscribe
- Printer Friendly Page
- Report Inappropriate Content
02-15-2018
8:13 AM
Overview
One business case which I was asked by customers in the last months was how to enable access to a ERP SAP GUI transaction in SAP GUI for html through a Cloud for Customer Mashup. My first idea was to use an URL Mashup for this purpose. Inside the URL Mashup, through parameter binding, I tried to add parameters to hand over to the transaction-URL, like for example a customer number. But here I failed, since provided parameters in a Mashup are always transferred with an & before to the URL. But a SAP GUI for html URL requires blanks and semicolons as separators. I checked with my colleagues from development for a hint. They suggested a html code Mashup. So, I was playing around to produce some code to call an ERP transaction with parameters in SAP GUI for html – and I succeeded.
I would like to share my results with you – this should help in generating the right URL for any SAP GUI transaction including handing over the required parameters.
Implementation
A SAP GUI for html URL has a form like this:
http://<Server>:<Port>/sap/bc/gui/sap/its/webgui?&~transaction=<Tcode>; <fieldA>-LOW=<value1>,<value2>;<fieldB>-LOW=<value3>;DYNP_OKCODE=OKCODE
So the challenge is to get this URL generated correctly by the Mashup, including all required parameters.
I am going to describe step by step based on an example for ERP transaction IW73 (List service orders) how you can achieve this.
Required steps on ERP side
- Check which fields of the selection screen should be prefilled when launching the application. For my business case, I wanted to populate partner role sold-to (SP) with partner number (for example 67). The following screenshot shows the selection screen of transaction IW73 and how the Partner parameters should be preset:

To populate these fields by the mash up code, it first needs to be checked what is the technical name (which is used in the URL) for these fields. To check this, select the F1-help on this field. Inside the F1-help, press the button (Technical Information). A window like this will be launched:

In the area ‘Field Description for Batch Input’, you will find the relevant screen field name. In this example for the customer number it is DY_PARNR. For the partner role, the name of the screen field is DY_PARVW. Note down the required screen names.
- Determine the https port of your ERP system. To do so, go to transaction SMICM. In the menu of this transaction choose Goto->Services. You will see a screen with information like this:
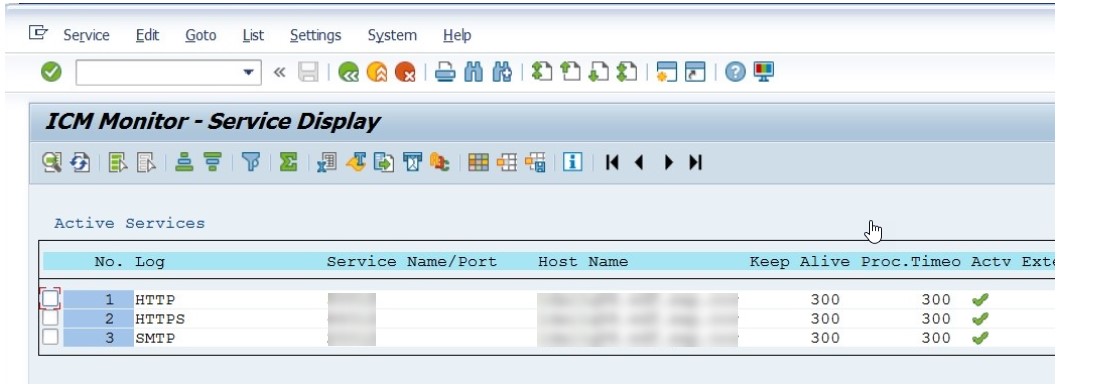
Here you will find the https port number (note it down), as you will need it to set up the URL for the MashUP.
That's all that needs to be done on ERP side.
Required steps on Cloud for Customer side
- In the Administrator work center, go to Mashup Authoring: Administrator->Business Flexibility->Mashup Authoring
- Choose New->Html Mashup
- Select Mashup Category ‘Business & Finance' and Port Binding ‘Additional Account Information’. The Port Binding decides on which screens the Mashup can be made visible. In my example I want to launch the Mashup from the Account screen, that’s why I choose the respective Port Binding.
- Choose a meaningful name for the Mashup, in my case it is ‘ERP transaction IW73 (Display Service Order: Selection of Orders).
- In Configuration Information, set the Radio Button to HTML Code.

- In the HTML Code Editor, the coding to generate the Mashup must be entered. My example coding is to bring a new button on a screen. By pressing this button a new window gets opened launching the ERP transaction in SAP GUI for html. My sample coding for this looks as follows:
<!DOCTYPE html>
<html>
<head>
<title>Launch App</title>
</head>
<body>
<button onclick="myFunction()">Select and List ERP Service Orders</button>
<script type="text/javascript">
function myFunction() {
var par = "&~transaction=IW73"
var par1 = "%20DY_PARVW=SP;"
var par2 = "%20DY_PARNR=";
var par3 = sap.byd.ui.mashup.context.inport.AccountID;
var url = https://<hostname>:<port>/sap/bc/gui/sap/its/webgui?sap-client=<client>+ par+ par1+ par2+ par3
window.open(url,'_blank');
}
</script>
</body>
</html>
With this coding, after defining the header, I define the button. This button should execute ‘onclick’ the action “myFunction” which is supposed to launch the URL to open the required transaction in SAP GUI for html.
The URL must be built dynamically, to include the variable parameters (in this case the customer number) through parameter binding. The first part of the URL contains the system information (like the https port, host name and client) which you determined on the ERP side. My variable parameter in this example is the external customer ID, which should be automatically provided from the Account which I am currently accessing. I achieved this by using the Input Parameter ‘AccountID’. It’s content is accessed by the html coding with the command sap.byd.ui.mashup.context.inport.AccountID;
This Input Parameter ‘AccountID’ is available since I chose Mashup Category ‘Business&Finance’ and Port Binding ‘Additional Account Information. The following Screenshot illustrates this:

If you want to get more information on Parameter Binding, especially which Port Binding makes a Mashup available on a certain screen, check out this SAP help page:
There is a section 'Mashup Categories' which you need to collapse to find the text. I did not find it on my first look, that's why I am describing this so precisely.
Additionally, I want to select by sold-to party, so I preset this in the selection screen of the application. Since this is not variable for my case, I am putting this hard coded in the coding with this command: var par1 = "%20DY_PARVW=SP;". If you work in a different language than English, you need to take the sold-to party abbreviation in this language (for example ‘AG’ for German).
In principle, what I described how to build the URL dynamically are these coding lines
var par = "&~transaction=IW73"
var par1 = "%20DY_PARVW=SP;"
var par2 = "%20DY_PARNR=";
var par3 = sap.byd.ui.mashup.context.inport.AccountID;
var url = https://<hostname>:<port>/sap/bc/gui/sap/its/webgui?sap-client=<client>+ par+ par1+ par2+ par3
You could define here further parameters (and populate the content through parameter binding) and then just concatenate it to the URL as done above. Sure for your example you need to replace <hostname> and <port> by the hostname and port you retreived on ERP side with transaction SMCIM.
Via preview, you can test your generated mashup up and enter example values for the used parameters to see that parameter binding is working.
- Save the created Mashup and Activate it.
- To be able to use the Mashup, it must be applied to the required screen. If it should be visible for all users, this must be done through adaption. To do so, from the Adapt menu, select Adaption Mode. Navigate to the screen where you want to display the Mashup. In my example it is the Customer Overview Screen. Inside Adaption mode, select Adapt->Edit Screen. The Adaption Mode bar is displayed at the top of the screen. On the right side, the adaption panel got opened. Click on Mashups and Web Services pane. Select the visible checkbox next to the mashup you want to have visible. Then press Publish, to get the Mashup available for all users. In addition, this link describes in very detail how to make the mashup visible through adaption.
- Alternatively, if you do not want to make a Mashup visible to all users who have access to a screen, then individual users can add the Mashup through Personalization.
By executing these steps, I made the html code Mashup visible on the Account Overview screen. This is my result:

When pressing the new button ‘Select and List ERP Service Orders’, transaction IW73 is now beeing launched in the ERP system:

With these instructions you should be able to call any ERP transaction through a html code Mashup and prefill parameters through parameter binding. For example as additional parameter you could provide an okcode (DYNP_OKCODE=OKCODE) to skip the initial screen.
Outlook: Call a S/4HANA Fiori App via Mashup
Another use case for a similar html code Mashup could be to call a S/4HANA SD FIORI App. For example, I was checking out the Customer 360° SD S/4HANA Fiori App. My URL for this App which I want to launch from the Mashup looks as follows:
https://<systemID>-<client>.wdf.sap.corp/ui?sap-client=<client>&sap-language=EN#Customer-displaySale...
So here I need to pass the Customer number (which is 10100001 in my example) as a variable parameter. In principle my Mashup coding is similar to the coding used for the ERP transactions explained before. Just the URL and the place of the variable parameter is different. But the parameter binding is again to the external Account ID as described before. So this is my example coding for this use case:
<!DOCTYPE html>
<html>
<head>
<title>Launch App</title>
</head>
<body>
<p>Launch S/4 HANA Customer 360.</p>
<button onclick="myFunction()">Launch Customer 360</button>
<script type="text/javascript">
function myFunction() {
var par = "('"
var par1 = sap.byd.ui.mashup.context.inport.AccountID;
var par2 = "')";
var url = "https://<systemID>-<client>.wdf.sap.corp/ui?sap-client=<client>&sap-language=EN#Customer-displaySalesOverview&//C_Customer360_F2187"+ par+ par1+ par2;
window.open(url,'_blank');
}
</script>
</body>
</html>
Sure if you want to try this out on your system you need to replace <systemID> and <client> by your system and client in the URL. And you need an integration between Cloud for Customer and S/4HANA to use the parameter binding to External Account ID.
After embedding the Mashup on a screen, you can launch the Customer 360° SD S/4HANA Fiori App directly from Cloud for Customer. The launched App looks like this:

Please check also my previous blog, were I described how to set up the standard Mashup 'ERP Account Cockpit' (Mashup ID SM00105) in Cloud for Customer:
Configure and use the ERP Customer Cockpit in Cloud for Customer
- SAP Managed Tags:
- SAP Cloud for Customer add-ins,
- C4C Sales
5 Comments
You must be a registered user to add a comment. If you've already registered, sign in. Otherwise, register and sign in.
Labels in this area
-
Business Trends
270 -
Business Trends
10 -
chitchat
1 -
customerexperience
1 -
Event Information
256 -
Event Information
17 -
Expert Insights
30 -
Expert Insights
48 -
Life at SAP
133 -
Life at SAP
1 -
Product Updates
666 -
Product Updates
24 -
SAP HANA Service
1 -
SAPHANACloud
1 -
SAPHANAService
1 -
Technology Updates
453 -
Technology Updates
15
Related Content
- Utility Product Integration Layer (UPIL) in S/4HANA Utilities for Customer Engagement – Part 1 in CRM and CX Blogs by Members
- SAP Commerce Cloud Q1 ‘24 Release Highlights in CRM and CX Blogs by SAP
- Delete & Rename Contract Account Name from SAP Cloud for Customer (C4C) in CRM and CX Blogs by Members
- Implementing Dynamic Case Flows Based on Case Type in CRM and CX Blogs by Members
- CRM Basic Technical Info for ABAPers in CRM and CX Blogs by Members
Top kudoed authors
| User | Count |
|---|---|
| 4 | |
| 2 | |
| 2 | |
| 2 | |
| 2 | |
| 1 | |
| 1 | |
| 1 | |
| 1 | |
| 1 |