
- SAP Community
- Products and Technology
- Technology
- Technology Blogs by SAP
- Building multi-target applications (MTA) for Cloud...
Technology Blogs by SAP
Learn how to extend and personalize SAP applications. Follow the SAP technology blog for insights into SAP BTP, ABAP, SAP Analytics Cloud, SAP HANA, and more.
Turn on suggestions
Auto-suggest helps you quickly narrow down your search results by suggesting possible matches as you type.
Showing results for
Employee
Options
- Subscribe to RSS Feed
- Mark as New
- Mark as Read
- Bookmark
- Subscribe
- Printer Friendly Page
- Report Inappropriate Content
02-05-2018
5:24 PM
One of the primary features of using the SAP WebIDE for Cloud Foundry (CF) application development is the ability to create a multi-target application (MTA) easily. An MTA is an SAP construct that allows you to combine modules into a single deployable unit for lifecycle maintenance. These modules could potentially use different runtimes (one on Node.js, one on Python, etc.). For more information on MTAs for the Cloud Foundry environment, please click here.
The Web-based SAP WebIDE, however, may not be the ideal developer environment for everyone. It does not work when you're offline and it also does not have support for development in languages such as Python, PHP, etc. Many developers prefer using their own IDE while still taking advantage of enterprise SAP features such as MTA, app router, and XSUAA. In this blog, I will show how you can use your own IDE and still build multi-target applications. It just requires a one-time setup of a few tools that are developed and fully supported by SAP Cloud Platform.
You can download and install the cloud foundry command line interface (CF CLI) from the following location. There are a number of options for download on a variety of platforms and install programs.
https://github.com/cloudfoundry/cli#downloads
After a successful installation, you should be able to execute the cf command:
SAP has developed and published an MTA plugin for Cloud Foundry CLI. This MTA plugin allows you to perform lifecycle operations like deployment and un-deployment on multi-target applications. The MTA plugin can be downloaded from SAP cloud platform tools page (search for MTA Plugin and pick your platform):
https://tools.hana.ondemand.com/#cloud
Install the MtaPlugin by running the install-plugin sub-command:
The MTA archive builder is a standalone command-line tool that builds a deployment-ready .mtar file from an MTA project using the development descriptor (mta.yaml) file. For details on the MTA archive builder and to download the jar file, please visit the following URL. Note: You will need Java 8 on your machine in order to execute this tool.
SAP MTA Archive Builder
Save the download JAR file (e.g., MTABUILDER110_0-80002501.JAR) in a well-known location and add it to your Java classpath.
You now have all the software you need to build and deploy an MTA!
If you are looking for a skeleton sample MTA project, then feel free to download one from my GitHub repository location below:
https://github.com/sunilwadhwa/mymta1.git
Mymta1 is a simple skeleton MTA project with three distinct modules - a Node.js module called approuter, a Python module called pymodule1, and a Java module called jmodule1. It also contains an xsuaa service used by the approuter for authentication. It is ready to be deployed to a CF space.
To build the MTAR file, cd to the root folder of the project and execute the MTA Archive Builder:
To deploy the generated MTAR file, run the cf deploy command:
In this final step, I will show you how to configure an IDE like Eclipse, to build and deploy a multi-target application. You can create a new Project Builder in the Project Properties section and specify the java command that we used in the previous step.
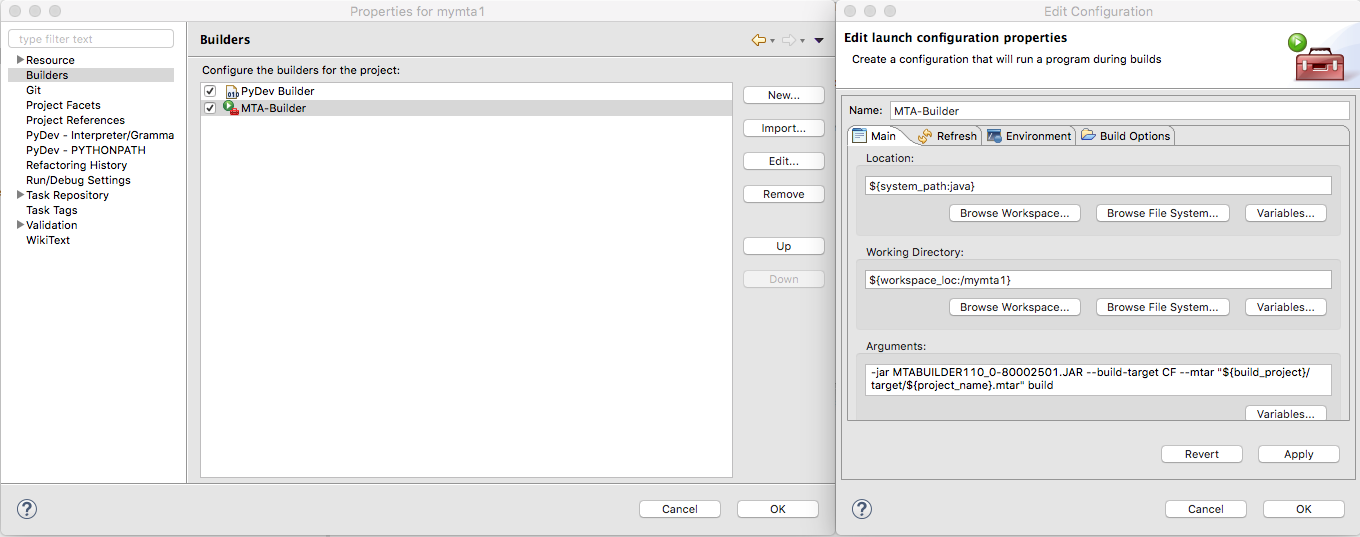
Here is a screenshot of the MTA-Builder that I created as an example. Now, when I click on Project --> Build Project menu, the MTA is automatically built for me. In a similar way, you can create an External Tool configuration to run the deployment of the MTAR to cloud foundry.
Have fun and please comment below if you have any questions/feedback!
The Web-based SAP WebIDE, however, may not be the ideal developer environment for everyone. It does not work when you're offline and it also does not have support for development in languages such as Python, PHP, etc. Many developers prefer using their own IDE while still taking advantage of enterprise SAP features such as MTA, app router, and XSUAA. In this blog, I will show how you can use your own IDE and still build multi-target applications. It just requires a one-time setup of a few tools that are developed and fully supported by SAP Cloud Platform.
Step 1: Install the CF command line interface
You can download and install the cloud foundry command line interface (CF CLI) from the following location. There are a number of options for download on a variety of platforms and install programs.
https://github.com/cloudfoundry/cli#downloads
After a successful installation, you should be able to execute the cf command:
$ cf -v

cf version 6.33.1+c77e55743.2017-12-15
Step 2: Install the MTA Plugin for the CF CLI from SAP
SAP has developed and published an MTA plugin for Cloud Foundry CLI. This MTA plugin allows you to perform lifecycle operations like deployment and un-deployment on multi-target applications. The MTA plugin can be downloaded from SAP cloud platform tools page (search for MTA Plugin and pick your platform):
https://tools.hana.ondemand.com/#cloud
Install the MtaPlugin by running the install-plugin sub-command:
$ cf install-plugin cf-cli-mta-plugin-1.0.2-darwin-x86_64.bin

Attention: Plugins are binaries written by potentially untrusted authors.

Install and use plugins at your own risk.

Do you want to install the plugin cf-cli-mta-plugin-1.0.2-darwin-x86_64.bin? [yN]: y

Installing plugin MtaPlugin...

OK

Plugin MtaPlugin 1.0.2 successfully installed.
Step 3: Install the MTA Archive Builder
The MTA archive builder is a standalone command-line tool that builds a deployment-ready .mtar file from an MTA project using the development descriptor (mta.yaml) file. For details on the MTA archive builder and to download the jar file, please visit the following URL. Note: You will need Java 8 on your machine in order to execute this tool.
SAP MTA Archive Builder
Save the download JAR file (e.g., MTABUILDER110_0-80002501.JAR) in a well-known location and add it to your Java classpath.
You now have all the software you need to build and deploy an MTA!
Step 4: Build and Deploy a sample MTA
If you are looking for a skeleton sample MTA project, then feel free to download one from my GitHub repository location below:
https://github.com/sunilwadhwa/mymta1.git
Mymta1 is a simple skeleton MTA project with three distinct modules - a Node.js module called approuter, a Python module called pymodule1, and a Java module called jmodule1. It also contains an xsuaa service used by the approuter for authentication. It is ready to be deployed to a CF space.
To build the MTAR file, cd to the root folder of the project and execute the MTA Archive Builder:
$ java -jar MTABUILDER110_0-80002501.JAR --build-target CF --mtar ./target/mymta1.mtar build

SAP Multitarget Application Archive Builder 1.1.2

Module "jmodule1": invoking maven

Module "pymodule1": zipping directory pymodule1

Module "approuter": invoking npm

Module "approuter": command output

...

>  up to date in 0.662s

Module "approuter": zipping directory approuter

Module "jmodule1": command output

>  [INFO] Scanning for projects...

...

...

>  [INFO] ------------------------------------------------------------------------

>  [INFO] BUILD SUCCESS

>  [INFO] ------------------------------------------------------------------------

>  [INFO] Total time: 0.893 s

>  [INFO] Finished at: 2018-02-02T16:33:04-07:00

>  [INFO] Final Memory: 15M/309M

>  [INFO] ------------------------------------------------------------------------

Generating archive ./target/mymta1.mtar

Done
To deploy the generated MTAR file, run the cf deploy command:
$ cf api

api endpoint:   https://api.cf.us10.hana.ondemand.com

api version:    2.99.0


$ cf deploy target/mymta1.mtar

{{output edited for clarity}}

Deploying multi-target app archive target/mymta1.mtar in org org / space dev as sunil.wadhwa01@sap.com...

Uploading 1 files...

  target/mymta1.mtar

OK

Starting deployment process...

  Service "mymta1-uaa" updated

  Application "approuter" started and available at "..."

  Application "jmodule1" started and available at "..."

  Application "pymodule1" started and available at "..."

Process finished.
Step 5: Configure your IDE (Eclipse example shown below)
In this final step, I will show you how to configure an IDE like Eclipse, to build and deploy a multi-target application. You can create a new Project Builder in the Project Properties section and specify the java command that we used in the previous step.
Here is a screenshot of the MTA-Builder that I created as an example. Now, when I click on Project --> Build Project menu, the MTA is automatically built for me. In a similar way, you can create an External Tool configuration to run the deployment of the MTAR to cloud foundry.
Have fun and please comment below if you have any questions/feedback!
17 Comments
You must be a registered user to add a comment. If you've already registered, sign in. Otherwise, register and sign in.
Labels in this area
-
ABAP CDS Views - CDC (Change Data Capture)
2 -
AI
1 -
Analyze Workload Data
1 -
BTP
1 -
Business and IT Integration
2 -
Business application stu
1 -
Business Technology Platform
1 -
Business Trends
1,661 -
Business Trends
88 -
CAP
1 -
cf
1 -
Cloud Foundry
1 -
Confluent
1 -
Customer COE Basics and Fundamentals
1 -
Customer COE Latest and Greatest
3 -
Customer Data Browser app
1 -
Data Analysis Tool
1 -
data migration
1 -
data transfer
1 -
Datasphere
2 -
Event Information
1,400 -
Event Information
65 -
Expert
1 -
Expert Insights
178 -
Expert Insights
280 -
General
1 -
Google cloud
1 -
Google Next'24
1 -
Kafka
1 -
Life at SAP
784 -
Life at SAP
11 -
Migrate your Data App
1 -
MTA
1 -
Network Performance Analysis
1 -
NodeJS
1 -
PDF
1 -
POC
1 -
Product Updates
4,577 -
Product Updates
330 -
Replication Flow
1 -
RisewithSAP
1 -
SAP BTP
1 -
SAP BTP Cloud Foundry
1 -
SAP Cloud ALM
1 -
SAP Cloud Application Programming Model
1 -
SAP Datasphere
2 -
SAP S4HANA Cloud
1 -
SAP S4HANA Migration Cockpit
1 -
Technology Updates
6,886 -
Technology Updates
408 -
Workload Fluctuations
1
Related Content
- Top Picks: Innovations Highlights from SAP Business Technology Platform (Q1/2024) in Technology Blogs by SAP
- sh: 1: fiori: not found-> The most popular error for Fiori Developers in Technology Blogs by Members
- SAP Datasphere News in March in Technology Blogs by SAP
- Announcing General Availability of SAP Build Code: Speed up development with generative AI in Technology Blogs by SAP
- User Experience Advances with SAP S/4HANA 2023 FPS01 (Private Cloud and On-Premise) in Technology Blogs by SAP
Top kudoed authors
| User | Count |
|---|---|
| 13 | |
| 10 | |
| 10 | |
| 9 | |
| 8 | |
| 7 | |
| 6 | |
| 5 | |
| 5 | |
| 5 |