
- SAP Community
- Products and Technology
- Technology
- Technology Blogs by SAP
- New change list explorer capability in SAP Process...
Technology Blogs by SAP
Learn how to extend and personalize SAP applications. Follow the SAP technology blog for insights into SAP BTP, ABAP, SAP Analytics Cloud, SAP HANA, and more.
Turn on suggestions
Auto-suggest helps you quickly narrow down your search results by suggesting possible matches as you type.
Showing results for
Product and Topic Expert
Options
- Subscribe to RSS Feed
- Mark as New
- Mark as Read
- Bookmark
- Subscribe
- Printer Friendly Page
- Report Inappropriate Content
01-29-2018
10:00 AM
With SAP Process Orchestration 7.5 SP10, we have improved the lifecycle management of integration flows and other configuration objects within the Process Integration Designer perspective of the Eclipse based SAP NetWeaver Developer Studio. So far, handling change lists in the Eclipse environment was quite limited compared to the corresponding functionality in the Integration Directory tool, i.e., using the Java Webstart UI. The My Changes view in Eclipse allowed you to run consistency checks, and to either activate or revert your changes. With the new change list explorer you can do much more when it comes to handling change lists, such as:
The new capabilities that we have shipped here were actually based on a feature request that was submitted as part of a customer connect project for SAP Process Orchestration that we ran until begin of last year. At that point of time it was not taken up because of other requests that were higher ranked by the customers that participated in the project. So, this hopefully shows you that the list of feature requests that we collected then has not been put into the recycle bin of my laptop. In fact, it is still taken into account for future improvements. As a heads up, based on this list we also decided to work on improving regression testing for process integration.* More to come soon. Anyway, this shouldn't be the topic for this blog. So, let's go back to the topic of the change list explorer. I will run through a couple of the above mentioned activities to show you how it works.
Assuming you are in the SAP Process Integration Designer perspective. You can access the change list explorer from the main menu at Process Integration -> Tools -> Open Change List Explorer.

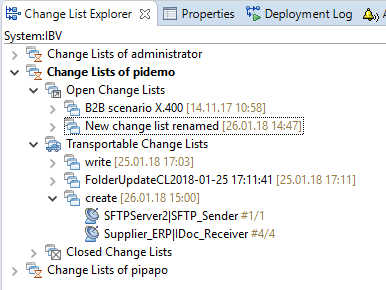
A new tab opens in the lower right pane of Eclipse showing by default all change lists assigned to you.

If you click on the triangle shaped icon on the menu bar in the top right corner of the tab, a menu opens where you can customize the views. The options are actually self explanatory and I won't go through all of them in detail. You can for instance switch between your own change list view and showing all change lists. You can display or hide all open, transportable or closed change lists. Open change lists contain objects which have been saved but not released nor activated yet. Transportable change lists are applicable only if you use CTS for transporting objects. Here, active objects are displayed which have not been released for transport yet. Closed change lists contain active objects that were either released for transport, closed without transport or - in case that CTS is not used for transport - objects which have been activated.

You can display more details by selecting Show/Hide from the menu. Here, you can add the change list timestamp and the object version. The date is then displayed next to the change list, and the version information is added next to the object.

Let's create a new change list. This can be either done from the icons in the menu bar or from the context menu of the pane, see below. A new dialog comes up where you need to maintain a change list name and description (not shown here).

Here we go.

Oops, we made a mistake, and need to rename the beforehand created change list. This can be done from the context menu.

Next, we like to move objects from another change list to the beforehand created change list. Select the source change list, and select the entry Move Objects from the context menu.

In the upcoming dialog, select all objects which should be moved, and click on Next.

On the next screen, select the target change list, and click on Finish.

The objects have been assigned to the new change list.

By the way, drag & drop would have been worked here as well.

Next, we like to continue working on objects that a colleague has worked on and which are hence assigned to the peer's change list. In this case, we need to transfer the other user's change list to us. First, select Show All Change Lists from the menu so that we can access all other user's change lists.

Expand the other user's change list hierarchy, select the respective change list, and select Transfer from the context menu. Optionally, you can directly select Transfer and Activate or Transfer and Revert if you like to run the corresponding activities in one go.

A dialog opens where you can change the transfer option, then click on Finish.

As you can see below, the change list has been assigned to your user.

Before activating a change list, you can run a consistency check from the context menu of your change list. All objects assigned to the selected change list are checked.

Upon completion of the check, a pop-up comes up informing you about the state of the check. In our case, issues have been found. Otherwise you get informed that the consistency check has been successfully completed.

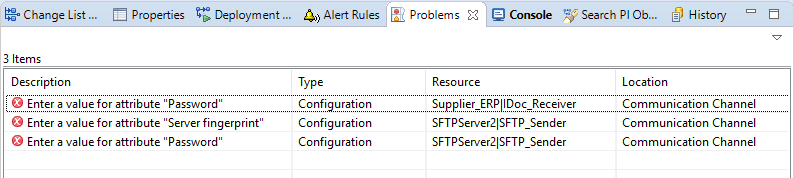
If you switch to the Problems tab, the issues found are displayed in more detail.
Once you have fixed the issues, you can activate the change list. Optionally, changes can be reverted.

Upon activation, the corresponding change list is shown below the transportable change lists node (assuming that CTS is configured).
Finally, you can either release for transport to trigger the transport or close the change list without transport, latter in case that changes should not be transported to the production system.

A handy feature is the removal of empty change lists. This helps you to clean up the list of change lists. From the context menu, select the entry Remove My Empty Change Lists.

Empty change lists are automatically detected and displayed in the upcoming dialog. Click on Finish to confirm to delete the same.

Here we go. All empty change lists have been deleted.

You find more information in the documentation at Working with Change Lists.
Future improvements are planned such as reworking keyboard shortcuts in the Process Integration Designer perspective, supporting default change list, reworking lifecycle management for all other objects (services, party, value mappings), etc.* So, stay tuned.
Footnote:
* This is the current state of planning and may be changed by SAP at any time without notice.
- Browse your own and other user's change lists
- Customize views, filtering, sorting
- Create a new change list
- Rename an existing change list
- Run consistency checks of all objects assigned to a change list
- Display all objects of a change list
- Move objects across change lists
- Transfer change lists from other users
- Activate or revert change lists
- Release for transport or close w/o transport
The new capabilities that we have shipped here were actually based on a feature request that was submitted as part of a customer connect project for SAP Process Orchestration that we ran until begin of last year. At that point of time it was not taken up because of other requests that were higher ranked by the customers that participated in the project. So, this hopefully shows you that the list of feature requests that we collected then has not been put into the recycle bin of my laptop. In fact, it is still taken into account for future improvements. As a heads up, based on this list we also decided to work on improving regression testing for process integration.* More to come soon. Anyway, this shouldn't be the topic for this blog. So, let's go back to the topic of the change list explorer. I will run through a couple of the above mentioned activities to show you how it works.
Assuming you are in the SAP Process Integration Designer perspective. You can access the change list explorer from the main menu at Process Integration -> Tools -> Open Change List Explorer.
A new tab opens in the lower right pane of Eclipse showing by default all change lists assigned to you.
If you click on the triangle shaped icon on the menu bar in the top right corner of the tab, a menu opens where you can customize the views. The options are actually self explanatory and I won't go through all of them in detail. You can for instance switch between your own change list view and showing all change lists. You can display or hide all open, transportable or closed change lists. Open change lists contain objects which have been saved but not released nor activated yet. Transportable change lists are applicable only if you use CTS for transporting objects. Here, active objects are displayed which have not been released for transport yet. Closed change lists contain active objects that were either released for transport, closed without transport or - in case that CTS is not used for transport - objects which have been activated.
You can display more details by selecting Show/Hide from the menu. Here, you can add the change list timestamp and the object version. The date is then displayed next to the change list, and the version information is added next to the object.
Let's create a new change list. This can be either done from the icons in the menu bar or from the context menu of the pane, see below. A new dialog comes up where you need to maintain a change list name and description (not shown here).
Here we go.
Oops, we made a mistake, and need to rename the beforehand created change list. This can be done from the context menu.
Next, we like to move objects from another change list to the beforehand created change list. Select the source change list, and select the entry Move Objects from the context menu.
In the upcoming dialog, select all objects which should be moved, and click on Next.
On the next screen, select the target change list, and click on Finish.
The objects have been assigned to the new change list.
By the way, drag & drop would have been worked here as well.
Next, we like to continue working on objects that a colleague has worked on and which are hence assigned to the peer's change list. In this case, we need to transfer the other user's change list to us. First, select Show All Change Lists from the menu so that we can access all other user's change lists.
Expand the other user's change list hierarchy, select the respective change list, and select Transfer from the context menu. Optionally, you can directly select Transfer and Activate or Transfer and Revert if you like to run the corresponding activities in one go.
A dialog opens where you can change the transfer option, then click on Finish.
As you can see below, the change list has been assigned to your user.
Before activating a change list, you can run a consistency check from the context menu of your change list. All objects assigned to the selected change list are checked.
Upon completion of the check, a pop-up comes up informing you about the state of the check. In our case, issues have been found. Otherwise you get informed that the consistency check has been successfully completed.
If you switch to the Problems tab, the issues found are displayed in more detail.
Once you have fixed the issues, you can activate the change list. Optionally, changes can be reverted.
Upon activation, the corresponding change list is shown below the transportable change lists node (assuming that CTS is configured).
Finally, you can either release for transport to trigger the transport or close the change list without transport, latter in case that changes should not be transported to the production system.
A handy feature is the removal of empty change lists. This helps you to clean up the list of change lists. From the context menu, select the entry Remove My Empty Change Lists.
Empty change lists are automatically detected and displayed in the upcoming dialog. Click on Finish to confirm to delete the same.
Here we go. All empty change lists have been deleted.
You find more information in the documentation at Working with Change Lists.
Future improvements are planned such as reworking keyboard shortcuts in the Process Integration Designer perspective, supporting default change list, reworking lifecycle management for all other objects (services, party, value mappings), etc.* So, stay tuned.
Footnote:
* This is the current state of planning and may be changed by SAP at any time without notice.
- SAP Managed Tags:
- SAP Process Integration,
- SAP Process Orchestration
Labels:
6 Comments
You must be a registered user to add a comment. If you've already registered, sign in. Otherwise, register and sign in.
Labels in this area
-
ABAP CDS Views - CDC (Change Data Capture)
2 -
AI
1 -
Analyze Workload Data
1 -
BTP
1 -
Business and IT Integration
2 -
Business application stu
1 -
Business Technology Platform
1 -
Business Trends
1,658 -
Business Trends
91 -
CAP
1 -
cf
1 -
Cloud Foundry
1 -
Confluent
1 -
Customer COE Basics and Fundamentals
1 -
Customer COE Latest and Greatest
3 -
Customer Data Browser app
1 -
Data Analysis Tool
1 -
data migration
1 -
data transfer
1 -
Datasphere
2 -
Event Information
1,400 -
Event Information
66 -
Expert
1 -
Expert Insights
177 -
Expert Insights
293 -
General
1 -
Google cloud
1 -
Google Next'24
1 -
Kafka
1 -
Life at SAP
780 -
Life at SAP
12 -
Migrate your Data App
1 -
MTA
1 -
Network Performance Analysis
1 -
NodeJS
1 -
PDF
1 -
POC
1 -
Product Updates
4,577 -
Product Updates
340 -
Replication Flow
1 -
RisewithSAP
1 -
SAP BTP
1 -
SAP BTP Cloud Foundry
1 -
SAP Cloud ALM
1 -
SAP Cloud Application Programming Model
1 -
SAP Datasphere
2 -
SAP S4HANA Cloud
1 -
SAP S4HANA Migration Cockpit
1 -
Technology Updates
6,873 -
Technology Updates
417 -
Workload Fluctuations
1
Related Content
- Top Picks: Innovations Highlights from SAP Business Technology Platform (Q1/2024) in Technology Blogs by SAP
- SAP Sustainability Footprint Management: Q1-24 Updates & Highlights in Technology Blogs by SAP
- Deliver Real-World Results with SAP Business AI: Q4 2023 & Q1 2024 Release Highlights in Technology Blogs by SAP
- Taking Data Federation to the Next Level: Accessing Remote ABAP CDS View Entities in SAP HANA Cloud in Technology Blogs by SAP
- Introducing the new pipeline concept in Cloud Integration in Technology Blogs by SAP
Top kudoed authors
| User | Count |
|---|---|
| 33 | |
| 25 | |
| 10 | |
| 7 | |
| 7 | |
| 7 | |
| 6 | |
| 6 | |
| 5 | |
| 4 |