
- SAP Community
- Products and Technology
- Human Capital Management
- HCM Blogs by Members
- SF Integration Centre - Advanced Header & Footer
Human Capital Management Blogs by Members
Gain valuable knowledge and tips on SAP SuccessFactors and human capital management from member blog posts. Share your HCM insights with a post of your own.
Turn on suggestions
Auto-suggest helps you quickly narrow down your search results by suggesting possible matches as you type.
Showing results for
naveenmaaroju
Explorer
Options
- Subscribe to RSS Feed
- Mark as New
- Mark as Read
- Bookmark
- Subscribe
- Printer Friendly Page
- Report Inappropriate Content
01-15-2018
12:10 PM
1. Introduction
Successfactors Integration Center is a new utility that allows non-technical to build, run, schedule and monitor simple integrations. The integrations can be built quickly and easily through a guided workflow.
Successfactors Integration Centre supports both file and Web Service based outbound integrations. It supports CSV, TXT, XML and EDI/Stacked formats for file based integrations and supports SOAP and REST outbound integrations for Web Service based outbound integrations. Also, Integration Center supports CSV based inbound integrations
Once built, files can be manually scheduled or executed to be directed to a configured SFTP server location.
In this document we will see in detail configuration to create an integration which includes how to add header and footer for a file, setup the destination settings and schedule the integration.
2. Procedure
Once you login into Successfactors, Type in ‘Integration Centre’ in the search area and navigate to Integration Centre.

Figure 2.1: Search for Integration Centre
On the landing page of the Integration Centre, choose My Integrations

Figure 2.2: Integration Centre Landing Page
Click on Create button and select the option More Integration Types to choose the integration types among the different options available.
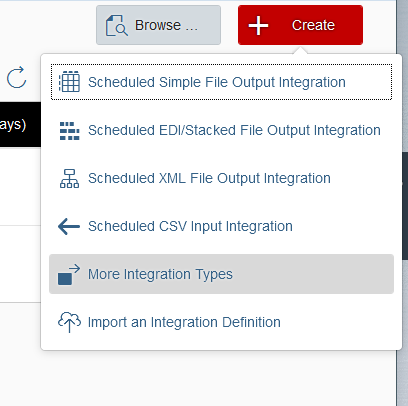
Figure 2.3: More Integration Types
A popup screen appears for selection of trigger type, source type, destination type and format. In our example we will proceed to create a Scheduled CSV file which uses the SFTP configuration for the destination.

Figure 2.4: Choose Integration Type
Selection of right entity is important for integration. We will be sending user data so we will select the entity User and required fields. Click on the Select button upon selection.

Figure 2.5: Create Output Integration
2.1 Options
In the Options tab, the integration can be given a name and besides even we can select for header and footer. Click on the Next button upon selection.

Figure 2.1.1: Options
2.2 Configure Fields
In the Configure Fields tab, an overview of the output data can be seen along with the options to add fixed values, calculated values to the existing structure.

Figure 2.2.1: Configure Fields
In the section, the structure of the header and footer has to be constructed.

Figure 2.2.2: Header, Details & Footer View
Switch to the Header View and click on the Add button to add the field into header section of the file. While adding the field there are different options available to define the type of field and default value of field.

Figure 2.2.3: Field Options
Upon selection click on OK button.

Figure 2.2.4: Header View
Similarly, follow the same procedure to achieve the footer view.
2.3 Filter and Sort
In this section, Filters and Sorting can be applied on the data chosen for integration. Upon selection click on Next button.
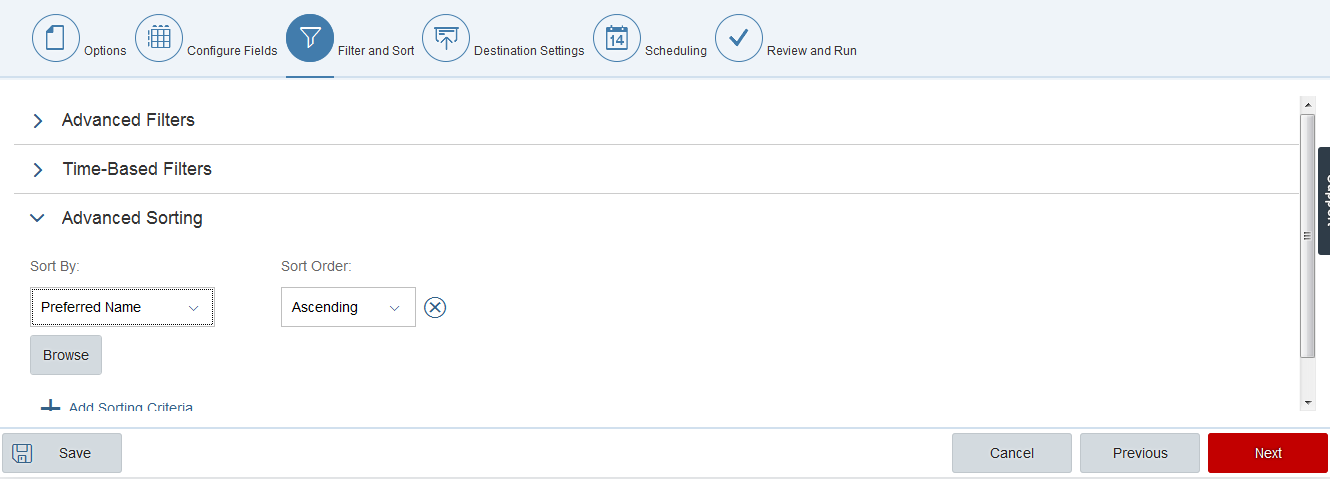
Figure 2.3.1: Filter and Sort
2.4 Destination Settings
In this section, the Destination Settings of the SFTP folder where the file will be saved will have to provided along with the authentication key, encryption, signing settings. Upon selection click on Next button.


Figure 2.4.1: Destination Settings
2.5 Scheduling
In this section, the schedule of the run can be set along with the email address to whom it has to emailed can be maintained. Upon providing the data click on Next button.
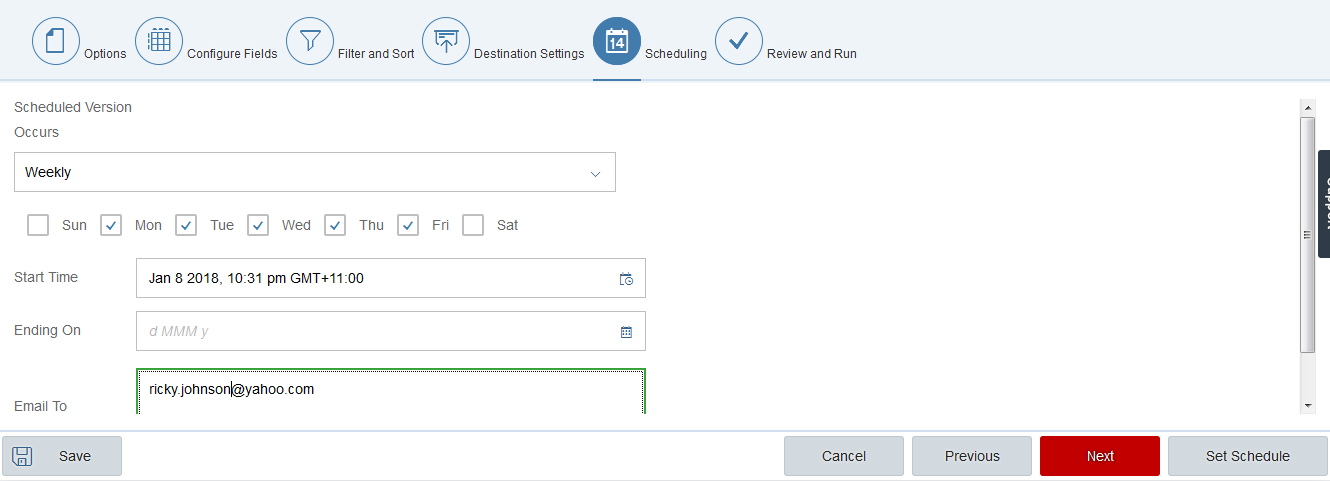
Figure 2.5.1: Scheduling
2.6 Review and Run
In this section, the details can be review and then submit/run the job. Upon review completion click Run Now button.

Figure 2.6.1: Review and Run
Upon completion of integration, the integration definition can also be exported by clicking the Save button also the data preview file can also be downloaded.

Figure 2.7 Save Settings
The event logs of the executed integration can be monitored in Monitor Integrations section of the Integration Centre Landing Page. Click on Monitor Integrations which will navigate to below page.

Figure 2.8 Execution Manager
Click on the event name, which will provide complete view of the event details.

Figure 2.9 Event Details
- SAP Managed Tags:
- SAP SuccessFactors HXM Suite
You must be a registered user to add a comment. If you've already registered, sign in. Otherwise, register and sign in.
Labels in this area
-
1H 2024 Product Release
1 -
2H 2023 Product Release
1 -
ACCRUAL TRANSFER
1 -
Advanced Workflow
1 -
Anonymization
1 -
BTP
1 -
Business Rules
1 -
Canvas Report
1 -
Career Development
1 -
Certificate-Based Authentication
1 -
Cloud Platform Integration
1 -
Compensation
1 -
Compensation Information Management
1 -
Compensation Management
1 -
Compliance
2 -
Content
1 -
Conversational AI
2 -
Custom Data Collection
1 -
custom portlet
1 -
Data & Analytics
1 -
Data Integration
1 -
Dayforce
1 -
deep link
1 -
deeplink
1 -
Delimiting Pay Components
1 -
Deprecation
1 -
Employee Central
1 -
Employee Central Global Benefits
1 -
Employee Central Payroll
1 -
employee profile
1 -
Employee Rehires
1 -
external terminal
1 -
external time events
1 -
Generative AI
2 -
Getting Started
1 -
Global Benefits
1 -
Guidelines
1 -
H2 2023
1 -
HR
2 -
HR Data Management
1 -
HR Transformation
1 -
ilx
1 -
Incentive Management Setup (Configuration)
1 -
Integration Center
2 -
Integration Suite
1 -
internal mobility
1 -
Introduction
1 -
learning
3 -
LMS
2 -
LXP
1 -
Massively MDF attachments download
1 -
Mentoring
1 -
Metadata Framework
1 -
Middleware Solutions
1 -
OCN
1 -
OData APIs
1 -
ONB USA Compliance
1 -
Onboarding
2 -
Opportunity Marketplace
1 -
Pay Component Management
1 -
Platform
1 -
portlet
1 -
POSTMAN
1 -
Predictive AI
2 -
Recruiting
1 -
recurring payments
1 -
Role Based Permissions (RBP)
2 -
SAP CPI (Cloud Platform Integration)
1 -
SAP HCM (Human Capital Management)
2 -
SAP HR Solutions
2 -
SAP Integrations
1 -
SAP release
1 -
SAP SuccessFactors
5 -
SAP SuccessFactors Customer Community
1 -
SAP SuccessFactors OData API
1 -
SAP Workzone
1 -
SAP-PAYROLL
1 -
skills
1 -
Skills Management
1 -
sso deeplink
1 -
Stories in People Analytics
3 -
Story Report
1 -
SuccessFactors
2 -
SuccessFactors Employee central home page customization.
1 -
successfactors onboarding i9
1 -
Table Report
1 -
talent
1 -
Talent Intelligence Hub
2 -
talents
1 -
Tax
1 -
Tax Integration
1 -
Time Accounts
1 -
Workflows
1 -
XML Rules
1
Related Content
- Reducing Active User Counts by Terminating Producer Details in APM in Human Capital Management Blogs by SAP
- SAP Enable Now Information Sessions (European Friendly Times) in Human Capital Management Blogs by SAP
- Talent Intelligence Hub and SAP SuccessFactors Learning in Human Capital Management Blogs by Members
- Redefining Talent management with AI in Human Capital Management Blogs by Members
- Redefining Talent management with AI in Human Capital Management Blogs by Members
Top kudoed authors
| User | Count |
|---|---|
| 4 | |
| 4 | |
| 2 | |
| 2 | |
| 2 | |
| 1 | |
| 1 | |
| 1 | |
| 1 | |
| 1 |