
- SAP Community
- Products and Technology
- Technology
- Technology Blogs by SAP
- How to Configure SAP CP Workflow User Tasks
Technology Blogs by SAP
Learn how to extend and personalize SAP applications. Follow the SAP technology blog for insights into SAP BTP, ABAP, SAP Analytics Cloud, SAP HANA, and more.
Turn on suggestions
Auto-suggest helps you quickly narrow down your search results by suggesting possible matches as you type.
Showing results for
Product and Topic Expert
Options
- Subscribe to RSS Feed
- Mark as New
- Mark as Read
- Bookmark
- Subscribe
- Printer Friendly Page
- Report Inappropriate Content
01-08-2018
10:57 AM
In this blog I explain how you can configure user tasks in SAP Cloud Platform Workflow, and how to take full advantage of the available features for your use case.
A user task is a flow object in the workflow that illustrates a task that a human performs. Whenever the process control reaches the user task, the corresponding recipients of the user task will see a task appearing in the My Inbox application. Here, the user is presented with the title & description of the tasks along with other details to take an informed decision in order to complete the task.
For example, when you create create a leave request, a user task is created for your manager to approve. The manager could see information like type of time-off, start & end date of the time-off, who triggered the time-off request, etc. so that he/she can take an action (Approve/Reject the request).
In the workflow editor, to add a user task you can either drag and drop the 'User Task' from the palette to the editor or (even better) use the speed buttons to add them to the workflow model.

The user task requires the following information to be complete:

The following properties are available in the General tab:
You can maintain any text here that gives a brief about the user task. Note that this text will be displayed in the user task activity of the workflow model and in My Inbox as page title. (Tip: keep it precise and brief).
In this optional field, you can maintain the detailed description about the user task - what it is meant for and what is the desired outcome of this task. If you had used a collaborative modelling tool to define the workflow (example, SAP Power Designer, SAP EA Designer, etc), you will already have the content for Name & Description.
When you enable this checkbox, the activity log corresponding to the user task (for example, user task is created, user task is completed, etc.) will be shown for the end users in My Inbox who is responsible for user tasks in that workflow. The end users could click on 'Show Log' button in My Inbox to view the all user tasks performed so far for that workflow instance. They also get to know who has performed them and when it was completed.

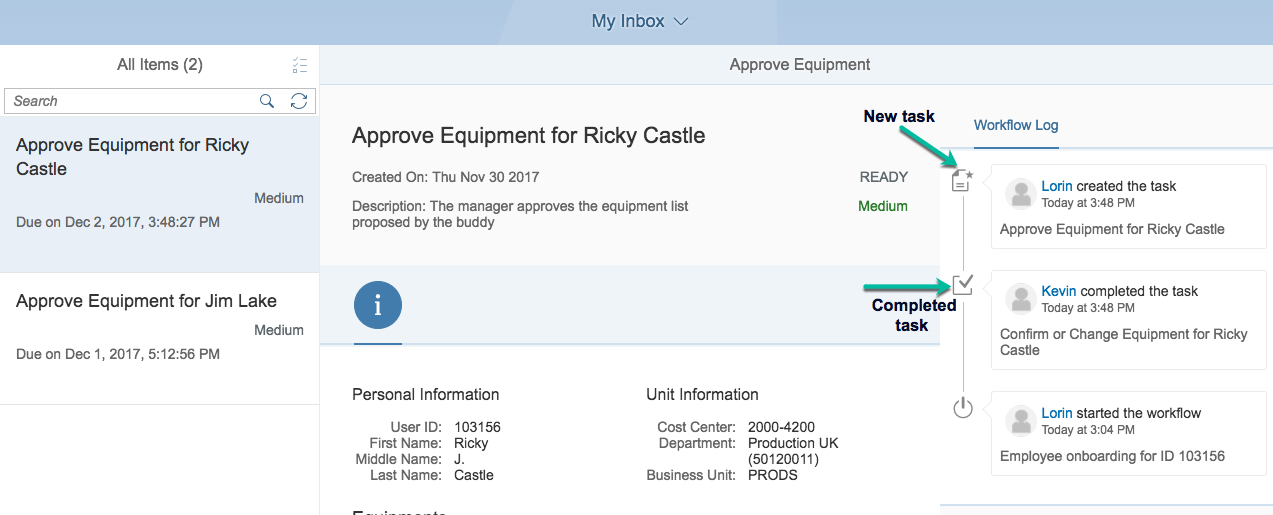
By default, every user task is shown in the workflow log. But, if the user task has sensitive information that it should not be shown to recipients of further user tasks of the workflow, then you can uncheck the same. This will hide the user task appearing in the workflow log.
Note: By unchecking the above property, you can prevent the task recipients to view the workflow log for the respective user task, but you cannot prevent from showing it in the 'Monitor Workflow' app (used by the Workflow Admin).
The following properties are available in the DETAILS tab of user task Properties:
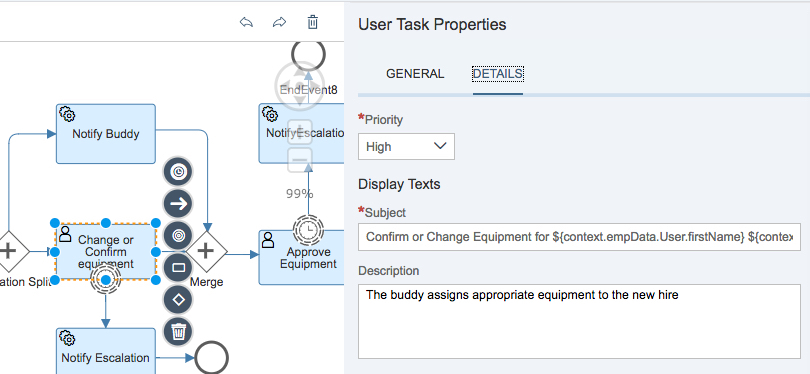
You maintain the title of the task in subject and this text is displayed in My Inbox. Keep it precise and make sure it contains attributes to uniquely identify user tasks, for example the Business Key. You could combine static text together with expressions to dynamically form the text based on the workflow context.
Example for bad subject text is 'Approve Leave Request'. When this task is displayed in My Inbox, the manager needs to go into the details to identify who created the request.
Good subject text uses combination of static and dynamic content. 'Approve Leave Request for ${context.employee.firstName} ${context.employee.lastName}'. This will be transformed to 'Approve Leave Request for John Doe' (assuming the workflow context contains employee information).
Here, you can provide detailed description on what the task recipient need to perform. This description can be shown in My Inbox to the end users (refer to the help documentation on how to enable description in task UI). You can use expressions to provide dynamic texts from the workflow context.

Here you provide one or more users who should process the user task. Task recipients could either be a single user ID or multiple user IDs, one or more user groups (use comma separated values for multiple user id/group) or you could also dynamically determine them using a SAP Cloud Platform Business Rules (and set it in the workflow context) or a combination of the above.
In the image below, I have used a static user (P194....) and a list of users determined by a SAP Cloud Platform Business Rule and made available in the workflow context.

Note: You can assign a maximum number of 100 users or groups as recipients to a user task.
To assign a custom task UI to the user task, first import the SAP UI5 application project to the WebIDE workspace (you can do it without importing the application, but assigning user interface is very simple if you have the application in the workspace).
For more information, refer to the help document which also explains the steps to manually provide the custom task UI details.

You can set priority of the user tasks depending on how critical the task is. By default, the priority is set as medium, but you can set either of Low, Medium, High or Very High as priority.
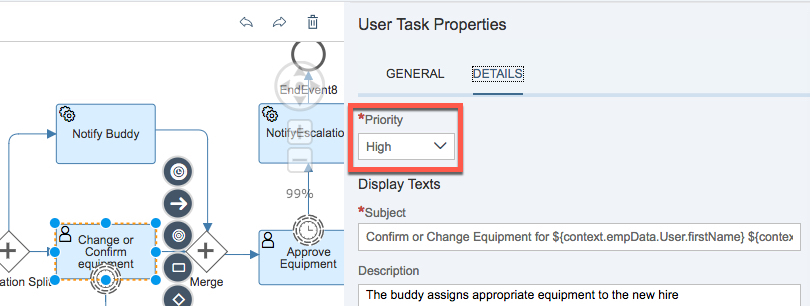
When do you need this - Based on the priority, the end user can filter or sort the tasks in My Inbox. This will help the user to focus on, for example, Very High priority tasks especially when there are huge list of tasks to work on.
If you need to maintain the duration by when the task is due, you need to select the checkbox. You could either provide a static value or an expression (as per ISO 8601) for the duration by when the task will be due.
Static Value: Static value comprises of the value and its unit, for example 25 Minutes, 2 Days, 1 Month, etc.

Expression: The expression accepts duration in ISO 8601 format. As per the standard, the duration is represented in the format P[n]Y[n]M[n]DT[n]H[n]M[n]S.
P is the duration designator for period, Y for the year, M for month, D for days & T for time. The H, M and S followed by T represents hour, minutes and seconds respectively. For example, P2Y represents a duration of 2 years. Similarly, P1M3D represents 1 month and 3 days while P3DT1H30M represents duration of 3 days 1 hour and 30 minutes. (Note that all designators other than P are optional, but atleast one designator other than P should be present. For example, P is invalid, while P1D is a valid duration).
Consider the following points before setting an expression for due date:
For the due date you could either give a static ISO 8061 standard value (like P1DT6H) or provide a workflow context expression which will evaluate to the ISO 8061 standard.

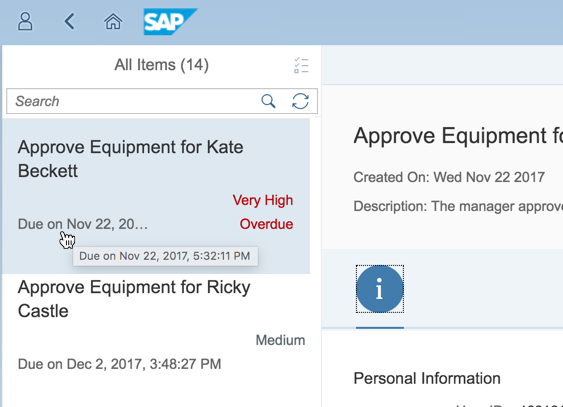
The due date information and priority are shown in My Inbox to the task recipients for them to choose the right task to work on. They can use the filter and sort options in My Inbox to work on, for example, overdue very high priority tasks.
Note: The due date, priority, recipients, subject, description, etc of an active task can be modified using the SAP Cloud Platform Workflow REST APIs.
Please keep in mind that not all the features explained here might be needed for your specific use case. But once you are aware of all the features available, it will be very easy to map & apply them for your use case.
A user task is a flow object in the workflow that illustrates a task that a human performs. Whenever the process control reaches the user task, the corresponding recipients of the user task will see a task appearing in the My Inbox application. Here, the user is presented with the title & description of the tasks along with other details to take an informed decision in order to complete the task.
For example, when you create create a leave request, a user task is created for your manager to approve. The manager could see information like type of time-off, start & end date of the time-off, who triggered the time-off request, etc. so that he/she can take an action (Approve/Reject the request).
In the workflow editor, to add a user task you can either drag and drop the 'User Task' from the palette to the editor or (even better) use the speed buttons to add them to the workflow model.
The user task requires the following information to be complete:
- Name, Documentation & Display Texts.
- Recipients of the task who can act on the task.
- User Interface which will be shown in 'My Inbox'.
- Other properties like priority, due date, etc.
Name, Documentation & Display Texts
The following properties are available in the General tab:
Name:
You can maintain any text here that gives a brief about the user task. Note that this text will be displayed in the user task activity of the workflow model and in My Inbox as page title. (Tip: keep it precise and brief).
Description:
In this optional field, you can maintain the detailed description about the user task - what it is meant for and what is the desired outcome of this task. If you had used a collaborative modelling tool to define the workflow (example, SAP Power Designer, SAP EA Designer, etc), you will already have the content for Name & Description.
Show in Inbox Workflow Log:
When you enable this checkbox, the activity log corresponding to the user task (for example, user task is created, user task is completed, etc.) will be shown for the end users in My Inbox who is responsible for user tasks in that workflow. The end users could click on 'Show Log' button in My Inbox to view the all user tasks performed so far for that workflow instance. They also get to know who has performed them and when it was completed.
By default, every user task is shown in the workflow log. But, if the user task has sensitive information that it should not be shown to recipients of further user tasks of the workflow, then you can uncheck the same. This will hide the user task appearing in the workflow log.
Note: By unchecking the above property, you can prevent the task recipients to view the workflow log for the respective user task, but you cannot prevent from showing it in the 'Monitor Workflow' app (used by the Workflow Admin).
The following properties are available in the DETAILS tab of user task Properties:
Display Texts
Subject
You maintain the title of the task in subject and this text is displayed in My Inbox. Keep it precise and make sure it contains attributes to uniquely identify user tasks, for example the Business Key. You could combine static text together with expressions to dynamically form the text based on the workflow context.
Example for bad subject text is 'Approve Leave Request'. When this task is displayed in My Inbox, the manager needs to go into the details to identify who created the request.
Good subject text uses combination of static and dynamic content. 'Approve Leave Request for ${context.employee.firstName} ${context.employee.lastName}'. This will be transformed to 'Approve Leave Request for John Doe' (assuming the workflow context contains employee information).
Description
Here, you can provide detailed description on what the task recipient need to perform. This description can be shown in My Inbox to the end users (refer to the help documentation on how to enable description in task UI). You can use expressions to provide dynamic texts from the workflow context.
Task Recipients
Here you provide one or more users who should process the user task. Task recipients could either be a single user ID or multiple user IDs, one or more user groups (use comma separated values for multiple user id/group) or you could also dynamically determine them using a SAP Cloud Platform Business Rules (and set it in the workflow context) or a combination of the above.
In the image below, I have used a static user (P194....) and a list of users determined by a SAP Cloud Platform Business Rule and made available in the workflow context.
Note: You can assign a maximum number of 100 users or groups as recipients to a user task.
User Interface
To assign a custom task UI to the user task, first import the SAP UI5 application project to the WebIDE workspace (you can do it without importing the application, but assigning user interface is very simple if you have the application in the workspace).
- Click the Select button
- Choose the project name from the drop down (all the projects available in your webIDE workspace will be listed here)
- Choose the SAPUI5 component path from the dropdown
For more information, refer to the help document which also explains the steps to manually provide the custom task UI details.
Other Properties
Priority
You can set priority of the user tasks depending on how critical the task is. By default, the priority is set as medium, but you can set either of Low, Medium, High or Very High as priority.
When do you need this - Based on the priority, the end user can filter or sort the tasks in My Inbox. This will help the user to focus on, for example, Very High priority tasks especially when there are huge list of tasks to work on.
Due Date
If you need to maintain the duration by when the task is due, you need to select the checkbox. You could either provide a static value or an expression (as per ISO 8601) for the duration by when the task will be due.
Static Value: Static value comprises of the value and its unit, for example 25 Minutes, 2 Days, 1 Month, etc.
Expression: The expression accepts duration in ISO 8601 format. As per the standard, the duration is represented in the format P[n]Y[n]M[n]DT[n]H[n]M[n]S.
P is the duration designator for period, Y for the year, M for month, D for days & T for time. The H, M and S followed by T represents hour, minutes and seconds respectively. For example, P2Y represents a duration of 2 years. Similarly, P1M3D represents 1 month and 3 days while P3DT1H30M represents duration of 3 days 1 hour and 30 minutes. (Note that all designators other than P are optional, but atleast one designator other than P should be present. For example, P is invalid, while P1D is a valid duration).
Consider the following points before setting an expression for due date:
- The smallest units which the duration specification supports are minutes.
- The "Week" unit ("W") is not supported, but instead you can use the "Days" ("D") to achieve the same result. P1W is same as P7D.
- The duration specification supports integers only - You cannot have an expression like P1.5M but the same can be achieved with the expression P1M15D.
For the due date you could either give a static ISO 8061 standard value (like P1DT6H) or provide a workflow context expression which will evaluate to the ISO 8061 standard.
The due date information and priority are shown in My Inbox to the task recipients for them to choose the right task to work on. They can use the filter and sort options in My Inbox to work on, for example, overdue very high priority tasks.
Note: The due date, priority, recipients, subject, description, etc of an active task can be modified using the SAP Cloud Platform Workflow REST APIs.
Please keep in mind that not all the features explained here might be needed for your specific use case. But once you are aware of all the features available, it will be very easy to map & apply them for your use case.
- SAP Managed Tags:
- SAP Workflow Management, workflow capability,
- SAP Business Technology Platform
18 Comments
You must be a registered user to add a comment. If you've already registered, sign in. Otherwise, register and sign in.
Labels in this area
-
ABAP CDS Views - CDC (Change Data Capture)
2 -
AI
1 -
Analyze Workload Data
1 -
BTP
1 -
Business and IT Integration
2 -
Business application stu
1 -
Business Technology Platform
1 -
Business Trends
1,658 -
Business Trends
93 -
CAP
1 -
cf
1 -
Cloud Foundry
1 -
Confluent
1 -
Customer COE Basics and Fundamentals
1 -
Customer COE Latest and Greatest
3 -
Customer Data Browser app
1 -
Data Analysis Tool
1 -
data migration
1 -
data transfer
1 -
Datasphere
2 -
Event Information
1,400 -
Event Information
66 -
Expert
1 -
Expert Insights
177 -
Expert Insights
299 -
General
1 -
Google cloud
1 -
Google Next'24
1 -
Kafka
1 -
Life at SAP
780 -
Life at SAP
13 -
Migrate your Data App
1 -
MTA
1 -
Network Performance Analysis
1 -
NodeJS
1 -
PDF
1 -
POC
1 -
Product Updates
4,577 -
Product Updates
345 -
Replication Flow
1 -
RisewithSAP
1 -
SAP BTP
1 -
SAP BTP Cloud Foundry
1 -
SAP Cloud ALM
1 -
SAP Cloud Application Programming Model
1 -
SAP Datasphere
2 -
SAP S4HANA Cloud
1 -
SAP S4HANA Migration Cockpit
1 -
Technology Updates
6,873 -
Technology Updates
427 -
Workload Fluctuations
1
Related Content
- Supporting Multiple API Gateways with SAP API Management – using Azure API Management as example in Technology Blogs by SAP
- Composite Data Source Configuration in Optimized Story Experience in Technology Blogs by SAP
- Onboarding Users in SAP Quality Issue Resolution in Technology Blogs by SAP
- Accelerate Business Process Development with SAP Build Process Automation Pre-Built Content in Technology Blogs by SAP
- Switch on gCTS (for existing packages) in Technology Blogs by SAP
Top kudoed authors
| User | Count |
|---|---|
| 41 | |
| 25 | |
| 17 | |
| 14 | |
| 9 | |
| 7 | |
| 6 | |
| 6 | |
| 6 | |
| 6 |