
- SAP Community
- Products and Technology
- Enterprise Resource Planning
- ERP Blogs by SAP
- Basic Settings for SAP EWM in SAP S/4HANA 1709
Enterprise Resource Planning Blogs by SAP
Get insights and updates about cloud ERP and RISE with SAP, SAP S/4HANA and SAP S/4HANA Cloud, and more enterprise management capabilities with SAP blog posts.
Turn on suggestions
Auto-suggest helps you quickly narrow down your search results by suggesting possible matches as you type.
Showing results for
former_member25
Discoverer
Options
- Subscribe to RSS Feed
- Mark as New
- Mark as Read
- Bookmark
- Subscribe
- Printer Friendly Page
- Report Inappropriate Content
01-08-2018
12:45 PM
Use Cases
- If you use a SAP S/4HANA 1709 or 1610 system with Best Practice activated but without using the SAP EWM in S/4HANA, and you want to add the Best Practice for the SAP EWM in SAP S/4HANA to an existing plant, this blog lists all the required Best Practice Org data and guides you to expedite the Basic Settings process so that you don't need to research for the input data.
- If you use a SAP S/4HANA 1709 or 1610 system, and you want to add the SAP EWM in SAP S/4HANA to a new or an existing plant, you replace the Best Practice Org Structure in this blog with your own and complete the basic settings by following the example.
1 Basic Settings for SAP EWM in SAP S/4HANA
SAP provides a copy of "Getting Started Guide - Basic Settings for SAP EWM in SAP S/4HANA" in the attachment of SAP Note 2494704 - SAP S/4HANA 1709: Release information and restrictions for EWM in SAP S/4HANA, and SAP Note 2347770 - SAP S/4HANA 1610: Release information and restrictions for EWM in SAP S/4HANA. Both SAP Notes have the same version of file "BasicSettings_EWMinS4_V01.pdf".
This blog provides step-by-step screenshots based on the guide and the Best Practice Org structure.
SAP EWM in SAP S/4HANA Best Practices
SAP EWM in SAP S/4HANA provides the following 11 scope items in the Best Practice content, and this blog shows the basic settings needed for these Best Practices. For each scope item, more functional related configurations are needed. Refer to the Prerequisites Matrix for the required Building Blocks for each scope item.
| EWM Scope Item | Delivered in | License |
| 1FS: Basic Warehouse Inbound Processing from Supplier | 1610 | Basic |
| 1FU: Initial Stock Upload for Warehouse | 1610 | Basic |
| 1FW: Physical Inventory in Warehouse | 1610 | Basic |
| 1FY: Replenishment in Warehouse | 1610 | Basic |
| 1G0: Scrapping in Warehouse | 1610 | Basic |
| 1G2: Basic Warehouse Outbound Processing to Customer | 1610 | Basic |
| 1V5: Warehouse Inbound Processing from Supplier with Batch Management | 1709 | Basic |
| 1V7: Warehouse Outbound Processing to Customer with Batch Management | 1709 | Basic |
| 1V9: Basic Warehouse Inbound Processing from Supplier with Quality Management | 1709 | Basic |
| 1VB: Production Integration - Component Consumption and Receipt in Warehouse | 1709 | Basic |
| 1VD: Advanced Warehouse Outbound Processing to Customer | 1709 | Advanced |
NOTE:
For easy cross reference, the following paragraphs use the same paragraph numbers as in the BasicSettings_EWMinS4_V01.pdf file.
2 Configuration of qRFC Communication
2.1 Background Information About System Landscape Settings
The system landscape entities in the following table is based on a single SAP S/4HANA sandbox system, which has system ID BES and Client 300. If you need to setup the system landscape for a distributed system landscape, e.g., with customizing, test, and production system, see Section 2.1 in the guide pdf file.
| System Landscape Entity | Example | Comments |
| RFC Destination | BESCLNT300 | Exists in your SAP S/4HANA system already, see Section 2.2 below |
| Logical Systems | BESCLNT300 | Exists in your SAP S/4HANA system and assigned to Client 300 already |
| Dummy Logical System | BESEWM300 | To be created by the Implementation Tool for System Connection, see Section 2.4. |
| Business System Group BG1 | BG1 | To be created by the Implementation Tool for System Connection, see Section 2.4. |
| Business System S4H_001 | BES_300 | To be created by the Implementation Tool for System Connection, see Section 2.4. |
2.2 Technical Prerequisites for qRFC Communication
The RFC Destination and RFC Connection BESCLNT300 should be in the existing SAP S/4HANA system already. You need to test the RFC Connection to confirm that the connection is working via transaction SM59 by clicking on the Connection Test button.

2.3 Creating Dummy Logical System Manually
The Dummy Logical System for EWM will be created automatically by the "Implementation Tool for System Connection" in Section 2.4.
2.4 Configuring qRFC Communication and Client Settings
You use this procedure to configure the following data with the help of the "Implementation Tool for System Connection" in SAP EWM in SAP S/4HANA:
· System landscape settings for qRFC communication.
· Basic number ranges (on client level) in SAP EWM including packaging specifications and shipping and receiving activities
· Warehouse-independent basic settings using BC Set activation within the tool
You follow the following steps to use the "Implementation Tool for System Connection".
- In Customizing for Extended Warehouse Management, choose Interfaces → ERP Integration → Tool-Based ERP Integration → Implementation Tool for System Connection, click on the IMG node execution icon.

- The following pop-up window opens.

- Select "Display Quick Help" to display input field information.

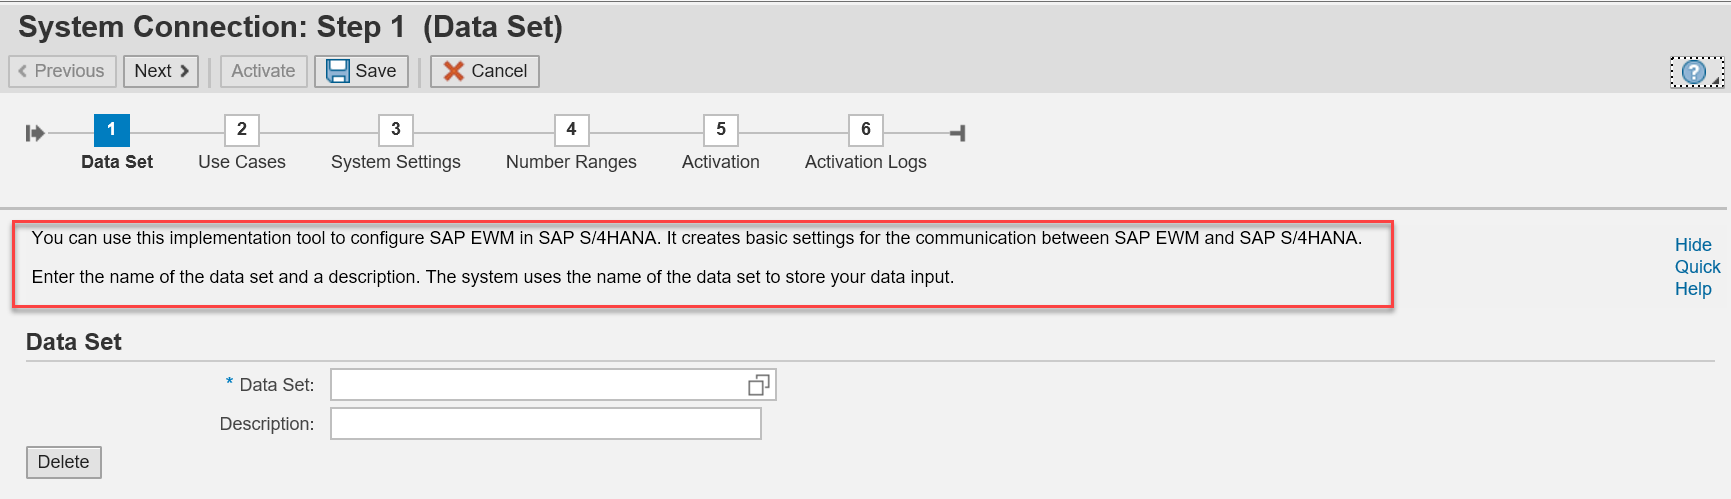
- Enter a Data Set name and its Description. The system uses the name of the data set to store your data input.

- Select an existing transport Request/Task or create a new one to store all the configurations made during the Activation step.

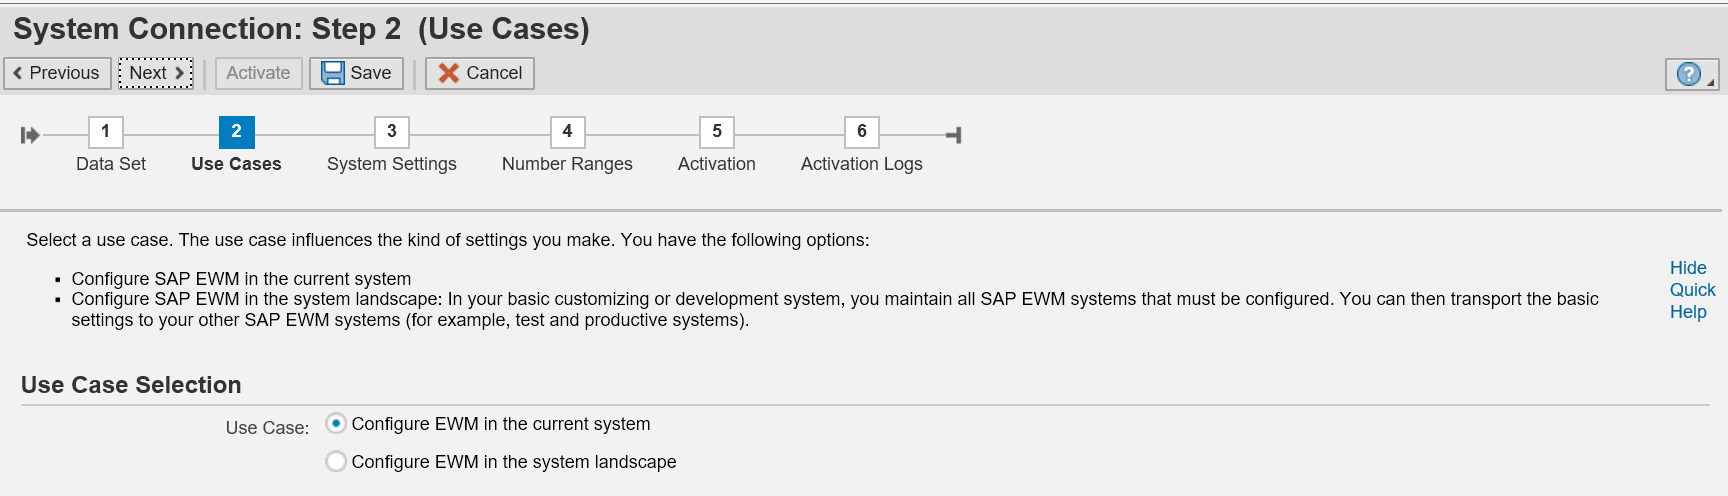
- Click on the "Next >" button to go to Step 2 "Use Cases", and select the "Configuration EWM in the current system" radio button.
- Click on the "Next >" button to go to Step 3 "System Settings", review the system proposed entries, and enter new values if the fields are blank.

- Click on the "Next >" button to go to Step 4 "Number Ranges", if you need to setup your own number ranges, select "Skip creation of number ranges".
The number ranges will be created by the system in this blog.

- Click on the "Next >" button to go to Step 5 "Activation". Enter the Request/Task, and click on "Activate" button. You could export the details of the activation content by clicking the Export button.

- The activation is executed in the background.

- Click on the "Next >" button to go to Step 6 "Activation Logs" after the completion of Activation. Check the logs for any error messages. The same log could be found in transaction SLG1 under object /SCWM/WME and sub-object IMPL_TOOL.

- You have successfully executed the Implementation Tool for System Connection.
3 Warehouse Creation and Integration into the Enterprise Structure
3.1 Background Information About Warehouse Integration
The Best Practices for US Localization version for SAP EWM in SAP S/4HANA requires the following org structure. For other country localization, replace the 17 prefix by your country number. For example, instead of Plant 1710 for US, use 1010 for Germany, 2910 for Canada, 1310 for China, 3010 for Australia, etc.

| Org. Master Data | Value | Master Data Description | Comments |
| Company Code | 1710 | Company Code 1710 | S/4HANA Object |
| Purchasing Organization | 1710 | Purch. Org. 1710 | S/4HANA Object |
| Plant | 1710 | Plant 1 US (or your description) | S/4HANA Object |
| Storage Location | 171D | EWM ROD | S/4HANA Object |
| Storage Location | 171S | EWM AFS | S/4HANA Object |
| ERP Warehouse Number | 171 | 171 WM Warehouse for EWM (or your description) | S/4HANA Object |
| Receiving Point | 1710 | Shipping Point 1710 | S/4HANA Object |
| Supply Chain Unit | YWAREHOUSE-1710 | SCU Warehouse 1710 | EWM Specific Objects in S/4HANA |
| EWM Warehouse Number | 1710 | EWM 1710 | EWM Specific Objects in S/4HANA |
| Custodian | BP1710 | BP1710 | S/4HANA Object |
| Entitled to Dispose | BP1710 | BP1710 | S/4HANA Object |
| Goods Receipt Office | YWAREHOUSE-1710 | SCU for Warehouse 1710 | EWM Specific Objects in S/4HANA |
| Shipping Office | YWAREHOUSE-1710 | SCU for Warehouse 1710 | EWM Specific Objects in S/4HANA |
3.2 Prerequisites for Warehouse Integration
Plant 1710 should have been already created in your system and an active material ledger for the valuation area has been assigned to Plant 1710.
If your plant doesn't exist, create it and set active material ledger for your plant, see Section 3.2 in file "BasicSettings_EWMinS4_V01.pdf".
You have to perform the following manual configuration before you could use the automated configuration tool in Section 3.4.
- Create storage locations 171D and 171S in plant 1710.
Customizing Path:
Enterprise Structure → Definition → Materials Management → Maintain storage location.

- Create a business partner BP1710 with predefined roles FLCU00 (FI Customer) and FLCU01 (Customer)Transaction BP
Select create Organization icon, and enter name, Country, Language, and Save
 To add the FLCU00 BP role under the change mode, select the FLCU00 BP role, enter address, and Save.

To add the FLCU01 BP role, under Change mode, select the FLCU01 BP role and save.
You need to link the customer BP1710 to Plant 1710 via Customizing Path:
Materials Management → Purchasing → Purchase Order → Set up Stock Transport Order → Define Shipping Data for Plants.
Enter BP1710 in the Customer No. - Plant field.

- Add FLVN00 (FI Vendor) and FLVN01 (Vendor) to BP1710
Use transaction Code BP to change BP1710.
Add FLVN00 BP role to Business Partner BP1710, and save.
Add FLVN01 BP role to Business Partner BP1710, and save.

You need to link BP1710 as the supplier to Plant 1710.
In the BP transaction change mode, select the FLVN01 Supplier role, under the "Vendor - General Data" tab, enter plant 1710 in the Additional General Data section.

The customizing for shipping point/goods receiving point assignment, posting period settings, and cost center assignment, see Section 3.2 Page 11 in the document "BasicSettings_EWMinS4_V01.pdf", have been set in the SAP S/4HANA configuration already.
3.3 Creating Organizational Units for the Warehouse
You need to make the following configuration in SAP S/4HANA.
- Define a warehouse on the SAP S/4HANA side (WM warehouse)
Customizing Path:
Enterprise Structure → choose Definition → Logistics Execution → Define,
copy, delete, check warehouse number, and choose the activity Define warehouse
number.
Click on "New Entries" to add the warehouse 171.
NOTE: Do not use copy warehouse function.

Click New Entries and enter
WhN: 171
Warehouse no. description: 171 WM warehouse for EWM

- Assign the warehouse 171 to the plant 1710 and storage locations 171D and 171C
Customizing Path:
Enterprise Structure → Assignment → Logistics Execution → Assign warehouse number to plant/storage location.
Click on New Entries and make the following assignments.

- Maintain EWM-specific parameters for the warehouse
Customizing Path:
Logistics Execution → Extended Warehouse Management Integration → Basic Setup of Connectivity → Configure SAP EWM Specific Parameters.
Enter
Ext. WM: E (ERP with Extended Warehouse Management)
Comm. WM: Q (Queued and Serialized Asynchronous RFC)
Dist. Mode: Distribution Immediately at Document Creation

3.4 Creating and Integrating a SAP EWM Warehouse
SAP provides the "Implementation Tool for Warehouse Integration" to configure the following objects in SAP EWM in SAP S/4HANA for you:
· SAP EWM warehouse definition and assignment to the Logistics Execution warehouse
· Supply chain unit (SCU) of the warehouse, which is also used as shipping office and receiving office
· Assignment of Custodian, Parties Entitled to Dispose (Plants), and Default Party Entitled to Dispose (optional) to the SAP EWM warehouse:
· Assignment of SAP EWM stock types to the corresponding plants and storage locations by means of availability groups
· Warehouse-dependent and warehouse-independent number ranges (optional)
· Plus other configurations made by the BC Sets included in the tool, see the list of the BC Sets at the end of Sec. 3.4.
You will find the "Implementation Tool for Warehouse Integration" in the following customizing Path:
SCM Extended Warehouse Management → Extended Warehouse Management → Interfaces → ERP Integration → Tool-Based ERP Integration → Implementation Tool for Warehouse Integration.
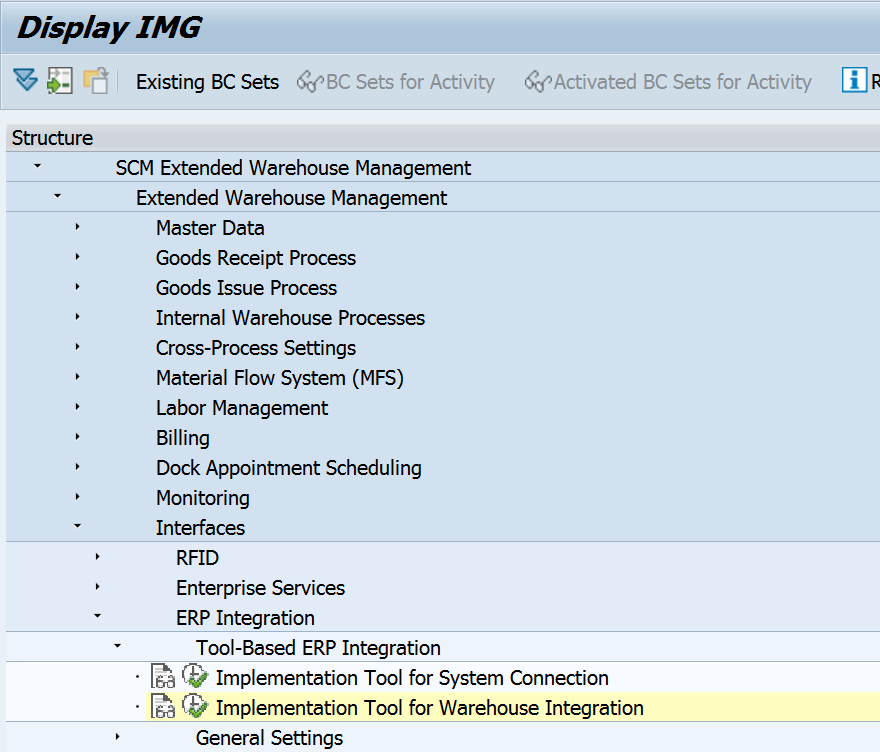
- Click on the IMG node "Implementation Tool for Warehouse Integration".
- Enter a Data Set name and its Description. The system uses the name of the data set to store your data input. And select an existing transport Request/Task or create a new one to store all the configurations made by the tool.

- Click on the "Next >" button to go to Step 2 "System Selection", keep the proposed Own Logical System setting - BESCLNT300, and select the BESEWM300 from the Logical Systems list.

- Click on the "Next >" button to go to Step 3 "Warehouse Definitions".
Enter Warehouse Number 1710 and your description.
Use the input help drop down to select the ERP Warehouse number 171.
If the ERP warehouse number is not found in the list, check the RFC connection in Sec. 2.2.

- Click on the "Next >" button to go to Step 4 "Organizational Units".
Enter the following settings used in the Best Practice:
Supply Chain Unit: YWAREHOUSE-1710
Custodian: BP1710
Default Party Entitled to Dispose: BP1710

- Click on the "Next >" button to go to Step 5 "Availability Groups".

Select the first line, Storage Location 171D, choose the Availability Group 001 and select the EWM stock type F1, Q3, B5, R7 and S5 as below. The selected values are automatically populated in the 171D line above.

Select the next line, Storage Location 171S, select Availability 002, and populate the Stock Types F2, Q4, B6, R8 and S6 as below:
- Click on the "Next >" button to go to Step 6 "Number Ranges".
If you want to use the default number ranges, select “Create All Standard Number Ranges”. Otherwise, define your own number range after the activation.

- Click on the "Next >" button to go to Step 7 "Activation"
Enter an existing Request/Task or create a new one.
You could export the activation list by clicking the "Export" button.
Click the "Activate" button to start the configuration in the background.

- Click on the "Next >" button to go to Step 8 "Activation Logs" after the completion of Activation. Check the logs for any error messages. The same log could be found in transaction SLG1 under object /SCWM/WME and sub-object IMPL_TOOL.

Additional Info
The "Implementation Tool for Warehouse Integration" activates the following BC Sets. You could check their content using transaction code SCPR3.
| BC Set ID | Description |
| /SCWM/PRC_10_10_S4 | Basic Settings (Client) - 10 - S/4 |
| /SCWM/PRC_20_10 | Basic Settings (Warehouse) - 10 |
| /SCWM/PRC_20_20_S4 | Basic Settings (Warehouse) - 20 - S/4 |
| /SCWM/PRC_20_30 | Basic Settings (Warehouse) - 30 |
| /SCWM/EXCEPTION | Exception Handling |
| /SCWM/PRC_10_20 | Basic Settings (Client) - 20 |
| /SCWM/PRC_10_30 | Basic Settings (Client) - 30 |
| /SCWM/PRC_11_9A | Assignment Number Range Intervals for Basic Settings |
| /SCWM/BASIC_LIME | LIME Basic Settings for EWM |
3.5 Aligning HU Numbering
SAP Best Practice creates the following HU number ranges.
| Application | Internal Ranges | External Ranges |
| Logistics Execution | 1000000000 - 7999999999 (10 digits) | 8000000000 - 9999999999 (10 digits) |
| EWM (Warehouse specific) 1710 | 800000000 - 899999999 (9 digits) 1000000 - 1999999 (7 digits) | None (all numbers outside the internal number ranges allowed) |
If your customer needs different HU number ranges, Section 3.5 in the pdf document, BasicSettings_EWMinS4_V01.pdf, provides setup guidelines.
3.6 Activating Transaction Data Transfer
SAP S/4HANA transfers the transaction data (inbound deliveries, outbound deliveries, and production material requests) to SAP EWM in SAP S/4HANA using queued remote function call (qRFC).
You need to allow the split of delivery so that the deliveries are split for EWM and non-EWM warehouse if an order contains items from different warehouses.
You configure Define delivery split by warehouse under customizing Path:
Logistics Execution → Shipping → Deliveries → Define Split Criteria for Deliveries → Delivery Split by Warehouse Number → Define delivery split per delivery type
Select the Delivery Split checkbox for all delivery types you use in your EWM warehouse, e.g., EL, LF, LR, etc.

In Delivery Split by Warehouse Number, choose the activity Determine delivery split per warehouse number, and select the checkbox.

For qRFC transaction data transfer, you need to generate the distribution model for the Logistics Execution warehouse:
Customizing Path:
Logistics Execution → SAP EWM Integration → Basic Setup of Connectivity → Generate Distribution Model from SAP S/4HANA to SAP EWM.
Enter data in the following fields:
Warehouse Number: 171
Logical System of SAP EWM: BESEWM300
Distribution Model View: EWM (not in the help drop down list)
In the Objects screen area, select All.
In the Action screen area, select Create Entries.
Execute.

Select Yes in the following popup window.

Click the green check icon to continue the generation of the distribution model.

End of SAP EWM in SAP S/4HANA Basic Settings
Congratulations! You have finished the basic settings for SAP EWM in SAP S/4HANA. This completes the technical and organization unit integration between SAP EWM in SAP S/4HANA and SAP S/4HANA 1709. Before you could use the Best Practice business processes, you need to make the required configuration in the Building Blocks given in the Prerequisites Matrix for each scope item. I plan to provide an example in a separate blog.
- SAP Managed Tags:
- SAP S/4HANA,
- EWM - Basis
20 Comments
You must be a registered user to add a comment. If you've already registered, sign in. Otherwise, register and sign in.
Labels in this area
-
Artificial Intelligence (AI)
1 -
Business Trends
363 -
Business Trends
21 -
Customer COE Basics and Fundamentals
1 -
Digital Transformation with Cloud ERP (DT)
1 -
Event Information
461 -
Event Information
24 -
Expert Insights
114 -
Expert Insights
155 -
General
1 -
Governance and Organization
1 -
Introduction
1 -
Life at SAP
415 -
Life at SAP
2 -
Product Updates
4,685 -
Product Updates
217 -
Roadmap and Strategy
1 -
Technology Updates
1,502 -
Technology Updates
89
Related Content
- Advance Return Management complete configuration(SAP ARM) in Enterprise Resource Planning Blogs by Members
- Building Low Code Extensions with Key User Extensibility in SAP S/4HANA and SAP Build in Enterprise Resource Planning Blogs by SAP
- Business Rule Framework Plus(BRF+) in Enterprise Resource Planning Blogs by Members
- Output Type SPED trigger Inbound Delivery after PGI for Inter-Company STO's Outbound delivery in Enterprise Resource Planning Blogs by Members
- SAP ERP Functionality for EDI Processing: UoMs Determination for Inbound Orders in Enterprise Resource Planning Blogs by Members
Top kudoed authors
| User | Count |
|---|---|
| 12 | |
| 11 | |
| 8 | |
| 6 | |
| 6 | |
| 6 | |
| 4 | |
| 4 | |
| 4 | |
| 4 |